
Definitive Guide to Ironclad
By Panacea
Foreword
In this guide you will find a lot of tier lists for various cards and relics. In general, cards within each tier are sorted from best to worst. Feel free to scroll around to look for them and only read explanations if you are interested. However, please bear in mind the following:
- Tier lists give a general idea of the frequency for which I go for certain options. There are a million reasons why a tier list might not give you good advice for your specific run.
Act 1
Selecting a path
In act 1 you want to accumulate as much resources as possible while minimizing risk of death. Different nodes (elite, hallway fight, ?, shop, campfire) provide resources with different costs. I think in act 1 it is a good idea to try to view the costs as hp. You start out with 68 hp and your goal is to try to spend this hp to improve your deck as much as possible, while minimizing the chance of ever running out of hp. You have your neow blessing + 15 floors of the act to do so, after which you will face the act 1 boss, and then recover your hp.
Elites: Elite combats provide the most resources for 1 floor. You receive a relic, a slightly improved card reward, and 30 gold (average). However elite combats can cost a fairly significant amount of hp depending on the strength of your deck. For this reason, elite fights should be a super high priority at the end of the act, when your deck will likely be strong enough to get the good rewards almost for free. When selecting a path, you will almost certainly want to allow for as much elite fighting as safely possible. If a path contains only a single elite combat, it will likely be fairly easy, and you may end up with a lot of hp to spare by the end of the act.
Campfires: Campfires allow you to choose from either upgrading a card or getting more hp back. Upgrading a card is a fairly significant benefit, and on average I value it more than the rewards of a regular combat or ? node. Getting more hp (resting) is also often quite strong if the path ahead of you allows you to spend it for more resources, or if the path ahead of you risks death.
Hallway fights: These reward us with a card reward, 15 gold (average), chance of potion drop, 6hp (starter relic). The first 3 of these that we encounter are significantly easier fights than all subsequent hallway fights. I view the first 3 hallways as almost being free. Getting free rewards is of course very good, and I recommend getting these free rewards before fighting your first elite. Subsequent hallway fights (advanced hallways) give the same rewards but cost a varying amount of hp based on RNG (looking at you pink slaver + acid slime), and the strength of your deck. Thus these hallway fights are also a bit better toward the end of the act when our deck is stronger.
Shops: These nodes allow you to spend gold to improve your deck and buy potions. How good they are is almost entirely a function of how much gold you have, so early shops are often quite bad and late shops are often pretty good. Specifically, I would not visit a shop with less than 170 gold, which is the price of a common/shop relic.
Events: There are many different possibilities for events. Some are very nice (living wall is basically a better campfire), and some are usually bad (serpent). Many events give you an option to spend your hp for resources, often gold. Some events give you the option of resources for a curse. For this reason, events are significantly stronger when there is a shop ahead, where you can either spend the gold and remove a potential curse. If the shop ahead is not forced, keep in mind that receiving a curse from an event and then pathing to the shop to remove it is costing you two floors of potential resources to get the benefit.
When pathing, a common decision that comes up is choosing event nodes vs advanced hallways. Players’ opinions on this will vary, I generally recommend choosing an event node. Reasons to choose an event node include 1) your deck is weak and advanced hallways will cost a lot of hp, 2) your deck does not foresee being able to spend its hp in other ways, so the possible hp cost of an event would not matter. Reasons to choose an advanced hallway include 1) You have a pretty high chance for a potion drop (see potions) and are about to face an elite/boss, 2) You benefit specifically from combats (feed, meat on the bone, etc).
My guide for selecting a path
- Step 1
Identify the paths with the most elites. Break ties by prioritizing a campfire and 3 hallways before the first elite. Further take note if there is a shop towards the end of the path.
This is your ideal path if things are going well.
- Step 2
Think about the Neow bonuses and consider whether that path seems doable. A 3 elite path with no fire until after the 3rd elite is not going to be doable too often. Be extra wary if the first elite is the spicy elite (emerald key). If the path is questionable, are we able to deviate to a different path that is still pretty good? Are we able to rest at a campfire before we die if things are going poorly?
- Step 3
If the answer to both the previous questions is no, the path is too risky. Try to evaluate paths using my discussion of each type of node above. If all 3 elite paths seem too risky, consider taking a path that could deviate to become a 3 elite path if things are going very well. Sometimes you will receive an immolate very early and a path that was previously risky is now safe. If all 3 elite paths seem too risky, consider taking on the spicy elite, prioritizing ? nodes that are before an optional shop, or at least visiting a shop toward the end of the act.
Neow blessing
A nice heuristic for choosing a blessing is trying to compare the rewards of the blessing to an extra floor before the map. For example upgrading a card is equivalent to adding an extra campfire before the start of your path.
Blessings that require a shop: Some blessings are best when combined with an early shop (think 100 gold). Blessings that require a shop can be viewed as upgrading a future floor (shop) instead of adding a floor. When comparing an upgraded shop to say a free card remove, you also need to keep in mind that the free card remove option will effectively get 1 extra floor. Instead of shopping it gets to do something else. It is also important to consider how much visiting an early shop hurts your path. This could be very little if you were considering going to a shop anyways, or quite a lot.
High variance blessings: The options obtain a random rare relic, transform 2, choose a rare colorless card, and obtain a random rare card are particularly high variance. When selecting these options it is good to have 2 paths in mind, one being a good high roll path, and one being a good low roll path. If there is not a good low roll path, the option may be significantly worse.
Here are my rankings from best to worst. Of course these rankings are only approximate. Lots of context can affect the value of the blessings. For example, even a low variance option like remove a strike is slightly better vs guardian and slightly worse in a path with many elites or vs slime boss. Neow’s lament and Boss swapping are not included in the ranking.
| 250 gold for max hp, 18 damage, curse | Requires shop |
| Choose a rare for max hp or 99 gold | |
| Rare relic for max hp | High variance |
| Transform 2 for max hp | High variance |
| Choose a rare colorless for max hp | High variance |
| Common relic | |
| Remove 2 for max hp | |
| 100 gold | Requires shop |
| Choose a rare for 18 damage | |
| Choose a rare for curse | Requires shop |
| Rare relic for 99 gold | High variance |
| Transform 2 for 99 gold | High variance |
| Choose a rare colorless for 99 gold | High variance |
| Transform 1 | High variance |
| Upgrade Bash | |
| Rare relic for 18 damage | High variance |
| Transform 2 for 18 damage | High variance |
| Choose a rare colorless for 18 damage | High variance |
| Rare relic for curse | High variance, requires shop |
| Transform 2 for curse | High variance, requires shop |
| Choose a rare colorless for curse | High variance, requires shop |
| Choose an uncommon colorless | |
| Remove 1 | |
| Obtain a random rare card | High variance |
| 7 Max hp | |
| Remove 2 for 18 damage | |
| Remove 2 for a curse | Requires shop |
| 14 Max hp for 99 gold | |
| 14 Max hp for 18 damage | |
| 3 potion | |
| Regular card reward | |
| 14 Max hp for curse | Never pick |
Enemies in your next 3 combats have 1 hp (Neow’s lament) discussion: If this just affects your first 3 hallway fights, it basically does nothing, since the first 3 hallway fights are drawn from the easy pool. If this hits an elite, it does quite a lot, potentially gaining you 50 hp if your deck is weak. Unfortunately, going for this “snipe” almost always has a chance of failure, since ? nodes can be hallway fights. However if you have a path such as a single hallway fight, into 4 ? node, into elite combat, then the chance of reducing the elite combat is more than 80%, and you can freely take all the damage in the world at the ? nodes because burning blood is guaranteed to heal you 18 hp before the 3 fights run out.
For this reason, if the path is hard enough and snipe is likely enough, I think Neow’s lament can sometimes be better than any of the above options. The less likely the snipe is, and the easier the path is afterward, makes this option get worse very quickly. Visiting shops to guarantee the snipe is not usually a good idea though, since you are effectively wasting floors.
Remove strikes or defends? In almost all of my games I remove all of my strikes before I remove any defends. The main reason for this is that defend can be exhausted late game with corruption, second wind, or sever soul. Many ironclad decks benefit from exhaust synergy, so defend is an acceptable card. If you find yourself with a very aggressive deck that scales with strength, or if you are blocking exclusively with relics / apparitions, or if you have multiple perfected strikes, removing defend can make sense. But from Neow, if I remove 2 or transform 2, it will usually be 2 strikes.
Boss swap discussion: With the view of act 1 that I have given, the ironclad starter relic gives around 50hp over the course of act 1. The boss relic that you receive may also save you a lot of that damage, but sometimes it will not. I only consider boss swapping if I am against hexaghost, because having more hp does not matter nearly as much as the potential power a boss relic could give. I also only consider boss swapping if the best path does not have a lot of elite combats, so the hp will not be as important, and we will not be receiving as many relics for the hexaghost fight.
Potions: Potion chance after your first fight is 40%. If you receive a potion the chance will go down by 10% for the next fight, if you do not receive a potion it will go up by 10% for the next fight. Potions allow you to gain hp in fights, often according to the difficulty of the fight. A fire potion in the gremlin nob fight can easily gain 24 hp. When you receive a potion, you should try to think about the fight it can gain you the most hp in, and consider saving it for that fight. If you do not have more potion slots, it can make sense to use a potion for suboptimal value in case you get a new one. If things are going very well you can consider trying to save potions for act 2.
Adapting your path based on potions is important. Receiving garbage potions means that you are less likely to receive good potions, and extreme caution should be taken when continuing on a hard path. If your potion chance is high, visiting a hallway fight over a ? node before an elite can be very good.
Choosing cards
Wow we have made it so far and haven’t even talked about what cards to pick! There are two phases of act 1 in terms of picking cards. The first phase is when your deck is extreme trash, with just the basic strikes and defends with 1 bash. In this phase you must get stronger as quickly as possible, in order to spend less hp in combats. Particularly spending less hp in elite combats is a huge priority, since they can be deadly to the starter deck. The first phase ends when either your deck is strong enough that you don’t take much damage in elite combats, or you do not have to face any more elite combats.
Picking cards in Phase 1: We pick cards here based on their ability to save us hp in the short term. For example, adding 1 perfected strike to our deck can be the difference between life or death in a gremlin nob combat. It is very important to consider each of 3 possible elites you may face when selecting a card. Fire breathing is a card that can save huge amounts of hp vs the tri-sentry fight. Further if you have a fire breathing already, you should be less worried about tri-sentries, and prioritize cards that perform well against gremlin nob and lagavulin, such as clothesline.
Sometimes we need to draft a card as part of our neow bonus. Here are my opinions:
- Rare tier-list
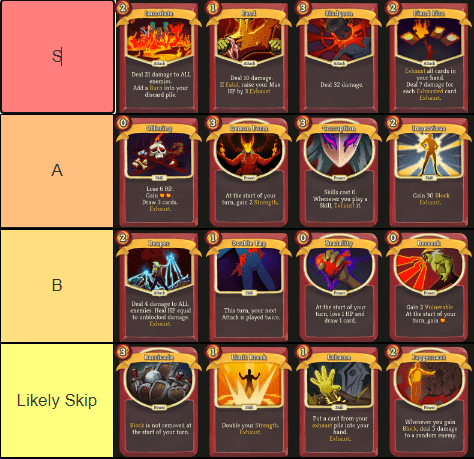
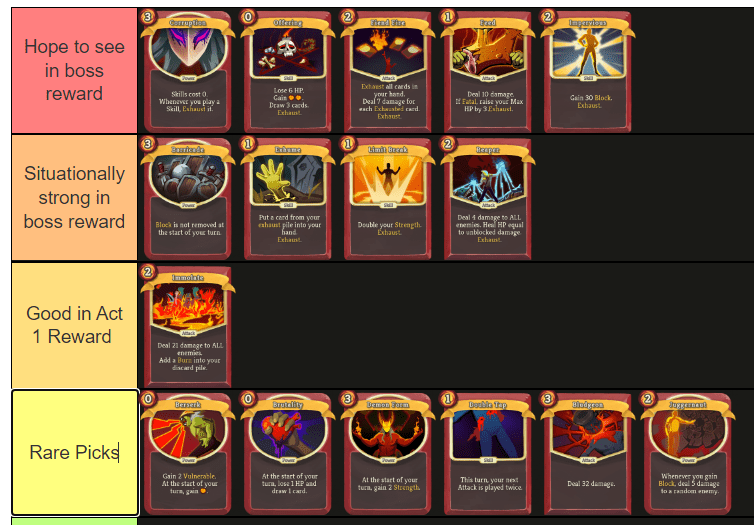
Immolate: Makes a lot of act 1 fights super easy, and is also quite useful in act 2. 1 card solution to a lot of pesky multiple enemy fights, great vs sentries, good vs nob. The burn rarely matters in short fights.
Feed: FEED
Bludgeon: A single card damage solution for act 1. Taking bludgeon is like taking 3 twin strikes, all of which can be upgraded at once, and only costs one draw. Removes the need to add sub-par attacks to your deck.
Fiend fire: Good damage card, lots of utility late game which will be discussed later. Particularly strong if you find some strength or card draw.
Offering: Huge amount of raw power, which is very strong in any fight where you anticipate potentially taking more than 6 damage. Basically amazing in every deck, it either lets you draw powers and get them in play, or it lets you draw a bunch of damage and kill everything. Doesn’t do damage by itself though, which is why I rate it slightly worse from Neow.
Demon form: This card excels in a few important fights. Lagavulin, act 1 boss, and act 2 boss. I definitely don’t mind taking this card early so I do not have to be as scared of the upcoming boss fights. It is particularly nice against hexaghost, which is otherwise a very hard fight. It can be fine later on as well if you find some synergy, or a snecko eye.
Corruption: I will discuss this card more later on, but it’s probably ironclad’s strongest card for late game, and getting it early means you just have more time to add skills to your deck! Very nice in the lagavulin fight.
Impervious: Just a very nice card. Synergy with barricade and body slam later on.
Reaper: Kind of a bad card early on, but has so much synergy that you can take it without feeling bad.
Double tap: Very reliant on drawing it with a decent attack. Not a huge fan but it can definitely be strong with some 2 energy attacks.
Brutality / Berserk: Some strength in longer fights at the cost of some hp. Borderline picks but they can be useful.
Barricade: Great late game, basically does nothing until act 2 boss though.
Limit break / Exhume: Useless without synergy. Who knows how long it will be a curse in your deck?
Juggernaut: Pretty bad card to be honest. It is slow and random damage is annoying for multiple enemy fights. Can be considered with block relics like thread and needle and self forming clay.
- Rare colorless tier-list
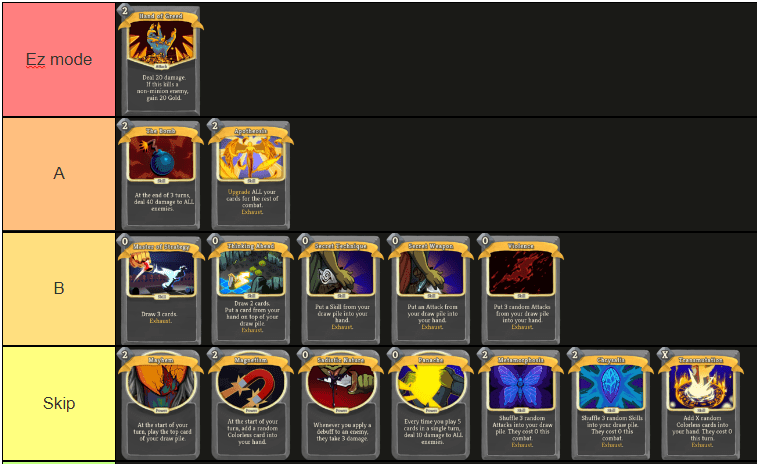
Hand of greed: Decently statted attack which is very nice for act 1. And it gives so much gold! Does not exhaust itself so you can farm multiple enemy fights for huge value.
The Bomb: Very nice against sentries (aoe damage), lagavulin (play before it wakes up). It is decent against the nob because you have a chance to draw it turn 1. It is also pretty good against the act 1 boss, particularly slime boss because you can use it to setup a very good split. Against hexaghost, 2 energy deal 40 is quite fine, and against guardian it is not an attack which is nice.
Apotheosis: aka aPOGtheosis
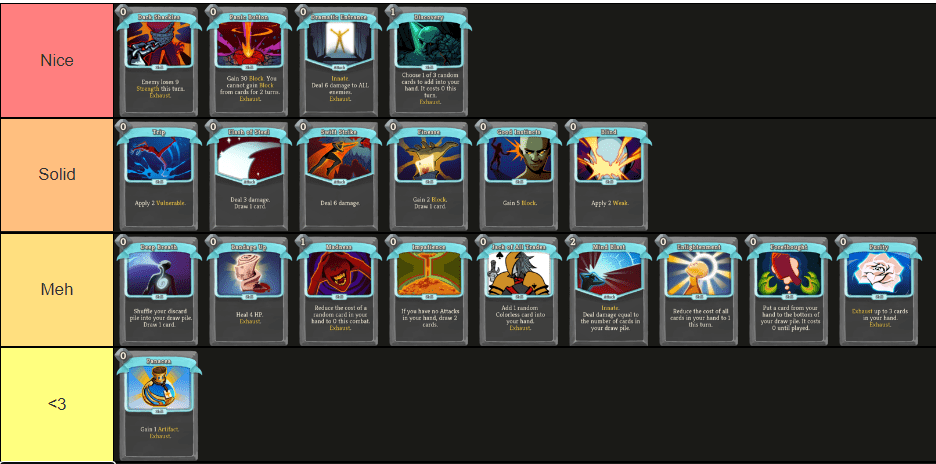
- Uncommon colorless tier-list
- Floor 1 card tier-list
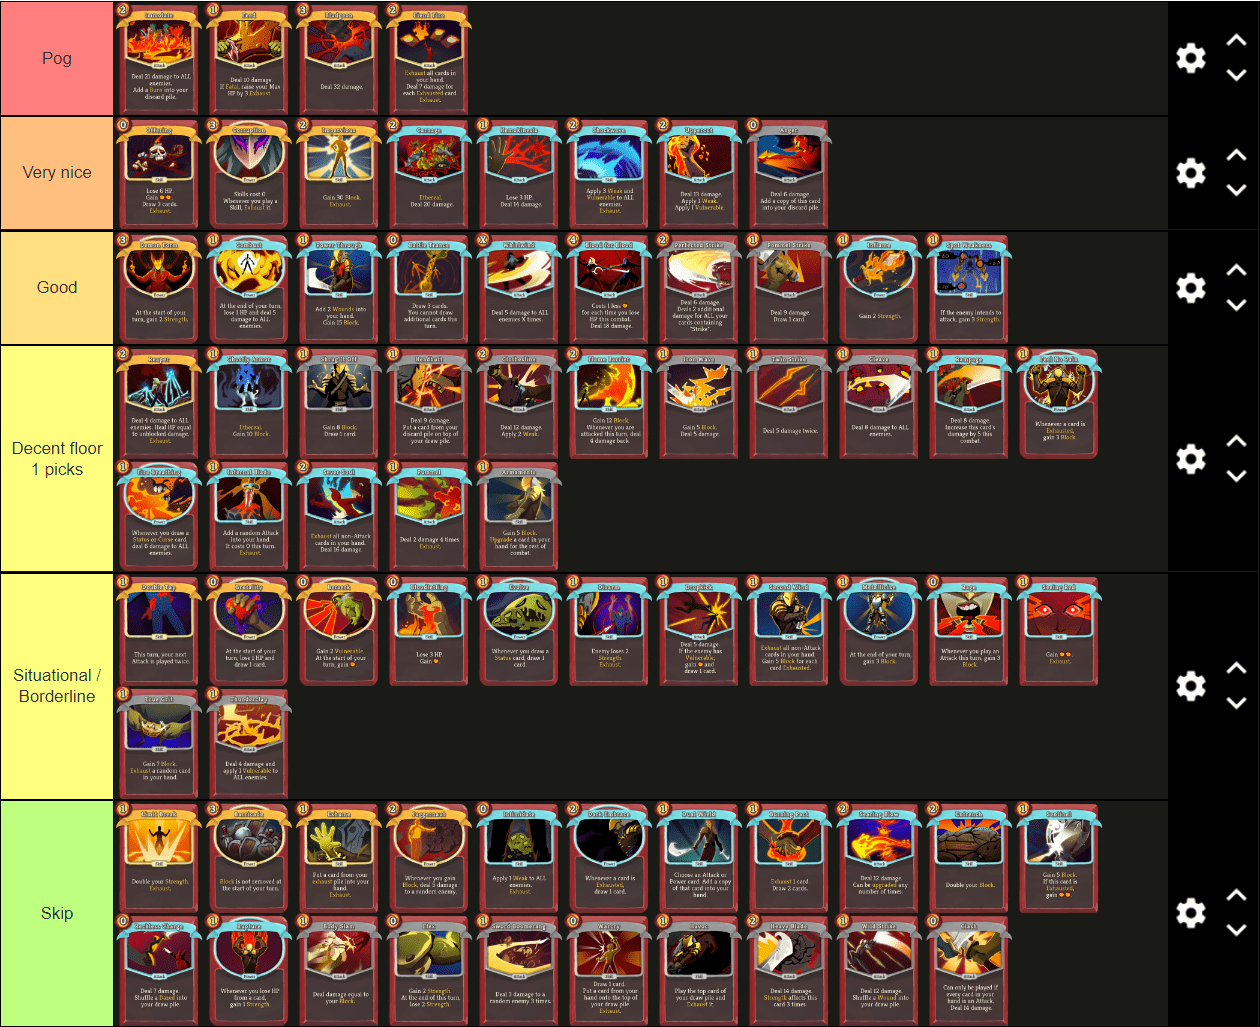
Anger: This card is a 0 energy strike which is perfectly acceptable. But it also shuffles more copies of itself into your deck! This is a very nice upside when your deck is trash at the start of the game. While it is true that when your deck is full of anger you will no longer be able to block, the enemies should be dying very fast if you have that much anger. So you shouldn’t need to block. It does fall off pretty hard in the late game though, think a little bit before playing it in a long fight.
Power through: Very nice card in short fights, can be not great in long fights if you have not found any synergy for the wounds yet. Notable synergy includes fiend fire, second wind, and evolve. There is also the relic med kit.
Battle trance: 0 energy draw 3 cards is powerful. Downside is nothing at the start, but subsequent battle trances are significantly less powerful. I would probably take 2 copies in act 1 but skip the third. Pretty much a great card at all stages of the game, unless you have a bottled dark embrace for some reason.
Perfected Strike: At the start of the game this card deals 18 damage, which makes it good to take. I generally do not recommend removing defends over strikes when you have this though, because in my experience the deck with a lot of strikes and perfected strikes struggles a lot against the final boss gauntlet.
Rampage: This card is definitely not amazing, but at the start of the game it deals 8 and sometimes you will draw it twice since your deck is small. This makes it good enough. It also provides a small amount of scaling for an exhaust deck that is not fully assembled yet. You might play corruption in act 2 boss, and then play rampage a bunch of times after exhausting your deck.
Fire breathing: I take this card over skipping at the start of the game mainly because of how much hp it will save me in the tri-sentry fight. Higher priority in a slime boss act.
Blood for blood: I thought this card was trash for a long time. I have since seen the light and now think it’s pretty good if you can upgrade it. Getting it cheaper isn’t too hard with self damage and taking small amounts of chip damage.
Headbutt: Just a nice attack to add to your deck for the early game, while also providing some utility. Battle trance is a particularly nice target for headbutt. Late game it can be good with limit break or entrench in a larger deck.
Disarm: Not great act 1, but I would highly consider it against guardian and hexaghost.
In most of phase 1, you will want to draft cards roughly according to the tier list. One thing that the tier list does not capture very well is that it is super important to get some kind of damage before your first elite fight. If you have just added 1 power through so far, and are offered battle trance and twin strike, you may consider picking the twin strike for this purpose.
The tier list becomes less useful very quickly. Your deck will start getting specific synergies, and you will need to constantly re-evaluate cards in the context of your deck and which elites still pose threats. This is what makes the game exciting!
Act 1 boss
The next phase of act 1 involves preparing for your specific boss battle, and if that is not a problem, preparing for act 2.
Guardian: This fight allows you to take as much time as you like to kill it. Cards that excel in long fights will be particularly strong. Block cards are strong. Some cards that should be prioritized higher when preparing for guardian act include: Disarm, Armaments, True grit, Spot weakness, Metallicize, Shrug it off. Potions that can ensure a turn 2 phase shift are a big plus.
Slime Boss: Damage is extremely important in this fight, as getting a good split is essential. Firebreathing can solve the fight on its own. Highly prioritize a fire pot, attack pot, or flex pot for the split turn. Area of effect damage can be good for after the split. Evolve is decent. Spot weakness, blood for blood, and disarm are not great because the enemy does not attack frequently.
Hexaghost: This fight has been the biggest problem for me as the ironclad. Hp cannot be used as a very effective resource to survive due to the turn 2 attack which scales according to your hp. For this reason, potions are a must. Particularly effective are power potion, cultist potion, strength potion, metallicize potion, fairy. Defensive plans rarely work out because hexaghost shuffles in burns and has an inferno turn 9 that hits for 6×6 and upgrades the burns to burn pluses. Therefore damage must be prioritized. Particularly effective are demon form and spot weakness, which scale strength over the course of the fight. Vulnerable is also very strong in this fight, bash upgrade is a must unless you have shockwave. Disarm and inflame are strong. Rampage, evolve and fire breathing can help if desperate.
Boss rewards
If you manage to take down the act 1 boss, congrats! We now get some strong rewards to help make a deck that can take on Act 2!
- Boss card reward tier-list
- Boss relic tier-list (Act 1)
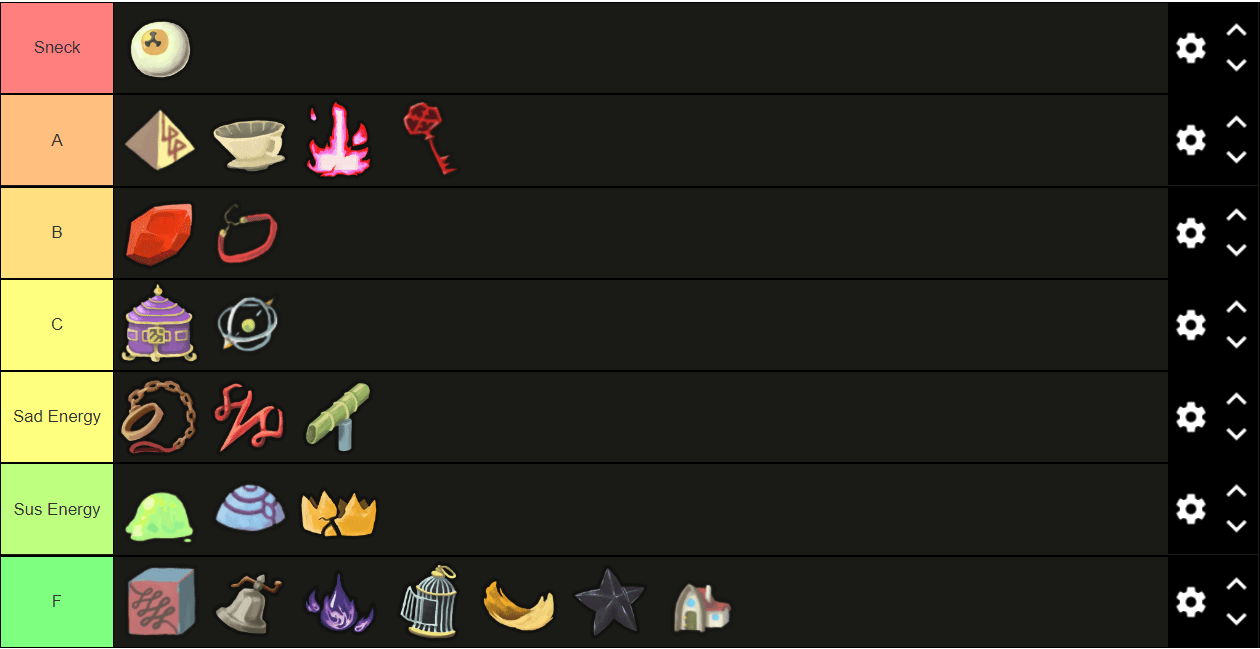
The bottom three tiers (sad energy, sus energy, F) are not meant to be ordered. Sad energy means that the relics have a huge immediate downside, which will continue to cost you a fair amount of hp every combat for the rest of the run. Sus energy means that the relics provide a huge power spike in the short term, effectively having no downside at the start of act 2. However the power comes at a price, costing an enormous amount of power by the time we reach act 4.
When you don’t receive any relics in tier C or above, you may have a tough decision on your hands. Deciding between sad energy, sus energy, and F is particularly difficult. Ectoplasm can definitely save a deck that would die if it picked sozu, but will start really costing you in acts 3 and 4.
Detailed boss relic
Snecko eye: This relic draws 2 cards per turn which is insanely good. It also randomizes the costs of cards in your hand which is scary. On average it either costs you energy or produces energy based on the average cost of cards in your deck. There are some particular interactions that make this relic extra strong. Corruption overwrites the cost of snecko, which is a run winning combo. Fiend fire / second work well with the larger hand size and unplayable 3 costs.
Ironclad has lots of 2 and 3 energy cards to draft, and snecko effectively produces energy whenever you draw them. Which is nice because it also provides a lot of extra draw. Snecko eye is significantly worse if your deck relies on multiple card combos to function, since you can no longer guarantee being able to play both cards if you draw them together. Overall I almost always recommend picking this relic after act 1.
Finally, a note on cost variance: Snecko has the potential to make all of your cards expensive. This can make easy fights worse because you have a chance of taking a lot of damage in situations that would have been fine without the card draw. This is a small price to pay. In longer fights you will have powerful turns that will make up for the bad turns, and your deck will perform well a vast majority of the time.
Coming into this game I got to ascension 20 without ever winning with a snecko eye. I wanted to make decks where I would know exactly what my deck would do every single turn. This was a limitation. Great power comes with embracing variance. Trust in the sneck and you will be rewarded.
Runic Pyramid: This relic allows for you to play cards on the turn that they are best played in, and also save pieces of multi-card combos, to have powerful combo turns. This effect comes with a downside of potentially not having the energy to get rid of unwanted cards, and thus being unable to draw cards due to the hand-size limit. Naturally, any cards that produce energy are amazing with pyramid.
Pyramid is particularly strong with corruption, fiend fire, second wind, and bloodletting as those cards have huge benefits with the large hand size and they help unclog your hand. If you do not have any of those cards, pyramid is significantly less good. If in addition, you do not have any 0 energy cards, taking pyramid after act 1 boss can be risky. Especially take extra care against the slavers elite fight, because you will not be able to discard your wounds after the reshuffle. After act 2 boss, this relic is usually amazing.
Coffee Dripper / Fusion Hammer: Part of what makes these relics amazing is that you can choose to path away from campfires. In an ideal world you don’t rest almost ever, so coffee dripper can often have no downside. Realistically, it comes with the downside of requiring more conservative pathing, and more conservative use of your hp. Fusion hammer is a bit worse than coffee dripper, but again you can avoid campfires if you don’t want to rest. Fusion hammer is also good with armaments and apotheosis so you can upgrade stuff during combat.
Cursed Key: With cursed key it is important to remember that you can just skip chests (unless in act 3 and need sapphire key). If you look at it this way, cursed key comes with the downside of losing a couple relics down the line. Compared with ectoplasm, this downside is almost negligible. Another cool thing is that you can look at the size of the chest before deciding to open it, which determines the gold distribution and relic rarity distribution. Big chests are better!
Philosopher’s Stone: In my experience, the downside of giving enemies 1 strength is not that significant. You will take some extra damage occasionally, and must prepare for tougher byrds, book of stabbing, and later on the heart. Against byrds typically the 4th energy is very helpful for knocking them down. Against the heart a single copy of disarm can completely negate the downside. If your deck seems particularly weak, this relic is a bit worse since it comes with an immediate downside rather than a delayed downside.
Velvet choker: This relic probably has almost no downside in the short term. In the long term it removes the option of scaling your strength by playing more cards. Often you will be fine just drafting high impact cards, but not having the option of going infinite or drafting bloodletting or getting a med kit is still a cost. Corruption plus dark embrace can still be strong, but it will be significantly hurt by the choker. If you already have a solid plan for how your deck will scale without playing more cards, choker can be amazing.
Pandora’s Box / Astrolabe: These relics are a lot of fun and pretty good at the same time. They are not as amazing as an extra energy each turn, but do not be too scared of the RNG associated with transform, most of the time it significantly upgrades your deck.
Sad energy relics: We now come to collar, mark of pain and sozu, which provide energy with a very huge immediate downside that will affect the rest of your run. The downside of collar is that you effectively lose 1 energy every turn in hallway fights. You basically skip a boss relic until you reach your first act 2 elite, and this can be deadly. The downside of mark of pain is reduced card draw, which is an extremely bad thing for an energy relic to give, since it may prevent you from being able to spend the extra energy.
The downside of sozu is no more potions, which costs an absurd amount of hp throughout your run. If you don’t have any potions currently, you also guarantee that you will not have any potions for the heart fight which is significant. You can take one of these relics if your deck seems very strong, or if your other options seem worse, but sozu is particularly bad.
Then there are what I call the Sus energy relics, but I could also call them the desperate prayer relics. These relics don’t have too much of a downside in the short term, but you will have a much harder time later on.
Ectoplasm: No. More. Gold. This will make many of your relics useless, many of the possible events useless, and prevent you from card removing and buying stuff to make your deck stronger. You can definitely win with it, but it won’t be easy.
Runic dome: Runic dome is interesting because it has almost no downside in a lot of fights but can completely screw you over in a couple big fights. I chose this relic in my 11th run following my 10 run winstreak, and eventually died to act 3 boss after a truly epic struggle (7+ hours). This relic can be pretty good if your deck just does damage or just gains block with body slam. If you know for sure that your deck falls into one of the above categories it can have almost no downside.
But most decks want to decide to deal damage / gain block based on the enemy intent. Enemy intents are well documented on the wiki, but certain fights (notably gremlin leader and collector) alternate between attacking, buffing, and summoning at random. Being scared of an attack and spending energy on block, just to find out they decided to summon instead, can be run ending. This relic rewards probability analysis pretty well, but even with good analysis it will be a huge downside for most decks.
Busted Crown: This relic is probably the most suspicious of them all, because it nukes your ability to find the cards you want. Becoming stronger is going to be a very tough challenge, and you will need to farm events heavily. This can be good if you think your deck beats the heart with an extra each turn, but otherwise only take this if you are very very desperate.
Finally, there are the bad relics. More realistically I should call them the low impact relics.
Runic cube: If you have a deck that synergizes with cube this relic can be nice. Bloodletting and brutality are particularly nice. For most decks this relic does very little until the heart fight, where it becomes amazing. Against the heart you can draw as many cards as you want by taking damage from beat of death. This relic is often amazing from act 2 boss.
Black blood / Calling Bell / Sacred Bark / Empty Cage: These relics do something, but it’s not really that exciting.
Black star: This relic doesn’t do anything in the short term, which can be deadly. If your deck is already strong in act 2 without a boss relic, this can be quite nice though.
Tiny House: It’s better than skipping!
Act 2+
In general it is very important to try to approximate how strong your deck is against various upcoming fights. Identify the next fight that has the potential to kill you. In act 2, if you don’t have good weakness/vulnerable, the book of stabbing will be tough.
If you do not have good damage on turn 1, and don’t have good area of effect damage, the slavers will be very difficult. When drafting cards, always prioritize cards that help against the next anticipated difficulty. Similarly keep this in mind when choosing a path, buying potions and relics, and deciding when to use potions. It is important to be familiar with all of the elite combats, and how to beat them.
Major considerations for pathing: If you have a decent chunk of gold (250+), pathing to a shop should be a high priority. It is ok to path away from elites if your deck risks dying to a specific elite combat. In general event nodes can be quite strong in act 2 and act 3. I recommend looking at the list of possible events quickly before deciding whether to path to a ? node vs hallway fight. If you are in act 2, and able to easily defeat hallways, and your deck has no desire for bites, apparitions, ritual dagger, and no golden idol, then hallways might be better than event nodes.
As you move into act 2 and eventually act 3, it is important to be greedier when picking cards. It is time to stop worrying so much about improving the base deck, and time to start looking for powerful synergies that will be able to take on much harder fights. Below is a very rough guide for when to pick / skip cards according to the act.
- Pick vs skip card tier-list
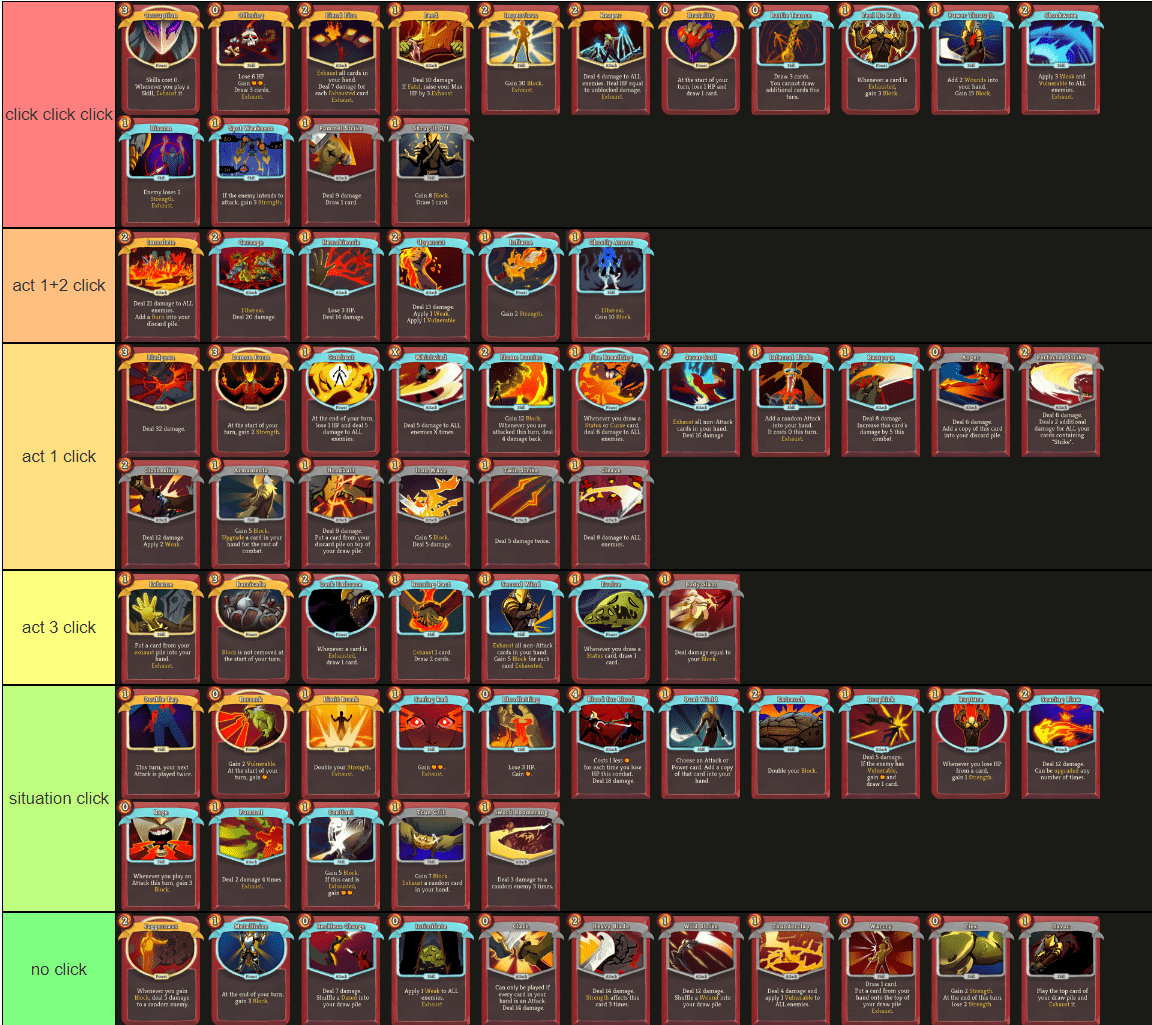
I feel like it is hard to make a guide detailing what to do in the late game because every deck is so different! Instead I will discuss some cards that have particularly large effects on runs in the late game.
Cards
Corruption: This is in my opinion the strongest and most game changing card that Ironclad has available. It is also a card I get a lot of questions about, since it has some notable downsides that can be intimidating. On the surface corruption is an energy card. You spend 3 energy to make all of your other skills cost 0. This provides a varying degree of energy based on how many skills are in your deck. Corruption also has the effect of exhausting your skills.
This has very powerful interactions with dark embrace and feel no pain. The main question is then, “What will we do once all of our skills are exhausted?” In shorter fights, the answer is simply: Use the fact that we have been spending all of our energy on damage to kill the enemy by about the time that we run out of skills. In longer fights, one option is to delay corruption to be more in line with when the fight will be ending.
This is okay sometimes, but often we can do better. If we have a body slam, we can deal a lot of damage in a single turn. If we have a barricade we can store up a ton of block for later. Sometimes we can make use of the fact that most of our deck is exhausted to achieve an infinite with dropkick / flash of steel. Even something like a rampage can output a lot of damage once a deck is exhausted.
Dark embrace / Feel no pain: Just take these cards in the late game. Stuff exhausts left and right. Drawing cards and gaining block are both very good.
Fiend Fire / Second wind: Both cards are similar to corruption in that they exhaust a lot of cards. They are also amazing when used in combination with power through! Dark embrace and feel no pain are again very relevant here. Exhaust synergy is an excellent way to block in the late game, and fiend fire second wind also interact nicely with the status cards that many late game fights will shuffle into your deck. Both can enable infinite combos.
Barricade: An amazing card for the late game. Strong with exhaust synergy, also can be a strategy in and of itself with entrench and body slam.
Reaper: An amazing card for late game if your deck gains any amount of strength. Can be used in an aggressive deck with offerings, bloodlettings, ruptures, limit breaks. These decks make blocking unnecessary and are very fun to play. Can be used in a defensive deck with blocking and either a demon form or limit break cycling.
Offering: Just click that already.
Disarm: Very strong vs time eater, awakened one, and the heart.
Evolve: Very strong vs donu deca, time eater, spear + shield, heart.
Note on the Champ: The champ is different from the other two act 2 bosses in that it is essentially divided into two phases. Before the champ goes below half hp, he doesn’t attack that frequently or for very much damage. During this time you can stall out the fight and try to grow stronger using whatever scaling your deck has available. The turn after you bring him below half hp, he will remove all his debuffs and gain a bunch of strength.
The next turn he will attempt to execute you, dealing a massive attack. It is very important to have a plan to kill the champ before he can execute you, or else be prepared to tank a massive hit. Cards like demon form, spot weakness, rupture, jax, barricade, or even rampage can enable you to delay the fight and kill him from half hp before the execute. Having a single source of scaling can make the difference, so be on lookout if you see that the champ is your act 2 boss.
Shops / relics
While it is always important to buy cards and potions to help you get through upcoming difficult combats, I wanted to talk a bit about how much I value certain relics when shopping. Sometimes you have to decide between whether to buy a relic or save your gold. Hopefully this discussion will help you get a feel for how frequently you should be buying the various relics.
- Relic tier-list at shop (prices taken into account)
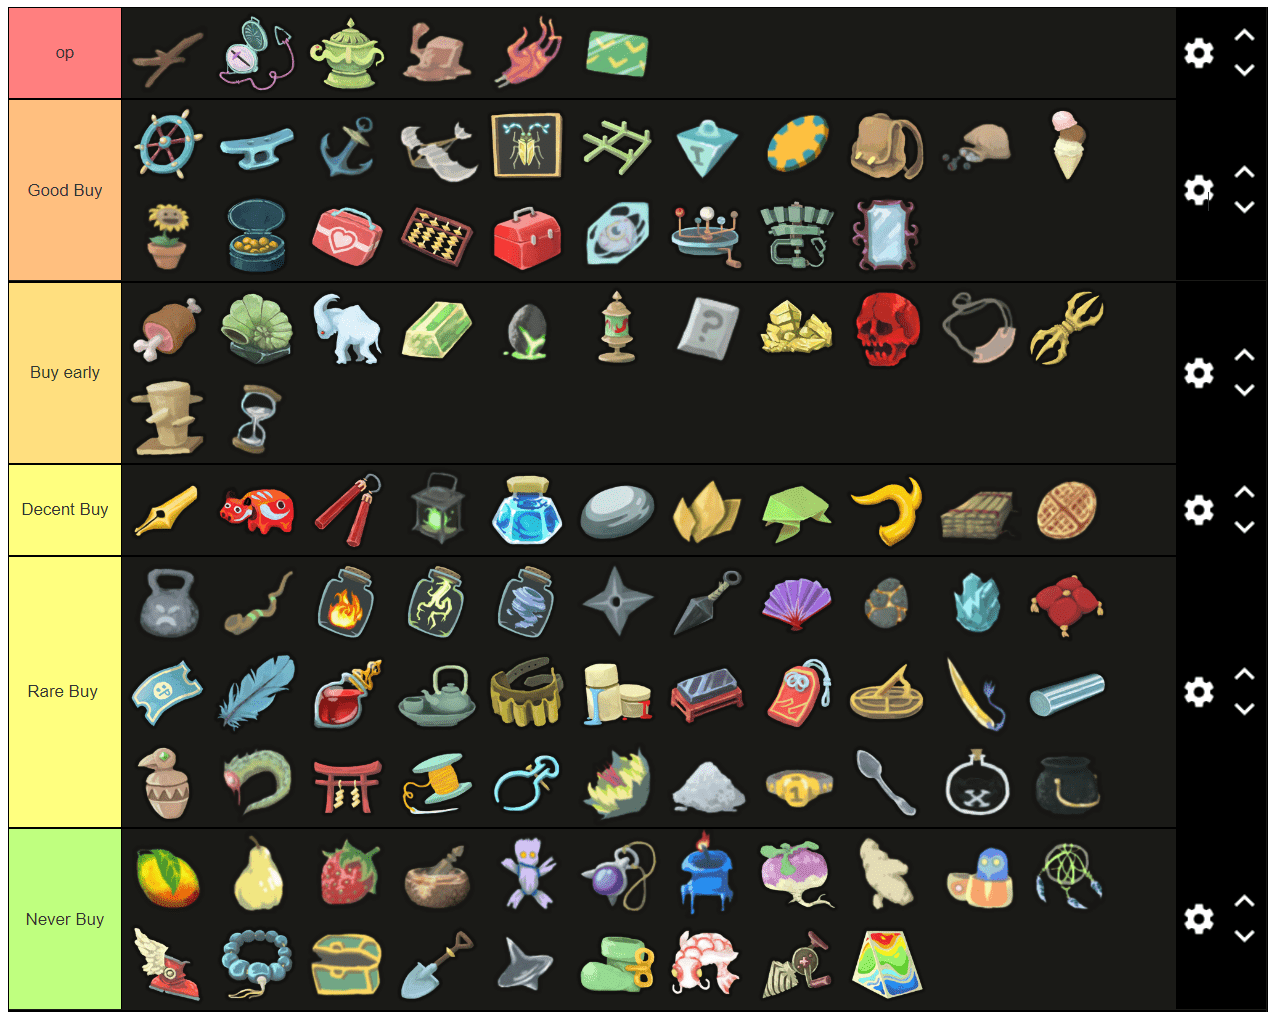
Shop relics: The rightmost relic in each shop will be a shop-exclusive relic. These cost ~165 gold which is the same price as a common relic, but many of them are quite strong. For this reason you should try to have at least 175 gold when visiting shops. Being aware of the possible shop relics is also useful for deciding how good pathing to a shop is. Keep track of the ones you have seen so far, you will not see the same one again.
- Shop relic tier-list
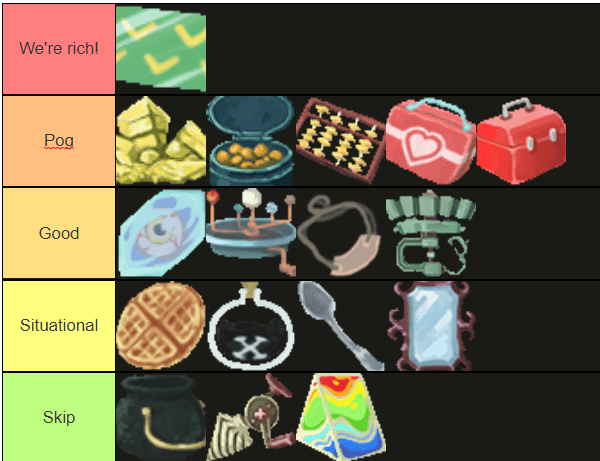
- About of each shop relic:
Membership card: Gold is now worth twice as much! If you have more gold than twice the price of the membership card, buying it is free and can actually increase how much effective gold you have.
Brimstone: For some reason I don’t see this relic very much. Everyone tells me it is super strong though. It basically gives you a bottled inflame and demon form that cast themselves at the start of combat for 0 energy. The downside means that you will need to end fights quickly, but this is usually doable with all the extra strength. The earlier you see this relic the better, so you can start focussing on making your deck take advantage of the strength. In the late game it can do more harm than good for most decks.
Orange Pellets: Allows you to use powers to cleanse debuffs. There are a lot of debuffs in the game that are great to get rid of (chosen, snecko, collector, champ, spire growth, time eater, heart to name a few) ! But not only that, this relic also works with berserk, flex, flex potion, speed potion, and mutagenic strength! Speed pot can now give 5 permanent dexterity in a fight like the heart. You can consider skipping this relic if you don’t have any powers yet, but it is very strong once you get powers.
A note on pellets + snecko eye: Pellets actually removes the confusion debuff, so you no longer get random costs. However all costs that have been affected by snecko since the fight started do not go back to their original costs. You can use this to your advantage, and only cleanse the debuff when you have good costs. If the average cost of cards in your deck is high enough, you can consider not buying pellets since the confusion is good for you.
THE Abacus: This relic doesn’t do much at the start of the game, but often becomes very strong because of how much exhausting ironclad tends to do. With a smaller deck, you will shuffle your draw pile more, sometimes multiple times in a single turn. THE abacus can enable infinite dropkicks / flash of steel to gain block, even against the beat of death of the heart, so it is a big enabler for infinite combos in general.
Med kit: This relic is very useful against enemies that shuffle burns or wounds into your deck. If you manage to find dark embrace and feel no pain, it can even convert the wounds to be an upside! This relic is amazing with power through, and this combo can be game winning with some exhaust synergy.
Toolbox: I think a lot of people underestimate toolbox. It adds a card to your opening hand, which is already good, but the fact that you get to choose from 3 options makes it super nice. Many colorless cards cost 0 and draw cards, so it is likely that one of the possible choices will allow you to replace the colorless card with a card from your deck. Notable good hits include apotheosis, master of strategy, secret weapon / technique, violence, dark shackles, and discovery.
Frozen eye: This relic allows you to plan out many turns in advance. It is particularly useful if your deck draws a lot of cards, so you can decide whether to draw or not based on what is on top of your draw pile. It has good synergy with havoc. This relic is only good if you are willing to use it extensively, but I highly recommend it. It is a bit worse with snecko eye because you will not be able to predict the costs.
Orrery: This is nice partly because you get to look at 5 rewards before picking any of them. It’s pretty good value in my opinion.
Sling of courage: Straightforward and powerful.
Clockwork souvenir: Worse version of pellets, but still good.
Waffle: Good or bad depending on how much you heal for.
Chemical X: Good if you have a whirlwind, bad if you don’t. You should never have a transmutation in your deck.
Strange Spoon: This relic can be good if you have apparitions. There are other times where you may consider it, but keep in mind that this relic makes dark embrace and feel no pain worse. Almost all ironclad decks will want a dark embrace and feel no pain at some point, so consider it carefully. Spoon does work with corruption, which can be nice on occasion.
Mirror: This is more of a card than a relic. Buy it if the card you will receive seems worth the price.
Cauldron: It is sometimes useful if you have potion belt or are in the act 4 shop.
Hand drill: I don’t think I have ever made much good use of this relic.
Prismatic shard: It’s fun but I would not buy it for 0 gold. It makes your card rewards a little worse on average.
- Analysis of the OP tier relics
Dead Branch: This relic is in some ways similar to the power dark embrace. If this relic said “whenever you exhaust a card, draw a card” it would be very strong. Instead it generates random cards, allowing you a potentially infinite supply of cards to exhaust, powers to generate, and general chaos to enjoy. The amount of resources this relic generates makes it incredibly powerful, even if your deck does not exhaust very much.
Generally, when I see this relic I stop doing whatever I was doing previously and start doing dead branch things. I just take any cards that either say exhaust or generate energy in some way. One scary thing about dead branch is that the cards you do not play will go into your discard, and you may end up drawing them again. Dead branch effectively trashes your deck for your second shuffle. This doesn’t usually matter tho, because most of the time the fight will be solved by all the cards you have generated. Corruption with dead branch is a free win. Dead branch is not as powerful with velvet choker or with runic pyramid.
Pocketwatch: This relic can draw a lot of cards. You can use it to dig for powers, and other high impact cards that you may have in your deck. You can use it to setup having more resources on critical turns such as turn 2 of the act 4 elite fight. I am always surprised by how often I choose to use the effect. When I have pocketwatch, I like to add more expensive cards to my deck, so I can get the most value from the 3 card plays I have each turn. But is also good to add some cards that synergize with the 8 card hands as well, such as bloodletting.
In some ways this relic can be compared with runic pyramid. Both do nothing turn 1, but pocketwatch draws you useful cards from your deck, whereas pyramid draws you the cards you chose not to play last turn. Generally decks like to play their good cards, so pyramid may draw you worse cards than pocketwatch. Pocketwatch is notably good with snecko eye, because often you will end up only playing 3 cards incidentally.
Incense Burner: On the surface, this relic provides intangibility on one sixth of your turns. Critical to the power of this relic is the ability to set it up on the right number, allowing you to effectively take no damage on some of the hardest turns in the entire game. For example, against the slime boss, being intangible on turn 3 blocks for 35. As any fight draws to a close, ask yourself: What do I want incense burner to be on for my next combat?
Taking some small chip damage to achieve the optimal number is very often worth it. Probably the most important thing to remember is to end your 2nd act 3 boss with incense burner on 4, so that you will be intangible on turn 2 of the act 4 elite fight. This turn you will have 2 less draw due to the burns and you may be attacked for 60 damage.
Self-forming Clay: This relic generates a lot of block. Very strong with some self damage cards, like brutality and bloodletting. Extremely strong against the heart, because you can intentionally proc it with beat of death.
Mummified Hand: This relic can provide a huge amount of energy, allowing you to get powers into play and still play other cards. Very good with expensive powers like barricade, demon form, and dark embrace. Some notable synergy with dual wield. You can dual wield a power for more reductions, dual wield an attack that has been reduced to 0, or sometimes even dual wield a power that has been reduced to 0. Very strong with snecko eye.
Metric for evaluating relics: I like to consider relics in terms of potions. Here are some examples.
Ship relics (wheel, cleat, anchor): Kind of like throwing a block potion every fight, even tho you do not choose when it happens. Good with barricade and body slam.
Centennial Puzzle: This relic throws a draw potion every fight. It can be controlled fairly often. Very nice with bloodletting to make your own offering.
Gambling Chip: Casts a gamblers brew at the start of each fight. Good with snecko eye because you can see the costs when choosing.
Thread and Needle: Casts an essence of steel at the start of every fight, unfortunately essence of steel is just not a great potion.
Vajra/Smooth Stone: Half of a strength / dex pot.
Akabeko: At a minimum, casts half a fire potion each fight. It can be an explosive potion if used on an aoe card. Sometimes it is much better though, very nice synergy with fiend fire, reaper, and pummel.
White beast statue: Approximately gains you a potion every other fight, since sometimes you would have gotten a potion anyway. Allows you to see a lot of potions, which allows for a higher chance of finding high impact potions by the time you need them.
- More relics
Fossilized Helix: This relic does wonders in certain fights like guardian and slime boss, and generally provides a large amount of value in the early game. However I don’t purchase this relic late game very much because it has some antisynergy with self damage cards like offering and bloodletting, and there also a lot of multiple hitting enemies later on. Against the heart it can be pretty good to nurture the buffer for a chance to block the big hit, but it’s easier said than done with 2 beat of death.
Ice cream: This relic can provide a lot of energy, or a very little amount of energy, depending on the deck. It allows for you to save up energy by not playing weaker cards like strike or defend, in order to have powerful turns playing more impactful cards. Notably very strong in the lagavulin fight. Also very nice to have in the champ fight, and awakened one fight, to save up energy for the second stage.
Toxic egg: This is the best egg and it’s not particularly close. Very nice with corruption because you will want to be adding a lot of skills to your deck. Instantly upgrades apparitions. Good with transforms.
Rest site relics (girya, peace pipe, shovel): They are not terrible but generally not worth buying. While digging is generally better than smithing, it’s not enough better to justify paying a bunch of money to dig instead of smith.
Bottles: Can be very nice to bottle an important power or skill. Dark embrace and barricade are generally nice late game bottles. Bottling corruption can be huge in a large deck. Bottling shockwave, offering, or rarely apotheosis is very strong. Sometimes however, it is better to skip bottles entirely. While botting bash may provide some utility in the near future, it will cost your deck to have bash bottled in the late game, because it will be harder to find your key cards. Unfortunately what you want to have bottled in the immediate future is often not what you want to have bottled later on. And even in the best case for a bottle, there is always the chance that you would have just drawn the card anyway turn 1, so these relics provide deceptively low impact.
Potion Belt: Very nice relic in the final boss gauntlet, effectively doubling the amount of potions you can use. I wouldn’t recommend purchasing the relic early though, it is usually good enough to cycle through your potions pretty quickly. It can be nice to buy if there are potions in the shop that you want but don’t have space for.
- Trash relics
When to take the sapphire key in act 1: Taking the sapphire key in act 1 should be super rare, because even a small benefit can help you survive until act 3. If you take the sapphire key and then die before the act 3 chest, you may have made a mistake taking the key. In act 1 I would consider taking the sapphire key over juzu bracelet, tiny chest, the boot, unceasing top, darkstone periapt, blue candle, and any of the bottles if I don’t have something great to bottle. These relics have their value extremely delayed and do not do much that is useful.
Events
Here I will detail some thoughts about the various choices you will see at events, as well as rate each of the common events as either good or bad. A good event is usually better than a hallway fight whereas a bad event is usually worse than a hallway fight.
Act 1
Events in act 1 are not amazing in general, but advanced hallway fights are often not amazing either, so you will find yourself here quite a bit.
Big Fish (Good): In this event we can either heal ⅓ of our max hp, gain 5 max hp, or get a relic in exchange for a curse (regret). I think that many people underestimate the power of the heal. I generally recommend healing unless it would cause you to overheal, or you are very certain that you will not be able to make use of the hp before the end of the act. Most of the time, the heal will allow you to take on the most difficult path and not need to rest.
When deciding between the other two options, I would only really consider the curse if I was already planning on visiting a shop soon. Regret is a really bad curse and will cost you hp in every fight before you remove it. Even then, removing it costs 75 and increases the cost of future removes, and you will miss out on the 5 max hp option. Even if you are visiting a shop soon, keep in mind that you will not have the option to remove a different card.
Living Wall (Good): This event allows us to remove, transform, or upgrade. All options are very nice, but I usually choose to transform a strike. The amount that a random card is better than a strike seems a bit higher than most upgrades. Upgrading can be amazing though if you have a good card to upgrade and it is unlikely to be upgraded soon at a fire.
Wing Statue (Good): Generally the remove for 7 hp is pretty nice. If the 7hp cost is particularly relevant, hopefully you have an attack to enable the gold option.
Dead Adventurer (Good): This event is similar to an elite combat that we can choose to opt out of. It is very important to note the text describing what killed the adventurer, as it tells us which elite we might have to face. Particularly take note of “chopped and eviscerated by giant claws” because this is no ordinary lagavulin fight. The lagavulin starts already awake and applying the debuffs turn 1. Use extreme caution when considering whether you want to take this fight.
Mushrooms (Good): This fight is not trivial, but is definitely worth taking if it won’t kill you. The relic that you get allows you to take less damage while vulnerable. It’s not amazing, but is relevant against the champ and collector, as well as the heart later on.
Golden Idol (Good): Here we obtain the golden idol which gives us a bit more gold in combat rewards, and upgrades the future events Forgotten altar and Moai head. I would say the golden idol is always worth the max hp cost, so you should never skip it. I always lose max hp over getting cursed, and usually lose max hp over taking damage, unless I still have Neow’s lament and am likely to heal up the damage immediately with burning blood.
The Cleric (Bad): Here we can choose to heal ¼ of our max hp for 35 gold, or we can remove a card for 75 gold. This event is generally worse than a shop node because you can only buy one of the options, but the options are decent. I would say that unless you are sure you will not make good use of the hp, the heal is generally a better deal. It’s a blood potion that costs less and heals for more.
Scrap Ooze (Bad): It is usually worth it to go for the relic. First you should try to evaluate how much hp you can afford to lose before the danger of death becomes real. Let’s say you can safely lose up to 20 hp. Then the max number of times you can reach inside will be 3 times. Then the chance of success is 1 – .75*.65*.55 = 73%, so you will get a relic about 73% of the time. The amount of hp you will lose on average 5 + 6*.75 + 7*.65*.75 = 13. You should then consider whether 13 hp for 73% chance of relic is a good deal. Often the answer will be yes, but you probably would have rather seen a different event. This event is quite nice if you have no other way to spend your hp before the end of the act.
Shining Light (Bad): Costs you 30% of your max hp to upgrade 2 random cards. Generally worth it if you can rest soon, since two random upgrades is likely better than the 1 targeted upgrade you would get from smithing. This event is quite nice if you have no other way to spend your hp before the end of the act.
The Ssssserpent (Bad): This is usually a wasted floor for me. I only consider taking the curse if I am planning on visiting a shop very soon, or the cost to deviate to a shop is not that big.
World of Goop (Bad): It is usually worth it to take the 75 gold at the cost of 11 hp. If it’s not, then you are very sad.
Act 2
Events in act 2 are generally very nice.
Ancient Writing (Good): Upgrading all strikes and defends is almost always extremely powerful. If I am getting at least 4 upgrades I will almost always take the upgrades. If I have already removed many of my strikes/defends, than the remove can be nice too.
Augmenter (Good): Usually I will transform two strikes here. If my deck seems to be more aggressive and I am doing a lot of damage turn 1 (say with bag of preparation or bag of marbles), the mutagenic strength can be a good option. If I still need some scaling for act 2 boss, or have a lot of strength / self damage synergy, getting jaxxed also can be good.
The colosseum (Good): These fights are relatively easy and have insanely good rewards. The second fight is often even easier than the first so I would also never recommend skipping the second fight.
Council of ghosts (Good): Apparitions are generally amazing, and worth the hp price. Very good with corruption, very good with powers (you can deploy them while not taking damage), very good with pyramid (but they need to be upgraded), very good with feed (can regain the hp), very good with barricade (store up block). Not so great with snecko eye. Significantly less good with decks that can regularly heal to full hp with reaper.
Cursed Tome (Good): These books are so darn good. Keep in mind it will cost 21 hp in order to receive a book though.
The Library (Good): If you can think of a couple good common/uncommon cards you could receive, I recommend the card draft pretty highly. The heal isn’t terrible either though.
Masked Bandits (Good): Fight them unless you think you might die. I recommend targeting bear if you can kill him turn 1, and romeo otherwise. Fight is not trivial but it is generally worth it.
The Nest (Good): Ritual dagger is super nice! I would almost always take this unless I already had Hand of Greed.
Pleading Vagrant (Good): 85 gold for a relic is a pretty good deal.
Vampires (Bad): I don’t usually take bites unless I have blood vial. I know some people really like them but I usually end up removing my strikes anyway so it does not seem worth the max hp.
Forgotten Altar (Bad): This event is so bad it can cost you the run if you don’t have the golden idol. Most of the time you should be able to lose the hp and then path to a campfire, but if not, you may be forced to take the curse.
Old Beggar (Bad): 75 gold for a remove is not a bad deal, but also not really exciting, especially if you will shop soon.
The Mausoleum (Bad): If for some reason writhe isn’t that bad for your deck you can consider this. Otherwise only take if you are planning on shopping very soon.
Act 3
Act 3 events are quite varied, but generally worth it.
Mind Bloom (Good): This event is really, really, good. Floor 40 and below, one of the choices will be “I am Rich” which gives 999 gold for 2 curses. A major consideration for me when choosing a path in act 3 is whether I can visit events with the potential of 2 shops following it. This will allow me to remove the normalities and spend my gold. Without two shops I will most often be quite happy to take “I am War” because rare relics are good, and the fight will not likely cost any hp. “I am awake” is not generally very good because it removes the ability to heal after the act 3 bosses.
Mysterious Sphere (Good): If your deck can deal damage quickly, this is definitely worth it. If not, they might kill you. The reward is quite nice though, so I recommend taking the fight if you think you have a good chance.
Sensory Stone (Good): I will almost always take all 3 card rewards for the price of 10 hp. Keep an eye out for flash of steel / finesse if your deck has some potential for going infinite.
Falling (Good): This event gives you a remove but you don’t have too much control over what you are removing. Most of the time it’s nice because you can ditch an attack that is not important, but there is always a chance to get completely screwed if all 3 options are important to your deck.
Tomb of Lord Red Mask (Bad): This event is nice if you have the red mask or have very little gold. Otherwise it’s pretty sad. I will usually take the relic if I have less than 100 gold or so, or want a way to strip artifact charges.
Winding Halls (Bad): Madness are generally not that good. However if you are looking to go infinite, madness can sometimes open up that possibility on pommel strike or shrug it off. If you have multiple dark embraces, they can also be fine. Unpickable with snecko eye.
Pro tip: Check your card reward before clicking whetstone.




Act 1’s Demon Form is fantastic because it allows you to bypass a particular elite and frequently the boss. Limit Break is usually overkill and not recommended.
Which elite would that be? With its powerful flat damage, anger, shockwave, and other abilities, Ironclad easily defeats Lagu, and Demon Form is a dismal performer against all Act 2 elites. The niche might be “Act 1 boss is Hexaghost, I have no scaling, and I don’t have many card picks left” , rather than “I have no scaling vs Act 2 boss/not quite enough for Champ.” Most of the time, it’s just a dead card in fights.
Yeah the elite is Lagavulin and I disagree that you have an easy time beating it, it can very often put you down 20-40 HP, and you don’t always get Anger or Shockwave. It’s also not bad against Slime boss if played turn 1 or even 2. And it’s playable against Nob if played turn 1. As for Act 2, if you get anything it combos with (eg Snecko, Reaper, maybe even Mummified Hand) it becomes very good.
It’s a card that straight up solves some encounters and has amazing combos, I would almost always pick it Act1.
As you also mentioned, Demon Form works incredibly well against almost every Act 2 boss. Additionally, it solves scaling for you practically in one card and without any prerequisites. I don’t see any reason not to pick it, unless your deck is so weak against Act 2 mobs and elites that a single card would make a significant difference. And in that scenario, the run is most likely lost anyhow.
Looking closer, we most likely have distinct playstyles, which explains why certain cards are more visible than others. Clothesline Act 1 feels like a trap, so I hardly ever use it. Act 1 defends over strikes is usually removed by me. Probably a mistake, but even with corruption, I virtually never use DE. Additionally, if Corruption is offered before Act 3, I usually pass on it.
perhaps try a different route on your next run? It’s pretty standard to remove strikes and take corruption 95% of the time; I believe Xecnar skipped it once during his world record streak. Jorbs selects it almost automatically. Actually, that was probably a mistake because corruption/DE typically wins the run on the spot. I’m not sure what to say to people who are content with their playstyle and winrate and aren’t open to trying something different; you’re probably not the intended audience, after all.
Yes, I completely agree that Clothesline is a damage pick out of desperation.
Since Xecnar is clearly superior to me, I’m not saying it’s wrong for him to choose it because I know he is doing so. However, I would be shocked if Xec didn’t also select Demon Form Act 1 rather frequently!
Ironclad is the character that I find the most difficult to comprehend and play, in contrast to the other three. While the other three characters have reached level 20, my Ironclad is still only at level 9.
In my opinion, many ironclad cards require exploiters and enablers in order to function well.
But a lot of the cards in the other class work well along with a lot of other cards.
In the Silent/defect/Purple game, for instance, if I am dealt a terrible RNG, I may just choose random cards and say “F*ck” to adjust to the situation and still win act 4.
This isn’t the case for Ironclad; there’s a good probability that I won’t make it to act 4 no matter how much I shout “f*ck”
Ironclad is simple to learn but challenging to master. His cards tend to be fairly basic and uncomplicated, which makes you wonder, “Why can’t I win?”
I was going to go into a long diatribe about how dependent he is on cards and relics and how little help his solo cards can provide, but in the end, it comes down to this: he’s the most rng dependent character and playing him requires more thought than “just pick echo form/whatever op card for the class.”
Regarding the elites of Act 4, to be honest, in many cases, this battle is much more difficult than the heart. It is critical to find a turn two solution of some kind. The HP loss entering the heart combat will typically cost you the victory, which is really just a postponed defeat to inspire elites, even if you win this fight frequently but take a lot of damage. It’s not enough to just beat the fight; you also need to beat the heart, which is extremely difficult to do while maintaining enough HP to do so. Never undervalue that battle. In spite of everything, a good guide that will undoubtedly aid gamers. Don’t take this as me merely criticizing your guide; it’s simpler for me to list things I disagree with than things I appreciate. This is a useful manual. Well done.
Really a reliable guide. As an ironclad main, I think this is quite decent, even while I disagree with a lot of what I’ve seen in some really, really awful guides. My primary grievances are that the significance of bash+ for hexaghost is frequently overlooked, that the consistency of the barricade is greatly underestimated, that act 4 elites are not prepared for (more on this later), and that the final point is still highly debatable even though we disagree on events vs. combats. I agree that there are some extremely good act 2 occurrences, but I wouldn’t normally advise you to hunt for them. Gaining strength through farming battles is far more reliable than grinding for gold, potions, card rewards, and +rare%.