
This guide focuses on a close-range combat approach designed to defeat opponents. The aim is to overwhelm them and listen to their… team’s reaction.
Introduction
Hello everyone. I wanted to share a build I enjoy in case it’s helpful to others.
This strategy emphasizes close-range combat, preventing enemies from having any time to react. It’s effective in the early and middle stages of the game (and possibly later, though I haven’t tested it). The main plan is to interfere with the enemy ship’s important functions and then board it as fast as possible.
Boarding, rather than sinking the ship, provides more loot and increases melee combat experience, creating a beneficial cycle.
Crew Composition
This build relies on your ability to deny the opponent certain weapons as you close the distance and ultimately board them.
As such, we will focus on two main crew occupations:

With this in mind, you should always be on the lookout for crew that excel in these two areas. If you can get a Healer that comes with 2+ melee or gunning you might consider taking it since the added healing is worth that fifth rank.
Target composition:

- Navigator: The navigator is extremely important for this tactic as the better she is, the faster she will fill your maneuver bar so you can close the distance and then ram the enemy as soon as possible. Grab a navigator as part of the initial 3 crew selection. This will free up your captain to fill other roles.
- Gunners: Should be self explanatory. The faster you can reload, the faster you can disrupt enemy ship operations. Take 1 gunner as part of the initial crew.
- Melee: The bread and butter of your build. Of course, they’ll be doing other things on your ship, but they’re great shock troopers. Take 1 meleer as part of the initial crew.
Note that as you play this tactic more your crew will level up those skills such that your Melee crew will be good at gunning and your entire crew will get good at melee fighting.
Ship Composition
For this play-style, there are several important upgrades you’ll want to grab ASAP:
Ship Upgrades:
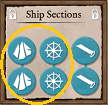
- Ship Mast + Helm upgrades (the wheel and sail in the Ship Upgrades menu). These will allow you to close the distance and ultimately ram and board your enemy much faster. Grab these as quickly as you can. They’re cheap.
- Heavy Ship Hull: Self explanatory. We need to survive long enough to board the enemy and this upgrade pays for itself within a few fights.
- Advanced Crow’s Nest: This upgrade isn’t as important in this build as it is in a long-range tactic, but it is always good to know where the enemy crew is so you can disrupt them more effectively.
- Hull spikes (optional): The goal of this build is to board and eliminate the enemy, not destroy their ship. If you go for Hull spikes make sure you don’t sink them as you ram!
Weapons:
- Chain shot: This is mandatory. Don’t sell it or swap it out. This is your primary way of closing distance with a ship playing coy. Even though you may not use Chain shot as much as you’d expect because you’re often able to close the distance quickly enough, if and when you need it you’ll regret not having it.
- Grape shot: While not exactly mandatory, grapeshot is a fantastic way of softening up the enemy before taking them out. Alternatively you can go Chain shot x2 to ensure you can always close the distance. I would not suggest the sniper rifle or the knock-down weapon as we’re interested in weakening as many of the crew as we can as quickly as we can.
- Poison Mortar (x2): This is an amazingly useful weapon for area denial and softening up the enemy. You’ll primarily use it to deny enemy weapon use as well as laying traps for the enemy (such as dumping one on their med-bay before shooting them with grape-shot.
- Main guns: I usually go for Round-shot and Double-shot. Really, what we’d like here is a weapon that does moderate-high crew damage and low hull damage. That said, you should have a way to sink the enemy in case you can’t close the distance and don’t want to flee.
Battle Tactics
Before you engage, you should position your crew appropriately. There’s some flexibility here, but I usually go with something like:
- Captain: Poison mortar.
- Navigator at the wheel.
- Gunners: 1 on grape shot, 1 on poison mortar.
- Melee: Main gun / repairs / fire.
Set your preferred distance to Close range (not boarding range so you can ram their ship).
As the battle begins, gauge whether the enemy is going to allow you to get into close range. Remember that grape-shot only works at this range or closer so you really want to get into close range as quickly as possible. If they try to keep their distance use your chain shot to take out their sails. You can then use your poison mortar in a few ways:
- Deny their navigator (drop a mortar on their wheel).
- Deny their sail repairs
- Deny their mortar
As you get to close range, you can really soften them up by herding them into poison drops. Don’t just fire mortars as soon as their ready. Synergize with your grape-shot! For example, you can shoot a mortar on their med-bay and then quickly grape-shot them so they run right into the poison as they try to heal. By then you should be close to another poison and shortly thereafter another grape-shot. You can see where this is going. This is also why you want crew with high reload skills on mortar and grape-shot. Note that if Haliphron are present, it might be a good idea to weaken them so you sweep them up quickly if they board you.
At this point, after a few rounds of poison + grapes the enemy crew should be in pretty dire straits. You can either keep doing this till they die, or you can swoop in for the kill! I almost always ram and board since it reduces the amount of hull damage I take, and it trains my crew in melee combat. The benefit of ramming is that it triggers a Brace for Impact check which the enemy can fail, making things all the easier for you.
If you decide to ram, the strategy is fairly straightforward:
- Ram > Brace for Impact > select Everyone (including Navigator) > as soon as the ships hit, order your crew to board the ship.
Since your navigator has left the wheel, the ships may separate, but that’s OK, your crew will still jump aboard!
Make sure to concentrate your attacks. With all crew members selected, target each enemy individually. Attack enemies with low health first (as dead crew members cannot deal damage). If health is similar, eliminate the captain first, then melee fighters, and then healers (or healers before melee fighters). If Haliphron enemies are present, target them first and then move away from their remains.
If the enemy ship is being annoying and does not allow you to close the distance you can either try and sink them, or simply flee. There are no repercussions to retreating so don’t be squeamish about it.
Be the first to comment