
This is a walkthrough guide for a specific puzzle area in Chapter 4. It explains each step clearly to help you solve this section. Warning: This guide contains spoilers for this part of Chapter 4, but only for the puzzle area. It doesn’t reveal anything about character deaths.
Introduction
This guide is of a special sort, not being for the entire game nor even an entire section. This is specifically geared towards the Final Dead Room section in Chapter 4. If you have no idea what I’m talking about, then it’s time to turn around, click back, and not ruin this section for yourself.
This isn’t for the entirety of the Final Dead Room either, as I’ve already pointed out. Rather, centered on one particular puzzle which has stumped many a player in Danganronpa 2: Goodbye Despair. The one which Monomi refers to as looking rather like Othello. That will be the focus here, not any other aspect of the room.
Though, if you are stuck somewhere else in the room, I believe I can help you out by saying that NEWS is an abbreviation for North, East, West, South and what may read as a “4” is actually indicating which way is North, like the compass of a map. That’s all I’m going to say, though. The rest here is actually quite a bit tricky, concerning the puzzle that comes afterwards. Full walkthroughs of the Final Dead Room are available elsewhere.
If you just want the code to solve the puzzle, go to the bottom of this section or search for it online. The middle part of this section explains how to solve the puzzle step by step. With this explanation, you can figure it out yourself and feel more accomplished. This is better than getting frustrated when the game doesn’t give clear instructions, looking up the answer, entering it to continue, but still not understanding how that solution relates to the clues. I’ve noticed many players have this experience, so I wanted to provide a proper explanation.
The solution to this puzzle was sourced from a Let’s Player who seemed to have solved it on her own during her playthrough named Lucahjin.
Step by Step
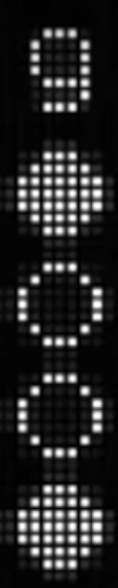
First, let’s go over the most common assumption people have when tackling this puzzle. We are presented with a pattern of blinking lights. In this order:
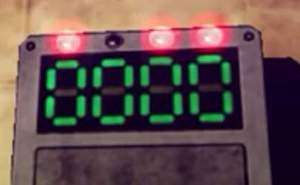
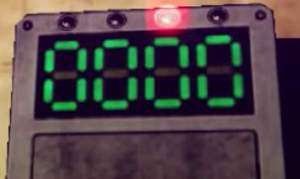
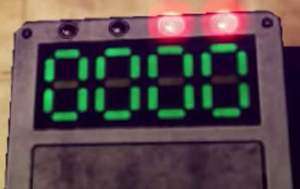
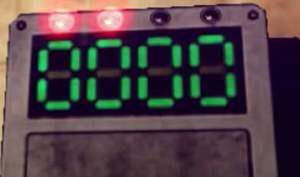
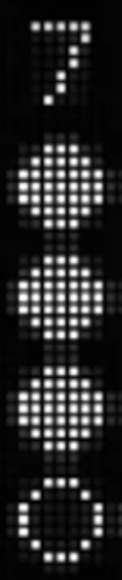
And then we were made to combine the pattern with a kind of decoding instruction on the USB drive, as seen here:

The most natural assumption that people make is that the lights, on and off, are depicted in the decoder as empty circles and filled circles which I will represent when talking about this puzzle with x and 0 respectively.
- x = empty circles/no light
- 0 = filled circle/light
As such, the pictures would be represented this way in this order:
- 0x00
- xx0x
- xx00
- 00xx
However, it’s when set against what would be seen as a decoder, this is where many a player faces despair! The most common assumption of how this problem is to be decoded is for one individual sequence to be compared to one column of lights. This doesn’t work in the end.
You see, the first set, 0x00, could be seen as 2 or 4 depending on which way you bend your head and if you flipped around how to line up the lights. However, once you get to the second set, xx0x, no matter how you interpreted the first, there isn’t a line of code that can be representing the second set in the same manner. It’s impossible to tackle this way.
It’s odd, but it seems like the sequences need to be stacked one on top of the other and THEN read vertically, like I have already illustrated. If we were to view this from a table, the proper sequences used for comparison with the key would become clearer.

For further illustration, this is how Lucahjin plotted the information during her Let’s Play (sans the answer, for the players who want to make the comparison themselves after being told how they were meant to find these new sequences).
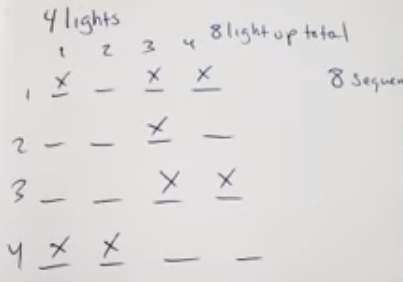
Now, as mentioned above the table, the next step is to read these new codes of light vertically and compare them to the key we were given. Each column is a new sequence which will then be translated to one number of the four-digit code.
- Column Sequence 1: 0xx0
- Column Sequence 2: xxx0
- Column Sequence 3: 000x
- Column Sequence 4: 0x0x
I’ll put the key again below for easy comparison. Continue scrolling for the final answer.

The Answer
Using the new sequences created from the columns of the table and the key that we were given, a four-digit code should be gathered from the comparison when in the correct order. You should notice that these match up perfectly.
0xx0
xxx0

000x
0x0x

Put it together, and you have your four-digit code: 9875.
Now who the hell would have thought of that lmao
i cant believe ive been watching a streamer who was stuck at this riddle for more than 4 hours
i like puzzles and sincerely stacking the lights without any hint about it is ridiculous