
A brief situation report on my turn 9 plans, it should give a new player ideas about how to use and position their forces as an Axis player in War in the East.
Introduction
This is a brief look at a section of the Eastern Front in 1941, dealing with the 1st and 2nd Panzer Gruppen (German for Groups) – two armored armies – of Germany’s Army Group Center (PzGr 2) under von Bock and Army Group South (PzGr 1) under von Rundstedt. It started out as a more philosophical snapshot than a guide, then in the making I tried to explain the logistics of the game as best I can. It still won’t tell you which button to click or go into great detail about mechanics etc., it is more of a how to employ your forces and plan for an upcoming move guide.
I set up the game with Axis human, Soviet AI, no Soviet combat bonus, reduced Russian Winter, and significant boosts to my stats, with reduced Soviet stats to 95 each. It is my first playthrough, after all!
Notes
Terms and abbreviations:
MP / MPs: Movement Point or Points
AB: Air Base
KGr zbV: Kampfgruppe zur besonderen Verwendung – Battle Group Special Purposes or Operations. German Air Transport Units
FBD: Railroad repair unit
Railhead: The closest functioning (damage level of zero) hex with a railway in it, connected by an unbroken and unblocked chain of like hexes to a supply source.
The Situation
On turn seven, the Soviet Union moved a significant number of units towards the border of the Pripet Marshes. My forces consisted of the 2nd Panzer Group in the northern sector and the 1st Panzer Group, which I will refer to as PzGr from now on, in the southern sector. Considering their current supply levels, which directly impacted how far they could move, I believed I could use these two Panzer Groups to surround the Soviet force. Additionally, there were only a few Soviet units positioned in the path of this planned encirclement.
The consensus, on the much more thorough Matrix forum/community, is that a strategy of destroying the Red Army and taking as many population centers as you can to deny manpower to the USSR is a sound strategy for Axis victory. I am following this overall strategy currently in my game, therefore the movement of Soviet forces presented a great target to encircle in the classic German Kesselschlacht or ‘cauldron battle’ way and reduce it with infantry approaching from the West.
This was not without trade-offs.
First, the mobile forces of PzGr 1 and 2 which are essential to the success of Barbarossa – essentially the first 6 months of war in the East – would be at best at the very furthest limits of supply and at worst beyond resupply. That would take half the Axis mobile forces out of action on turn 8, which along with the 3. PzGr tied down West of Moscow and 4. PzGr for the most part up against the outer defenses of Leningrad awaiting Infantry, meant that I would be giving up the last of my mobile forces for at least a week, maybe longer. Was the trade-off worth it?
Second, the enemy had a turn too, and actions available for them to take…
I decided the best use of my forces would be to encircle the Soviet formations East of the Pripet Marshes. I executed the encirclement, spacing my forces as widely as possible yet trying to deny the Soviets any possibility of breaking the encirclement.
Turn 8

The situation East of the Pripet Marshes at the beginning of turn 8, following air recon.
The encirclement held, and my infantry forces were able to march forth and reduce the Soviet pocket on turn 8. I can’t say if it was worth it or not, as the game is still ongoing at the moment. However, I did achieve a great reduction of Soviet formations (39 divisions and 9 brigades, regiments and smaller units) and manpower (386,914). Of the losses, I captured 329,030 men, which is important to the Axis cause.


Captured manpower provides the largest early pool for Hiwi, Hilfswilliger, meaning “voluntary assistant”, or more literally, “willing helper” (Wikipedia). I’m not sure what their employment will be in WitE, but in WitW, which I have played much more, you will run into various Ost formations, usually poor quality coastal defense or security units which were sometimes pressed into combat. I would guess that, like all German ground formations, the majority would have been used in the East.
I have seen references to regular Wermacht units which had German soldiers fighting along side elements made up of hiwi’s, who seem to have been handled differently than other volunteers. Those other volunteers would be absorbed into the SS, which seems to have included division-sized units from almost every country occupied by the Germans, and some allies like Hungary.
However they end up being used in WitE, more manpower is always better than less.
All that was the good news on turn 8, at least in the section of the front covered here. Elsewhere Axis forces pushed ahead, encircling Odessa, reaching the outer defenses of Leningrad, and moving the front forward along almost the entire length from the Baltic to the Black Sea.
However, I experienced my first Partisan attack, West of Minsk. That was an unexpected Soviet move I could have done without…
Turn 9

Force dispositions East of the Pripet Marshes at the beginning of turn 9
On turn nine the supply situation improved for both the 1st and 2nd Panzer Groups, helped by being set on refit. They were stretched thin on turn 7 to encircle the Soviet forces – nearly 40 divisions – East of the Pripet Marshes. Turn 8 they were consolidated for supply with HQ units within 25 hexes of the railhead. Not great. Army HQs were also moved ahead to the spot which put them in the best supply position possible while being within 5 hexes of as many of the subordinate combat units within their command as possible to help with recovery.
< XXXIX Pz Korps Positions Near Vyazma, Turn 9
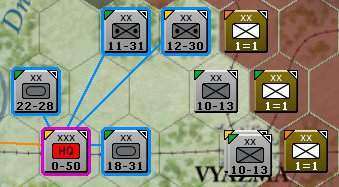
The catastrophe of the Partisan attack near Minsk which materialized on turn 8 (hex 66,55) had many consequences. Von Bock’s northern FBD 2 saw their hard work crimped off some 10 hexes further west, leaving PzGr 3 in and near Vyazma along with elements of the 9th and 4th Armies desperately short of supply. FBD 2 shifted South to begin work on a spur off of FBD 3’s East line from Brest-Litovsk, linking up at Osipovichi (72,61) and heading Northeast towards Mogilev while FBD 3 continued East.

Army Group Center FBD Positions, Turn 9. Rose-tinted hexes are damaged rail hexes reachable by selected FBD, though not all could be repaired. See section 14.2 in game manual for details.
Meanwhile IV/KG zbV 1, KGr zbV 105, and KGr zbV 9 found themselves far away form the railhead, beyond the 5 hex limit to fly resupply missions, since they had been following FBD 2’s Northern rail line pushing East. This removed 3 of the 5 Tante Ju gruppen which would have helped resupply either PzGr 3 near Vyazma or PzGr 2 in their cordon near the Pripet Marsh. To the South Luftflotte 4’s KGr zbV 50 and 104 hauled what fuel they could to PzGr 1 and elements of the 6th Army, aided by some supply drops by IV and V Fliegerkorps He 111s and Ju 88s.

FBD 1 stacked with V FliegerKorps AB, Army Group South, Turn 9. Moving East the HQs for the Hungarian (green) and Slovakian (tan) air contingent are stacked with V FK HQ (Highlighted yellow); East of the HQ stack on a line of 5 hex distance are forward airbases for V FK containing JG 3 (in-line w/HQs) and 2 Gruppen of StG 77 to the north. Telemecus has explained on the Matrix Forums that forward airbases can extend the range of your bombers, while leaving them in the most advantageous supply position. Note AG South Auto Rail Repair near Proskurov. AB NE of Proskurov contains Luftflotte 4’s Ju 52s in KGr zbV 50 and KGr zbV 104
This left 1. Panzer Gruppe’s XIV and XXXXVIII Panzer Korps’ mobile divisions with between 23 and 28 MPs for the coming action, and III Pz Korps, further South and closer to von Rundstedt’s FBD 1, with 31-50.

PzGr 1 HQ selected, subordinate Corps and Organic Recon AB highlighted. Stacked with 6 Army’s LI Corps HQ, Turn 9
In the North, PzGr 2’s XXXXVII Pz Korps – HQ 32 MP and 15 hexes distant from the rail on turn 9 – had it’s three mobile divisions each get 40 MPs. XXXXVI Pz Korps – 28 MP, 16 hexes – had 41/42/42 MPs, with 1st Cavalry (who was stranded beyond 5 MPs from HQ on turn 7) at 31 MP. XXIV Pz Korps at 32 MP/20 hexes had 29 MP for 10 Mot. Div., 28 for 4. Panzer, and 33 for 3. Panzer. The infantry divisions attached to PzGr 2’s Panzer Korps had between 11 and 15 MPs.

Panzer Group 2 selected with subordinate units highlighted, Turn 9. Airbases South of insert are those of VIII FliegerKorps, with the AB containing the three Luftflotte 2 Ju 52 Gruppen slightly further West outside the image area. Forward VIII FK Airbases contain the Bf 109s of JG 27, a Geschwader of Ju 87s, and the Bf 110s of SKG 210 on the three Easternmost bases.
Backing these formations is the 2nd Army in the North and elements of 6th Army in the South. They will be the base against which the mobile forces will – if all goes as planned – squeeze the enemy on turn 10. On turn 8 they mopped up the 20 infantry, 10 cavalry, 5 armor, and 4 motorized divisions as well as 4 airbourne brigades and single motorized regiment trapped East of the Pripet Marsh.

Disposition of the German 2nd Army, Beginning of Turn 9
While the 2nd and 6th Armies were reducing the Soviet pocket, their Bolshevik brethren were establishing a hasty defense line further to the East. Denuded of fuel and supplies, not to mention a strong infantry anvil to strike against, the mobile forces mostly moved back to regroup and rest for the coming turn.
Notes
FBD refers to the four rail repair units assigned to the three German Army Group commands, numbered 1 through 4.
Supply as an Aside, or Your New Friend Logistics!
During turn 8 my various Panzer Gruppe HQs were moved back to at least the turn 8 25 hex distance-to-rail line for the best supply position possible, without further exhausting and emptying the fuel tanks of the mobile forces – distances quoted in the prior ‘Turn 9’ section are after the rail extensions over rivers and through forest and swamp during turn 8. Infantry HQs were also positioned with supply range in mind.
When I use supply in this section, I am referring to both fuel and supply. While Fuel is seperately tracked and shipped to a unit, Supply delivered to a unit will further be divided into generic supply (food, water, fodder for horses, grease, tires etc.) and ammunition according to your first new friend you made when entering WitE, A Formula in a Rule!!

Please read through the following, even if your eyes begin to glaze over, there is a happy ending!
When you’re executing a pull-back to regroup and resupply, or positioning your headquarters units before ending your turn, some things to keep in mind are:
There are two measurements in hexes which are important to a given HQ’s draw of supply: range to nearest functioning (repaired) rail hex connected back to a side’s supply sources, and Movement Points (MPs) to that supplied, functioning rail hex. To view the status of your rail network, and supply sources (which will be highlighted in red – not shown in images), and the supply status of hexes under your control, use the rail overlay (hotkey ‘r’). These will be explained further in this section, but the game manual is the place to go for a real understanding of these rules.

Army Group South’s Northern sector, rail overlay on, turn 9. Green dots are connected, functioning rail hexes which supply can be drawn from (lower left). Red dots are hexes with 100% damaged rail lines, and useless for supply. Hex shading can also be seen, with the dark hexes (upper right) over 25 hexes range from a railhead.
The two measurements to a railhead can be thought of like this: range to railhead is what you can easily count on the map by counting hexes from the unit or HQ to functioning railhead. Movement Points to railhead are displayed when you hover the pointer over the hex you want to know the stats about, along with the range. The MP figure will account for terrain such as rivers and forests the supply line must cross to reach the drawing unit. In practice, while a unit is selected (you can’t select a unit while the rail overlay is on – to do so closes the rail overlay) I simply look at the info pop-up when I hover the mouse over a hex I want info on.
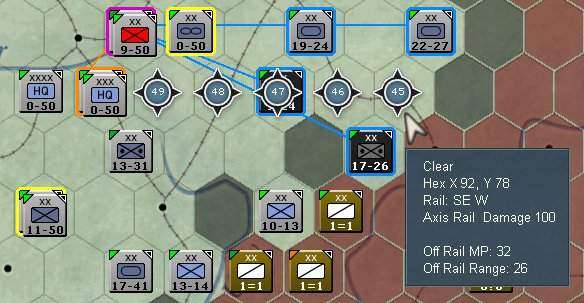
The XIV Panzer Korps has been selected in the stack (upper left, red NATO icon). Note the bottom two lines: Off Rail MP: 32; Off Rail Range 26.
If the units highlighted in blue connected by blue lines to the HQ’s hex – XIV Pz’s combat units – advance more than 5 hexes into enemy territory, XIV Pz HQ will be forced to move to the hex line indicated by pointer and path of numbered dots (the numbers are the amount of MPs the HQ will have left when it arrives in that hex) or farther to remain in command contact with it’s units. It will, however, be beyond the 25 hex range from a supply source and will not receive supply during turn 10, nor will it’s units – unless a unit is within 25 hexes, in which case they will draw supply but at a disadvantage because their HQ is not in range to receive supply.

Again the XIV Pz Korps has been selected, but this time a path ostensibly closer to the rail lines is chosen. Notice that while the rail range is now 17, due to crossing a major river and entering a swamp the Off Rail MP remains 32 as in the previous example. Bear in mind that terrain effects the Off Rail MP number.
As range to railhead increases, supply received decreases, with a further decrease implemented past 10 hexes distance. This is in addition to movement point range, which also reduces supply received.
Use the rail overlay (hotkey ‘r’) to get a visual on where your supply limits are. Hexes over 10 hexes from a reailhead are shaded, hexes with a range of 26 or more to a railhead are darkly shaded and receive no supply but remain in supply for unit status purposes. A unit which is within 25 hexes but more than 100 MPs – or vice versa – remains in supply for status, but can not draw supply: a unit must be either within 100 MPs or 25 hexes range to railhead to avoid penalties for being out of supply, but within both to draw supply from the rail network.
Simply: getting no supply bad, status achievement ‘out of supply’ even worse!
Keep your units within the first shaded area and you should avoid major problems with supply. Your decision then is how far to push your forces, knowing that the further into the shaded areas, the worse the supply situation in your units will be going into the ensuing turn, and the shorter any of their movements are going to be (including ability to attack which requires MPs).
Push the limit and achieve a glorious victory or debilitating encirclement, or be cautious and remain well supplied and therefore more flexible? That’s your real choice in WitE, not ‘counting trucks’ or getting bogged down in the minutia of logistics. Those choices for the Axis player will, as was the case historically, become very important for the player around the time Army Group Center reaches Smolensk.*
While all this might seem complex to someone who’s not played the game, it’s not really as bad as it seems. It’s more important that you are familiar with these rules than it is that you can quote them from memory like a lawyer arguing a case before a judge.
HQ Management / Support
Keep your units together. Not only is this necessary for the German doctrine of Schwerpunkt (an operational focus on getting the most forces they could to the decisive place on the battlefield they needed to be when they need to be there), it helps them recover supplies and readiness for future action.
It’s very important to remember the first and best supply source for your combat units – the ones that close with the enemy and impose your will upon them (or resist the enemy’s attempts to do same) – is the HQ they are attached to, which has a command range of 5 for supply purposes regardless of whether it’s a Corps, Army, or higher level HQ. Beyond 5 hexes distant from their HQ, units will try to draw supply from a railhead, but only on the second supply round – this gives the unit only one chance to draw supply and is far less efficient.
While a unit itself might be beyond the 25 hexes from a railhead which are in range to draw supply, if it’s HQ unit is inside that 25 hex range the unit will still draw much better supply than one who’s HQ is also beyond the 25 hex line – provided the unit remains within 5 hexes of their HQ as the crow flies. The Movement Point distance is also important, and must remain within 20 MPs from that unit’s HQ to draw supply.
The movement points from a railhead to an HQ are important to the supply the HQ can get to then pass along to it’s units or to stockpile. There’s a formula that reduces the amount of supply based on how many MPs are expended to get supply to the HQ, which in turn increases the number of trucks that are damaged and (fewer) destroyed in the movement of that supply.
Keep attached on-map units within 5 hexes of their HQ at all times unless there is a really very good reason not to! Not only will supply suffer, an HQ won’t be able to share support squad elements with an on-map unit which is more than 5 hexes from their HQ – support squads help in recovery of damaged equipment and recovery of your units’ stats.
While overall not as important as the HQ an on-map unit is attached to, a higher HQ (Army, Army Gruppe or Soviet equivalent) attached to the unit’s chain of command will also try to help with Support Squads during the appropriate section of the logistics phase.

Returning to this image of the 2. PzGr, it’s interesting to note that the units stacked with and closest to the PzGr HQ – XXXXVII Pz – got 40 MPs for each of it’s mobile units, while the XXXXVI Pz just to the South and one hex further in range yet 4 MPs closer to rail, got more than 40 MPs for every mobile unit save the 1. Cavalry, which is outside the 5 hex range of the 1. PzGr HQ but was also outside HQ supply range on turn 8. Furthest South is the XXIV Pz Korps, which is farthest ranged at 20 hexes, but the same 32 MPs from rail as the XXXXVII Pz., and has the least mobile unit movement points.

In the South, 2 out of 3 of 1.PzGr’s Korps ended turn 8 with their HQs at the 25 hex limit of supply, with a long MP haul from the rail as well. The exception, South-most III Pz Korps, ended up with the highest MPs of any of these formations for turn 9, and was the only 1. PzGr formation to have all it’s units within the 5 hex command range of their immediate higher HQ.
Support Squad help flows down the chain of command linearly, and is only shared between higher HQs and subordinates.
Example: 6 Army HQ may attempt to send Support Squads to a division which is in range and attached to a Corps which is in turn attached to 6 Army, as may Army Group South if in range. However, a Corps attached to 11 Army will only get support to it’s units from the Corps HQ, 11 Army, and Army Group South if in range – even if stacked with 6 Army HQ or one of it’s subordinate Corps HQs. Similarly, Corps HQs attached to the same Army may only attempt to support on-map units which are subordinate to it.
Note that ‘Support Squads’ referenced above are not support units such as artillery, pioneer, or StuG units. Support squads are listed in a unit’s TOE and are the organic non-combat elements of the larger formation. An HQ may share it’s Support Squads with it’s subordinates to help in recovery. This is doubly important for Air bases in WitE, so keep them as close to their command chain as possible.
Regarding Support Units, for them to be committed to a battle they must either be attached directly to the unit, or the HQ has to again be within 5 hexes of their combat unit or units involved in the battle. While I’ve glossed over the fact that closer is better for supply, it is very important for HQ commitment of Support Units. Note that Artillery units can not be directly attached to combat units.
To get you started and playing the game with enjoyment, this outline is really all you need to know about these topics, but of course there is much more to it, others more qualified than myself must take that form here.
The Turn 9 Plan
The plan is to create as many encirclements as possible during turn 9 – as many as 3. Two big ones maybe, or perhaps only two small ones due to bad die rolls or other circumstances. Unlikely but maybe one big one to rule them all, or maybe just a small one because reasons. Point is, I tried to set up the combined Panzer Gruppe forces and infantry army backing to enable as good an encirclement of enemy forces as I can manage. Infantry form 6th and 2nd Army will punch holes where possible, then movement points will dictate what’s possible after that.
That is a strategy of destroying the Red Army and taking as many population centers as you can to deny manpower to the USSR is a sound strategy for Axis victory. We shall see to the best of my abilities. I’m optimistic about taking Leningrad, though the KV factory is gone as well as everything else the Reds can move. I would imagine that a push to Moscow might be feasible, though I read that taking and still holding Moscow after the Soviet Winter Offensive are two different things.
I should also mention that when I set up this game I set rather large benefits across the board for myself, especially in Administration because I want the extra APs. I find the APs – at least in WitW with all the command shake-ups prior to Overlord – are too few to do what was historically done. This being my first time through WitE, I wanted to give that boost ‘just in case.’ Otherwise I just don’t want to be shouting at my monitor in frustration at 2am and waking up the house, lol! For a newbie, I would definitely suggest boosting your stats to as much as 125 and reduce the Soviets a bit – I set them at 95 myself for, again, my first playthrough.
Also – historically the Axis did not win in Russia. From what I’ve read, it was probably impossible to have won, save for astute strategic reasoning and precise execution on the ground, which Hitler himself precluded with his decisions and decrees. Even with the large benefit I gave myself, I am still not sure of victory, given this is my first try. From what I’ve read on Matrix, it’s quite possible to win without an unbalanced setup and giving the Soviets an advantage (+1 defense or attack). I wanted to give myself a chance to win with all my known and unknown limitations going in.
I’m finding this game quite enjoyable, and beginning to worry that I might have set it up wrong(too easy), so I might change things going forward. I know I boosted things higher than I did when I played WitW, and in the West I didn’t cut the Axis stats at all. I believe all I did there was to boost the Administration stat to 105 or 110, and left the rest at 100.
Final Thoughts for Now
I first played War in the West because it’s one of the few detailed and interesting war games that gives the German side a compelling starting situation, similar to what you see in the game’s predecessor. War in the West is the only other game I can think of that does this.
I believe this is the main reason many players generally choose to play as the Germans in most World War II strategy video games set in Europe. The German army starts with an advantage, which in some games like War in the East is accurately shown through their experience and organization rather than just having a large number of armored and mechanized units that didn’t historically exist. I also enjoy simpler games like Panzer Corps and own all of its German campaign expansions. I have also enjoyed playing the Making History series.
I’ve noticed that some people find the rules of these types of games intimidating. I’ve been playing games with similar complexity since childhood, so for me, it’s nice to find a computer game that feels like the older paper-based games. Learning the rules can definitely be challenging, but once you understand them, both War in the East and War in the West are great games that can provide many hours of entertainment and historical learning. You’ll also discover many other computer and paper games that can entertain, educate, and challenge you and your friends for years to come.
Be the first to comment