
An overall strategy guide to the game, in its 1.0, post-release state, aimed at beginner and intermediate players. The guide includes tips on weapon load-out and targeting, slot management, resource management, battle and cruise configurations (beyond just crew assignment), and more.
Introduction
This guide assumes that you’ve played through the tutorial, and understand the basic mechanics of the game.
The structure of the guide is somewhat random. One way to structure it might be to follow how the game starts: with ship and perks selection. However, I feel that unless you have a good understanding of the mechanics of the game, starting there would be overly complex, and overwhelming to a new player. We need to start with the normal, basic stuff, and then perhaps circle back to the beginning.
Combat Strategies
Combat is perhaps the main focus of the game, in the sense that it cannot be avoided (not that we’d want to, in any case). It’s also one of the best ways to “make a profit” in the game, so it makes sense to ensure that your ship can easily take on the enemies.
Projectiles vs energy weapons
The two main options for weapons seem to be along the lines of projectile weapons versus energy weapons. At first glance, energy weapons seem to be a clear favourite, since they seem to shoot instantly, and don’t use resources. The reality is a bit more nuanced.
Let’s look at energy weapons first. Energy weapons require a lot of power to run. This is a problem in several ways; first, it can be problematic to power them at all. On some runs, good power sources are rare until much further into the run. Second, they cannibalise the same power that you could be using for additional shield generators or shield banks. Lastly, if your power sources take a hit, your weapons will most likely go down immediately, making them far more vulnerable than you’d think. Energy weapons are also not really “instant”. They seem to apply their damage only at the end of their several-second-long effect. Although this is untested, I suspect that it may be advantageous to de-synchronise energy weapons, so that if one of them brings down the enemy shields in its own “turn”, the other energy weapons get through, instead of being wasted on the shields.
Next, projectile weapons. These are typically either cannons, missiles, or gatling guns. Their main downsides are their heavy use of resources, and enemy point defence (PD). Some types of cannons can be reliably defeated by PD, so can be a complete waste of resources to use. On the other hand, these weapons typically only use 1 energy, freeing up the remaining for your own shields. To counter enemy PD, you should make use of volleys, where you fire all of your weapons at once. Luckily the developers have included a “hold fire” button next to the weapon quick list. Since at least one or two of your projectiles will still be taken our by the enemy, the game meta seems to favour weapons that shoot more projectiles at once rather than weapons that shoot fewer, stronger projectiles. In this sense, gatling, various miniguns and cannon-IIIs seem to work great. Once they reach the enemy ship, the effect will be instant, interrupting any weapons, PD, energy source, etc, that you aimed for. In my experience so far, they seem to be more effective than energy weapons, and can be overwhelmingly powerful.
Since they bypass shields, in many cases, your first volley will render a ship unable to meaningfully fight. In this case, unless it’s already trying to warp away, switch to another target. Before you do though, have a look at the level of damage on the enemy ship – you can generally figure out roughly how many seconds / volleys’ worth of time you have, before you’re forced to switch back to finish it off.
If you only have a single target, and it’s not warping away, make sure to disable your more explosives-hungry weapons. This can be done with the “Z” key, if you have the weapon selected. It may be worthwhile keeping a single, high hull damage laser on hand for this type of cleanup work. Remember that they can be swapped in during combat, at the cost of 10 seconds or so.
When attacked from the rear
Fights where the enemies show up behind you can be particularly annoying (especially if they are using projectile weapons, as you will have hopefully set up your point defenses at the front, knowing that most fights happen from that direction). Your main issue is with your PD being in the wrong place, both to stop projectiles, and potentially, boarding parties. In these types of fights, do the following:
- Prioritise enemies with projectile weapons even more than usual. In terms of enemies with energy weapons, nothing changes.
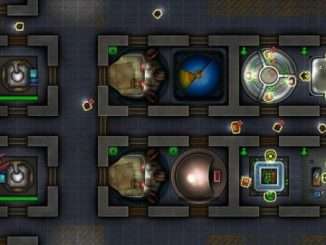
- Remember that you can switch modules on the fly. The starter ship actually has hybrid slots in the top / bottom left of the ship, and you can move your PD here on the fly. This involves a 10 second downtime, but is usually worthwhile.
- One thing to remember is that power sources and shields should not be swapped out, the downtime will cause problems.
- Similarly, weapons cannot charge while swapping places.
Splitting your attacks on the first volley
If the enemies are particularly numerous, or you have a serious weapons advantage, you might consider splitting your attacks on the first volley already. I would only recommend doing this if you have 5 or more weapons, and you’re fairly sure that the first 4 will already take the one ship out of commission for a while, and any more would be a waste. n all other cases, disable your primary target first (which is either your main threat, or the easiest one to kill).
Crew layout
Part of your “battle stance” preset should be the position where your free-flowing (repair, fire, and security) crew members stand. Some of the crew – especially fire bots – can be painfully slow to move, so I would recommend placing them somewhat centrally, and spread out to cover the entire ship. Security crew members should be toward the front of the ship by default, and moved to the back immediately in the event of a ship attacking from the rear.
Point defences
Point defences are awesome. They take down slow moving enemy projectiles, and importantly, boarding parties. For this reason, I’d recommend at least 2 PD, but you can feel free to go much higher (I think on one run, I had 8 main weapons and 5 PD, for reference). Pay attention to their firing radius and time, as those are their main stats. It’s definitely worthwhile to put a very good gunner on these (though perhaps, less important than on the primary weapons).
On some ships, their close layout seems to make multiple PD likely to target the same individual incoming projectiles, which more often than not, is a waste. You might consider breaking these up by upgrading one of the hybrid slots to a weapon slot, and installing the PD elsewhere.
Another tip is that PD mounted in the centre or even towards the rear of the ship is definitely not wasted. Often, the AI will target your mid or rear ship, and these PDs will have plenty of time to take these down.
Combat and Cruise Stances on Steroids
Most players are aware that there are buttons for saving and loading crew task assignments. In this section, we’ll go over some additional tips.
Combat refit 201
You should definitely use the crew assignment saving and loading feature heavily, but you can also take the concept much further. Unfortunately, most of it is manual micro.
- Certain modules are not useful during combat, such as sensors. They can (and should be) powered off to redirect power to weapons and shields. You can also completely replace them just before (or during) combat with weapons, point defence, structural integrity modules, etc.
- Other modules which are worth replacing just in time include cryosleep, farms, research modules.
- Consider that container modules are similarly not useful during combat. If you remove them, you will temporarily be in an “excess” state, meaning movement on the map is not allowed, but no other negative factors will be applied.
The above strategy swapping of modules is very powerful, making your ship effectively have several more slots than it really does (at the cost of several module storage slots being constantly used by your replacement modules). It’s main downside seems to be player sanity and tedium.
More mundane tips on stances
If you’re not pulling module swapping tricks to get your ship into combat readiness, it’s really just a matter of saving your crew assignments and clicking the “load” button. When you do this out of combat, it all happens deceptively fast; unfreezing from cryo-sleep is instant, and your crew seem to get to their stations really quickly. Don’t let this fool you, if you are in a combat situation, or if you even just have an enemy ship chasing you on the map, this plays out much more slowly. Getting your crew to their stations can mean getting the first volley off before the enemy can, or vice-versa. To ensure that you’re ready whenever possible:
- Always switch to combat mode before a warp jump. Since you don’t know where you’ll be landing in the other system, and quite often you are immediately attacked by one or more enemy fleets.
- Since the slowest part seems to be the unfreezing of the cryo process, and this is instant out of battle, you generally don’t have to wait for your ship to reach full battle readiness. Unfrozen, your guys can usually reach their weapons stations before the first volley charges, and it seems that their skill is immediately applied to their weapon countdown (i.e. your weapon might drop from 13 seconds to 9 seconds as soon as the gunner is in place, even if we’re already at 8 seconds charging, and the crew just got there).
- Obviously, always be on battle readiness before any sector exit nodes.
- Conversely, I’m yet to see an actual battle mini-game started from an event node, so it’s generally not necessary to switch.
Resource Management
In a large part, the game revolves around managing resources, and the supporting activities around this topic. We’ll start with some general observations and tips, and then move on to specific resources and strategies.
Resource management overview
- Try to keep a nice empty buffer in your stores for most resource types (with some exceptions). This is because you should be visiting basically every point of interest on the system map, and taking every fight (unless your ship is unusually weak in combat). Your spoils should then fill up your stores very quickly. You do NOT want to have to dump resources, and the convert to fuel option is only marginally better than dumping (it converts at a horrible 10:1 ratio).
- Whenever you visit a station, make sure you sell off some of your resources, if they are above some threshold. I normally like to keep metal and synthetics at around 50-60% full, fuel at around 80-85% full, organics at 60%, explosives close to 90% (if I’m running a build that is heavy on projectile weapons). At some point, you will likely find yourself having far more of some resources than you can reasonably sell, so it’s important to start this trend as soon as you’re doing well. If the station you’re in happens to have lots of capacity to buy your resources, consider scrapping unused modules you may have forgotten about.
- Conversely, do not scrap modules before you start to have a storage problem. Some modules can contain 3-4x as much resources as a single resource pack can store (quite aside from the fuel costs to make a resource pack), so they are very effective resource containers, too. When scrapping to free up space, always scrap in the order that makes most sense – starting with modules which only give you resources you have a lot of storage for, and / or modules which yield fewer resources (a slot is a slot, etc).
- If you happen to have modules which convert from one resource to another, they can be a good option to use, if you find yourself with excess materials. Always consider these when you’re in excess. Other options for using resources quickly are drone repairs (synthetics), medbay (organics), repairing modules (synthetics), or repairing hull (metal). Another option might be crafting, though these tend to be sub-optimal, and you generally don’t have space for modules, if you’re in an excess situation. Always run through this checklist mentally, before you dump or convert resources.
- It’s rare, but keep an eye out for stations which are willing to buy a resource from you for the full price. It can be worth it to sell a bit extra in these cases.
- Some modules are actually worth more when scrapped than their buying price. Most of these tend to have 3+ exotics in them, as well as other resources in the 50-100 range. This is fairly rare again, but well worthwhile to keep an eye out for.
Fuel management
- Fuel can be problematic to source, so it is generally better to have a terrible engine which has good fuel efficiency, than to have a top tier engine which requires 50 fuel to move.
- In some cases, it can be worthwhile to keep two engines on hand, and to keep swapping them, though the notes about sanity do applier here as well.
Organics management
- Make sure you identify individuals who have unusually high food requirements. -5 is the norm, but this number can easily go to -15 or more. Crew like this should either be in cryosleep, or producing organics.
- Organics making modules don’t just make food, they also automatically zero the assigned crew’s organics needs! This makes them far more useful than they initially seem. Note, however, that a max tier farm module only allows 3 crew, while cryosleep can go up to 8.
- Try to ensure that you have a very low organics burn rate when travelling around the system map. A slightly positive number would be even better, if possible.
- If you have a decent or positive organics rate, using weapons which consume organics can be a great idea.
- Try to keep a spare cryosleep module in storage, in case your main one takes a hit and gets destroyed. Few things sink a ship faster than having another -60 organics consumption all of a sudden.
- Organics will be the main limiting factor to your number of crew, and the crew in turn, will limit the number of modules you can use which require (or really need) an operator. Of course, this is in addition to the number of slots on the ship in the first place. As an example, however, if you have 6 main weapons, you will certainly need 6 crew manning them. You will definitely have at least 1 bridge and 1 shield crew. Some repair, fire, and security crew, as well as operators for 2+ PDs will be required, which means that you have at least 10 operators which need some form of cryo sleep, or meaningful work during cruise. Plan ahead in terms of cryo sleep and farms.
Metals management
- Metals are fairly important for repairing your ship, and also critical for upgrading core slots to hybrid and then weapons slots. Depending on your strategy, you may want to have two or three extra weapons slots, which would each need at least 1000 metal. Depending on your ship and storage options, it might be difficult to even amass this much metal, so plan ahead. Straight after such an upgrade, you probably also want to have a little bit of metal on hand for emergency repairs, in case you have a bad fight.
- As the tutorial points out, repairing hull is actually cheaper at stations, so do so when you can. It might be worthwhile to switch off the auto repair feature, and micro this manually, if / when necessary.
- Towards the late game, if you are doing well, metal might also be in a massive surplus. Some weapons use metals to fire, and they can be good alternatives to explosives based weapons.
Credits management
- Your main source of income will probably be / should be selling of resources you’ve won through events and fights.
- If you happen to have several low-organics-needs crew members with high research capability, it can be easily worthwhile to have a research module for when you’re moving around on the map.
- Crysleep modules which generate income don’t tell you how much they make, but in my experience, it can be pretty decent, equalling the output of research modules.
Exotics management
- Exotics are essentially alternate currency. They can generally be sold en-masse to stations for decent money, and upgrading to weapons slots also requires 10 (I think).
- Keep 3-4 on hand for traders who you don’t wish to buy their wares from. They typically will give you 50+ credits for the exotic, plus 15 or so of some resource, making it a great deal.
Starting the Game
Ship selection
At the beginning, your ship selection is likely to be severely limited. I’ve found the starting ship to be quite difficult in the late game, however it’s plenty good enough to unlock the medium-sized ships, which simply require a few sectors to be completed. Those in turn should be enough to unlock the largest ships, which are generally more than enough to beat the game with. At that point, I suppose the game’s charm would be similar to most rougelikes, in the sense that you try to beat the game with increasingly more odd builds, most of which are actually less powerful than the ones you originally beat the game with (but perhaps even more fun!).
Perk selection
Not all perks are equal, nor is their cost necessarily an indicator of the value you’re getting. Keep this in mind when choosing perks. Typical examples are spending 2 fate to unlock 1 exotic resource, while you can just buy a module plus extra resources with the same number of fate points, scrap the module, and end up with your exotic plus a few hundred resources for the same price. At the early stages, you will likely have a fair amount of fate points to spend, but not a lot to spend it on, so perhaps just taking everything that looks good can work.
In general, I recommend having a drone repair and medbay capability for all ships as a backup feature. Late game crew are incredibly valuable due to their skill levels, and losing them should be avoided.
Know your ship and game plan
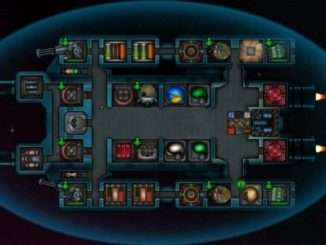
Take a good look at your ship when you start out. One aspect to look out for is hidden hybrid slots, which can be good to know about, for later PD installation or weapons slot upgrades. Identify unused or sub-optimal container modules. On the starting ship for example, 1 organics container tends to be unnecessary right off the bat (though you may choose to keep it installed). Typically, single-resource containers make less than perfect use of space, especially on smaller ships. This might be overwhelming at first, so play a fair bit, and soon enough it will become second nature.
Have a good understanding of what you currently have installed, what you can do without, what your ideal endgame setup might look like, and so on. This way, you can always make decisions that progress you towards the next step in your plans. And, since the game is somewhat random, you kind of have to be ready when something comes along, so that instead of accidentally scrapping a module you say “ah, yeah, I’ve been looking for that for 4 sectors now”.
Be the first to comment