
Cubeworld has changed a lot. Don’t get caught out clinging to the old ways. Time to update your knowledge with this (eventually) ultimate guide from your resident knowledge seeker, Darkmega.
Cube World Guides:
- Quick Starting Guide.
- Beginners Guide 2019.
- Class Specialization Guide.
- Advanced Movement Guide.
- How to Tame Pets.
The Biggest Difference for Old Alpha Players that You Should Know!
The Primary Difference
Cubeworld is no longer a standard RPG with leveling! It is now entirely an EQUIPMENT based RPG with a focus on staggered area exploration and discovery.
The player is no longer a standard issue happy go lucky adventurer who loves murdering wildlife and other salty adventuring types for pleasure and personal gain who’ll figure stuff out as they go (leveling and skill picking/training).
The player is now an already somewhat skilled representative of their class type going on a life long quest across the land to collect artefacts, power and fame.
The big glaring difference everyone hates
You no longer have an xp bar or traditional leveling mechanic no more sticking points in skills which eventually decay in scaling, no more hanging out power leveling for years just to see big numbers… but also no more picking a direction and just going there endlessly to slay the next and the next dungeon. It’s a bit more metered than that.
What these changes mean
Instead of looking for murder and the occasional cool piece of gear, you’re mostly looking for gear now, and any special items that further this, usually by opening up more ways of travel or locations containing loot.
Although sure you can fight the wildlife so they cough up shiny’s (gold and leftovers) and other bits and pieces. But they’ll defend themselves, and anything above your tier level will absolutely destroy you unless you’re similarly kitted out or apply a fine mixture of cheese and skill liberally.
Oh, and most of the loot and special items are attuned to the area that they’re found in. They’ll flat out disappear or become as effective as tier one gear when you cross over into different areas where you’ll then repeat to find gear and artifacts to clear that location of it’s riches and once again continue on. More on this progression later.
How to Think of it
Basically you adventure in an area and do all the things and get cool gear, then you bring that cool gear to a new place where it becomes your “new game plus” kit, being deleveled to have the illusion of a harder area where you will now essential find more kit that holds power equivalent to the new area.
Think of it that way if it makes the transition easier. It’s a seamless level scaling circle rather than a line to the heavens where eventually nothing stands in your way except clouds and lofty expectations. But it can feel like that once you get some high tier kit and can clear the current area with a snap, and it can feel equally demotivating to find awesome gear only to have it power down cause you left the area it was found or created.
Each biome in of itself is basically a little self contained quest land or micro world all connected to one another that you can seamlessly travel between by eagle or land/sea.
You no longer become an overpowered murder hungry powerhouse eventually consuming everything in your path and eventually feeling no satisfaction with mundane loot because you’ve picked up too much of it or are kitted out in full legendary or godlike apparel. cause now atleast you can keep it on hand for selling and some rare items can function across the boundary to a certain degree. Gold also has a bit of a use after-all.
Choose Your Character! [Rogue]
The first thing you do is pretty straight forward, but the big question is, what class should I be? This much comes down to a playstyle. So lets start from the top and get you a class you enjoy.
Assassin
Surprise Initiation damage dealer.
[You start as this guy when picking rogue, but can switch to ninja at a town.]
Your Shift is a stealth movement ability, use stealth to become transparent gradually and generate mana as you sneak around. Stealth when closer to full also greatly improves your chance to crit and deal massive damage! Stealthing also reduces aggro rate down to nothing when full and moving at sneak speed unlike the old game doesn’t reduce it as long as you keep your sneak key held. Notice that stealthing up in shadowed areas allows it to build quicker. Stealthing and being further away from enemies may or may not also allow you to break aggro with them quicker so they reset so you can go back to sneaking up to them and giving them spooky bad times.
Holding shift and rightclicking is intercept, which consumes 25 stamina to allow you to dash before your rightclick comes out. Homes in on cursor/the enemy under it. Doesn’t use it from full charge, it actually just uses the rightclick on impact or on the end of the dash that you have, so it actually requires a little bit of mana to use. Use it to jump out of stealth and home in and floor people to open a fight.
Your R, Camouflage folds into this on a 40 second cooldown for 20 seconds you become fully stealthed constantly even when moving and attacking. You know what that means? Easy pickings, always generating mana, more stabbing for more massive damage and the ability to move at full speed and still have stealth benefits.
Middle Click without input consumes all your stamina to chuck a vial of poison. it goes into the air then kinda curveballs around and slams into the area you was aiming to. It poisons enemies making them take damage ticks over time and constant damage if standing on the poison area. Use it from stealth behind an enemy when you’re about to engage. just toss the vial, then floor em with an up close and personal rightclick attack as it comes down and just go to town while invisible with your R. Should be sufficient most of the time.
Just careful if you don’t floor them, cause the full bar of stamina usage means no rolls for a little bit if you get caught out or need to get out of that mage laser beam/tornado about to hit you. It also slows you down for a second or so when you use it, so it’s not the greatest to be used in the middle of combat unless a friend has the heat or you’ve just freshly knocked down the enemy and want to toss in a bit more damage.
Ninja
Nerfed and revised. Fast and agile melee+ranged hybrid damage dealer and distractor. No longer a crit spammer. but still hits like a truck.
Unlike cubeworld alpha, the ninja no longer has stealth. Instead, he’s a speedy boi.
Holding shift gives you a sprint that basically lets you run about as fast as being mounted at the cost of constant stamina drain. Jumping while sprinting lets you do like a front flip jump that goes roughly twice as high, letting you easily vault tall obstacles and scale some cliffs. Costs 25 stamina.
Holding Shift and attacking instead converts your melee into a shuriken toss. The shuriken damage scales with weapon damage and it’ll normally deal a lot more than your normal attack on impact. It costs 25 stamina per shuriken you throw. Use them to open fights from afar, then when the enemy is close, either run away and vault an obstacle and keep shurikening, or convert into melee combat using the mana you would’ve gotten from the shuriken attacks. YES you generate mana with both melee and shuriken strikes. You can also arc them pretty far, so it’s quite good, but they’re floaty and have some travel time, so aim well.
Shift and mouse two is still your intercept, get some mana from shuriken tosses and use it to floor enemies who get too close or close in to interrupt foes charging specials or down those pesky mages who will absolutely murder you until you shower them in shurikens or bait em close by breaking line of sight…
Speaking of a hail of shurikens, your R is Ninjutsu! For 60 second cooldown on use it converts your melee attack into free, faster firing shuriken tosses, and your rightclick into intercept by default (no stamina consumption). It lasts 20 seconds and is your main way to ruin everythings day. Get at range, turn on ninjutsu, hose em down with stars, then when they get close, roll through their attacks and counter with intercept to down them and keep firing. You can easily off mobs a tier or two higher than you by just letting a storm of shurikens do the talking from a safe vantage point.
The ninja still retains it’s ability to dodge damage on roll to gain a particle effect buff. This buff allows your next Rightclick or intercept boosted rightclick to automatically crit. You may also get some if you interrupt an ability being charged or knockdown an enemy in the middle of an attack. But I’m unsure of this portion. But the melee combat basically boils down to dodging attacks to gain free burst mana and your particles, sneaking in a few hits to fill the bar (or dodging more moves in succession), them blowing them away with massive crits and a few cheeky ninja stars to put them on their ♥ over and over.
Here is a video from Colde Blauth on youtube showcasing visually the skills of the rogue!
Choose Your Character! [Rangers]
Sniper
Stealth and evasion based Long range Burst damage.
[You start as this class when picking Ranger! Switch to Scout at a town]
Basically a long ranged Assassin.
Sneak around with shift, much the same as the assassin, attacking or letting go with make it go down. Sneak to build mana pre-emptively, and score some tasty crits. Boom, headshot! (there is no headshot. just consider it a crit).
Charging your rightclick attack also builds stealth. Try to keep stealth atleast a little up all the time so you’ve got some crit chance and mana generating for free then rain hell from afar. I mean really afar. you don’t want enemies getting to you. Try to keep them on their ♥ as much as possible with crit snipes and charged shots.
The Sniper also gains bonus attack speed the more attacks in a row that you land, allowing you to hose enemies down with arrow fire from afar by standard when it comes down to just shooting at your target.
Your tap middle click with no input makes you backflip towards the camera at quite a speed, instantly consumes your stamina bar but also fully charges stealth. Use it to keep your stealth high and trickily flip up small ledges or across gaps to juke and out space your enemies. Use it at the pinnacle of a jump, or aiming downwards to choose the angle.
Try not to roll, cause the more rolls you use the more time you have to wait for stamina to use your backflip. Of course, easier said than done when it comes to bosses with ranged attacks or melee enemies faster than you up in your grill.
Your R is a shadow clone companion that follows you around for around 20 seconds. they look just like you but shadowy and with ninja shadow particles on and will shoot and charge shoot where you’re looking, but she sometimes will disjoint from you if you do a retreat. You’d hope that she’d be able to pick up aggro, but the way aggro tends to work in this game is they’ll just come for the first thing that hits them unless someone redirects them with a knockdown and they lose track.
They also only deal a percentage of your damage, so it’s not like your double your output, but the crits still hurt for sure.
Scout
Fast, tricky, can’t touch this. Ruiner of melee enemy’s day.
The Scout gains the same ability to sprint on shift movement like the ninja. It also has the front flip jump to scale obstacles and be evasive without being sneaky.
Your stationary middle click instead of yeeting yourself, yeets your enemies! It’s a quick, slightly weak, but decent chance of knockdown roundhouse kick that sends enemies flying back regardless of if it knocked them down or not. It consumes 50 stamina but you can use it over and over. The ultimate dickmove when used to kick enemies away from you when they just spent 10 seconds climbing up a cliff.
And now the reason you’re the ruiner of melee enemy’s days.
Your R places down a large circular quicksand Trap kinda area field at your location. For around 15-20 seconds this sits around and any enemies that try to walk through it are mostly stopped in their tracks and seem to sink into it a little. Not a fun time for them. Since in this time you can shower them with damage and it acts as if you’ve already built your combo! Thats right, enemies stuck in this thing have reduced defenses, meaning you can even cut through higher tier enemies without too much trouble. Of course you still need to deal the damage to reduce their health, but atleast their armor won’t make you deal literally nothing. You can also set it down and leave it, so you can say, bait a group of mages or rangers into it and still continue shooting them from outside the range the AI actually starts attacking. Just be watchful of the timeout so you know when to take cover before the lasers start flying.
Instead of gaining natural attack speed with combo the Ranger at random procs a buff that gives you pink particles that allow you to instantly charge a rightclick attack. You generally want to use this at full for maximum impact or close to full, and it procs quite often and since other than the kick your power shots are another way of knocking enemies down, you’re golden. Just keep trapping kicking, shooting, shooting harder and being generally hard to get at.
Here is a video from Colde Blauth on youtube showcasing visually the skills of the rangers!
Choose Your Character! [Warriors]
Berserker
Melee Brawler and “Damage tank”. Knockdown Specialist.
[You spawn as this guy at first]
The Berserker is a melee boi who gains attack speed the more hits he lands. This allows you to ramp not only the raw damage the combo counter provides but overall damage faster than a defender because you hit quicker and quicker. You start with a heavy weapon that takes a while to swing but hits hard and has a 3 hit combo. A down swing that takes a second to happen, a poke for less damage then an upswing that has a chance to KO. But I suggest using dual one handed or shield and sword as they hit faster and so build your attack speed quicker.
Holding Shift is your spin attack. It blocks attacks through a block gauge that gradually fills constantly when not actively holding block with a shield (attached to charging your rightclick) and allows you to deal constant damage to enemies around you. It’s great for building combo or used to “run into” a fight to block initial attacks, and it decimates enemies weaker than you allowing you to gather them up and nuke them down quick for gear farming.
If you jump while holding spin you’ll do funny little helicopter spin slash into the air that goes about as high as the scout or ninja’s flip jump, it will still hit enemies on it’s way up and down and can be canceled at it’s pinnacle with a charged attack or some other form of interrupt, like using your ulti.
Middle Click is your Leaping ground pound. This can and usually will down enemies that it lands on who aren’t KO immune or super high level or doing their own defensive move that manages to block it all. it also deals massive damage, but consumes all your stamina. Meaning you can’t roll after using it so be careful you don’t miss or you’re wide open for a bit without stamina to spin away or roll.
Your Ultimate is the mother of all Falcon punches the rock fist. It’s a quick to engage long range dash with a giant fist attached to the end that deals big damage and sends enemies high into the sky and knocks them down. It’s good for both disengaging and engaging. But because they are launched up at the point you hit them try to learn the distance and space it so that it lands and you’re somewhere nearby if you use it as an opener as by the time they come down from being punched into space they won’t be stunned for much longer. You can also cancel it if you don’t want to fly the whole distance with a well timed roll or by charging your rightclick. You can use it for raw damage, potion interruption, crowd smashing, or yeeting out of there on a 20 second cooldown. It’s pretty good.
Sometimes when dealing damage you’ll hear a sudden sound effect and you’ll turn red. This I like to call “the sauce”, but it’s probably more akin to a battle fury buff. What it does is it makes you life steal on attack, makes your charged attacks charge almost instantly and greatly reduces incoming damage you take for what seems like 6-8 seconds, unsure but you might also get some attack speed, not sure. Yes you can re-proc the buff to refresh while sauced up. So once you activate this buff you get right in there and fight as many enemies as you can handle and make sure you hit as many of them as you can to benefit from all the life steal you’ll be getting which is directly based on the amount of damage you’re dealing in turn. This includes almost full healing off a well placed ground slam when in a bind.
The Berserker suffers maybe a bit more than your rogue, ranger or mage at first. Given that you need to be able to get in there to deal damage to get “fired up” but he lacks as many of the ranged or surprise/skill benefits of other classes to cheese mobs who are out of his league as if he’s in range to attack, they’re in range to attack you. So choose your fights carefully, and consider using a shield so you can get the extra layer of using your charge attack to block attacks at least at first until you get some survivability, then you can switch to some dualswords and just count on getting Battle fury activated to live, tank and kill at the same time while having a jolly good time. A rock fist out and a spin jump over the nearest obstacle and a potion also works too.
Defender
Mostly the only difference with the defender is instead of gaining attack speed per hit you gain some Bonus HP and the ability to block with any set of weapons, dualswords or great weapon included. The special attack for the great weapon is also slightly different. Blocking attacks has the benefit of making your charged attack charge quicker but it doesn’t seem to give bonus mana like it used to in alpha. they might also have a tougher block also? Unsure on how to tell, they should honestly if Wollay is reading.
The Defender can still activate the Sauce Battle fury to get lifesteal, practically instant charge attacks and gain increased resistance. Although it seems slightly harder to get it to proc, unless I was just having terrible luck.
However instead of rock fist you gain Heroic Shout. No, it’s not fus-ro-dah. It’s an area of effect taunt that pulls enemies within natural aggro range to you instead of where-ever they’re heading, making them glow red, taunted. It also has an unmarked effect of making you regenerate health in chunks per second for around 10 seconds, this can stack with the sauce to give you some really good survivability when you bring all your tools to bear and don’t bite off too much.
Here is a video from Colde Blauth on youtube showcasing visually the skills of the Warriors!
Choose Your Character! [Mages]
Fire Mage
Ranged DPS, knockdown specialist, artillery.
[You start as this when you spawn!]
Mages. ♥ wizards and the like. Overpowered as enemies, similarly strong in a player’s hands too for sure. First thing to mention however is a rather major difference when it comes to mages. Instead of generating mana on attack or through other means like stealth/evasion mages generate mana relatively rapidly over time up to the maximum 100. Your mana is used for your various spells obviously in varying amounts including your rightclick attack which consumes 30 of it. Other abilities differ slightly.
The fire mage’s passive allows them to gain glowing fire particles over them when landing hits, similar to the scout’s pink particles this allows the mage to instantly cast your rightclick. Doing so also consumes no mana. Quite handy if you can get it to proc, as you use your rightclick first to knockdown off the bat, use some normal hits to hopefully proc it again in between then hold your charge and use a different knockdown if you want then use it whenever you need to immediately knock them back down on their ♥ again with varying effectiveness.
Holding shift as a mage allows you to float/hover. Floating cancels all fall distance built up and suspends you in the air briefly before you float back down to the ground. To keep yourself relatively level you can reapply the floating effect when you start to pick up a bit of fall speed again to re-float yourself. Another trick you can apply is jumping and then immediately shifting on your way up from the jump to sling shot yourself into the air. If done right you can very easily launch yourself up into trees to get to safety from melee enemies and scale cliffs with relative ease as floating seems to be completely free. Pretty good.
Shift+Leftclick is a fire explosion for around 50 mana. It’s a spherical cast hitting above and below you and comes out relatively quickly. It deals minor damage and knocks back enemies. Not nearly as effectively as the more narrow kick from the scout but it also has an alright chance to knock down.
Middleclick without an input requires full mana but is a midrange range teleport to get yourself places. Takes a moment to come out, so don’t wait on it too long if you’re using it to evade.
Finally your Ultimate is Fire missiles. This launches up a volley of 4 large fire balls that then come down at the aimed location soon afterwards. They hit really hard in a really big area and generally ruin days and cause knockdowns.
If the AI ever decides to use this on you, usually from a boss, you can more often than not kiss your ♥ goodbye if they’re equal or lower your equipment rank. If you see it coming roll like your life depends on it.
The great thing about all this stuff using mana is that mages don’t need their stamina for other things, so it can be completely used for dodging as much as you want either to micro around enemies while waiting for mana if enemies get close.
Water Mage
The Healer who can kick ♥ and tank too.
Water mages probably need no introduction for alpha players, they were pretty much the go to choice for mages and being OP, given that their kit allows them to practically forego healing items by healing by attacking and with special abilities.
Water mages damage comes from hosing enemies down with water magic at an ever increasing speed. The more hits in a sequence the quicker you shoot up to a maximum, like Sniper and Berserker essentially, but ranged, and splashy.
Speaking of splashes, water mage’s attacks when they impact terrain their damage radius is highlighted in blue flashing water puddles that stay for a few seconds. Allies standing in these puddles are healed gradually… and for some reason or another they stack. Meaning if you can hose enemies down faster enough you can build up so many puddles on the floor that you can become a damage tank by standing still and firing away while standing in your own puddles being created as you shoot a now very confused enemy who’s trying desperately to murder you.
Teleport is still intact and shift is still hover, but instead of explosions on shift+left click, you have swirls of water vapor, or as they’re called “Healing streams”. Left click focuses it on and around you healing rapidly. While rightclick focuses it on your cursor allowing you to rapidly heal others at range like the good support you are. This consumes mana rapidly to cast either version.
Your ultimate instead of raining hell releases pretty Water bubbles around you. There’s around 6 of them and they act as a kind of sticky remote mine. They stick to enemies who run over them and then you can later detonate by firing your magic at the bubble stuck enemy or just the bubbles on the ground. This causes the bubbles to rupture leaving your healing puddles everywhere and causing some decent damage per bubble, culminating in a real big splash of doom.
Here is a video from Colde Blauth on youtube showcasing visually the skills of the Mage!
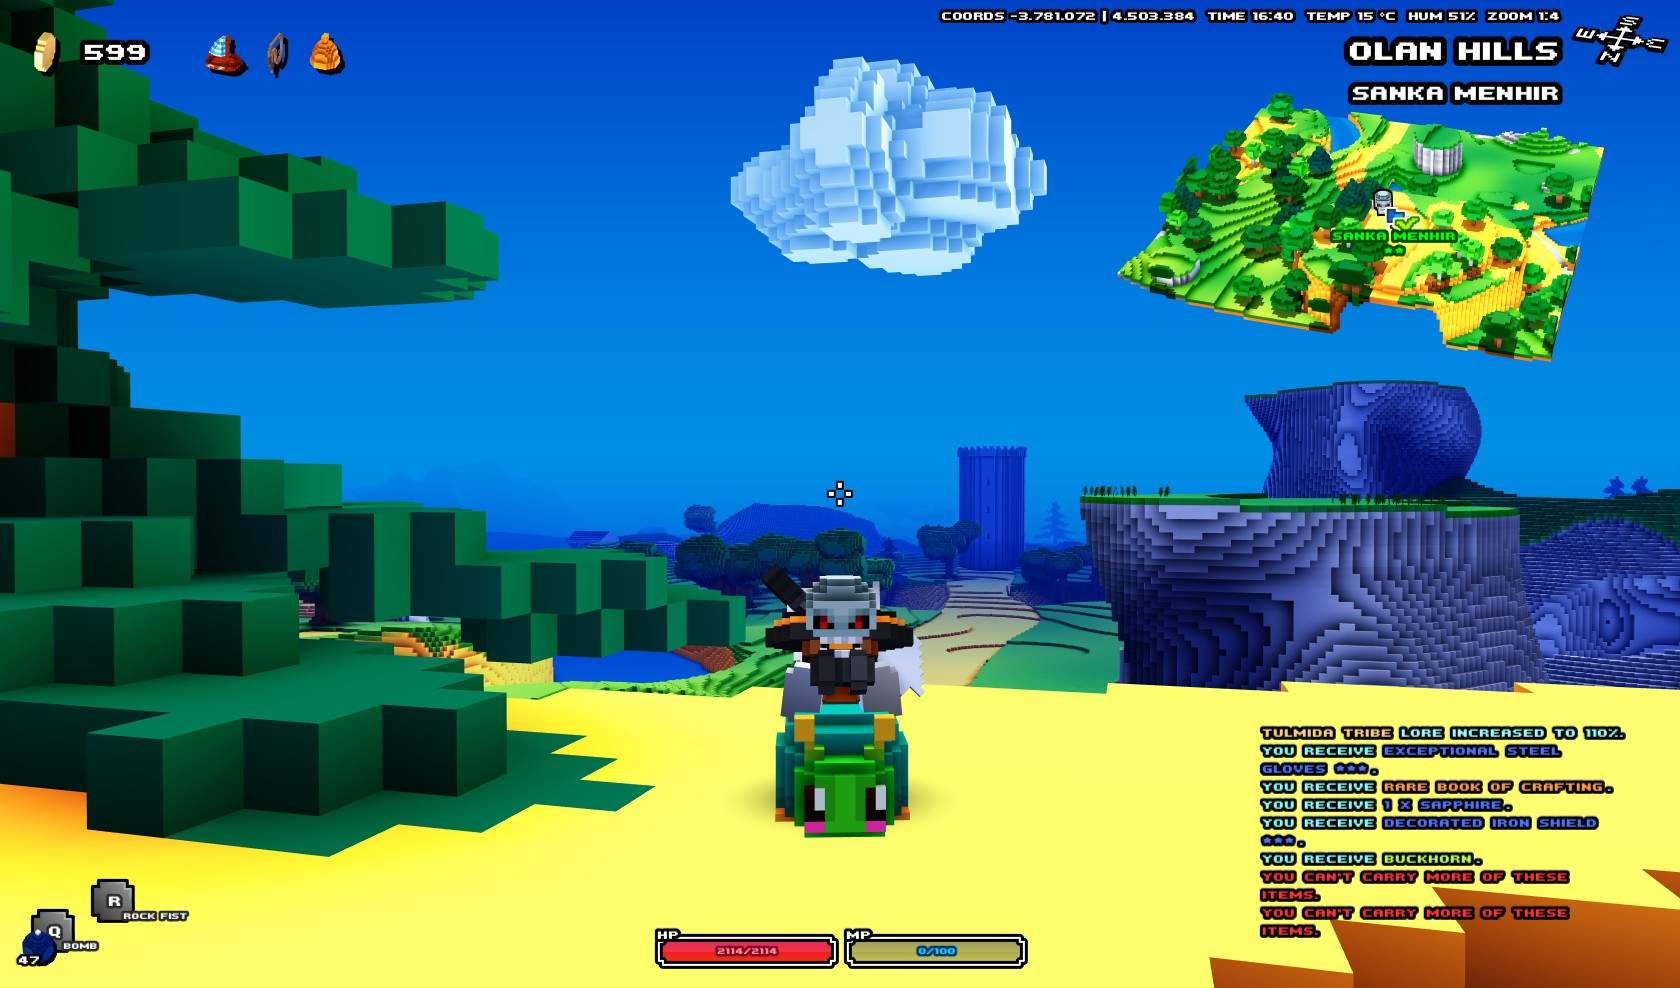
Starting Out
Well, here you are, a brand new biome full of quests and things to find. You should spawn in a shrine of life near a town.
Shrines of Life
Shrines of life are angel statues in little white shrines which are both respawn points and quick travel points when unlocked and activated. You know they’re activated because they emanate light. if you find one in the wild normally it won’t be activated. Press E near one thats not active to play a little flute song that turns it on. This makes it your current spawn point and opens it to be used for travel. Traveling to a shrine simultaneously marks it as your respawn.

Starting Kit
Well, you probably want to get out there and start murdering. But you should notice something. Hit B by default, your inventory button.
In your inventory you’ll have 3 sets of weapons for your current class. Pick the one you think is cooler to you. Each type of weapon has a different use style and rightclick attack. I’ll tell about weapons after. But some other stuff to be aware of first…
Pay attention to your stats and compare it to your enemy
Check the left of your screen in your inventory. At a glance you can tell what kind of enemies you should be engaging based on your star ranking for armor and weapons. An enemy above your kit level will destroy you quickly, while one thats two levels will probably obliterate you on a touch unless you apply cheese and get a high combo counter to boost your damage by being good at the game.
When you mouse over enemies at a range you’ll notice their name color. White, Green, Blue, Purple, Gold. Fight enemies your level or one higher. But damage is king. If you luck out and get a good weapon based drop, you’re well on your way to having an easier time as weapons also provide health to level your status up so you don’t get destroyed as quick, so you have more time to use your better equipment to fight the better mobs.
You can activate a star ranking system so it’s easier to tell what each tier is also in the options menu.
Get some quests
Talk to people at the town and hope to get quest dings that will reveal areas of interest in the biome to go questing. Most will have random banter, but a few will tell you of places where someone might be being held by evil mobs, or places they remember seeing special key items you need to help with traversal or loot collecting.
Loot all the things! Capitalism, ho!
Collect all crafting mats and items like mushrooms lemons shrubs, cotton etc that you can. They can be sold so you can instead buy some super basic kit to make you a touch stronger or get items like pet food or potion bottles at the general store.
Money can also be used to buy flight points around the biome (or to other biomes if you so wish!) that you can use at the flight master eagle guy usually in the middle of town. Once you buy them you can use them over and over and are a good way to get to different places to hunt for shrines or get closer to your objectives or points of interest.
Plot a course
Check your map with M and zoom it in and out with the mouse wheel. On the map you can usually see fairly obvious land marks on it such as craters, dark forests, enchanted forests, graveyards, towns and other things.
Revival shrines usually look like little white cubes from afar on the map, while something a different color, like a cluster of brown buildings, a lone grey shrine, golden tower, circular pedestal with pillars, these are all places you should look out for.

Fully zooming in will let you see objects with more clarity. So if they stick out or look suspect, give em a closer look.
You can mark points of interest with a tap of the middle click. Pan with rightclick, rotate/look around with left. Points of interest you make can be seen on your minimap when you zoom it out so you can figure out a heading of where to go.
When starting, usually a good idea to not try to murder something too tough without a shrine nearby that won’t bounce you all the way back to your starting point.
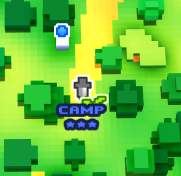
Day, Night, monster respawn and camps
Time is fairly long in cubeworld and the nights get really damn dark. Perfect for rangers and assassins. But it makes light sources like camp fires or other adventurers or some mobs who bring out lanterns easier to see.
Normally you want to adventure during the day, then go back to town and use the inn to bring it back to morning when it starts getting too dark to see. Alternatively if you don’t want to do that sleeping in a sleeping bag that usually spawn near and around camps will regenerate your health gradually and speed up time flow.
Night time’s great for just hanging out and really scrutinizing the map before you change to day. But sometimes, as a stealth character keeping it dark can be beneficial. Just know that the closer to midnight it gets the pitcher dark it gets. Usually about an 1-2 hours on other side is too dark to work with, but 3 is decent for visibility while still letting you stealth up and keep stealth longer in general.
Whenever it hits 12 AM the mobs who are not part of quests of dungeons will also respawn allowing you to farm their loots some more. Crafting mats out in the wilderness also seem to get respawned too.
Cube of the wild
Remember where any crafting mats are that you find. You can come back to these places as a way of farming and collecting them for selling or weapon upgrading/crafting.
This also includes things like apple trees, which are a wonderful source of free out of combat healing, and other potion mats which can be used to make buff potions to give you a bit more of an edge over foes provided you buy and fill a helping of bottles from the general store.
Careful of Strangers
The thing that changes from day to day are other wanderers and explorers. However it can sometimes be hard to tell if they’re friend or foe, and the last thing you want is to walk up to some people wanting to talk then instantly get hitscan lasered back to your shrine. So just like mobs, mouse over them first.
You’ll usually show name rarity colors and stars if you have the setting on which lets you know they’re hostile. Otherwise they should have a light blue name above them and wave when you get within chatting distance. Adventurers are another good source of quest and location data.
Lightsouls
The game can get pretty hard if you’re not kitted out for the content, but fear not, you can always try again or come back later, death doesn’t have a drawback. Just travel time and a critical hit to the pride or a cargoship full of salt depending on how you went out.
Find yourself a friend
The general store usually sells a pet food item a day very cheaply and sooner or later you’ll also have them drop as loot also.
Having a pet gives a slightly extra source of DPS, potentially a distraction once aggro can be shifted properly and sometimes something cute to follow you around if you get the right food.

Eventually a set of Reins key item can be found in each biome that lets you ride your pet to gain increased speed which is WONDERFUL for people who need to keep at a range or need to get some distance to get healed. Don’t worry if the pet goes down. It’ll respawn after a short time close to you.
Your pet will also try to fight whatever you initially try to fight, but if you want it to come to you so you can say, make a quick getaway with the reins hit T to blow your trusty pet whistle and call them back to you. If they’re considerably far away they’ll be teleported.
Weapons and You [Basics and Warrior]
Each class, as I mentioned in the above section spawns with a set of 3 weapons for your testing pleasure. Each has some positive and negative things to them to be aware of that I’ll cover now when it comes to checking your favorite.
Basics
Unarmed
For everyone if you’re using singlehanded weapon but don’t equip a weapon in your main hand (the slot that you equip to when you left click) you’ll instead have unarmed strikes, except for the mage, who’s unarmed works just like a very low powered bracelet set. The rightclick is a short range roundhouse kick. But you typically don’t ever want to be unarmed.
Combo Counter
A Hit chain counter is visible near your cursor when attacking enemies. As this climbs to a maximum value (usually around 20-30 depending on class) you’ll build damage. The combo counter will gain an exclamation mark and turn bright blue when it’s fully charged so you know you’ve capped out on damage and or attack speed gains etc.
The damage gained from gaining combo feels like a form of armor ignore. Building your combo sufficiently will usually allow damage to start creeping through even tougher enemies, such as fighting rocklings with a freshly spawned fire mage.
EG: At first your shots will be doing close to nothing with some minor damage and having knockdown potential on rightclick. But as the hits climb your damage will go up until at full chain you can seem to damage them normally, even if you’re still only doing around 12 or so damage a shot and 50 a charge shot with your tiny fireballs.
Missing any attacks or specials with clear hitbox (wiffed ground pound or shuriken for example) will immediately drop your counter to zero and you’ll lose the penetration gained from the counter. It also means say goodbye to your attack speed gains for water mage, berserker and Sniper. You CAN however transfer your attacks between any targets as long as you keep dealing damage and not missing your clicks as the combo will also expire after what feels like 5 seconds. So feel free to roll around and mix and match your attacks as long as you land them.
Warrior Weapon Analysis
Great Mace, Sword, Axe
When you first pop in, this is what you’ll be holding. At first, it’s like a tree trunk, but you can get better weapons but all in this class work the same. Holding it requires two hands, but normally they deal damage which is better than having a sword and shield or dual one handers.
The great weapons have a three hit combo which works differently than most other weapon types. Their big drawback is how slow you go when using them. It takes a little bit for you to roll up a strike which brings the weapon down overhead directly infront of you. The second hit is a jab with the weapon in it’s down state which comes out a lot quicker but causes less damage. While the third strike is special. You flick the weapon back up and over your head behind you after a similar delay to the first attack. The third strike is unique is that what the weapon has in slowness, it makes up for in free stuns! The third strike has an alright chance to flick the enemy and stun them if you can land it.
Berserkers when charging their rightclick charge up an angry overhead swing that brings it immediately down infront of you when released dealing big damage with good stun potential. Because of charge attacks and their inherent speed due to their attack time being charge related you can use these relatively quick overhead bashes to bring out some quick damage and build some quick combo.
But if used with a Defender, you’ll instead take a defensive stance which allows you to block even with this big two hander due to defender’s passive. When released it’s instead a sideways swipe that deals good damage and hits in an wider area and is typically quicker than your normal big beefy overhead swing. Due to gaining mana on damage block it’s also a good way to quickly deal some hits to build combo and attempt to get sauced up War fury to proc quickly making twohanders a bit more redeemable early on in their hands.
Being a big tough guy weapon it deals big tough guy damage, but I tend to find it’s slowness of reaching it’s third strike before you’re actually dead tends to hold it back early game. But later when you’re surviving more hits and dealing overall more damage it becomes an oppressive weapon that can bring the pain and knockdowns quickly, and provides good scaling to your special moves due to it’s big damage, and good life return while mad, provided you can use it.
Single Mace, Sword, Axe and/or Shield
There are two ways you can generally wield these. You can take two at the same time to improve your damage, or you can use it with a shield which is classified as a type of “weapon” due to how it influences your charge attack and given that the character bashes with it.
Having both onehanded weapons allows you to swing both one after another, being a fast set of weapons this can allow you to build up combo stacks quickly which means faster chances of proccing Fury and more combo counter so your attacks pierce through as your damage will typically be lower per hit. For Berzerker, it also means quicker gains in attack speed and so more damage output.
As mentioned, because of damage being lower sometimes for tougher enemies above your tier you need to build some combo before the damage starts punching through a bit better.
Berserker can’t block with dual handers so you have to rely solely on attacking quickly to get fury as fast as possible. When using your rightclick it uses a dualbladed spin attack which moves you forward slightly. This hits multiple times and can hit multiple enemies. At low charge you won’t get too much damage but a few quick spins after a single hit to get mana can quickly build some combo without eating into stamina to spin attack, and despite being low uncharged and hence low damage if you’re lucky you might just get a knockdown here and there while trying to proc your fury and build hits with this.
As before, A Defender using dual weapons can actually still block, and they still have the spin attack, so due to not attacking as fast the spin attack is a good bet to try to gain fury procs quick to sustain you in the fight along with the ability to block and gaining mana and charge power per blocked attack these spin attacks make for great counter attacks which can knockdown enemies if they inadvertently charge you up too much.
If you instead choose to use a shield with your one hander your berserker will now be able to block naturally without having to rely on the hold shift spin attack. Naturally your defender though will just have an even tougher guard as you’re now using a shield, a tool for actually blocking.
Having a shield on changes your rightclick special to a quick “out of shield” spin swipe with your weapon. The effect is misleading in that the area of effect isn’t as big as the air swipe makes it out to be as you still have to be within attack range to land it. However, it can hit in an area and knocks down fairly reliably even half mana. Because of blocking you can instantly charge the attack without waiting by blocking an attack while holding rightclick! Defender gaining mana on block also further improves this allowing you to almost constantly swipe with fairly damaging and quickly charging small area attacks for applying damage, knockdown, combo counter and fury proc chances.
Personal Favorite
Sword and Shield, because of strong counterattack play with defender and extra layer of survivability especially for early berserker. Occasionally play around with twohander or dual once some gear is gotten.
Weapons and You [Rogue]
The rough has three types of weapons. All of them hit quickly and have rightclick attacks which come out immediately when used and can be bolstered with the use of Intercept to make you zoom at your enemy from afar before using it.
Fists
Fists attack very quickly, however what you’ll also quickly notice is the lack of damage until some combo builds. it also has a very high combo capacity to max out being 50 due to how fast they hit. Unless you’re causing some crits it won’t hit very hard.
The rightclick attack is a roundhouse kick. The damage is quite low and so is the chance of knockdown respectively if used when mana is low. but above 50% is when you start getting some alright to relatively kickass damage out of the hit. 100% mana and some crits from stealth or ninja evasion proc? It might just sting a bit.
Daggers
They’re in a similar bag to fists. They’re pointy and attack like a flurry, but deal not amazing damage until you really start drilling it in at which time it’ll start rocketing. But they have an added benefit that the fists don’t. Daggers when you land your rightclick they also poison the enemy! This buff lasts around 5 ticks over 5 seconds and can stack with more rightclick applications.
From some minor testing the damage appears to be based on the original damage your rightclick attack did when it landed. So once more, try to have atleast 50% before going for it. This is usually easy when combined with easy stealth mana, or a few shots from shurikens into intercept. A crit is what you want, cause if that crit goes off, they’re gonna melt, because not only will it hit for the initial strike, it’ll change that damage into that strength per tick. So store up that ninja crit, or stealth up and deliver some enemies the cure for wellness. Or if you just want to be silly, land a hit then poison them over and over and watch them turn bright green for ♥ and giggles.
Something to note with both fists and the daggers the weapon that is in your righthand (left click to equip!) is the style of attack animation and rightclick attack it will use. So if you want poison, put a dagger in the right and fist in the right. Instead of punching you’ll be thrusting as if stabbing with your claw/brass knuckle fist and poisoning with it using the dagger rightclick attack. Where-as if you use a fist on right and a dagger on left you’ll kinda awkwardly try to punch the enemy to death with the hilt/side of the blade of the dagger and will instead roundhouse kick (no roundhouse poison. :< ).
Longsword
A crowd personal favorite and go-to for rogue. It’s got the damage and strikes wide. Generally, unless you’re playing with some hit and run poison tactics this is where you wanna be weapon wise. It attacks a touch slower and so has a lower max required combo of 30 before it caps out. But even for attacking standards it’s still quite fast cause it’s rogue, the fast guys.
The rightclick strike is a lunging stab which deals 4-5 hits of damage which can very quickly build said combo, you can also kinda sweep it around at enemies ahead of you. If you crit at lower power or even naturally at higher power you’ll most likely knock stuff down.
Usually providing the best total damage this converts well into shuriken/poison vial toss overall damage and most later long swords just look really cool.
Personal Favorite
Typically longsword to start and as a main-stay. But if I get good daggers I don’t mind them.
Weapons and You [Rangers]
Rangers are blessed with… well… Range! Their three selections of equipment are the Bow, Crossbow and Boomerang.
Bow
Projectiles from the bow are fired towards the cursor and travel in a soft gravity arc. With skill, you can shoot stuff from all the way to the view distance if you care to, most cases, further the better so you’ve got longer time for sniper to spin up to practically become a minigun, or ranger to proc a bunch of free rightclick charges.
The Rightclick of the bow is a volley of four arrows. These are fired with stronger velocity and are less affected by gravity. You can sweep the shots to spray around an area, and they have minor splash damage on impact. So a cluster of enemies can all be stunned and damaged simultaneously.
Being a rapid fire volley you can actually spam it at low charge to gain combo if you’re so inclined since the bow has a 30 hit combo to build before it peaks. Spamming rightclick for combo is particularly useful to build your attack speed rate or to get your damage up quicker off a downed enemy who won’t dodge too much.
Crossbow
Crossbow follows a similar deal with the bow. Arc-able projectiles, solid damage per shot. Ideal pick for sniper cause it usually has higher damage but random loot is random, so not always but it tends to be.
It’s rightclick charge shot is a single charged bolt with energy swirling around it. It deals big damage, but just like bow you can rapidly click rightclick to fire dud projectiles even without mana to build combo the cheesy way since it’ll fire them as fast as you can rightclick. Just don’t do yourself an RSI (repetitive strain injury). I tend to favor crossbow with sniper due to the single shot being ideal for watching those massive crits fly and high knockdown power from full charge due to the high damage connected to it.
It has a similarly big 30 hit combo to be built for it to get maximum spin up and damage penetration.
Boomerang
The Boomerang is an unique weapon in that it’s one of the only weapons that you can control around and redirect during it’s default attack rather than firing straight projectiles or casting area of effects. The boomerang throw sticks to the position under your cursor be it the ground infront of you spinning to hit a few enemies, or the enemy’s face that you tossed it at.
It tends to cause more hits of damage the closer the enemy is as the time that it stays out is on a timer. It also follows the mouse around but still will get foiled by a lack of line of sight. These damage ticks are generally weak but they stack up… and more often than not, they need to be stacked up to deal considerable damage unless you over level your enemy. That’s not to say it’s a weak weapon. It’s just got a slow start up at 80 hits maximum combo… Yeah…
At first you’ll notice it has maximum range, although it’s fairly reasonable for most peoples uses, but as I mentioned you get maximum hits the closer the enemy is. From simply nicking them for one or two ticks at max range, to a whole slew of 7 or 8 hits at practically face range. You can also toss the boomerang quickly and still have it continue spinning after cancelling into a dodge roll if an enemy is sticking to you, so it has that going for it as being a highly versatile outplay weapon provided you can get it to deal damage.
The Rightclick charge attack is a dual boomerang toss. Your character whips out a second boomerang while seething with rage (anger charging shakes) and lobs them one after another extending the amount of hits by a bit under double and dealing overall more damage per hit if close to max.
Charged up it has good knockdown potential PROVIDED that the hits are dealing damage. So if you can deal atleast a bit of damage at close range you’ll have a good chance at knocking down. Where as fully charged and with some combo in it to really drive in the damage it’ll more than likely knock something over when the second boomerang slams into them.
It’s probably not something you want to use on sniper, although maybe with all those crits I’ll eat my words? I didn’t actually try it. But holy ♥ does it mop up on a scout!
You know how the quicksand trap causes the enemy’s resistance and armor to be stripped while they’re drowning? Well… get ready to deal some TERRIBLE-TERRIBLE DAMAGE at any level. The ability for the multihits to work even on stronger enemies caught in a trap ruin just about anything’s day who is unfortunate to be swimming around in it.
Personal Recommendation
Bow or Crossbow at first for damage and knockdowns. But if going to be using scout, give boomerang a shot, especially if you can loot a better one.
Weapons and You [Mages]
Mages use semi-typical spell casting apparatus to bring big pain and heavy rain on enemies. Some weapons are easier to use in some situations than others though. As I might’ve mentioned in the mage section all your rightclick specials consumes 30 mana which regenerates rapidly when not in use.
Just remember, as water mages spin up a lot of their cast times and recoils will diminish as the combo climbs to maximum. And in the case of fire mages having your special particles makes a rightclick cast come out instantly without any charge time and not consume mana.
Staff
The weapon you start with. The primary attack of the staff creates a small tornado at the location of your mouse. It takes close to a second to charge up and spins in place once active. It has a maximum range that while not restrictive isn’t super ideal either given the keep back nature of the mage (unless you’re heal cheesing at face range with water mage). The multihit nature of the tornado tends to help fire mage proc a crapload of fire buffs too for instant rightclicks.
Speaking of which, the rightclick is a much BIGGER tornado also at your mouse point which hits for longer and harder and can knockdown albeit semi-unreliably. Sometimes it might ko straight off, sometimes it takes a few ticks sometimes you’ll be praying for a ko to save yourself but it doesn’t happen. :V This big tornado hits a fairly decent area but it takes around twice as long to channel up.
In both cases once the tornado is set it’ll continue to spin in the spot it was left. It can’t be moved around anymore. The multi-hit nature of the tornado causes it to have a 50 hit max combo to build before peaking. However it’s rather lenient in that as long as a single hit of the entire hit streak of the tornado lands it’ll continue it. So you can be a little inaccurate as long as you don’t flat out wiff.
However the tornados have a fairly large drawback in that they don’t continue to spin after you roll. you must stay in your cast animation for it to continue damaging. This wouldn’t be a big issue if the enemies wouldn’t make a B-line for you.
I’d suggest mostly using the staff with friends, so a melee/dodgy friend can take the heat and you can support them by having them pull the enemies into your tornados for free damage, but can’t recommend using it solo.
Wand
The wand used to be a spray of projectiles, but since beta is now a thing it got updated to be practically a beam sniper… yeah. It’s a twohanded weapon seemingly wielded in one hand with each shot taking maybe half a second to charge and then it fires a pinpoint beam that penetrates in a line. Keep in mind it’s not infinite range, but it’s range is usually sufficiently far and it’s completely hit scan. Only a single hit despite looking like it can be moved around though and thats on the first moment it comes out so aim well.
The rightclick takes a further second to charge then produces a much thicker damage over time laser beam that can comb through multiple enemies and hits a wider area for a total of around 10-12 hits. This is kinda amazing since the wand only needs a 20 hit combo to peak in damage.
However it has a couple of fairly glaring draw backs. The hitscan nature can sometimes have issue with close by tiered terrain and small targets who hide within them making you sometimes catch the edge of terrain you didn’t want to hit and lose your combo. The giant laser also needs to hit CONTINUOUSLY to actually count. If even a single damage proc hits the terrain without hitting an enemy first it will ruin your entire combo! D: this includes if the enemy dies from the hit and then the last hit phases through the dead body before you can redirect it on another foe.
If you think your laser is gonna over do it or you’re running out of targets or just want to stop lasering consider rolling to animation/action cancel. Obviously the big laser also won’t continue if you roll, so you’ll waste mana and damage in a fight that requires you to evade close range if you don’t have an escape and an unsteady/unreliable aim due to close range panic can ruin your combo and hence your damage if facing tougher enemies you need the combo strength to cut through.
Still it’s considered one of the better weapons to use. Although the time between each laser tap makes fire mage attack procs a little iffy to acquire cause of it’s slow shots.
Bracelets
Large circular bracelets over your hands which amplify mage’s unarmed fire balls with some oomph. bracelets let you fire alternating long range fire/water balls. They’re projectiles and have no gravity and will just keep on flying allowing you to snipe at ranges similar to shooting with your ranger shots. They’re the quickest to fire firing almost immediately.
The rightclick is a single much larger fireball which splashes in an area. It needs to hit directly to count towards combo but will hit a small area when it explodes and causes knockdowns quite reliably because of it’s single strong shot nature. It also only takes half of charging to come out so you can easily evade an attack and stun in between enemy attacks giving you some breathing room and if you want to burst something down you can release multiple of them one after another quite quickly.
The combo counter is fairly quick at 20 hits just like the wand. Nothing much else to them. Just small and large projectiles much more suited for action combat rather than long range combat. Combat mage as it were. Ironically the nature of the projectiles makes bracer mages easier to deal with as AIs than any of the others with their hit scan perfect aim bull. :V
A drawback could probably be the need to get two of them to have both your shots deal same or similar reliable damage. As having one purple and one green just like any other weapon that requires two is that only your every other hit will deal good damage.
Personal Favorite
Bracelets for reliable stuns, long range shots with no gravity and quicker up takes allowing you to manage close fights easier. You also become a machinegun with water mage. Wand if I have something better or feel cheesy. Staff never unless it’s just really good. Might try it if I ever do multiplayer though.
Picking Up the Pace
Here’s a healthy helping of more tips for you to use to get going into the game and some stuff thats worth being aware of.
Hunt lore Pieces
Lore are usually on stone tablets, in small self contained crypts or in ruins. Usually they’re similarly curious little structures visible from orbital map view when you zoom in. A grey set of stone circles, a weird white colored spire of rocks, a tiny grey structure, a slightly larger thing looking like a respawn structure, all potential spots to pick up a piece of procedurally generated lore you can use to think up a story about the various generated clans and factions. Lore pieces also have a big hand in revealing the location of the artifacts that the game uses to level you up.
Those who bear their name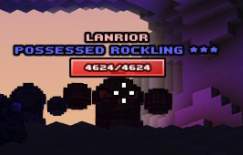
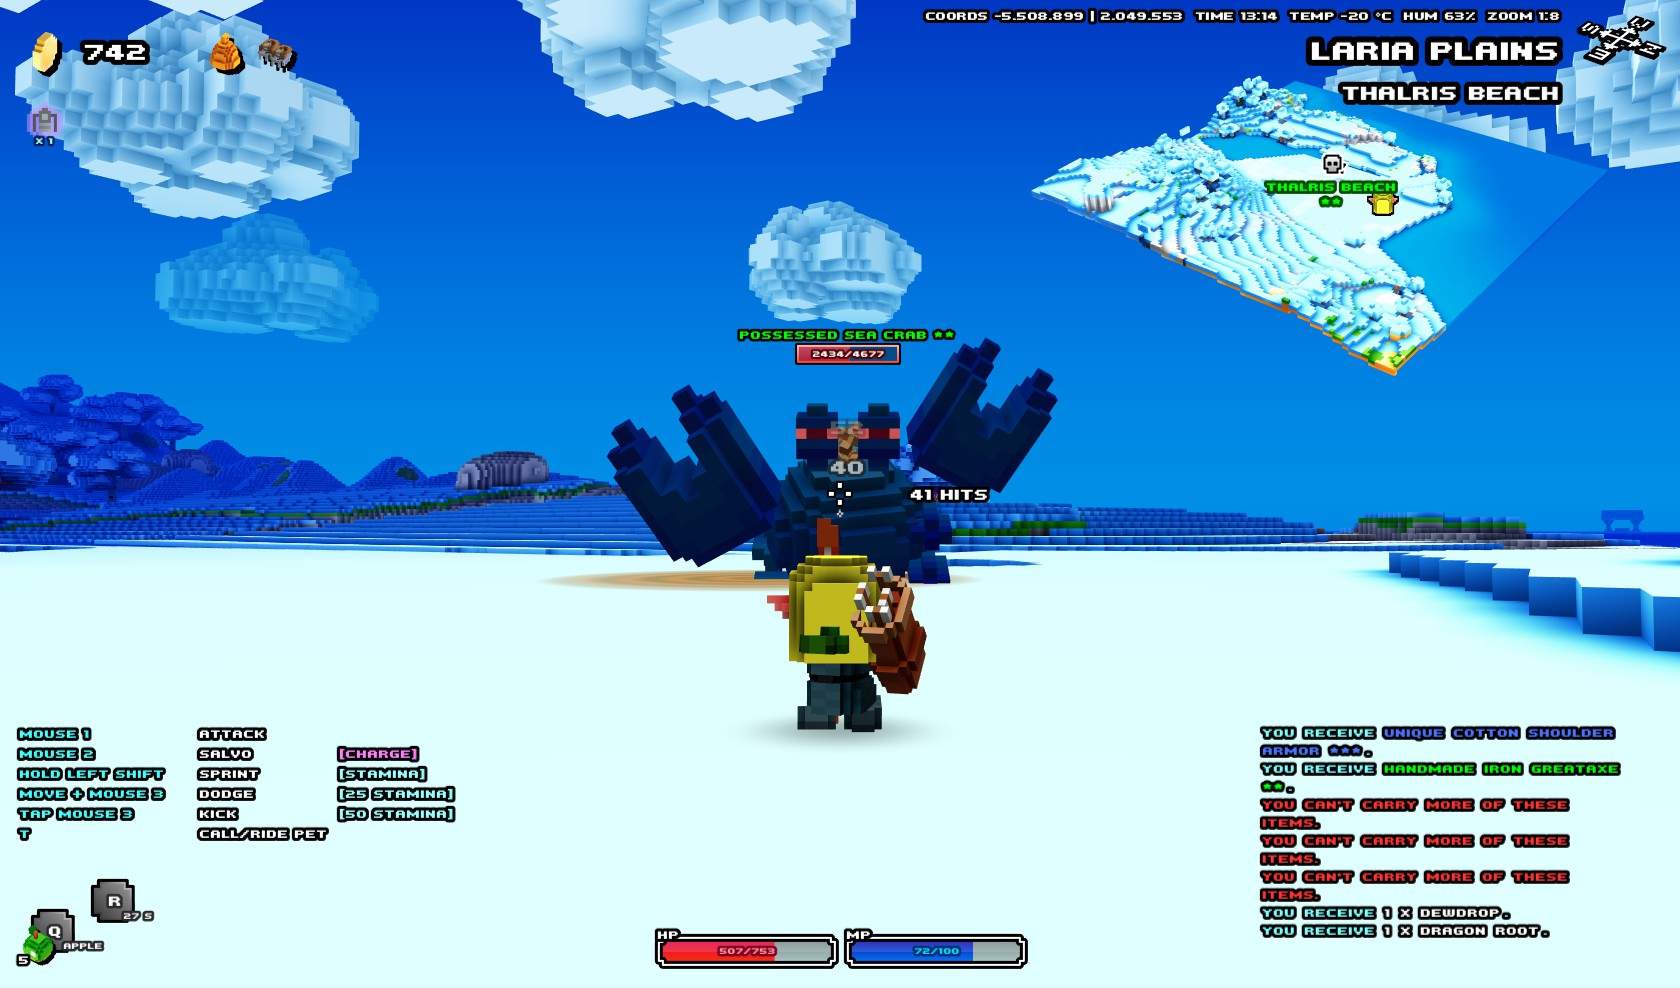
Sometimes you might run into larger mobs with colored names hanging out with their smaller counter parts. These are procedurally generated world bosses. At base they’re souped up boss versions of their original mob and can be anything from a white tier lowly king of seagulls, to a massive gold tier alpha of the alpha dogs. As seen here, they can also be “possessed” which improves their stats and lethality. The possessed stat can also appear on other normal mobs to the same effect, but thats another effect for another tip for later.
These random bosses also sometimes come with one or two special moves they might randomly throw out. Stuff like warrior ground stomps, fire mage missiles or even weirder stuff like summoning zombies or weaker copies of themselves to slowing lava traps or channeled explosions. Don’t get caught out. One moment you can be fighting them quite decently then one of these moves comes out of left field and melts you…
The great thing about them though is that they’re a great source of randomly generated loot, usually dropping items which are a tier higher than themselves as a reward (or equivalent if they’re already gold tier). Since they respawn the next day keep in mind where they spawn early and if they’re too strong note them down to fight later when you get tougher.
Eagle air drops and fast travel
At the town you can find a person called a “Flight master” hanging out next to a giant eagle on a perch. These guy when talked to opens the map and reveals points on the map represented as large “+” symbols. These are flight points.
Most flight points within your biome and those just over are normally 100 gold a piece. You can buy these flight points which permanently unlocks them for free super fast transit to again at any time. Once you reach the point the eagle will drop you off high in the sky and provide you with a free glider even when you don’t have it allowing you to reach nearby areas easily.
JUST. DON’T. HIT. E. IF. YOU. DON’T. HAVE. THE. GLIDER. ALREADY. You will not be able to re-open your glider cause you don’t actually have one and will fall to your death like a dumbass if you do it too high. Unless of course you just float down with mage, cause mage traversal op. But anyone else will hit the ground and cease to exist quite literally on impact.
As you accrue gold if you’re not saving up for hopeful items or supplies consider using a flight point to get you across the map and closer to key objectives like traversal or questing items that you can tackle or areas of interest so you can unlock the shrines nearby to get to later.
Grab traversal kit when you can
If you manage to get clued in by an npc on the location of a traversal item like the glider, boat or reins, consider going to collect them to make getting around in your current biome easier. The boat is really fast, and having a pet you can ride around is both good for exploration and in combat escapes.
The glider could take some getting used to, as you need a sufficiently high area to jump off. Normally a tree won’t do but once you get into the air you’re a bit more fine.
Simply hold forward in the direction you want to be traveling. At first you’ll most likely start to dip into a downwards trajectory. Hold space to pull up and consume stamina to swoop yourself upwards. Do this usually in chunks of a quarter and a bit of stamina and then do it again once you start going down again and stamina begins regenning to keep yourself afloat. Just careful of smacking into solid surfaces from too high or near enemies as you’ll stun yourself temporarily on a bad landing.
Treasure any + gear that you find
It’s a part of the game design that could be improved, hopefully in time, but when you cross the boundary to a new area all your equipment will become nullified. Maybe through some kind of differences in mana or some kind of magic seal or peculiarity in the world this effectively renders the gear similar in power to starting equipment and negates it’s tier color. Crossing back into the original location will reactivate the gear back to it’s former glory.
How do you get around this? You hope to get lucky and find equipment with a + attached to it. Plus gear is special in that it stays active when within the borders of adjacent lands to the one it was found in giving you a leg up on combat and equipment in your next area’s exploration.
Don’t let go of them if they’re useful to you, keep them and use them to bolster your exploration into neighboring zones in search of more adventure, different scenery, pets, artifacts and general adventure.
Where’d my stuff go?
Each area also has it’s own armor and weapons equipment tab that is switched to when you cross the border usually that can be switched between in any location. It might look like all your other armor and weapon stuff was tossed out, but it’s actually safely still in the other inventory of the previous map you can switch to.
To that point, it’s probably a decent idea to consider entering a new region from the air by eagle closest to it’s regional village so that you can have a safe location to fly in and acquire quests and such.
In much the same way traversal items and key items like gliders, reins, boats, spirit bells etc will also disappear and have to be reacquired. It’s kinda unfortunate but thats the way it works I guess…
I need healing!
The only classes that can really self heal are warriors and water mages. Any other class would need to rely on a water mage or the defender’s shout for healing or use the variety of healing items required. Remember that potions can be chugged on the move while food items are consumed sitting down over a longer duration. It’s probably pretty clear, but eat your food items while out and about out of combat but switch to your potions before a fight. Don’t accidentally try to have food while fighting like I used to do cause I’d forget to switch my quck tab.
Cartography Quickly
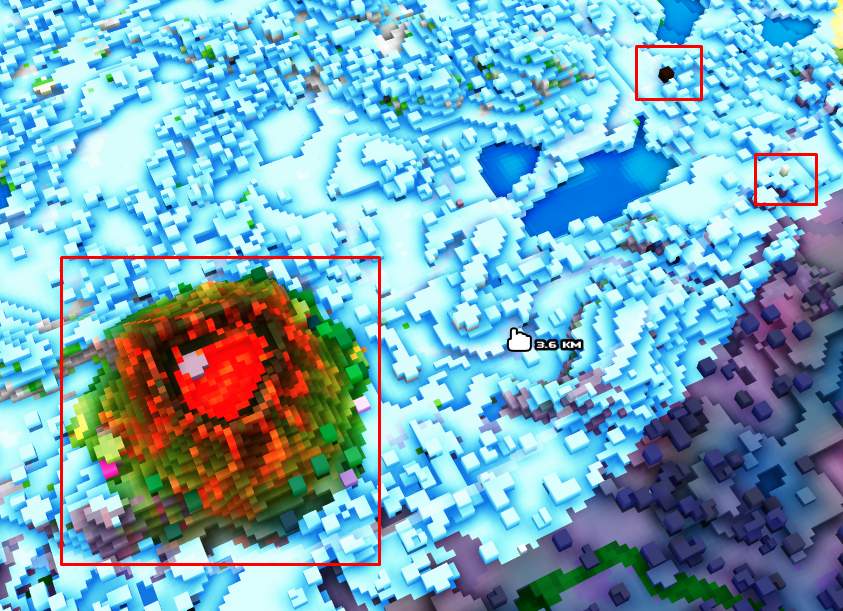
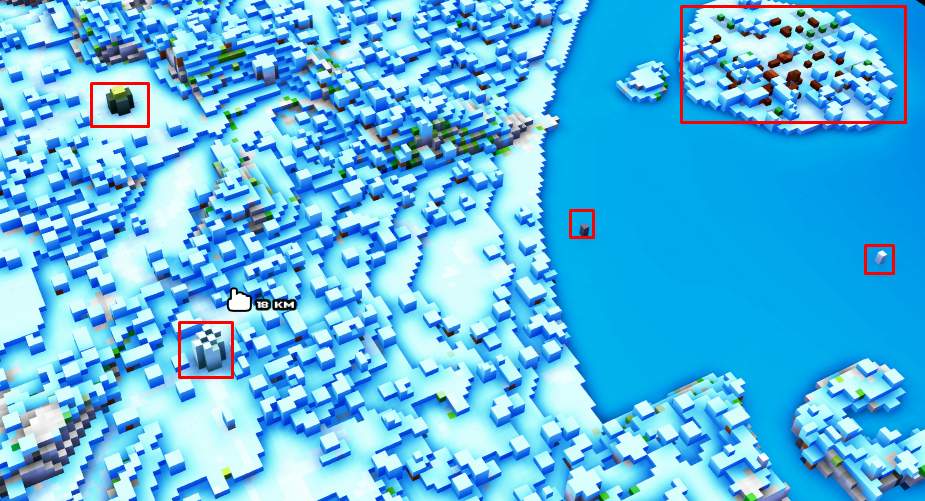
This is gonna get screenshot heavy. But heres a whole bunch of sights from orbital view that you can use to eyeball points of interest at a glance without having them be marked by npcs for you. Some are obvious, some curious. Few different biome types most from relatively zoomed out but some locational special features or types of places can show up just about anywhere.

Here you can notice the discoloration of a dark forest. A lava lake, which is out of place in a land of green pastures and water. Also a mana pump, a place where the steel legion is draining mana from the surrounding biome to fuel their machines. more on that later.

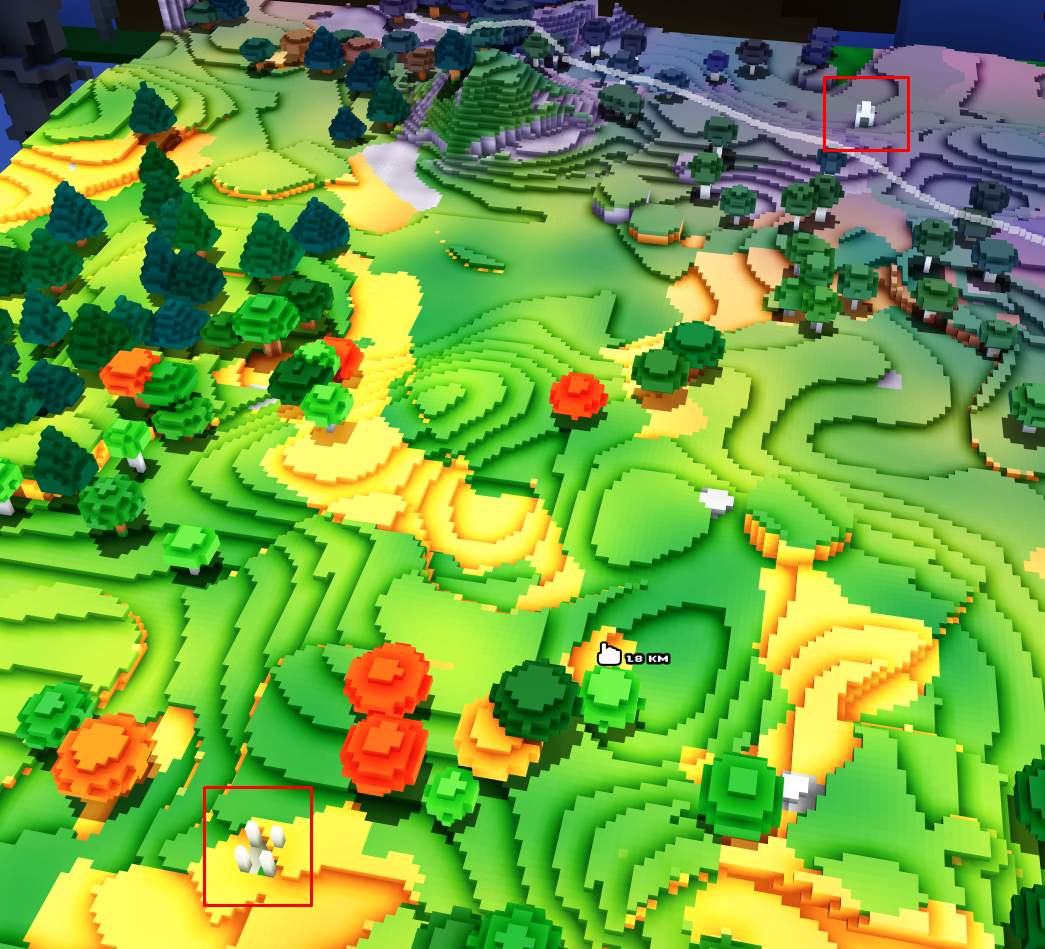
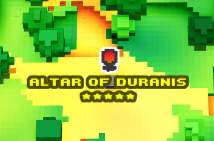
Here we can see a large chunk of raised terrain and several small dotting structures out on the water. White dots can be lore or respawn points. The grey ones, potentially towers containing unlockable loot or lore or even a little sky altar.
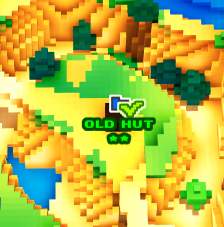
Big volcano with what seems to be a lore structure floating off it’s coast. Theres also a large grey cube from this far away that could be a lone crypt or old hut by the lake and a large cube on top of a mesa thats probably a piece of lore structure or a life shrine.
Up close here we can see one of our small tiny white structures turned into what appears to be an altar or maybe sky island access point. while the other one with it’s open sides is most likely a life shrine in the next biome over.
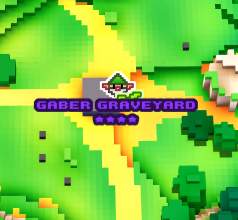
Here we have what appears to be an overgrown lore structure pillar and a graveyard/crypt access point. Graveyards can sometimes be just top side, containing anything from a combat encounter to a captured npcs, but sometimes they can be access points to catacombs down below which are a type of super dungeon that contain an artifact.
Here’s an lighter colored forest within a dark forest overall biome, probably an enchanted grove of some kind. Theres also a golden tower, a form of locked up loot structure that could require a special key item or mechanic to be used to get in. Also a village, but at this distance it could also be some ruins as the builds look very similar from this far away and village colors could be different in this biome.
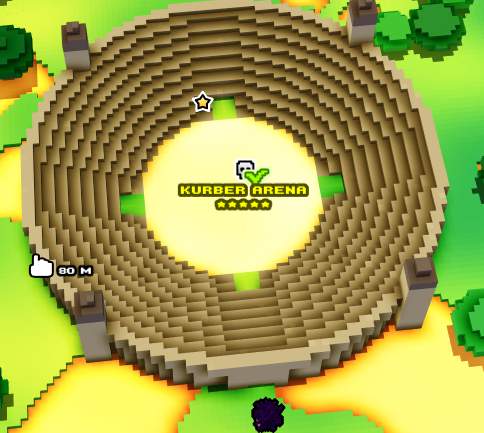
Here we’ve got an Arena, these provide you with what is essentially a boss rush from easy to godlike hard that you can use to get good equipment from both the bosses and it’s completion. Theres also what is probably a farm on a lake island nearby and a few white cubes of interest.
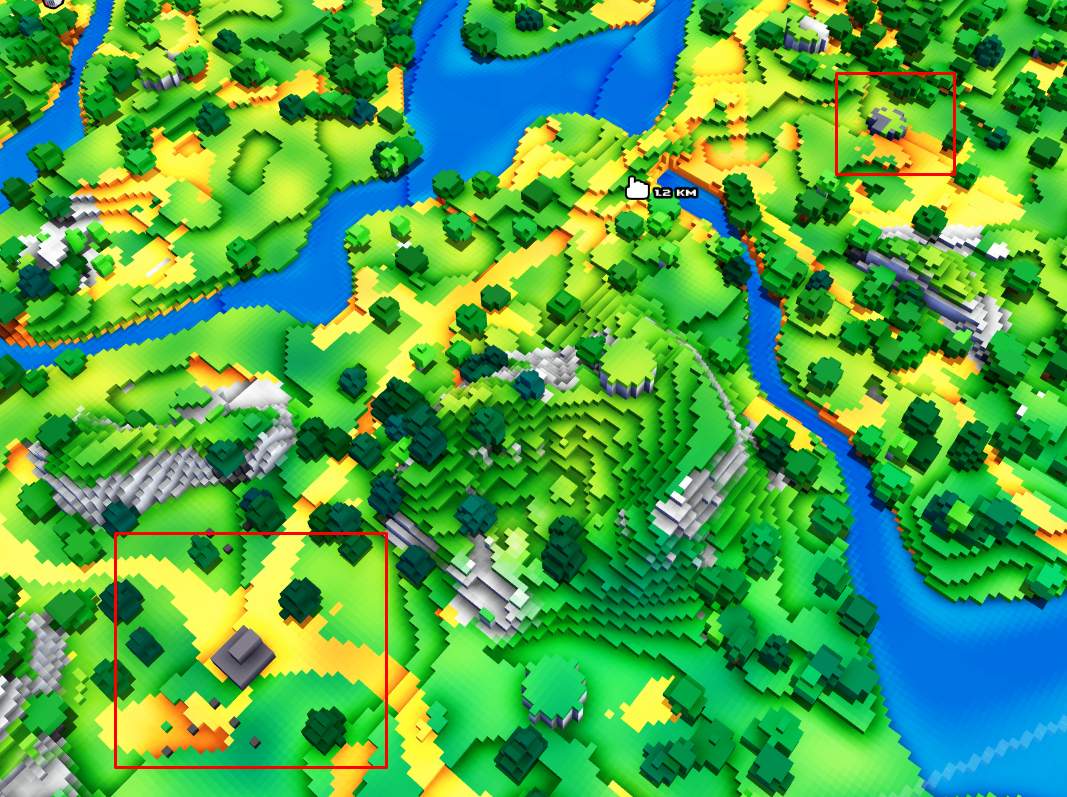
Here we have a dense cluster of trees which could be a grove or small forest of some kind and a castle in the biome over.
Castles tend to be really easy to see and tend to be big dungeons also containing an artifact.
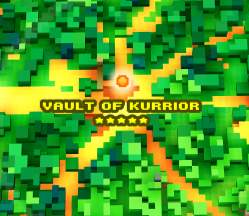
A bit closer in, here we’ve got a white cube of interest, a loot tower and what appears to be the entrance hall to a “vault” another type of underground dungeon. note the difference of the long section after the tower.
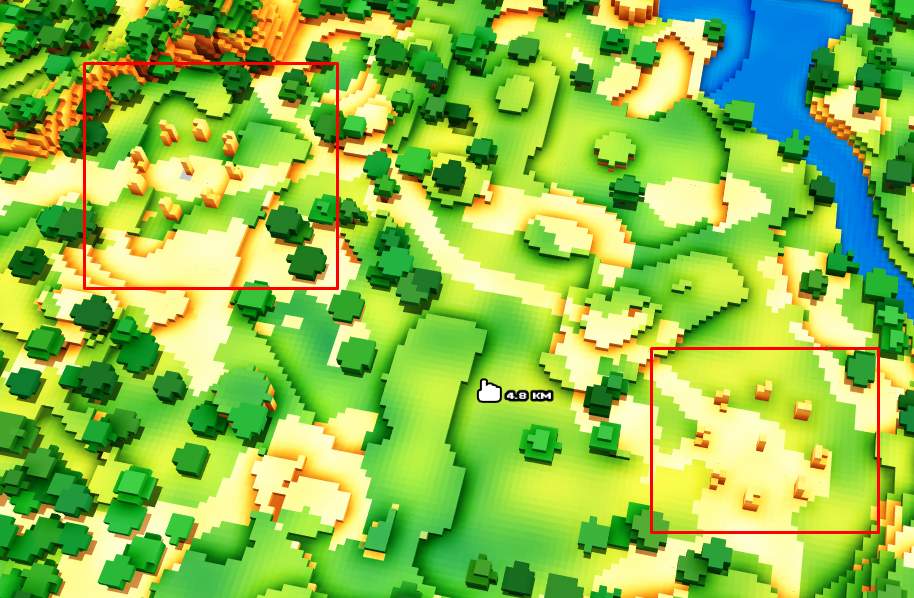
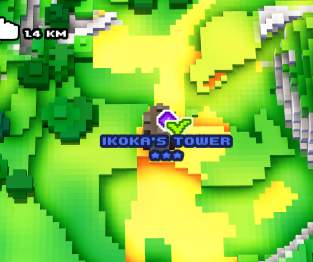
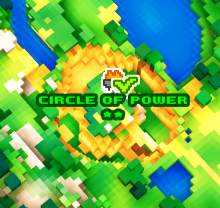
also closer in, here we’ve got some stonehenge looking places with spire like rocks the color of the biomes rocks or terrain. These would probably be rings of power, which have a boss guarding an unlit flame holder. Beat the boss who can vary in strength to get the item to light it which provides a slight power boost within the biome it’s attached to.
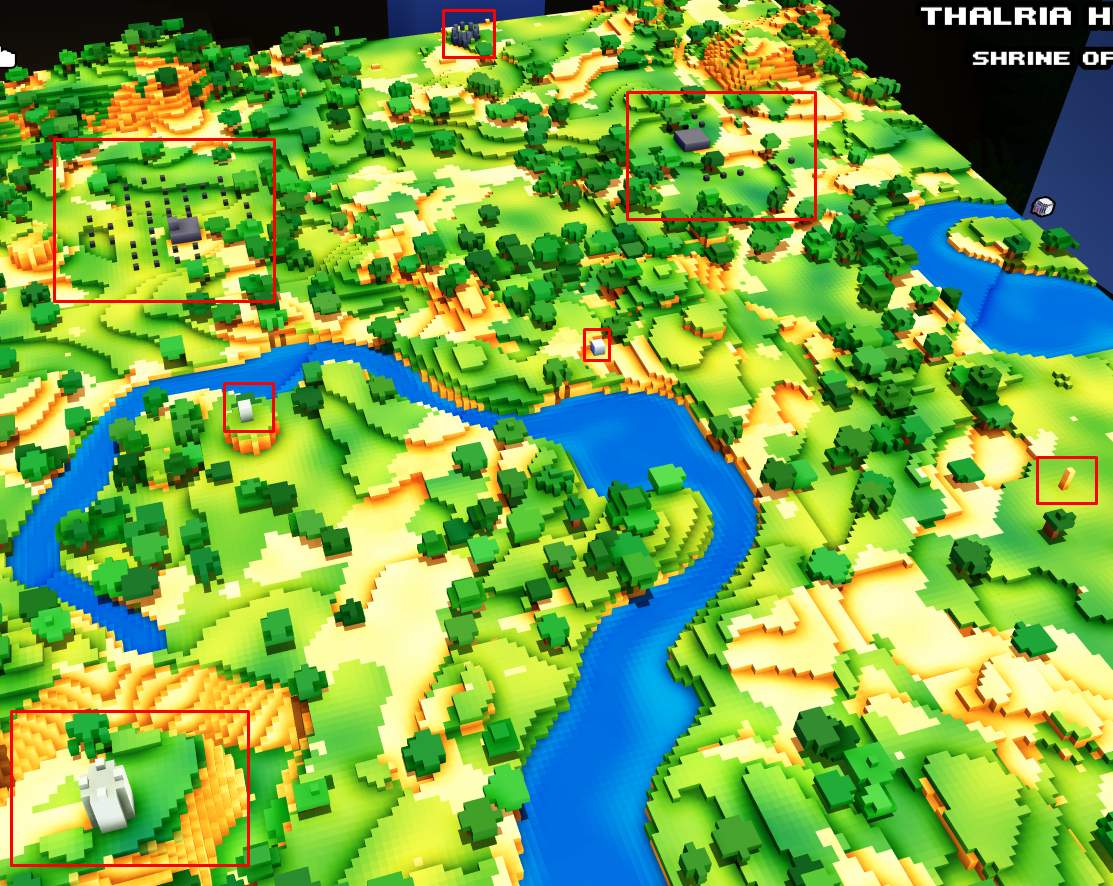
Here we have a few things. What appears to be a large mesa could possibly be an unroofed wizard tower. A pair of crypts or graveyards, a loot tower, a couple different cubes of interest and a dark grey lore henge in the distance.
More crummy wizards probably, and a town on an island plus two different cubes of interest. One is probably lore related or a grey colored sky island access point.
Get the idea? Theres are others that are less obvious, like large hills, or a cluster of close together mesas that can form an “insert name here” rocks zone. But this should give you an idea on what to look out for. Just if you find an area, survey it for enemies, you don’t want to use all that time getting there and get smashed by some overpowered enemies. Be sure to try to find a nearby respawn shrine before doing anything silly. Frustration is killer.
Key Items and You
Whats all this about loot dungeons, artifacts and key items? Well, they’re special items you can collect along your travels through a biome that aide you in busting into dungeons fully or looting certain structures. Often you can get clued into their location by npcs in your starting village or npcs out in the world who’re willing to talk.

Traversal Kit
Hang glider: I mentioned it before but it’s a glider best used from high locations to keep you in the air and make you go slightly faster. As you hold forward to keep straight as you dip down pull up with space bar and stamina consumption periodically to keep yourself up. you also get to use it temporarily for free when a travel master hawk drops you off at your location.
Boat: Use it on water to make yourself go really fast and not sink. The boat is nice in that once you set a direction you’ll keep sailing that way. Got a lot of ocean surrounding your starting area? Find the boat and if theres much interesting stuff out there go for a leisurely sail in that general direction while perusing your map during the trip. Just don’t cross the boundary or it’ll evaporate out from under you cause of peculiar region locking game mechanics.
Reins: Wonderful riding apparatus to allow you to go fast across the land by using a suitable pet as a mount. I particularly like my caterpillar. (so damn cute)
Simply hit T as if calling your pet but when you’re right next to it and you’ll hop on. Some pets can’t be ridden at a fast rate though. Usually discernible by if you can pick them up at close range with E.
Climbing Spikes: (the last item in the set I showed) Not super required, but these allow you to nullify all costs to climbing around on surfaces allowing you to quite easily climb out of dark pits in dungeons that you survived falls or up and around edges without worrying about falling.
Key Items
Sky flute: The sky flute allows you access to sky islands. Use it near the little structure of a bird surrounded by pillars and you’ll play a little tune, then suddenly a flock of blue birds will come and levitate you up to the floating island. If you go up, I suggest you have a hang glider, jump into water or teleport back down from the nearest respawner… or… y’know… float down… as mage…
Divine harp: The harp allows you to unlock golden doors. Usually blocking access within dungeons or walling off loot inside loot towers. Simply approach and use the prompt to play a little tune that opens the gate. They look gold and shiney almost with an eye kind of motif in the center.
Spirit bell: The spirit bell once again, is used to access areas walled off. In this case, it’s metal grated portcullises. They’re usually silvery and reflective to tell you that they’re the type. When you play it you’ll be “transported to the spirit realm”, which makes you turn transparent like a ghost and able to simply phase through doors of this type for around 45 seconds. During this time the music will get spooky and an eerie fog will close in around you and the colors of the surrounding area will look different.
I’ve heard mention that being in spirit world mode is a good way to enable yourself to see easier at night due to the change in color hue and overlay effects. If you ever want to play or use any of your key items manually you can do so from your inventory. The Bell is typically the only one that still does anything as the harp and flute require certain objects to be nearby.
The Treasure Spirit: Finally this little blue raindrop spirit allows you to easily search for loot hidden around a biome. Sometimes loot can just be hidden in little caves, underground in burried shrines under breakable terrain on top of Mesas inside hollow logs and all sorts of places.
If you’re within a decent distance from an item lying around to be discovered the treasure spirit will pop out of you and start hovering around you acting like a compass. Running towards the spirit will take you in the direction of the item in question letting you find stuff ranging from simple (and salty) bags of gold to rare/epic/legendary loot that adapts to your class when you pick it up. Quite useful if found early while a lot of exploration is needed, but I don’t think I’ve ever had someone point me in it’s direction, so it’s a little random to find him.
A Questing We Shall Go!
There are numerous quests and locations you can find scattered around the world either by running into them or being told they’re there. Here’s a quick run down of the types I’ve found and their effects on the world around you, if any.
Combat encounter: These are simple fight mission encounters with a faction or group of enemies. It can range anywhere from a group of necromancers raising or empowered some undead. A bunch of guys and their boss hanging out or some enemies with a captive in the area all the way up to a full blown warzone of paladins fighting unholy pact legions or druids of mana being assaulted by the steel empire.
Simply fight the small fry and kill the boss, or in some cases hunt down and destroy spawning structures like mini demon portals or mana generators set up by the opposing faction that will naturally be hostile towards you.
Crafting Kit encounters are similar to a combat encounter but they can involved bosses or captured npcs but they reward a book of crafting based on the level. These unlock crafting recipes that you can make for yourself. I honestly can’t suggest crafting, but collect them and check what they have, you might get lucky and have a piece of plus gear you could flat out craft to keep you set for later biomes.
A supplier gnome has been captured by unsavoury mobs and enemies and is probably being stewed alive or kept for experimentation or something in the general area. Find and defeat the enemies and he’ll go free, providing you with some loot while also upgrading the inventory of village armor and weapon shops based on the number of freed gnomes. There is usually 4 of them to an area.
Shops resupply every day reset, so check the shops regularly, they can actually sell that shiny plus gear you so desire in their stocks some time.
A mage tower is a tower inhabited by a mage watching over a magical crystal of some kind. There can sometimes be multiple of them in an area. Being a MAGE tower the boss is always a mage, so they can be rough fights. But both the boss and the crystal will drop loot when destroyed and breaking all crystals in the biome will break the spell on blue forcefield doors you otherwise wouldn’t be able to get through. They’re basically mini and very vertical dungeons.
A circle of power is like a little stonehenge of pointy spires. Within the area will usually be a lore piece or two, a boss watching over the area, and a large unlit brazier. Defeating the boss will drop “eternal embers” which allows you to ignite the brazier which improves your “power” throughout the region. I’m not sure what that entails, probably some small stat boosts, but it appears in the top left buff bar when completed.
Demon Portals are bad news because around the biome you’ll see mobs who are big, red and possessed, more often than not they’re also bosses I’ve noticed. Possesed mobs and bosses are overall a portion stronger than normal which can cause troubles especially when it comes to large grand bosses at skull encounter zones, mage towers or in arenas or dungeons. Sometimes they even possess villagers in the town who will attack you and probably force you to murder them. They will respawn with the day mobs, but will remain possessed and hostile until the portal is busted.
When you get there some Cult of doom enemies will be channeling energy to keep a demon portal active. It’ll have a lot of HP and defeating the humanoid enemies there channeling into it will reduce it’s health (and it probably heals as they channel into it? so theres that). The portal constantly spits out imps who’ll try to murder you but the aim is to just smash the portal closing it stopping magical invisible demons from possessing creatures, bosses and characters around the biome.

This is a witch boss. Sometimes you’ll come across a town where all the people in it are turned to stone and you can’t speak or interact with them. This is unfortunate and usually means theres a witch hiding out in a hut or location somewhere that you’ll need to murder to cancel the curse and bring everyone back to living again.
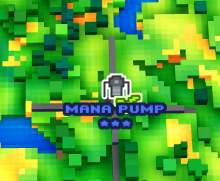
A Mana Pump built by the steel legion to extract and refine mana from the environment to power their machines and technology.

If you notice an icon that looks like this in your buff bar it means you’re under the effects of “Mana absorption”. Mana absorption isn’t a massive deal but there can be multiples of them. Mana absorption slightly slows the rate at which you build mana from your attacks to power your rightclick attacks and pumps are culprit.
To break them you need to find the 4 arms of the pump structure and defeat the boss guard patrolling around it’s mana inducer. This generator structure becomes vulnerable when they’re killed and must be smashed. When all inducers are smashed the big officer of the installation will appear in the central platform where the pump itself is and be ready for a fight. Smash him too then smash the pump to get sweet loot and turn down the mana absorption effects in the biome.
This Skull icon means there is some kind of boss encounter at this location. Usually a grand boss like a yeti, mammoth or saurian… Even a giant enemy crab!
This boss will probably absolutely smash you if you’re unkitted. They can be a rough time. Especially from arenas where you have to go through 3 rounds of other bosses before the big guy is let loose on you. But the loot is nice, and like world bosses even after you beat them I think they should respawn with the day.
Cue up your favorite dungeon diving music. This glowy icon when revealed is normally your ultimate goal in the region. Finding a special artifact mentioned in the lore of the biome that you’ve been exploring. You can of course, stumble across the dungeon itself before it’s even revealed, but sometimes you’ll need the key items from last section to fully crack into them. Usually littered with parkour traps, enemies, bosses all varying anywhere from green to yellow and of varying lengths.
Cracking in and getting the relic affords you a level up and a small boost to one of your traversal skills which stack and stack to buggery and beyond as you collect more and show off who’s the best artifact hunter.
Hopefully one day they’ll have a much better use… We can always dream… but for now, it’s just bragging rights mostly and satisfaction of beating an area. Although keep in mind there can be more than a single relic in any given biome. Search well, and hoard all of them.
Gameplay Tips and Tricks
If you’ve gotten this far through my guide and indepth ramblings here is where you’ll my best tip, and maybe a few more if I get some questions that I can answer!
Early Morning Double Dip
This is a tip for farming loot and materials for whatever you need quickly. I hope you’ve been marking all the locations of bosses and clusters or good materials you need like gems and metal! Cause you know how mobs and resource respawn at 12 AM? Well at the town you can reset the day for 10 pieces of gold at the inn every day between 18:00 in the evening and 6:00 in the morning. The effect this has is effectively setting it to 7 AM bright and early so you have daylight and resetting the world.
See where this is going? Essentially At 12 you go for a round trip of all your favorite resource points, bosses and respawning encounters across the world to farm your loot. Then, before 6 AM hits, go back to town and pay to stay at the inn. The world will get reset to 7 AM again and you can do another round in quick succession for more success. This is great for gathering materials which you can only find a few of usually like gems, silver, gold and of course the bosses (or all mobs really) and their drops.
If it’s just way too dark, like i mentioned in key items see if having the spirit bell active helps at all, or sleep in a bed in villages or sleeping bags generated in camps to restore health and hurry the clock along till it lightens up a bit.
Volcano Panic, Icy Blues and Toxic Greens
There are a few drink items you can make in your recipes called lemonade, hot chocolate and green smoothie. These items are used to save you from environmental effects. Lemonade shields you from hot damage like the lava in volcanos where sometimes key items can be spawned forcing you to toast yourself… Hot chocolate would stop you becoming an icy pole if you take a swim in a cold biome. While the water in dark forests seems quite sickly and probably poisons you, so if I’m correct (I’ve never actually gone into one yet) the green smoothie probably helps with that.
- Ice cubes apparently spawn under the water in ice biomes.
- Cocoa beans feel like they’d spawn in some kind of tropical jungle region. Same with the bananas.
- Kale appears in some farms occasionally.
- The General store sells sugar cubes.
- Lemons spawn fallen from trees just like apples.
Be the first to comment