
A guide to all maps, and how to unlock all gallery entries.
Walkthrough (Contains Spoilers)
Prologue and Day 1
Until you get to day two you can’t really do much wrong:
- The objective is to survive against the bandits for fifteen rounds, otherwise it’s game over.
- You need to travel through Borak Ridge, then go past the bridge over the Gnath River, and finally cross the Marlbara Desert.
- When you reach the city, you should complete all possible actions at each accessible place before you can proceed to the next area.
Common Route
- At the start of Day 2, talk to Cless and Salman.
- Go to the Harbor and get your money back from the Man in a Blue Turban.
- Go to Church to see a scene with Cless.
- Go to the Main Slave Plaza and talk to the Buyer.
- Go to the Stage in the Main Street and Watch the dance.
- Go the Silver Goblet Bar and talk to the Barkeeper.
- Find and talk to Zahadola in Qanat B2.
- Go to the Dawn Shephard Bar.
- Get Wine from the Barkeep.
- Talk to the Taciturn Man.
- Talk to Slave Broker Batil (optional: betting for exhibitionist and a H scene).
- Exotic dancing and prostitution are now unlocked.
- Selling Luna’s virginity will get you 200k right away, avoiding the need to make money in other ways.
- Go to the Harbor and talk to the Grim Sailor.
- Go back to the Dawn Shephard Bar.
- Bet and win as many times as you can (aim for 80-100k).
Do other jobs to make the rest of the money (arena / dance / hunt / prostitution).
- After getting enough money, Batil will ask you to get him a clue.
- Go out of the city to Balsa Wilds and find the ambush spot in the North area.
- Take the clue back to Batil, and then return to Salman’s house.
- Clear the Sapphire Ruins with Cless and Salman.
- Enter the Underground Market and face Rahad on B4.
- Note: if you don’t enter the Underground Market before the end of day 8 it’s game over.
Chaos Route
- Defeat the Choker Guard on B6.
- Get back Luna’s stuff from the Storeroom on B5.
- Defeat Rahad on B4 (loss is gameover).
- Go the Silver Goblet Bar in Main Street and ask the Barkeep about Cless.
- Go to the Church and break into the Church Basement B1 with Airi’s help.
Law Route
- Go to the Harbor and talk to the Devout Youth.
- Go to the Silver Goblet Bar in Main Street and talk to the Drunkard.
- Go to Qanat B2 and talk to Big G.
- Go to Qanat B3 and find Cless.
- Continue into Church Basement B4.
Dancing – How to Max Out Audience Size, Hype and Tips
A dance consists of 7 moves. For the 4th and 6th move, the audience will always demand for Luna to strip.
Audience size
- Before 2.30pm: 10-27
- Between 2.30pm and 5pm: 20-35
- Between 5pm and 7.30pm: 50-70
- Between 7.30pm and 8pm: 20-35
Airi will comment:
- 0-14: “There aren’t many people in the audience today.”
- 15-24: “I guess this is passable?”
- 25-44: “An average-sized crowd.”
- 45-64: “The crowd’s pretty big.”
- 65+: “There are so many people here!”
Hype
Initial hype: half audience size +10. Every turn it’s increased by 4.
Reacting to the audience
- If you respond with the right move, hype and tips will increase.
- Tips is increased by 3-5×hype×(1+experience) + 6-8×audience.
- Hype is increased by 4-6.
Prance around
- God, your t*ts are the best. Shake ’em for me! The audience’s eyes follow my chest.
- I can’t take this! Shake the goods!
Lean forward
- Man, she’s spilling out of that outfit. That bra’s basically a string. I can practically see her nipples!
- That’s it, give us a good look at your t*ts!
Shake hips
- Hehe, now she’s a good dancer. Wish I could just grab that *ss and plow right in.
- That’s it! Turn your *ss this way and shake it!
Spread legs
- Oi, spread your legs! I want a good look at your crotch!
- Oi, spread your legs! Show us what’s up there… Hehe!
Stripping
Stripping greatly increases hype and tips.
Bra:
- Tips is increased by 7-10×hype×(1+experience) + 12-20×audience, +1000 if it was demanded.
- Hype is increased by 4-6, +6 if it was demanded.
Panties:
- Tips is increased by 9-14×hype×(1+experience) + 20-26×audience, +2000 if it was demanded.
- Hype is increased by 4-6, +10 if it was demanded.
End
- At the end you’ll get a final tip of hype×5×(audience/10)+1000. This is increased by 20% if you danced 5× before, or by 44% if you danced 15× before.
- After the 4th dance you’ll get the title “Novice Dancer”.
- After the 7th dance you’ll learn the passive skill Dancer’s Footwork.
- After the 15th dance you’ll get the title “Popular Dancer”.
Prostitution – How to Get the Perfect Price
- Wait for a customer – Price ranges.
- Well-Dressed Merchant: 15,000 to 20,000, +3000 if they recognize you.
- Middle-aged Citizen: 13,000 to 17,000, +3000 if they recognize you.
- Young Traveler A (f*ck in alley): 10,000 to 15,000, +3000 if they recognize you.
- Young Traveler B (blowj*b): 5,000 to 8,000.
- Man with Bulging Eyes: 4,000 to 18,000.
- +3000 if done prostitution at least 20 times (times Luna sold her body in sexual encounters window).
Note that before 2.30 pm and after 8pm there’s a 25% chance to get no customer.
Approach someone – Price ranges
- Middle-aged Citizen: 8,000 to 12,000
- Young Traveler A (f*ck in alley): 8000 to 10,000
- Sharp-eyed Man: 4000 to 6000
- Heavily Bearded Man: 4000 to 6000
- Young Traveler B (blowj*b): 4000 to 7000
- +2000 if done prostitution 10-19 times
- +4000 if done prostitution at least 20 times
Responses
- “He looks about uncomforable”: too high by 1000 or 2000.
- “He asks you to lower your price”: too high by 3000, 4000 or 5000.
- “He shakes his head”: too high by 6000 or 7000.
- “The moment he hears your price, he shakes his head.”: too high by 8000 or more
- “He seems satisfied with your price.”: too low by 1000 or 2000.
- “He nods with a smile”: too low by 3000, 4000 or 5000.
- “Surprised, he instantly agrees.”: too low by 6000 or 7000.
- “He asks you to repeate the price”: too low by 8000 or more.
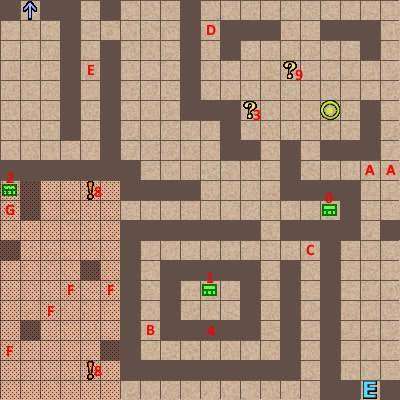
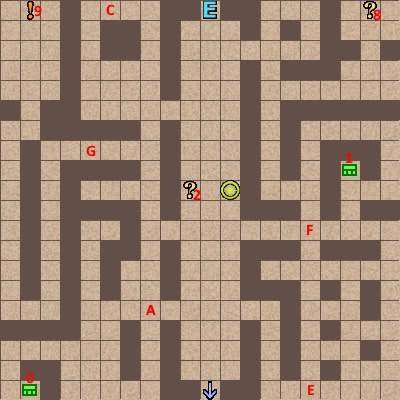
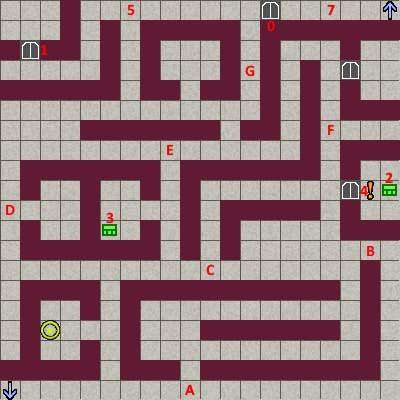
Borak Ridge
Enemies
- Grey Wolf (HP:110, weak to Fire)
- Weak Goblin (HP:100, weak to Fire, defeat in 3 turns or reinforcements appear, after 6 turns r*pe will start)
- Tough Goblin (HP:120, weak to Fire)
West

- 0 Exit (not functional)
- 1 Heal Drop (HP+120)
- 2 Grey Wolf (tutorial)
- 3 Weak Goblin
- 4 Sign about goblins
- 5 Heal Drop Tree
- 6 4×Tough Goblin (gameover)
- 7 Clear Drop (Recover status debuffs)
- 8 Weak Goblin Ambush, learn Vigilance (can’t be surprised)
- 9 Grey Wolf (level-up battle)
- A Dungeon movement explanation
- E Grey Wolf
- F Weak Goblin
- G Grey Wolf
- H HP and MP fully restored
East
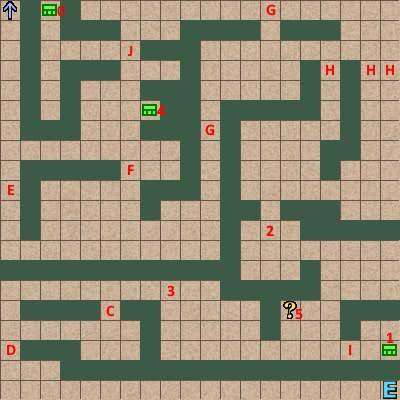
- 0 Chest: Small Mana Ring (MaxMP+1)
- 1 Chest: Wind Sprite Staff (ATK+20 M-ATK+10 M-DEF+35 <Wind>)
- 2 Jill scene “Torture at the Enemy Base”
- 3 4×Tough Goblin (gameover)
- 4 Chest: Heal Drop
- 5 Heal Drop Tree
- C 3×Weak Goblin
- D 2×Tough Goblin (gameover)
- E Grey Wolf
- F 2×Tough Goblin (gameover)
- G 3×Weak Goblin
- H Grey Wolf
- I Grey Wolf
- J Weak Goblin
Gnath River
Either bribe the guard, or defeat the Kraken (HP:500, weak to lightning / wind. Use magic arrow to escape the tentacles)
Marlbara Desert
Enemies
- Scorpion (HP:150, poison attack)
- Ghurab (HP:100, weak to lightning)
- Sand Worm (HP:500, weak to water. Use lightning on self to get rid of small worms)
- Zahaf Scorpion (HP:160, poison attack)
- Slave Hunter (HP:430, counter attack)
West
- 0 Merchant (advice on Sand Worms)
- 1 Chest: Mana Drop (Recover 5 MP)
- 2 Chest: Clear Drop
- 3 Chest: Farih’almashi (+20 HP and +1 MP for every 5 steps, surrounding squares guarded by Sand Worms)
- 4 Chest: Heal Bottle (+250 HP, surrounding squares guarded by Sand Worms)
- 5 Chest: Heal Drop
- 6 Quicksand
- A Scorpion
- B Ghurab
- C 2×Ghurab
- D Scorpion
- E Scorpion, Ghurab
- F 2×Scorpion
- I Zahaf Scorpion
East
- 0 Chest: Travel Boots (AGI +20)
- 1 Chest: Mana Drop
- 2 Chest: 2000 Dinar
- 3 Chest: Clear Drop
- 4 Heal Bottle
- 5 Heal Drop Tree
- 6 Shortcut
- 7 2×Ghurab, Scorpion
- 8 Sand Worm
- 9 3×Slave Hunter
- A Ghurab
- B 2×Scorpion
- C 3×Ghurab
- D 2×Scorpion, 2×Ghurab
- E 3×Scorpion
- F Quicksand
- G Quicksand
- H Quicksand
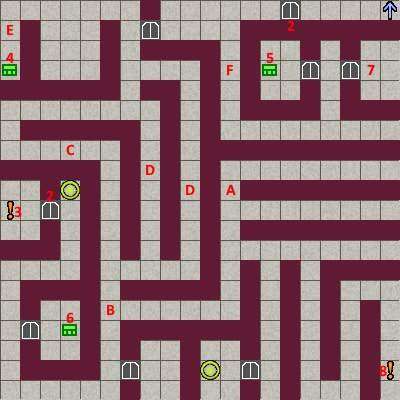
Qanat
Enemies
- Scorpion (HP:150, poison attack)
- Green Slime (HP:400, DEF:250, weak to fire)
- Farasha (HP:190, weak to fire, paralysis attack)
- Viper (HP:270)
B1
- 0 Chest: Void Emblem (Negates equipment effects during battle)
- 1 Chest: Awareness Amulet (Blocks sleep and confusion)
- 2 Chest: Heal Drop
- 3 Chest: Heal Bottle
- 4 Switch, opens 6
- 5 Rock Door
- 6 Drawbridge
- 7 Airi event, unlocks 5
- 8 Man
- 9 Man
- A Farasha
- B Scorpion
- C 2×Farasha
- D 2×Viper, Farasha
- E 2×Farasha, Scorpion
- F Viper, Farasha
- G Exit
- H Airi event
- I Green Slime
- J Green Slime
- K Life Seed (Revive and recover 40% of HP)
B2

- 1 Chest: Water Guardian (Airi: ATK +34 DEF+18 <water>)
- 2 Chest: Heal Bottle
- 3 Ground: Mana Bottle
- 4 Locked Door
- 5 Big G chat
- 6 ! Drawbridge
- 7 Switch (opens 6)
- 8 Zahadola event
- 9 Farasha, 2×Viper, Scorpion
- A Viper
- B Scorpion, Viper
- C 2×Farasha
- D Green Slime
- E 2×Viper
- F Viper, Farasha
- G 2×Farasha
B3
Balsa Wilds
Enemies
- Alwald (HP:250, weak to fire, poison attack, paralysis attack, 250 D)
- Giant Snail (HP:410, weak to wind, physical counterattack, 220 D)
- Black Wolf (HP:360, 300 D, 55% Black Fur)
- Mirror Egg (HP:200, magic reflect, 100 D, 15% Reflect Ring)
- Mandragora (HP:1300, weak to fire, poison attack, 5000 D)
South

- 0 Chest: Heal Bottle
- 1 Chest: Life Elixir (+10 Max HP)
- 2 Chest: Spirit Pill (0 MP consumtion for 3 rounds)
- 3 ? Heal Drop Tree
- 4 Shortcut
- 8 ! Monster Warning
- 9 ? Man taking 10 Black Wolf pelts for Hunter’s Mark (Raises drop rate slightly)
- A Alwald
- B Giant Snail
- C Giant Snail, Alwald
- D Black Wolf
- E Black Wolf
- F Black Wolf
- G 2×Alwald
North

- 0 Chest: Heal Bottle
- 1 Chest: Clear Drop
- 2 ? Heal Drop Tree
- 8 ? Sealed Pot
- 9 ! Ambush area
- A Mirror Egg
- C Giant Snail
- E Black Wolf
- F Black Wolf
- G Giant Snail, Mirror Egg
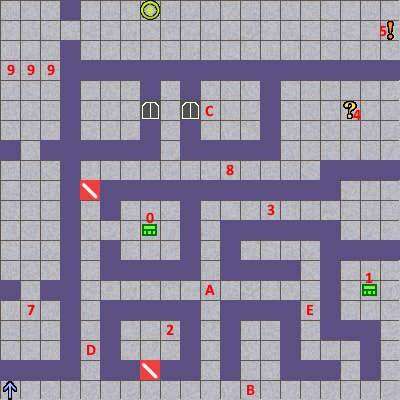
Sapphire Ruins
Enemies
- Green Slime, Farasha, Viper, Mirror Egg
- Wisp (HP:100, DEF:250, weak to dark, no physical attack)
- Mummy (HP:400, weak to fire, undead, 100 D)
- Creeping Coin (HP:50, ATK:215, weak to lightning, floating, 2000 D)
- Bandit Boss (HP:350, 1000 D)
- Underling 1 (HP:270, 750 D)
- Underling 2 (HP:180, 750 D)
- Machine Golem (HP:1200, weak to lightning, magic counterattack, 2500 D)
B1
- 0 Chest: Cursed Choker (Reverse stat boosts and debuffs)
- 1 Chest: 25,000 Dinar
- 2 Chest: Empty
- 3 ? Remains of a fire
- 4 ? Caved in staircase
- 5 Ground: Life Seed
- 6 ! Switch (opens wall near 9)
- 7 ? Strange wall
- 9 2×Wisp, Viper
- A 3×Viper
- B Wisp, Farasha
- C Wisp
- D Wisp, Viper
- E Viper, Wisp, Farasha
- F Creeping Coin
- G ! Elevator pipes
- H ? Elevator Cless dialog
- I ? Elevator Salman dialog
- J ! Elevator
B2
- 0 ! Teleport Trap
- 1 ! Luna switch
- 2 ? Caved in staircase
- 3 ? Broken down door
- 4 ! Cless switch
- 5 Reunited
- 6 Chest: Empty
- 7 Chest: Flare Javelin (ATK+40 <Fire> Additional Damage(S))
- 8 Green Slime
- 9 Bandit Boss, Underling 1, Underling 2
- A Wisp
- B Green Slime
- C Wisp
- D Mummy, Wisp
- E Wisp, Mummy
- F Mummy
- G 2×Mummy, Farasha
- J Chest: Fire Staff (ATK+47 M-ATK+8 <Fire> +Additional Damage(S))
- K 3×Mummy
- L Ground: Heal Bottle
B3
- 0 Chest: Life Seed
- 1 Chest: Lucky Ring (LCK+10)
- 2 Ground: Life Elixir (+10 Max HP)
- 3 All walls unlocked
- 4 Professor Salman
- 5 ! Elevator
- 7 Archive room
- 8 Wisp, Mummy, Mirror Egg
- 9 Machine Golem
- A Wisp, Mirror Egg, Farasha
- B Mirror Egg
- C Creeping Coin
- D Mirror Egg, Mummy
- E 2×Mummy, Wisp
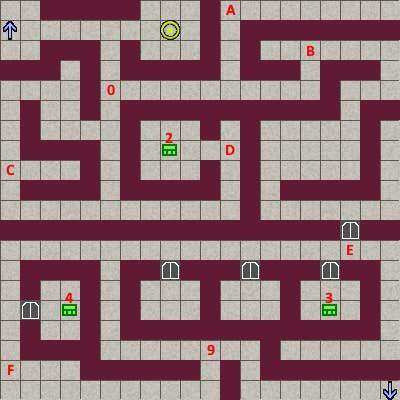
Underground Market
Enemies
- Crimson Elite (HP:300)
- Choker Guard (HP:1300, physical counterattack, 10% Life Elixir)
- Rahad 1 (HP:1600, skill counterattack, 10,000 D, 100% Yaqut (-1MP cost of Shortcut 1 (Fixed in battle)))
- Rahad 2 (HP:2100, skill counterattack, 10,000 D, 100% Yaqut (-1MP cost of Shortcut 1 (Fixed in battle)))
- Shadow Eater (HP:1100, weak to earth, magic counterattack, 2500 D, 5% Mana Crystal)
B3
- 0 Hint
- 2 Chest: Mana Bottle
- 3 Chest: Heal Bottle
- 4 Chest: Heal Bottle
- 9 Crimson Elite
- A Crimson Elite
- B Crimson Elite
- C Crimson Elite
- D Crimson Elite
- E Crimson Elite
- F Crimson Elite
B4

- 1 Locked Door
- 2 Chest: Yaqut (-1MP cost of Shortcut 1)
- 3 Chest: Unlimited Heal & Mana Bottles
- 4 Rahad
- 5 Oneway Door (east to west)
- 6 Oneway Door (north to south)
- 8 Airi (chaos route)
- A Crimson Elite
- B Crimson Elite
- C 2×Crimson Elite
- D Crimson Elite
- E Crimson Elite
- F 2×Crimson Elite
- L Chest: Life Elixir
B5
- 0 Locked Door
- 1 Storage Room
- 2 Chest: Mana Drain (Enemies M-ATK restores MP)
- 3 Chest: Heal Bottle
- 4 ! Shadow Eater
- 5 3×Crimson Elite
- 7 Crimson Elite
- A 2×Crimson Elite
- B 2×Crimson Elite
- C 2×Crimson Elite
- D Crimson Elite
- E Crimson Elite
- F 2×Crimson Elite
- G 2×Crimson Elite
B6
- 2 Locked Door
- 3 Choker Guard
- 4 Chest: Mermaid Tears (Revive and recover 100% HP)
- 5 Chest: Heal Bottle
- 6 Chest: Unlimited Heal Drops
- 7 Crimson Elite with Jail Key (unlocks 2)
- 8 Luna’s Cell
- A Crimson Elite
- B Crimson Elite
- C Crimson Elite
- D Crimson Elite
- E Crimson Elite
- F Crimson Elite
Church Basement
Enemies
- Believer (HP:550, weak to wind, 750 D, 30% Heal Bottle)
- Evil Book (HP:370, weak to fire/holy, 660 D)
- Skull Fencer (HP:1500, weak to holy, physical counterattack, HIT+, undead, 5000 D, 10% 2257)
- Bishop (HP:2300, 15,000 D)
Luna – Main Scenario
Prologue: Survived 15 Turns
- Use the ceremonial spear to survive for 15 turns.
- Lust Worm Progress +1%
Prologue: Defeated
- Number of Sexual Encounters +1
- Times Penetrated +1
- Times Ejaculated Inside Of +1
- Number of Times F*cked (Humans) +1
- Lust Worm Progress +5%
Chaos Route: Defeated – Became a Slave
- Lose in Underground Market
- Number of Sexual Encounters +1
- Times Penetrated +1
- Times Ejaculated Inside Of +1
- Number of Times F*cked (Humans) +1
- Lust Worm Progress +1%
Chaos Route: Sex Slave (Playable)
- Number of Sexual Encounters +5
- Times Penetrated +5
- Times Ejaculated Inside Of +5
- Number of Times F*cked (Humans) +5
- Lust Worm Progress +2%
Reunion with Airi
- Number of Sexual Encounters +100
- Times Penetrated +30
- Times Ejaculated Inside Of +30
- Number of Blowj*bs +30
- Number of Times F*cked (Humans) +30
- Number of Times F*cked (Monsters) +5
- Lust Worm Progress +10%
Sex Slave End
- Reply “…” to Airi
- Game Over
Luna – Town Events
Lust Worm Progression
- Progression 1
- Progression 2
- Lust Worm 100%
Dancing
- Lust Worm (0~49%)
- Lust Worm Progress +1%
- Lust Worm (80%~)
Drunk Gangr*pe
- Main Street – Silver Goblet Bar – Boorish men
- Number of Sexual Encounters +1
- Times Penetrated +3
- Times Ejaculated Inside Of +3
- Number of Times F*cked (Humans) +3
- Lust Worm Progress +5%
Deals with the Old Beggar
- Main Gate – Reward the Old Beggar for giving information
- Normal Equipment
- Damaged Equipment
- Number of Sexual Encounters +1
- Number of Times F*cked (Humans) +1
- Lust Worm Progress +1%
- Tights
- Damaged Tights
- Naked
Bishop’s Hypnotism
- Church – Ask the bishop to help you with the Lust Worm.
- First time
- Lust Worm Progress +1%
- Second time
- Lust Worm Progress +1%
- Third time
- Fourth time
- Game Over
Arena Defeat: Orc
- Number of Sexual Encounters +1
- Times Penetrated +1
- Times Ejaculated Inside Of +1
- Number of Times F*cked (Monsters) +1
- Lust Worm Progress +1%
A Bet with an Information Broker
Dawn Shepherd Bar – Keep Betting
Deals with the Pimp
- Wh*re District – Register as a prostitute
- Virgin
- Experienced
Virgin Prostitution – A Millionaire’s Toy
- Number of Sexual Encounters +1
- Times Penetrated +1
- Times Ejaculated Inside Of +1
- Number of Blowj*bs +1
- Number of Times F*cked (Humans) +1
- Lust Worm Progress +7%
Prostitution – All Events
The ‘2’ events are with Lust Worm Progress at 80% or higher
- First Prostitution
- Well-dressed Merchant
- Well-dressed Merchant2
- Middle-aged Citizen
- Middle-aged Citizen2
- Young Traveler A
- Young Traveler A2
- Young Traveler B
- Young Traveler B2
- Man with Bulging Eyes
- Man with Bulging Eyes2
- Sharp-eyed Man
- Sharp-eyed Man2
- Bearded Man
- Bearded Man2
Luna – Field Map
Defeated by Goblins (F*ck and Chuck)
- Number of Sexual Encounters +1
- Times Penetrated +1
- Times Ejaculated Inside Of +1
- Number of Times F*cked (Monsters) +1
- Lust Worm Progress +1%
Defeated by Goblins (Taken to Nest)
- Lose to Tough Goblins.
- Game Over
Bridge Guard Blowj*b
- Convince the Gnath River bridge guard to let you pass
- Number of Sexual Encounters +1
- Number of Blowj*bs +1
- Number of Times F*cked (Humans) +1
- Lust Worm Progress +1%
Defeated by Kraken
- Swim across Gnath River
- Number of Sexual Encounters +1
- Times Penetrated +1
- Times Ejaculated Inside Of +1
- Number of Times F*cked (Monsters) +1
- Lust Worm Progress +1%
Defeated by Sand Worms
- Number of Sexual Encounters +1
- Times Penetrated +1
- Times Ejaculated Inside Of +1
- Number of Times F*cked (Monsters) +1
- Lust Worm Progress +1%
Defeated by Slave Hunter, Slave Market
- Game Over
Defeated by Mandragora
- Game Over
Jill
Torture at the Enemy Base
- Borak Ridge East (14,12)
Whipping Girl
- After day 2
Aphrodisiac Training 1
- After day 3
Aphrodisiac Training 2
- After day 4
Virginity Auction
- After day 5
My Days as a Sex Slave
- After day 6
Fall into Corruption
- After day 7
Tentacle Broodmare
- After Underground Market
Reunion with Luna, as a Slave
- Follows scene Sex Slave End
- Game Over
Master’s Sex Slave
- After day 8
- Game Over
Cless
Defeated by Slime
- While playing as Cless in the Sapphire Ruins, get defeated by a Slime.
Raiders Gang Bang
- While playing as Cless in the Sapphire Ruins, get defeated by the Raiders.
- Game Over
- Small Hand Devil Tickling
- Defeated by Believers – Intense Drilling
- Trap Room – Sleeping Gas
- Defeated by Brainwashed Luna
- Defeated by Bishop – Brainwashed Sex Slave
- The Mirror World (Playable Replay Mode)
- The Mirror World: Low Sanity Events
- The Disgraced Saint
- Defeated by Id, Possessed
Airi
Alley F*ck
- Visit the back alley in the wh*re district.
Dancer on the Stage
- Watch Airi’s performance on the Main Street Stage.
Tentacle Lover
- Event in Qanat B1
- I Wanna Help Lunie
- Torturing the Torturers
- Reverse R*pe
- Defeated by the Collar Keeper
- Blowj*b from Hell
- Caught by Pursuers
Be the first to comment