
If the game’s instructions were unclear, this will explain how to solve the puzzles in the cave after your first time there.
Introduction
I’m going to do my best to explain this puzzle in an easy to understand manner, and tips on completing it. This guide will include:
- Prerequisites needed before entering the cave.
- How to get to the cave & first visit there.
- Second visit: and how to navigate the puzzles.
- Third visit: & all the items you can collect in this mini dungeon.
Well, lets get on with it!
Prerequisites
Getting the cave unlocked
- In Chapter 1: Go to the Zanarkand Ruins and speak with Cid, tell him you’re unhappy with him turning the ruins into a tourist spot.
- In Chapter 2: Go to the Thunder Plains and speak with Cid while he sulks. Now in Chapter 5 He will be inside the cave.
- The calibration mini-game isn’t required to unlock the cave, so if you didn’t do it don’t worry about it.
- During Chapter 5 you must defeat Humbaba, then the man who ran the calibration mini-game will tell you that a hole has appeared near one of the lightning rod towers. He proceeds to offer to take you to it. This is your only way of entering the cave, so anytime you want to go- you have to speak with him.
Things to get before attempting the Puzzles
- Get a calculator, pencil & paper. You’re going to need them.
- Retrieve the Charm Bangle from Leblanc’s place.
- You can also steal a Charm Bangle from Baralai at Bevelle in Chapter 2.
- Another option is to buy a Charm Bangle for 500 Credits at Open Air, Inc. in the Calm lands.
The charm bangle is an absolute necessity for making this puzzle easier. So I’ve offered several ways to obtain one.
1st Visit to The New Cave
Time to rescue Pops
You can choose to equip the Charm Bangle now, just to make navigating the cave easier, as it can be very confusing. Cid is inside the cave resting. Go meet up with him.
Once you Speak with Cid / Get too close to him a Boss Battle will ensue. Make sure you’re prepared.
There are some treasure chests you can get now, but you can wait to open them for your 2nd or 3rd visit.
Once you defeat the boss you should get a nice Episode Complete. And that’s really all there is to your first visit!
2nd Visit to The New Cave
The puzzles begin here. The game provides a tutorial which you can use. I will explain the puzzle mechanics in a simple way, as they may be difficult for people with dyslexia or dyscalculia.
As soon as you enter the cave, you will be given a Key, write it down.
- An example of what you will be given is: [_] >> 3, with 7 underneath it.
- I will explain what these mean in a minute. Just make sure to write it down for reference.
The Keys & Codes given to you in this dungeon are completely randomized. The solutions in the next part are completely hypothetical, and are used as a demonstration on how to solve the puzzles correctly.
Next off: Equip your Charm Bangle.
- The mechanics in this puzzle will counts things such as the amount of Gil you have Earned between your opening of the doors, and the amount of Monsters you have Fought.
- Equipping the Charm Bangle will effectively make those sums: 0.
- As you will not be able to fight in random encounters, nor will you have to keep track of it.
Reminder: You need to write down every code & clue you come across in this dungeon. I will show you why in the next section.
Let’s continue.
How to Solve the Puzzles
Each door you examine will have Two Keys on them.
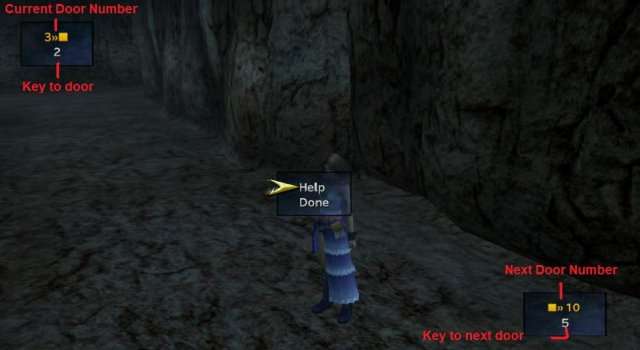
- In the top left corner: the current door number you are unlocking will be listed, and underneath it is that door’s hint / code.
- In the bottom right corner: the next door number will be listed, and underneath it is that door’s hint / code.
The very first door you will solve will involve the code given to you as soon as you walked into the dungeon and the top left code on the door you are examining.
So, here’s a hypothetical solution to the door:
- Using the example key I gave earlier that you get as soon as you enter the cave, our first clue is:
- [_], >> 3 with 7 underneath it.
- The 3 represents the door number it will be used on.
- The 7 represents your clue/key to unlocking the door.
- Don’t worry about >> [_].
Next we examine the Key in the Top Left Corner in the image above.
- 3 >> [_], with 2 underneath it.
- The 3 represents the door number it’s for.
- The 2 represents your clue/key to unlocking the door.
In order to unlock the door we need to Add the first key with the second key.
- Key Number 1: is 7, and Key Number 2: is 2.
- 7 + 2 = 9.
- 9 will be the code you enter to unlock this door.
Before inputting the code needed to unlock the door, make sure you write down the numbers shown in the bottom right corner on every door, as you will need that for the next door you attempt to unlock.
Let’s try another example.
- Remember: In the top left corner: the current door number you are unlocking will be listed, and underneath it is that door’s hint / code.
- In the bottom right corner: the next door number will be listed, and underneath it is that door’s hint / code.
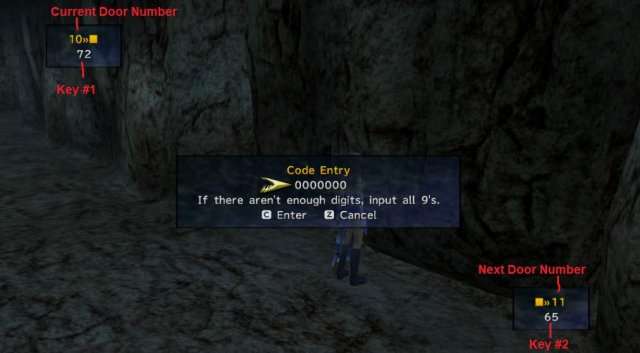
Did you remember to write down the previous code shown in the bottom right corner of the first door? It’s needed to solve this puzzle! Let’s get to it.
The code shown on the last door read:
- [_] >> 10, with 5 underneath it.
- The 10 represents the door number it’s for.
- The 5 represents your clue/key to unlocking the door.
Now let’s examine the code written on the current door (Door 10), in the top left corner.
The code shown on this door is:
- 10 >> [_], with 72 underneath it.
- The 10 represents the door number it’s for.
- The 72 represents the clue/key to unlocking the door.
Now, we add the two keys together to get the code for unlocking this door.
- Key Number 1 is: 5, and Key Number 2 is: 72.
- 5 + 72 = 77
- 77 is the code you need to enter to unlock this door.
Just like before: Write down the code written in the bottom right corner of this door before inputting the password. You’ll need it for the next door.
As you proceed through the doors, the keys & clues will get a bit more difficult.
Luckily with the Charm Bangle, any clues that are affected by the amount of battles you’ve been in, or the amount of gil you earned will be 0.
Now you may be asking why you need to write down every single code you come across? Well… the simple answer is…
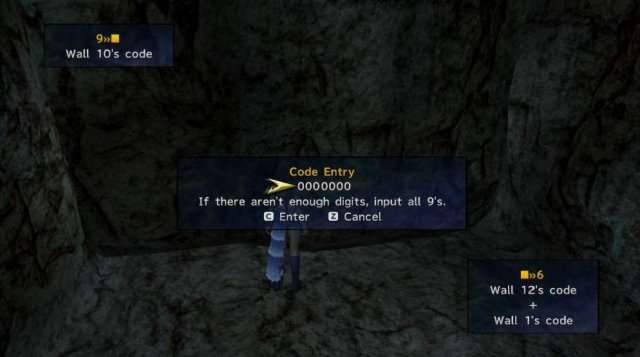
Certain clues will be sneaky! They’ll ask you for previous answers to doors. As long as you write everything down you’ll be okay! Just look at your paper, find the door number it wants, and the code you inputted for it.
And if you don’t want to go through adding the keys from previous doors again, another thing you can do is write down the code itself for a door. Like with our previous examples, you’d write down 9 as the code for door 3, and 77 as the code for door 10. Work smarter, not harder!
Hopefully with these examples you’ll be able to solve all the puzzles you come across! If you need help though, don’t be afraid to ask for it. Monkey is here 2 help <3
3rd Visit to The New Cave
Yes, unfortunately after you complete all the puzzles in your 2nd visit to the cave, You’ll have to redo it all again: for another special item. Luckily with the tutorial I gave earlier, it should be a breeze this time around.
Remember: Write Down Every Code You Come Across!
And the Charm Bangle is your friend!
Rewards For Doing This
Why bother with these puzzles to begin with? Well… items of course! You’ll be rewarded for your hard work with the following items.
- Diamond Gloves [1st or 2nd visit]
- Hyper Wrist [1st or 2nd visit]
- Mystery Veil [1st or 2nd visit]
- Talisman [1st or 2nd visit]
- Nature’s Lore [1st or 2nd visit]
- Corpus Invictius [2nd visit only]
- Salvation Promised Garment Grid [2nd visit only]
- Force of Nature [3rd visit only]
Corpus Invictus allow’s Paine’s Full Throttle dressphere to break HP Limit., and Salvation Promised Garment Grid allows the use of white mage abilities no matter what dressphere is equipped, and Auto-Life becomes available.
Finally Force of Nature adds all elements to attacks, and turns all elemental damage received into HP. Tanky!
Finale
I hope this was helpful to people who were struggling with this puzzle.
I created this guide because I have learning disabilities and found the in-game tutorial confusing. I reset the dungeon many times to understand it. I hope this saves people time trying to solve it through trial and error.
Be the first to comment