
This guide teaches you all about the usage of info_nodes.
Contents
What is a Node?
All credit goes to Hezus!
A node is a nagivation point used by the AI to help them move around in your map. You might have seen the message “Rebuilding Node Graph” when loading up a new map. At this stage the engine is creating a network of lines between all nodes, so monsters and NPCs know where valid paths are from one node to another.
Nodes and AI
Even without the nodes, the AI in the Goldsrc engine knows how to walk through 3D space and navigate around small objects. The AI has been improved in Sven Co-op over the years and is even better at navigating on its own. However, it still relies on nodes to find its way through more complicated scenarios and execute its AI behaviour.
This first example scenario puts the Zombie behind the counter. It will want to walk towards the player but it will fail since it can’t determine a clear path. The AI might be smart enough to navigate past smaller objects but this large counter is too much for it to handle.
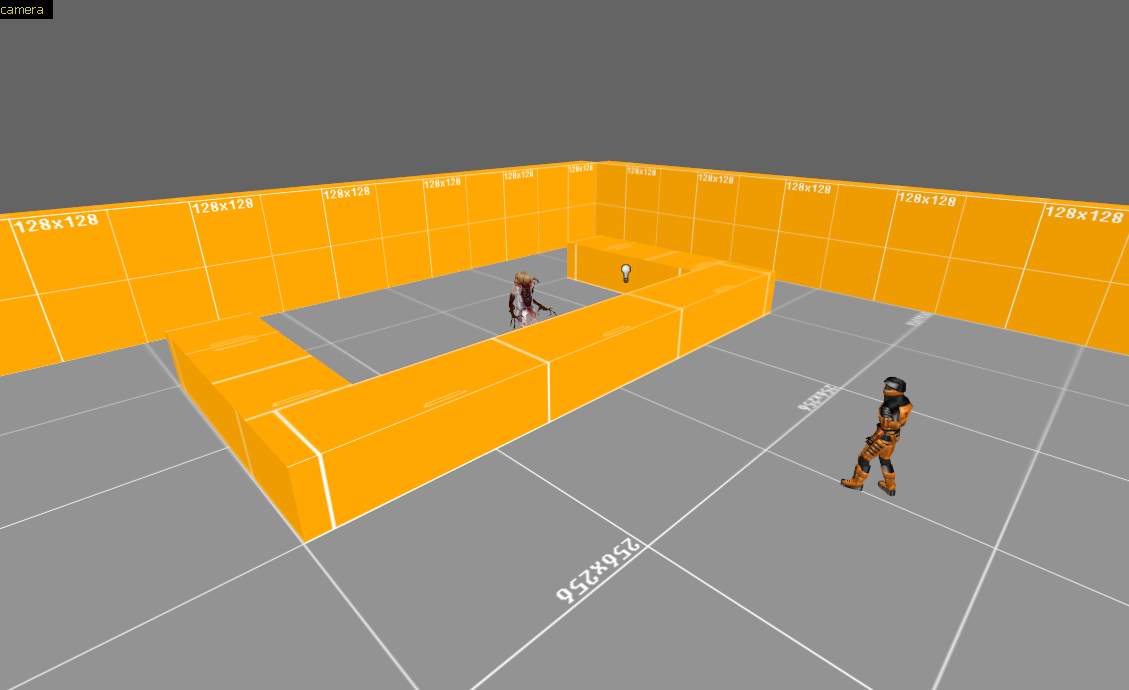
Let’s add some info_nodes (yellow squares). These points will generate a network of paths for the Zombie to take. As soon as it spots the player and it can’t directly engage him, it will look to the node network for guidance and determine the fastest path from its current node to the node the player is currently closest to (indicated by the red line).
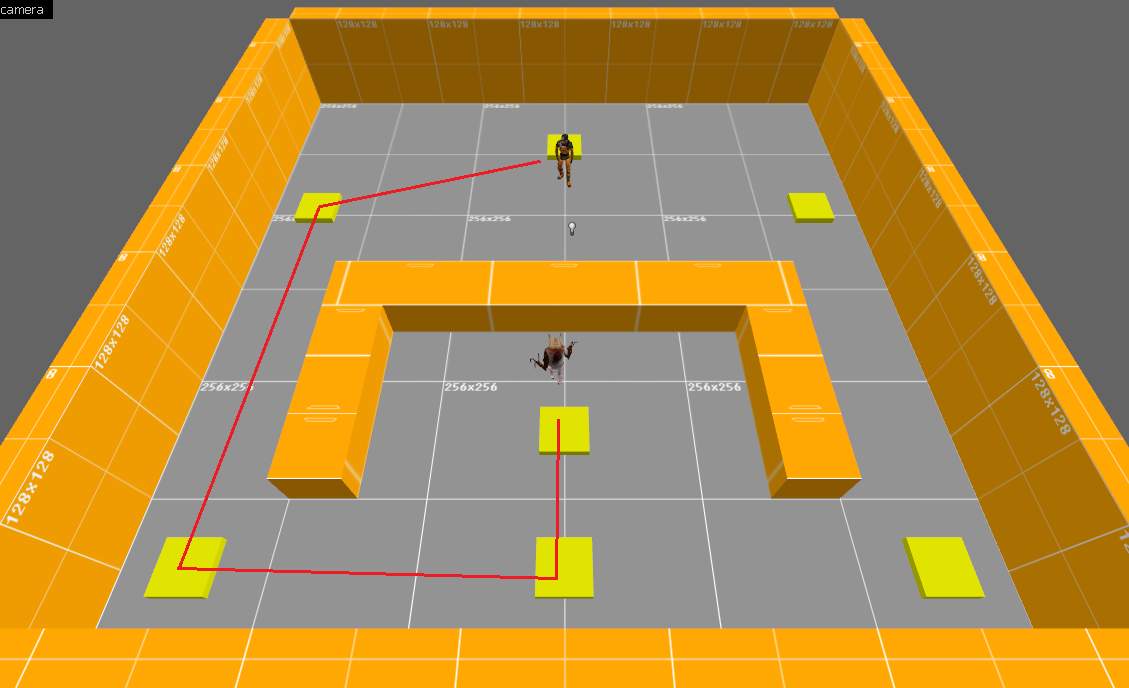
Another example of the usage of nodes is to help the AI execute its special behaviour. The AI code of this Grunt for instance, tells it to find cover when it is taking damage. It will look to the node network to find this spot, so I’ve placed a strategic node behind the sandbag.

Node Networks
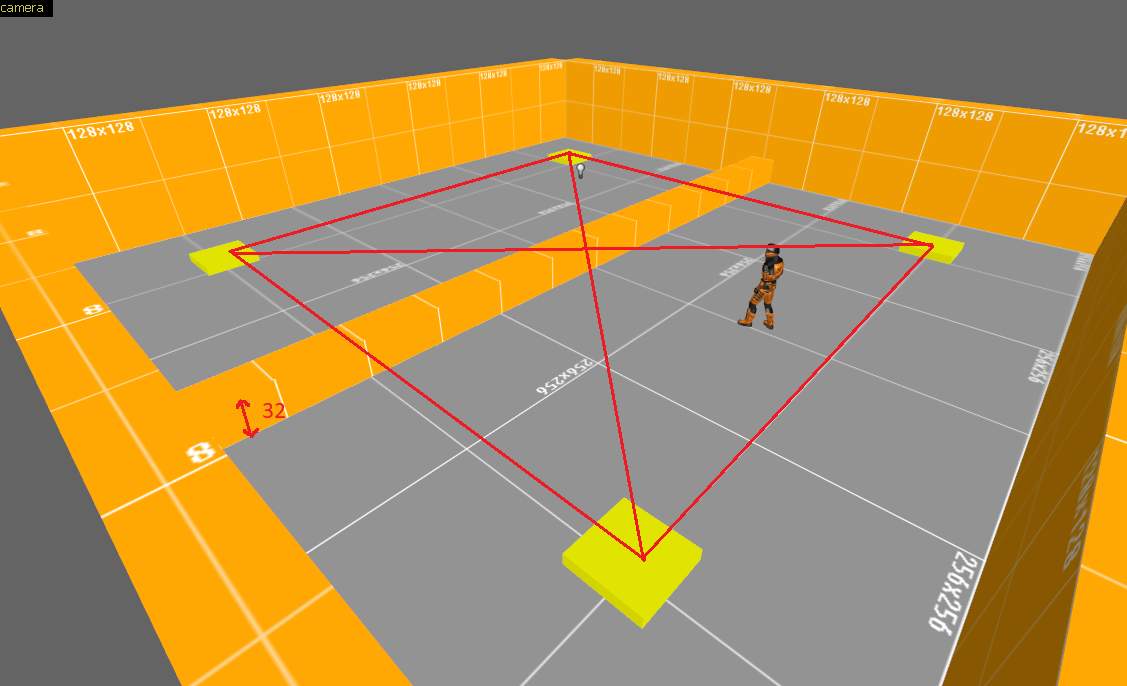
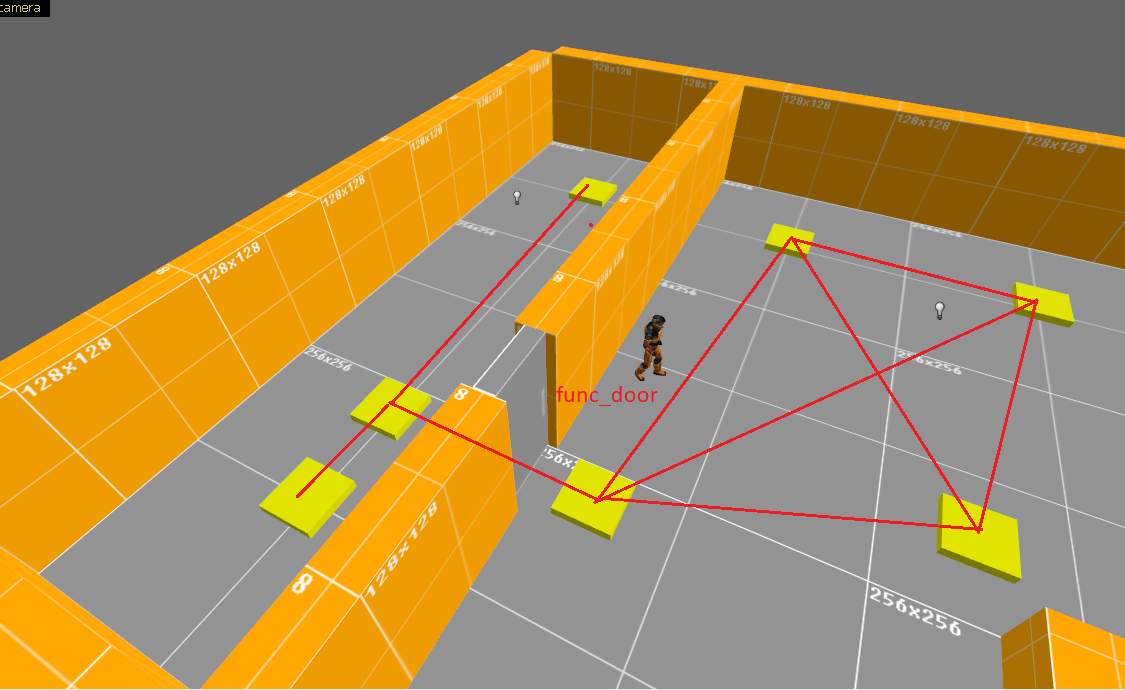
As we’ve established, nodes are important for the AI to function properly. But how is the network built? The engine will determine if there is a straight visual line between two nodes and if there is, a link is made. I’ve placed four nodes in this room, and the links will look like this:
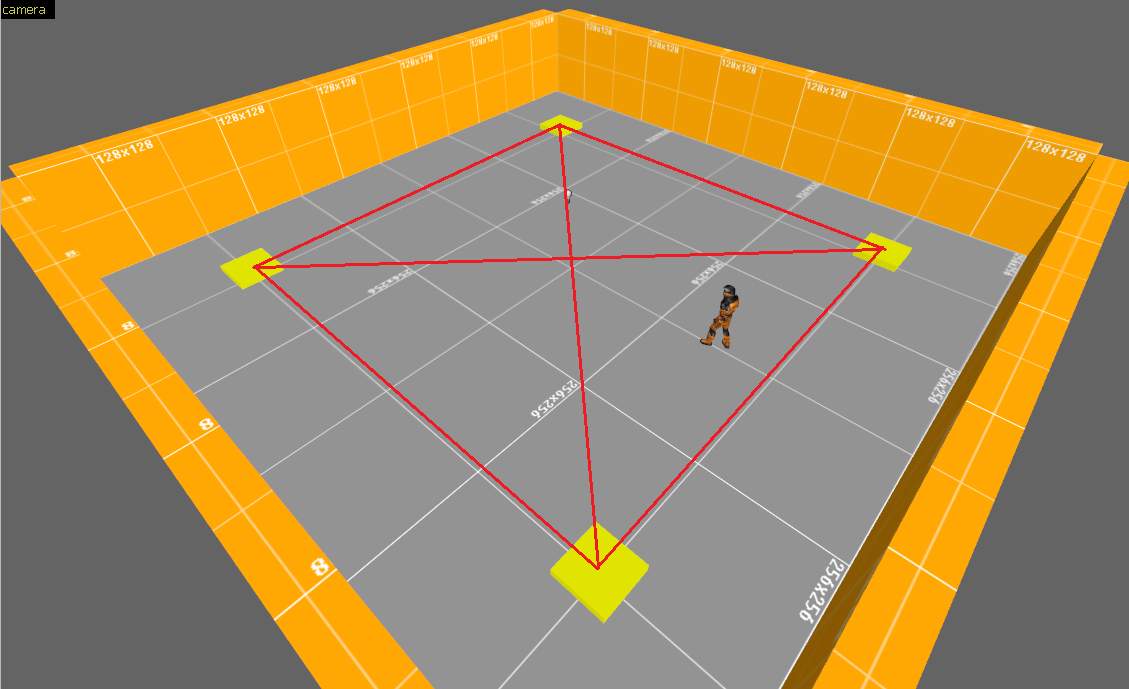
You can actualy see these links in game. Walk to a spot where you know a node is at and type ‘impulse 199’ into the console. This will show you all links for this node for a limited amount of time. Mind that it will only show this information for nodes you are close enough to, it will not show you the network for the entire map.
A single node can hold very many link to the rest of the network. As long as there is a possible line of sight, there shall be another link.

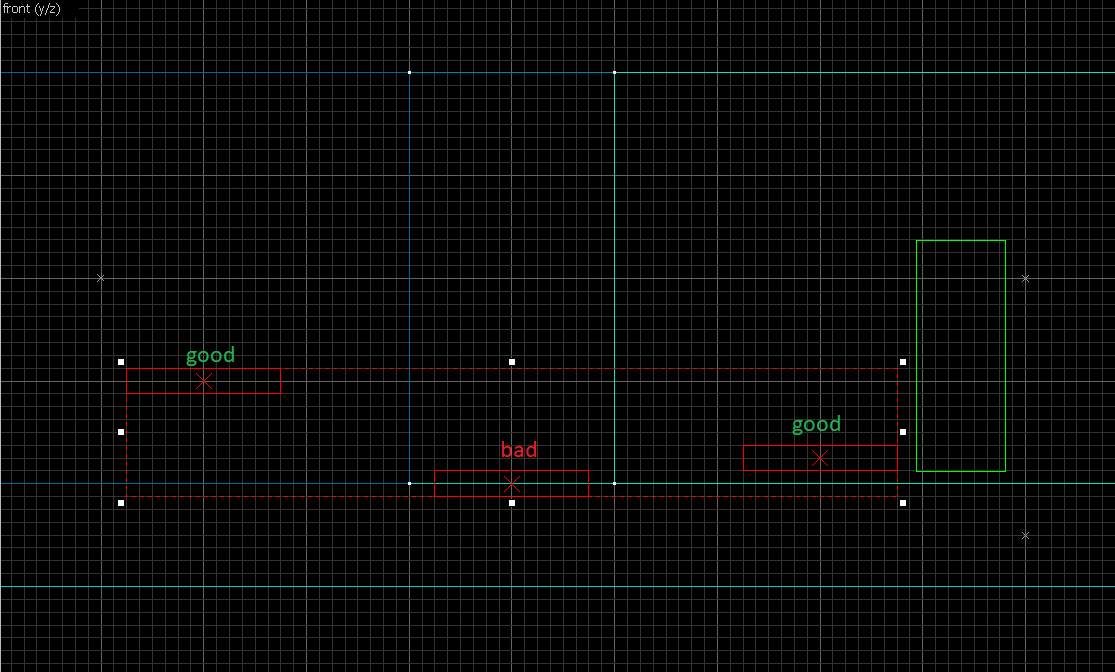
The visibility between the nodes can be blocked by solid world geometry and also by func_walls, as long as the wall is higher than 32 units.
The point where the node will be created will always float at 32 units above ground level, so if a wall is 32 units or lower there will be a link. The engine will also create links through non-solid brushes no matter how high they are.
Four Different Types
Now we know how the network is built, we can expand on this knowledge by introducing the different types of monsters. There are four types:
- Small sized (Headcrab, Chumtoad, etc)
- Normal sized (Zombie, Grunt, etc)
- Large sized (Gargantua, Bullsquid, etc)
- Flying (Alien Controller, Stukabat, etc)
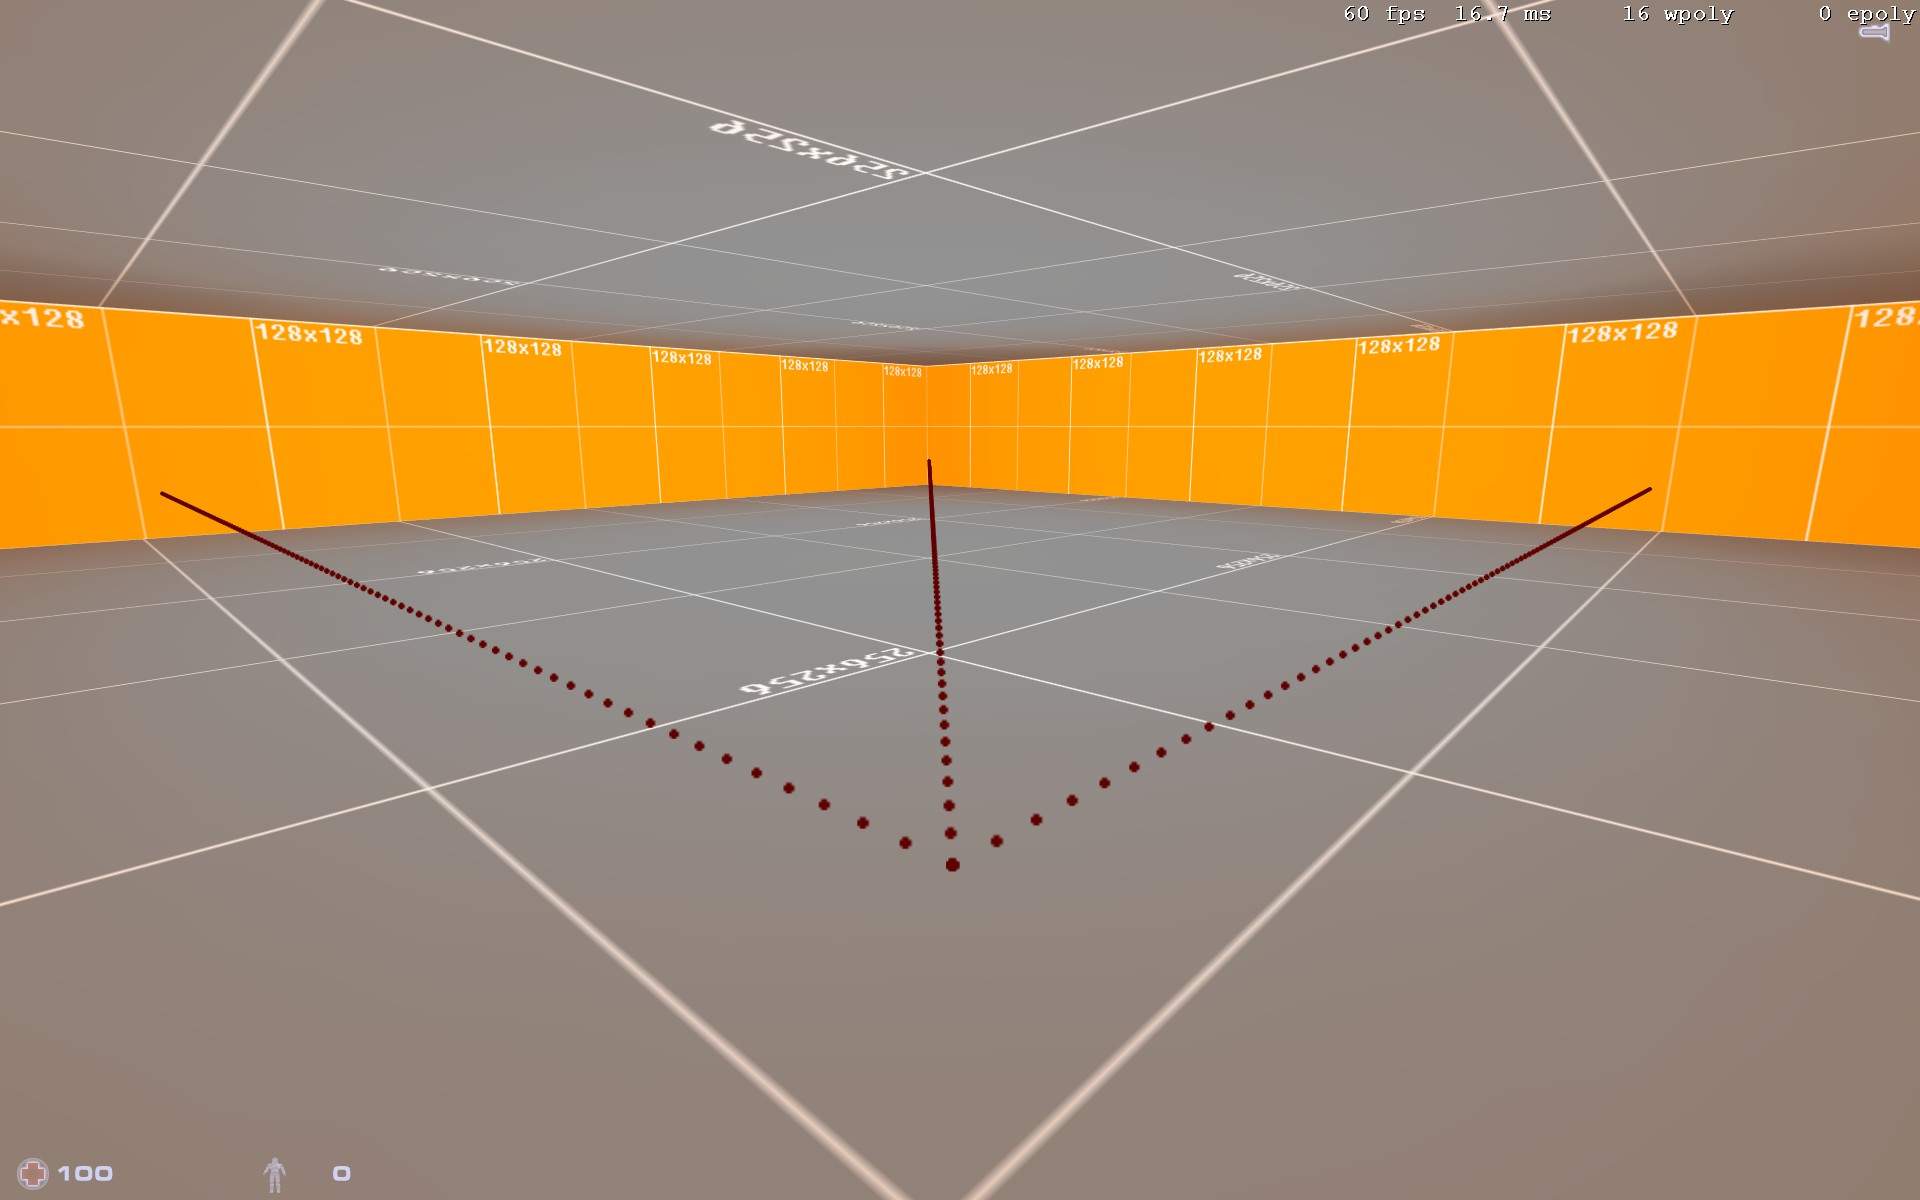
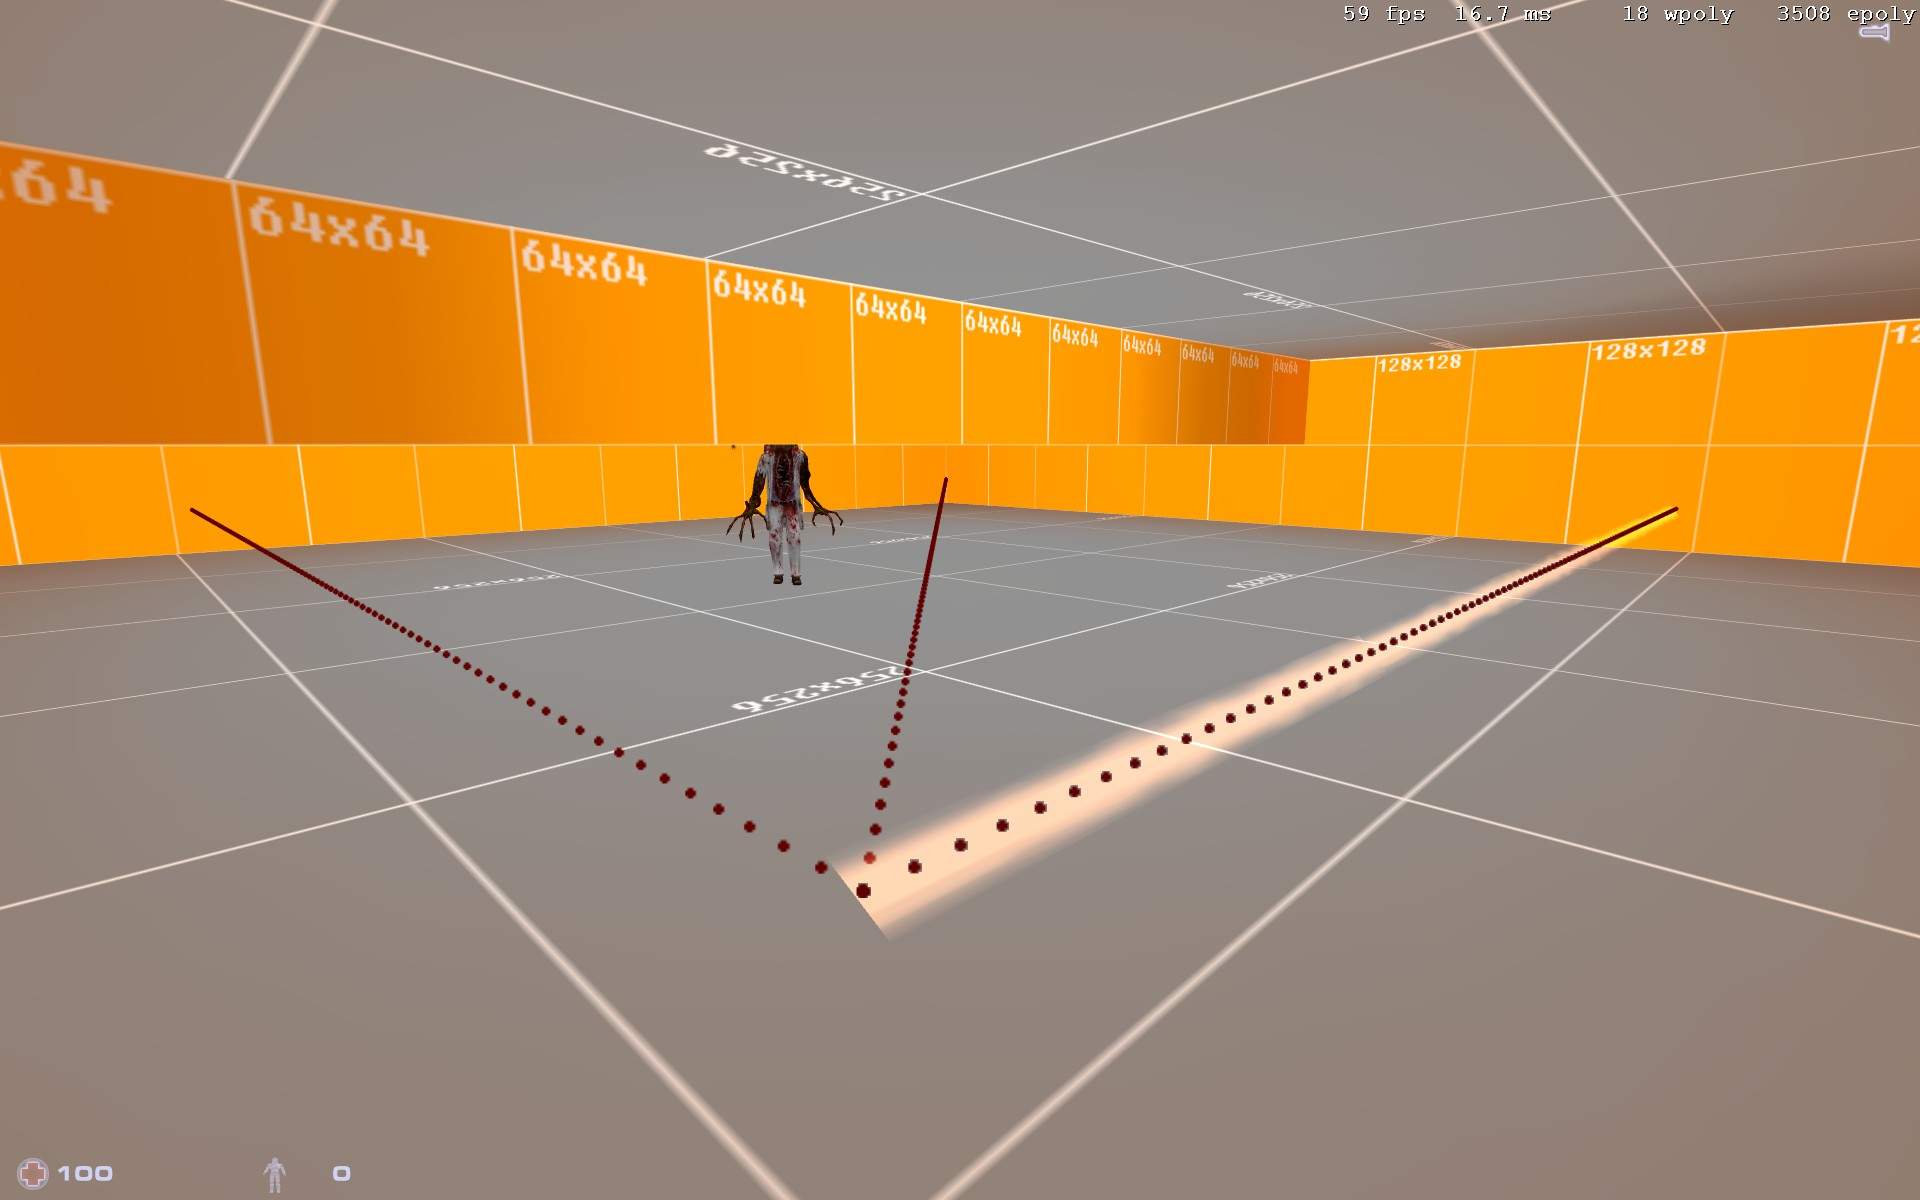
When the node network is built, it will also determine if a certain monster type can actually use the paths. A passage might be too small for a Large sized creature, so it will not establish a usable link between the nodes. You can highlight the different types by use of the other impulse commands. Small creatures will use the default path visible with impulse 199. impulse 197 will show you the paths for Normal sized creatures, impulse 196 for Large sized Creatures and impulse 195 for all airborne creatures (more on them later!).
In the following example you can see how the node network for Normal sized creatures (highlighted as a pink beam) doesn’t extend into the other room, because the brush blocks the way. Small sized creatures would however be able to crawl under it and use the default node link to find their way.
How to Properly Place info_nodes
Now that we know how the node network works, we can move on to placing our nodes. What are good practises to get the most out of our nodes?
When the map starts, all info_node entities will fall to ground level, so it does not matter how high above the ground you place them. Node points will always be created 32 units above the ground where you place your info_node entity. Just make sure that the origin on the info_node is not inside the floor because this might cause the engine to overlook them.
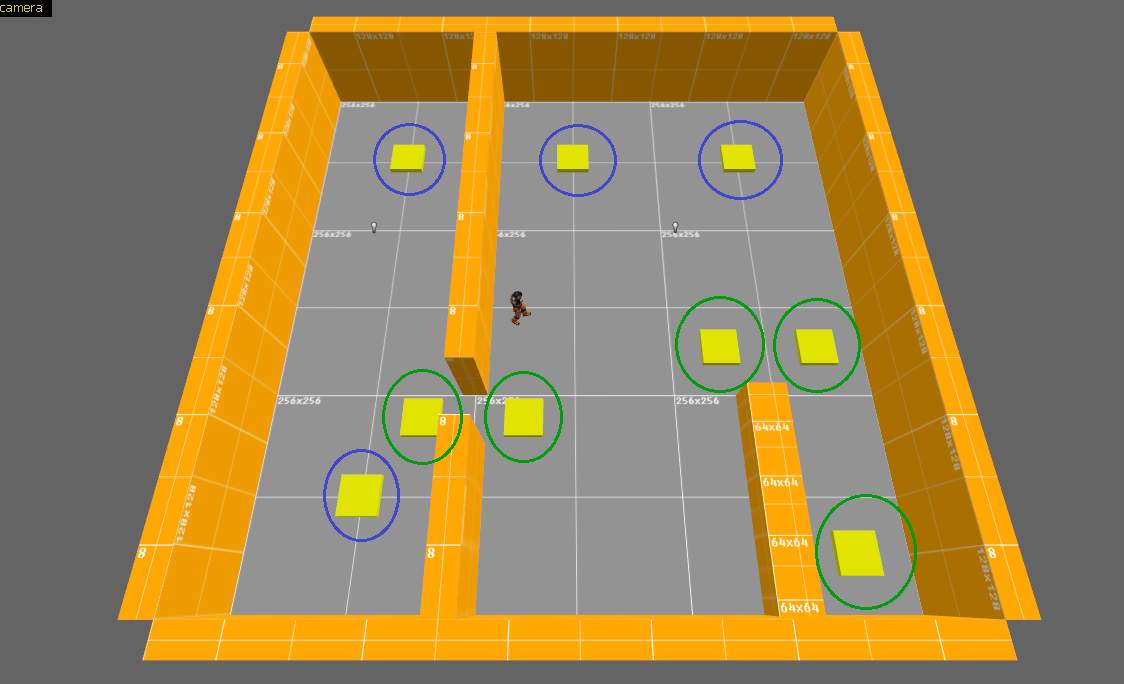
So where to place your nodes? We’ve seen that AI can get into trouble whenever there is an obstacle or no clear line between it and the player. So it’s good to add a few nodes to help them navigate around (green). You can see those nodes at the door and around the counter. Next to that it’s good to place a few ‘anchor points’ (blue) in the room. This will give the AI a starting point to navigate from and it can serve as a spot for special AI behaviour (such as the Grunt running for cover earlier).
Some guides might tell you to place an info_node every X units. This is not strictly necessary. The engine also doesn’t require it. You can place two nodes at a distance of 9000 units from eachother and they will still create a link, as long as they have a line of sight to eachother. You just have to place enough nodes for the AI to have enough anchor points. If you do not have enough, you might encounter undesirable AI behaviour. For instance, if the node a Grunt is falling back to is too far away, it will not resume its normal behavior for a long time. If the node is closer, it will then decide on a new course of action once it has reached the node.
As mentioned before, nodes will only create a link where there is a visual line of sight between two nodes. Luckily, it ignores movable brush entities, such as func_doors, so you can place this door in between the nodes and there still will be a link.
The nodes will link through most brush entities that are movable, such as func_train, func_rotating, func_button, but also func_breakables. Next to that it will go through all non-solid entities such as func_illusionary and everything that uses zhlt_noclip 1.
Info_node_air
Airborne monsters use a special type of node called the info_node_air. Just as regular info_nodes, these are used for navigation and AI behaviour. However, you might find that airborne monsters are not as good as finding their way to the player as land creatures, since they also have to navigate in upward and downward directions. Info_node_air will not drop down to ground level, as the info_node does and info_node_air and info_nodes will not create links to eachother.
Especially the Alien Controller will hardly move on its own without the help of air nodes. To make sure it will float down or up to engage players on their level, you’ll need enough air nodes on that same level. Without these, the Alien Controller will just hover there, not knowing how to get to the player under the ledge. So when you use these monsters, it’s good to place extra nodes.
Other flying creatures that use the air nodes are the Stukabat and the Flyer Flock but also swimming creatures make use of them, such as the Leech and the Ichthyosaur. So make sure you place enough info_node_air entities in the waters that house them.
The Apache and the Osprey technically also use the air nodes network for navigation, however, the Osprey will only function with path_corners to guide it (the game crashes without). The Apache will use air nodes to find its way to the player but isn’t very good at it and will just wierdly wobble after the player. Setting up a network of path_corners for the Apache will make it behave for more realisticly and it will then require no air nodes for its navigation.
Less is More
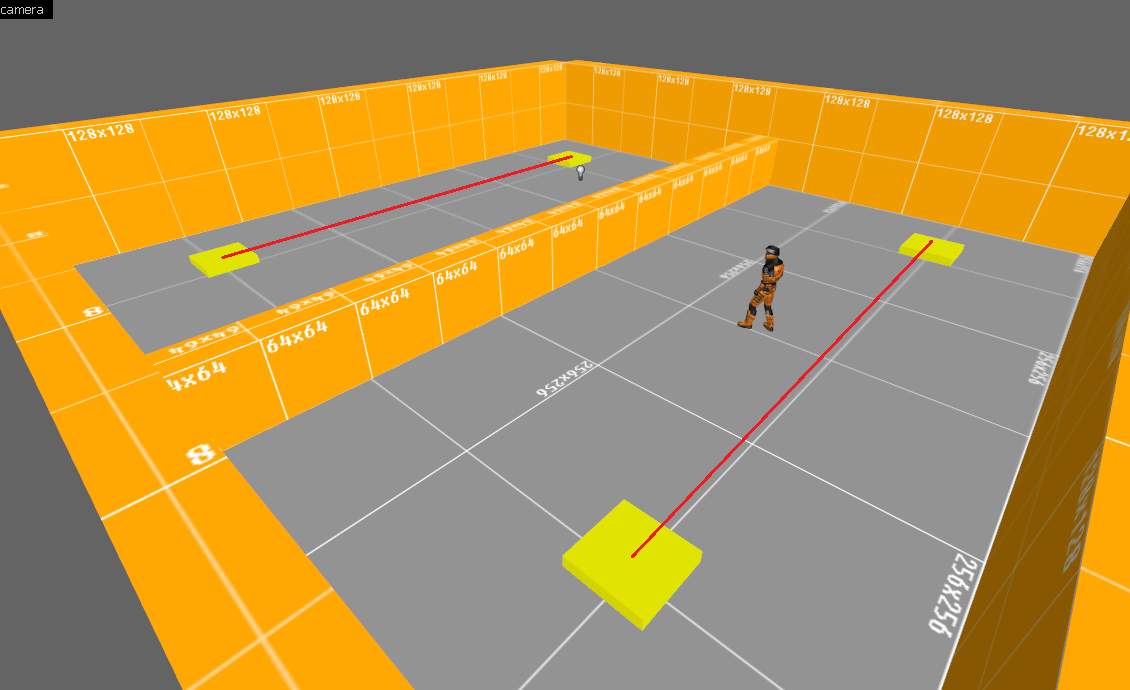
As we’ve established, you just need enough nodes for the monsters to find their way around. But often maps are littered with nodes that serve hardly any function at all. The example below shows you the route (red line) the Grunt has to take to find its way to the player. It only needs those four nodes to get there, so each node in between is just an extra unneccesary step. So if we remove all of those and leave a few nodes as anchor points for navigation and AI behaviour, we can do with almost a third of the nodes we started with.
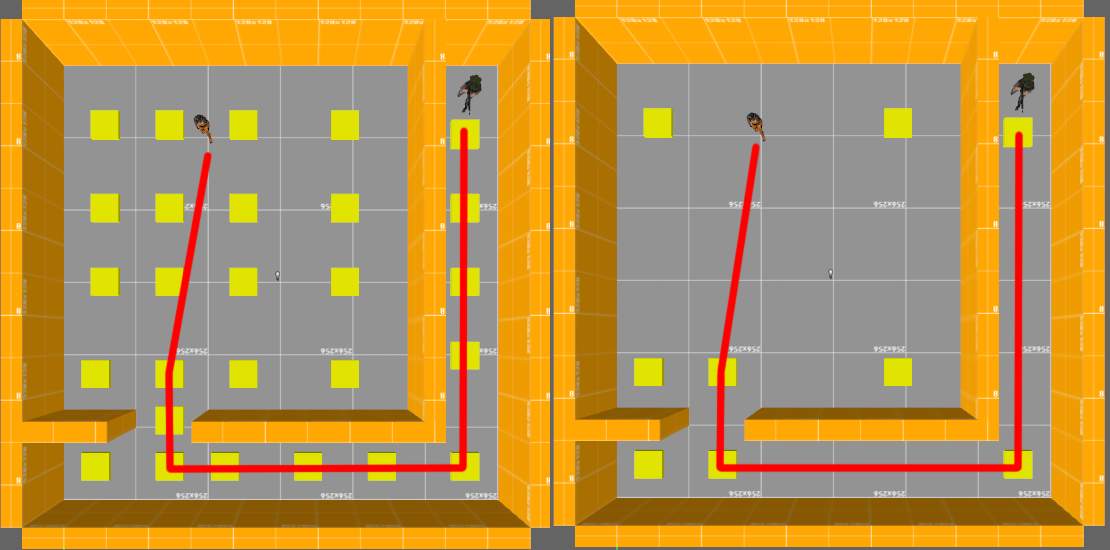
Having less nodes is good in multiple ways. First, it uses up less entity slots (which are limited). Secondly, it makes the node graph calculation faster and finally, it makes the node network far less complex. This can benefit the performance of your map, since each monster has to do route calculations. For only a handfull of monsters this will not be a problem but imagine a large map with many active roaming enemies accessing the node network constantly.
Misc. Info
In Sven Co-op, the info_node entity also has an Activity and Hint type keyvalue. These currently have no function. Judging from the source code, Valve planned to put extra information into nodes, so the AI could use them for specific purposes. Imagine a node that suggests to a Grunt that this is a place to find cover. These hint nodes actually ended up being used in Half-Life 2. In HL1 the code for hint nodes is only found for the Houndeye, where it can investigate buzzing machinery and blinking lights.


Be the first to comment