
This guide covers everything you need to know when you first start playing.
Useful Hints and Tips
Key Concepts and Features
This is a guide about how to survive and earn enough money to build a nice Satsuma car in a decent amount of time. It is for new players and those who have not played the game recently and are unfamiliar with the current version.
- This guide assumes you know the following things. If you didn’t know this already, don’t consider these spoilers as until you understand these things, you have no hope of getting anywhere in the game.
- There is no “right” way to play MSC. You actually never have to touch the Satsuma ‘kit” at all to still have a good time enjoying 1995 rural Finland. If you choose to build the Satsuma, you can make it a street rod, a rally racer, a drag racer, or whatever pimpmobile you want, and switch back and forth at will, as long as you’ve got the money. You can be a good, hard-working person or a layabout drunk. You can have a home or live on the street. Whatever you find enjoyable, within the limits offered by rural 1995 Finland.
- There is 1 save slot. Unless you manually copy your save files to a safe location, starting a new game overwrites the previous save.
- No quicksave. You can only save at toilets/outhouses, of which there are only a few scattered across the map. Strangely, this does NOT decrease your need to drain your bladder. But more to the point, it means you must sometimes go through much gameplay and accept must risk along the way between opportunities to save.
- Saving also quits the game to the main menu. When you continue the game, the in-game time will have advanced 1-2 hours. Because various NPCs and events are only available at certain times of day, this can make it hard to keep appointments. Thus, you sometimes need to go long periods without saving, to save time in the gameworld.
- Permadeath is on by default (toggled at bottom of driver’s license when starting a new game). If you die with it on, you start over from scratch (although your previous character gets a tombstone at the church). Also, quite a few achievements are only available with permadeath on. Dying without permadeath is (without cheats) often almost as much of a pain as with, in terms of the recovery process. So try not to die. It will suck either way.
- There are a gazillion ways to die. You can avoid many by not being a reckless, drunken idiot, no matter how much the game tempts you. A few ways, even if you’re being careful, are just BAM!, you’re dead (such as meeting a reckless, drunken AI idiot head-on at a blind hill or corner). Others can be held off (most of the time) with proper risk management. But the bottom line is, expect to die and don’t get upset when it happens. Learn from your mistake (if you made one) or curse fickle Fate, and go on as best you can.
- There are survival aspects: You have to buy (and consume) groceries, pay bills, not burn your house down, etc. This requires money, getting which requires fuel (which requires money) and time. It also puts you out on the dangerous roads where you’re at risk of dying all the time. And all this not including the vast amount of extra money you need to build a decent Satsuma.
- There is a totally optional story involving a love interest for the player character. Without spoiling the details, understand that following it WILL end your game, although you get an achievement for that. So, if you want that achievement, go for it. Otherwise, put it off until you’ve done everything else you want to do with your current save.
- You cannot get all achievements in a single play-through. Many require getting killed in stupid ways and are only available in permadeath games.
- Don’t be afraid to use mods or even “cheat”. MSC is, after all, an early access game so there are bugs. Even if you play permadeath and accept the consequences, there will be times when a bug kills (or otherwise totally hoses) you, as opposed to your own stupidity. So have the capability to recover from such things. You’ll find a list of recommended mods later on in this guide, the first few of which are present specifically for such instances.
With that said, on with the recommendations for how to get started.
Important Health and Safety Tips, and Other Useful Tidbits
Here are some things which new players, and returning old players, need to know to stay alive and/or avoid the consequences of dying.
Cheating Death with Alt-F4
Whether or nor you have permadeath on, dying sucks. Fortunately, you can cheat death with ALT-F4. You know when you die because the screen gets covered with blood and you start screaming. This lasts a couple of seconds. If you hit ALT-F4 during this time, you quit the game and can reload from your last save. But you have to be quick on the draw here. If the word “Saving” or the newspaper showing your death ever appears on screen, you’re too late and must suffer the consequences.
Given the strong incentive to save infrequently to avoid wasting in-game daylight, using ALT-F4 often makes you lose the better part of a day’s work. But that’s better than starting all over or getting home from the graveyard and collecting all your scattered possessions.
Ai Rally Cars
There are now 9 AI rally cars running the race from 1000-1800 both Saturday and Sunday. These guys are like Pena only way worse: there’s more of them, they go way faster, and they’ll run you over without hesitation. Do not drive the dirt roads during racing hours in anything except the tractor or truck, and think twice before even trying that. So, for most of the weekend, the only safe way to leave home is with the boat.
So, doing jobs is largely out for the weekend. However, you can use this time to partake of the social aspects of MSC nightlife (the pub, the dance pavilion, ventti), de-stress in the island sauna, or work on the Satsuma.
Note: Also new is that during racing hours, the rally is shown live on TV (on the default starting channel) so you can watch the AI drivers crash.
The Helmet
You now have a motorcycle helmet. It begins on the desk beside your game. Put it on by focusing on it and hitting F. Take it off by looking straight down and hitting F.
There are a number of basic things to know about the helmet:
- Operating the Jonnez without a helmet at a police checkpoint results in a fine.
- Must be wearing the helmet when entering the rally race.
- Cannot eat, drink, or smoke while wearing the helmet.
- Helmet can be repainted.
- Makes wrecking any vehicle somewhat more survivable.
But, the most important thing about the helmet is that it protects you from bees in the eyes, a new way to die. Basically, if you drive a vehicle at high speed with no face protection, there’s now a chance that you could just die out of the blue from getting hit in the eye by a bee. This applies not only to the Jonnez but also any vehicle without a windshield, However, it’s not a problem with the boat and it’s hard to get the Gifu fast enough to worry about it.
Limited Stock at Teimo’s Store
Teimo’s store now only restocks once a week instead of every time you load the game. IOW, if you buy all the sausage on Monday, there will still be no sausage in the store on Tuesday.
Restocking occurs at 0001 Thursday morning. However, if the player is in the vicinity of the store at that time, restocking will not happen. Also, if the player saves at the store’s privy after 2200 Wednesday night, the store will not restock due to the time advancement putting the player back at the store at midnight. Therefore, the best bet is, don’t go to town on Wednesday night.
Don’t Burn Your House Down
There are many ways you can accidentally burn your house down. Besides the obvious (lighting fires and fireworks in our near the house), using any of the electrical appliances in the house can also start a fire. So for safety’s sake, do the following:
- Move the portable grill and burn barrel out to the front hedge well away from your house. Do any cooking on the grill, not the stove or the indoor coffee maker.
- Don’t leave the TV on for too long.
- Don’t use the electric sauna. If you want to use a sauna, use the wood-burner at the island cottage.
Free Stuff
No, not vehicles or their parts. See a wiki for where they are. I’m talking about player survival-related stat-changes, which are even more important.
- Free drinks: Besides the old kitchen sink, there are now new hand-pumped water wells scattered around the map: Jokke’s house, haunted mansion, Ventti house, Grandma’s house, and north end of strawberry complex.
- Free food: Catch, cook, and eat fish. Also, kill a moose (best to hunt them with Gifu) and cook the meat. Immediately or it rots. So have the portable grill with you.
- Free fatigue increase: During the night, turn on the TV. All stations are off the air and a test pattern is showing. Stare at this and your fatigue increases quickly. Very useful for when Jokke calls at 0200 and you want to go back to bed. About 1/2 a fatigue bar will let you sleep until about 0600-0700.
- Free fatigue decrease: Drink as much as you want of Grandma’s coffee. Only available when delivering groceries in good weather at Grandma’s house. IOW, it can be raining elsewhere on the map, but the sun must be out where she lives.
- Free stress relief: Hang out on the island, take a shower, chop firewood, and drink Grandma’s coffee.
Alternative Transportation
Should you find yourself afoot on the paved roads, you can ride the bus. Just sit at a bus stop and eventually the bus will come. Pay the ticket and get off at the stop closest to where you want to go. Beats walking.
On the dirt roads, you can hitchhike and get a ride from Pena, your drunken, murderous cousin driving the little green car that frequently kills you. This is free. Be sure to wear your seatbelt. You can also get an achievement for flipping him off but be prepared to die if you do.
So, let’s say you died in a non-permadeath game and find yourself afoot at the graveyard. Go to the town bus stop. Ride the bus to the stop in the SE corner of the map, just S of the dirt crossroads. Walk to the dirt crossroads. Hitchhike with Pena, who will take you home. Hopefully before you starve, die of thirst, or stress out.
Other Info
This guide just hits the high points of important concepts without going into any detail. If you want more detailed info, check out the many wikis (official, semi-official, and reddit), plus YouTube. Just be advised that any advice from prior to late-2019 is probably obsolete so check the date.
When to Build The Satsuma and What It’s Good for
When to Build the Satsuma
There are 3 main things to consider here:
- The 1st time or 3 your build the Satsuma, even armed with tutorials and a handy guide on the flag in the garage, it will take a lot of playtime and mental effort. Losing this investment is a major reason to turn permadeath off. But the more you build the car, the more you memorize it and the faster you work, so this initial investment decreases significantly with the learning curve, making permadeath less scary.
- Many key parts of the Satsuma (mostly in the engine, some in the transmission) wear out with use and abuse, and the parts you have to start with are already on their last legs. If you build the car with them, it will almost immediately break down and you’ll have to disassemble it again for rebuilding. OTOH, you can build the car with brand new wearable parts from Fleetari but getting the full set costs about 7084mk.
- Getting the Satsuma built the 1st time, although a major hook of the game and a big personal goal of new players, is really just the true beginning, not the end. The real meat of the game is what you do with it once you have it running.
So, my recommendations are as follows:
1st Few “Playthroughs”
Here, your goal is simply to slide down the learning curve on building the Satsuma, plus learning a lot of lessons about surviving the Finnish roads during your grocery runs and odd jobs. You’re not really trying to make significant progress in the game, you’re just learning how to play it.
So, protect your time investment by turning permadeath off and building the car with the crappy starting parts. Even go get it registered (assuming it doesn’t break down en route there). Then quit and start over because you’ve got a crappy car and you will have noticed many things in the game world you could have done better.
Subsequent Playthroughs
Once you’ve gotten a handle on Satsuma construction, the general game mechanics, have become familiar with the map, met the important NPCs, etc., you can now play the game properly, as if you were a true Finnish redneck born into the gameworld, turning wrenches and driving stupidly fast on very bad roads for nearly 2 decades.
Now you can turn permadeath back on and not start building the Satsuma until you have enough money to replace all the wearable parts (and maybe get some of the aftermarket parts that won’t fail your vehicle inspection). By this point, losing Satsuma construction progress by untimely death won’t bother you so much as you’re now good at it and will consider it less of a pain than recovering from a non-permanent death.
Purpose of the Satsuma
Every vehicle the player can drive in MSC has a specific purpose and isn’t all that great at other jobs. The Satsuma is unique in that you can configure it to serve 1 of 3 distinct purposes and, with enough money, can change it back and forth between these versions. These versions are:
- Street Rod: Essentially the default as you must initially build a street-legal vehicle to pass inspection. Cannot enter the rally. A pimped version of this is the only way to catch the girl of your dreams (which ends the game). In the meantime, you have a light utility vehicle that’s more fun but less-capable than either the van or the Ruscko, but you can sleep in the back seat so don’t have to get home before you die of exhaustion.
- Rallycar: Start with a street-legal, registered Satsuma then apply a bunch of expensive aftermarket parts to make it rally-legal, and a few more to make it faster, then go court death and bankruptcy competing in the weekend rally races. Otherwise, as a utility vehicle, you gain cargo space but lose the built-in bed, and the girl is not impressed.
- Dragster: Specialized to accelerate as quickly as possible in a straight line on pavement so not much good for anything else, like driving anywhere in Finland other than on a runway. However, it has the most cargo space due to being stripped down as much as possible to minimize weight. You CAN drag race in the other versions but won’t do as well as a specialized dragster.
Note, however, that the Satsuma is also unique in that everything on it can be damaged from wrecks or hard use, and wearable parts continually die slowly from just regular use. Thus, using the Satsuma for a utility vehicle saps its lifeforce, leading to increased maintenance costs and the time sunk in repairing/servicing its problems. It’s thus best to limit use of the Satsuma to pursuing one of the above goals unless money and doing repairs don’t bother you.
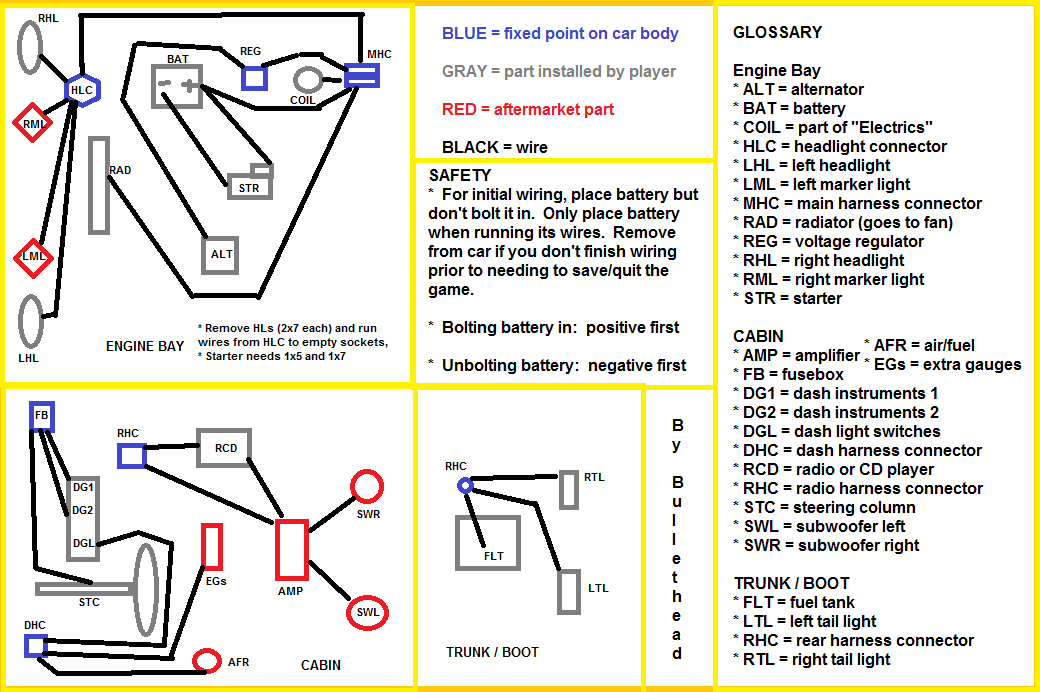
Useful Flags
Below are a couple of flags. One for building the car, one a wiring diagram. The car-building one I have modified heavily from an obsolete version. The wiring diagram is my own creation.

How to Drive Your Satsuma Correctly
I always see people driving their Satsumas at the redline, driving it incorrectly and forcing it more than it can, getting it out of the comfort zone.
Here’s a guide on how to drive your Satsuma correctly and keep it happy, and increase its efficiency and life.
Do not rev it to its limit, really
- Many car parts break because the engine is working too hard and is not in its optimal range. It is better to change gears sooner and at lower engine speeds. When starting to drive, do not hold the clutch pedal down to rev the engine very high before releasing it and driving. Instead, press the clutch, increase the engine speed to around 3000 to 4000 RPM, and then quickly release the clutch to start driving. This puts less strain on the car.
There’s no need for insanely big speeds
- At high speeds, the car also runs at high RPMs, so obviously, you need to calm your fast and furious, reduce your maximum speed up to 100-110, because the car itself (if stock), was never made to go 160 km/h bone stock or in GT version. Have a general speed of 60 on dirt roads and around 80 on asphalt. It indeed takes longer to get to somewhere, but atleast you save condition of your parts so you can drive at a bigger distance but at just a bit little speeds.
Don’t off-road it
- As I said, driving at lower speeds is also more efficient with handling, at lower speeds like 60 or 80, you generally have more control over the car rather than 120 or 140 km/h on dirt and asphalt roads. Offroading it and forcing it off the dirt road and going over big bumps and so on just forces the engine to work more and more.
Idle it when needed
- Let’s say you go 100, before you enter Perajarvi and your like at the hill, consider using your clutch to full pressure and shift your car into neutral, it saves fuel and puts less stress on your car. Or if you dont want to shift it, simply hold clutch until the speed is really low, like 40 km/h or so.
Other Vehicles and Their Uses
Besides the Satsuma, the player either begins with or can acquire a number of vehicles, each of which is useful in 1 or more ways in accomplishing the main goals of staying alive, making money, and getting the Satsuma into shape to accomplish one of the main game goals. These are:
- Jonnez ES “moped” (actually a minibike as it as no pedals): Available from the start. Cheapest vehicle to operate as it can circumnavigate the whole map on about 1/8 of a tank Runs on 2-cycle fuel. Unique in that you can pick it up and stow it inside larger vehicles, so you can use it to get home after staging the other vehicle away from home, then getting back to it when needed. Reasonably fast but can’t carry passengers and, unless you have the “Carry More” mod, you can only bring 1 item with you on a trip. Thus, without this mod, it’s pretty useless except to get home after staging a vehicle elsewhere, to get to the never-to-be-sufficiently-damned strawberry field, or to deliver adverts for Teimo or Fleetari. With the “Carry More” mod, however, it’s quite useful as a grocery-getter, bringing supplies to Grandma, picking up Satsuma parts from around the map, and making low-volume kilju runs (either delivering to Jokke or picking up the empty bottles at the landfill).
- Boat: Available from the start. Runs on 2-cycle fuel. Only way to get to the island where the kilju bucket, fish trap, camera, coffee pot, camera, wood-fired sauna, and fireworks are. Also allows direct trips from home to the dance pavilion and ventti house. Not much good for anything else at present You can, for example, toss the Jonnez in the boat and sail to the town, then use the Jonnez to move purchases from the store to the boat but this often doesn’t end well due to the Jonnez being a bit glitchy when put in other vehicles.
- Kekmet Tractor: Available from start. Burns diesel or fuel oil, reasonable fuel efficiency for a heavy vehicle. Only vehicle that can pull the firewood trailer, which can also be used for carrying wrecked vehicles (including the Satsuma), lots of groceries/kilju bottles, or large car parts. Has front forks that can upright overturned vehicles or put them in the trailer. Can tow junk cars to Fleetari for money but is slower at this than the Gifu truck. Essentially indestructible unless overturned.
- Hayasiko Van: Initially owned by your uncle and only available occasionally for short-term loan after playing the game a while. Eventually, however, you get it for keeps (see the Uncle section). Burns diesel or fuel oil but as you’ll frequently be on the policed roads, you should only run diesel. Good fuel efficiency–can circumnavigate the map on 1/8 of a tank. Can carry the most stuff and also 1 passenger but limited to 80kmph on the blacktop or you’ll get a speeding ticket. Can easily carry the Satsuma rear seat or the sketchy sofa found at the landfill so you can have a bed wherever you roam. Also good for high-volume kilju runs. Nice to have but, if you’ve got the “Carry More” mod, you won’t really miss it if you were used to having it from the start in earlier versions of the game.
- Gifu Sewage Truck: Initially owned by your Uncle and only available after he loses his license (see the Uncle section). Burns diesel or fuel oil but diesel recommended or your uncle will have to sell it, depriving you of it. High operating cost due to large fuel tank and burning nearly 1/2 of it circumnavigating the map. Indestructible (except for the windshield) unless overturned so fear no wrecks, which can be useful for meeting your girlfriend. Only vehicle that can suck septic tanks, which is a highly profitable job. Can also tow junk cars to Fleetari faster than the Kekmet. Has built-in sleeper cab and 1 passenger seat but otherwise not much cargo capacity–the Jonnez will fit inside but complains the whole trip.
- Ruscko: Can be acquired by theft or by gambling. Must be de-wasped prior to use. Burns gasoline. Has passenger seat. Not quite as much cargo space and rather worse performance than the van but you can sleep in the back without furniture. If you can’t get the van early enough to suit your needs, consider stealing this. Otherwise, not very useful, more a prestige item. And it looks like crap unless you use mods to pimp it.
- Other Vehicles: You can briefly come into control of various NPC-driven vehicles if you dispose of their drivers. However, these vehicles never pass into your permanent ownership and respawn with their resurrected NPC drivers when you save/quit/reload.
Your Uncle and Getting His Vehicles (minor spoilers)
The big change introduced in the late-2019 updates is that the van and sewage truck are no longer available from the start. This forces you to make due for some time with the Jonnez and tractor (and, optionally, steal the Ruscko). However, this is really not that big a deal–you’ll find you really don’t need the vehicles that much in the early going and you’ll get your hands on them soon enough anyway.
Borrowing the Van (minor spoilers throughout)
You can only get your uncle’s vehicles (van and truck) by talking to your uncle. He lives in the house between yours and the woodshed so you’ll be walking by his house frequently to chop firewood. However, when you start a new game and for an indefinite time thereafter, he’s not home, but he’s left you a present on the table behind his house.
Note: Your in-game actions affect how fast uncle-related events happen. See timing section below for details on that.
You can tell when your uncle finally comes home because the blue van will be parked behind his house (you can see this from your back porch so keep an eye out if you’re not chopping wood right then). He will also only be home that briefly and will then be gone again for some time, so if you need to use the van, ACT NOW. Knock on his back door repeatedly until he answers. He will give you the van keys and you can now run that major errand you’ve been needing the van for. Be sure to bring the van back to uncle’s house. Also, it will need fuel.
Once you have the van keys, you can simply borrow it again next time it’s there without knocking on the door. You will likely go through this sporadic, temporary borrowing process 2 or 3 times before you get the van for keeps.
Note: Borrowing the van is like being Cinderella–you have to get it back to your uncle pretty quickly, and you can’t sleep, save, or walk too far away from it, or it will despawn and leave you stranded.
Permanent Ownership of Van and Truck (minor spoilers throughout)
Eventually on your way to or from the woodshed, you’ll find uncle sitting at the table behind his house with a partial case of beer. The van will not be present. If you sit and have a beer with him, he’ll tell you his driver’s license has been revoked so he no longer needs his vehicles. They are now yours. You already have the van keys and uncle will tell you the truck keys are on the rack in the hall of his house. Now all you have to do is find the van and truck.
Both vehicles are in the town of Peräjärvi.
- Truck location: sewage treatment plant.
- Van location: next to closed shop adjacent to vehicle inspection shop.
Go to Peräjärvi on the Jonnez. Drive the truck to Teimo’s and park it behind the fuel pumps to be ready for the septic tank job. Refuel it now if possible. Throw the Jonnez in the van, refuel the van if possible, and drive home (doing any errands along the way). Congrats! Now you have all the main vehicles. And you no longer have to talk to your uncle again, although he’ll still be there at the table and you still get free beer by sitting with him.
The Timing of Uncle-Related Events (all spoiler)
Your uncle first appears within a random time (1.5 to 3 gameplay hours) after you install 1 of 3 things on the Satsuma:
- Driver’s seat; or
- Engine Block; or
- Both trailing arms.
If you do none of these, he seems to appear anyway, after some further random time. Subsequent appearances also seem to be variable.
Teimo’s Store and Fleetari’s Shop
It’s important to understand the key differences between the 2 vendors, Teimo and Fleetari.
Teimo
Main purpose
Sells consumables for both vehicles (fuel, other fluids, batteries, oil filters, spark plugs, belts) and the player (food and drink, charcoal, mosquito repellant, etc.). Off-the-shelf items restock weekly but he never runs out of fuel.
Mail Order Parts
On your workbench your garage is a catalog of aftermarket Satsuma parts. When you complete an order form, you get an envelope which you must place in the mailbox next to Teimo’s shop door. A few days later, Teimo will call saying your order came in. He’ll call multiple times if you don’t pick it up right away. Go inside to pay for them, then pick the parts up outside.
Note: You can place the order before you have the money to pay for the parts because you don’t pay until the parts arrive a day or 2 later.
Social Aspects
At 2000, Teimo closes his store and opens the Pub Nappo next door. There, you can get drunk with the locals.
There are slot machines in both the store and the pub. You can also buy lottery tickets in the store.
Fleetari
Main Purpose
Performs major vehicle services (new tires, body repair, gear ratio change, repainting, etc). Also sells new replacement parts.
Note: Everything at Fleetari’s is cash in advance (the opposite of ordering parts from Teimo). If the service will take some time, you pay up front.
Servicing Whole Satsuma
This is for things like new paint, installing a roll cage, changing gear ratios, repairing body work, etc. Park in front of the shop, go in, select what you want from the catalog, and pay up front. Fleetari will loan you the Ferndale to get home. He will then call when the Satsuma is ready. You’d best get there quickly, returning the Ferndale, or Bad Things may happen.
Buying New Wearable Parts
First, make sure the part you want is not installed on the Satsuma (either it never has been, you’ve removed it, or it came off in a wreck). You do not need to bring the part to Fleetari. As long as it’s not on the Satsuma, a new version will appear on the shelf. Take the part from the shelf and move it to righthand part of Fleetari’s counter. Then click the cash register to pay for it.
Doing this deletes the old part from the world and the only one left is the new one you just bought. Now you have to carry the new part to the Satsuma to install it. This is the only Fleetari transaction where you get immediate results. The new parts are yours as soon as you pay for them. No waiting.
Getting Tires and Repairing Parts
To get tires, put the rims (which might already have tires on them) on the counter, then select the type of tire from the catalog on Fleetari’s desk. Pay the price and come back to pick them up once Fleetari says they’re done.
You can do the same thing to repair wearable parts. However, this is not at all recommended because repaired parts only get about 50% health, whereas new parts are (not quite) 100%.
Where’d All My Money Go? (Aka Expenses)
You Need Income!
You start the game with 3000mk (and 10-30% more in your present). This will barely cover your basic survival needs for a week or so, let alone get the Satsuma in basic working order, much less modified and pimped. Finland is an expensive place to live.
Cost of Living
- Bills: Every week, you have to pay bills for home electricity and telephone, which add up to about 300mk/week depending on use. These bills come on different days of the week so check your mailbox every time you pass it. Failure to pay bills will result in those services being cut off.
- Bodily Needs: Plan on 1 pack of sausage/day and 1 case of beer/week. That adds up to about 350mk/week. You can reduce the beer usage somewhat by drinking free water at home or from a few wells scattered about the map, but you’ll still drink a lot of beer just to survive.
- Fuel: You have to drive a lot to do the jobs to make the money to pay your bills and feed your body, plus make weekly supply runs to the store. This means you burn a lot of fuel. Expect to spend 300-500mk/week on fuel (mostly diesel) at the beginning when you just have the boat, Jonnez, and Kekmet. This increases as you get more vehicles (especially the Gifu).
So, your basic living expenses are going to be anywhere from 1000-1500mk/week. And if you can’t meet them, you starve in a dark house. MSC hates folks who don’t work.
Cost of Satsuma
You have quite a few options here and it quickly adds up, so it’s best to take this in stages:
Street-Legal with Original, Worn-out Parts (not recommended)
This is the bare minimum just to get the car assembled and inspected. But it won’t run very well. Get tires by dropping rims off with Fleetari. Other parts and fluids from Tiemo’s store.
- New road tires: (Standard 1750mk or Gommer Gobra 2110mk).
- Alternator belt: 295mk.
- Motor Oil x2: 298mk.
- Brake/Clutch Fluid x3: 105mk.
- Coolant x2: 490mk.
- New battery: 495mk <– old battery is dead, just burn it.
- New oil filter: 59mk <– old oil filter is junk, just burn it.
- Spark plugs: 99mk.
Total: 3591mk or 3951mk depending on tires, and it will just break down immediately.
Street-Legal with New Wearable Parts: (highly recommended)
Before assembling any of the engine, go to Fleetari’s and buy every part on the shelf except the block and oil pan. The block and oil pan don’t wear out (although you can break them in wrecks or through engine abuse), so you don’t need them now. IOW, you need to buy: water pump, alternator, starter, 4x pistons, crankshaft, head gasket, rocker shaft, gearbox, fuel pump, and clutch disc.
- Sub-total for all new wearable parts: 7084mk.
- Total (including parts, fluids, and tires in #1): 10675mk or 11035mk depending on tires:
Street-Legal Aftermarket Parts (highly recommended)
The following parts will pass vehicle inspection and improve your experience by making your car faster, more reliable, and easier to tune. Thus, I recommend installing them in the initial build:
- Racing radiator: 1215mk <– much better than stock radiator (but might prevent GT achievement).
- Fuel Mixture Gauge: 549mk <– really helps tuning carburetor.
- Extra Gagues: 299mk <– helps you spot engine trouble before major damage occurs.
- Twin Carburetor 1750mk <– improves speed and required for GT Restoration achievement.
- Subtotal for aftermarket parts: 3813mk.
- Subtotal for new wearable parts: 7084mk.
- Subtotal for basic required parts and fluids: 3591mk or 3951mk.
Grand Total for Good Satsuma Build: 14488mk or 14848mk
Throw in 20L of gasoline in the jerrycan just to get to the inspection shop, and the 325km inspection fee, and call it an even 15,000mk.
Going Further
So, for 15K mk you get a basic, street-legal Satsuma. Expect to spend about that much again turning into an effective racecar, and you can spend even more adding cosmetic features. And after all that, the car will still look like a rust-bucket. To fix that, you need a new paintjob, which will cost 11K-21K mk by itself.
And this is not even considering repairs to damage from wrecks and the inevitable need to replace the wearable parts. Basically, the Satsuma is a money pit. But that’s the basic trope of the game. You spend all this time and money fixing the car, the you wreck it and have to do it again, at great expense. It’s a pastime for those who enjoy doing this sort of thing.
Every Day I’m Hustlin’ Hustlin’ (aka Making Money)
So, you need 1000-1500mk/week just to survive and get around, and you need an extra 15,000mk to get a reliable, basic, street-legal, Satsuma (and a lot more for racing parts, pimping, normal wear and tear, and the inevitable crash damage repairs). Fortunately, this money isn’t that hard to come by if you’re willing to work.
Starting Income Opportunities
At the start of the game, you have the following main ways of making money. None of them are particularly profitable or pleasant by default, but the mods I recommended above really alter the balance. So I explain them with and without mods.
Firewood
This is a great job. It pays 3200mk and the trip is relatively short even in the slow tractor. Plus, chopping the wood eliminates stress so you don’t need to smoke as much. Problem is, by default it’s only available every 8 hours of playing time, which is about 1 week in the game world (1 real life hour is about 1 day in the game). Luckily, there’s the “Firewood Job Cooldown” mod, which lets you reduce the delay between jobs down to 1 real hour if desired. Understand this IS summer so firewood demand is low, but speeding this up to twice a week makes the early game suck a lot less.
Kilju
To make kilju, you need the bucket (from the lake cabin sauna room), 6 bags of sugar, 1 box of yeast, and 30L of water. To sell kilju, you must put it in empty fruit concentrate jugs and take them to Jokke. Then you retrieve the empty jugs at the landfill. Repeat. Each batch fills 20 jugs and requires about 2.5 real hours to make. You can make about 3200mk profit per batch and can ultimately produce 2 batches per week if you have 20 jugs. But you can only get 6 jugs per week at the store, which means making 2 or 3 delivery/retrieval trips per batch, which limits you to 1 batch/week for the 1st few game weeks. Still, good and easy money even to start with.
Problem is, you need a way to carry all those jugs at once. Without the van and without mods, your only options are the stolen Ruscko or the tractor’s wagon, both of which are relatively slow and burn a lot of fuel. With the “Carry More” mod, you can use the Jonnez to carry up to 10 (or 11) jugs at once, which will cover the 1st couple weeks of the game when you have at most 12 jugs. After that, you should have the van available at least periodically.
Towing Junk Cars to Fleetari
There are 4 junked car bodies scattered around the map. Prior to mid-2019, there were only 3 and they were always in the same places. Since then, they can be in any of a couple dozen places randomly chosen each new game. If you manage to drag them to Fleetari (using either the Kekmet or the Gifu), he’ll pay you from 1200-4500mk each. Thus, you can expect to get about 10K mk in total from this (less lots of diesel fuel and time), but each is a 1-time job.
Without mods, you’ll have to spend a lot of time looking for the wrecks, and will need to look everywhere, including in old, boarded-up barns. If you have MSCEditor, however, you can use its map function to show you where they are. Most will be far from Fleetari’s and moving them is slow, so depending on luck of the draw, this may or may not be worth the trouble. Or it may be better to wait until you have the Gifu instead of using the Kekmet, at least for certain wrecks.
Note: the 4th car is a GT Satsuma. Beside it will be the GT Console part, required if you want to get the GT Restoration achievement for building your own Satsuma.
Picking Strawberries
This job totally sucks and, if you use a few mods (“Carry More” and/or “Firewood Job Cooldown”), you can avoid it completely. Without mods, this job exists to give you a (marginally) productive way to spend your downtime between firewood and kiju jobs.
This monotonous job requires you to go to the strawberry field, grab an empty box, take it to the 1st bush, pick 1 strawberry at a time, drop it in the box, repeat until the bush is empty. Move the box to the next bush and repeat. It takes (slightly less than) 4 bushes to fill one box. Then throw the full box onto the stack of full boxes and take 40mk from cash box on the table. Pick up another empty box, go back to the 1st bush still having berries, repeat.
At first, it takes geologic time to pick berries but you develop a skill for it the more you pick, so eventually it only takes an annoying long time per box. There are 120 bushes (the 1st 3 rows of the field) you can pick between field resets (happens when you save) so that’s 30 boxes @ 40mk each = 1200mk, plus a 1200mk bonus for getting them all in 1 go (and not wasting any berries). Problem is, until you do this A LOT, your low skill means you can’t fill but a few boxes per day, so you get only a few hundred mk per day of mind-numbing, soul-crushing monotony. Still, that’s more than you’ll make that day building the Satsuma, watching TV, or taking a sauna.
Other, Minor Things
Grandma will call about once a week wanting various food items delivered. This can include grilled fish so be sure to grab the fish trap from the island while getting the kilju bucket. She doesn’t pay with noticeable money (<100mk/trip) but provides a lot of lore and unlimited free coffee. Her coffee is special in not affecting your bladder much. Really useful for adjusting your fatigue level for free. However, she always wants more than 1 item, so you can’t use the Jonnez for this unless you have the “Carry More” mod.
Then there’s Jokke, who frequently calls you at 0200 wanting a ride home from the Peräjärvi bus stop, even before you have a passenger-carrying vehicle. So, until you have either the van, the Ruscko, or the Satsuma, all this does is throw off your day/night cycle for no purpose. But, if you do have a way to drive him home, he’ll pay you about 150mk.
Early Game Bottom Line
So, all in all, early in the game you can count on income as follows:
- 2x loads of firewood = 6400mk.
- 1 batch of kilju = 3200mk.
So you end up with a net income (after cost of living and fuel) of about 8000mk/week (with maybe a few windfalls from towing convenient wrecks). IOW, by the end of 1 week, you should be able to afford all the new wearable engine parts. In another week, you can afford the tires, fluids, and other consumables. And in the 3rd week, you should be able to get all the recommended aftermarket parts.
Later Income
All that really changes later in the game is that you have uncle’s van (for high-volume Kilju runs) and the sewage truck. The sewage truck opens up the septic tank job, which will net you about 3800mk for 2 days’ work once a week if you stay on the dirt roads, burn fuel oil, and only make the trip when all 5 tanks need pumping.
So, basically, once you have the van and the truck, you can set the firewood cooldown back to default. This leaves you with the following income:
- 2 days spent pumping septic tanks = 3800mk.
- 1 load of firewood = 3100mk (net).
- 2 batches of kilju = 4100mk net.
So, it won’t take long to accumulate the wealth you need to build upgrade and/or repair the Satsuma however you want or need to.
Suggested Starting Strategy
OK, now that you understand the salient points of what’s in the world, what they cost, and how to make money with the tools provided, we can finally get on with strategic advice for getting off to a good start in a new game under the current rules (early 2020).
This advice assumes the following things:
- You’ve read the above sections of this guide or acquired that info elsewhere, so you know what to expect from the world.
- You have wikis and other sources of info available for all the detailed “how-to” instructions to accomplish specific tasks.
- You’ve tinkered with building the Satsuma a few times already in failed er, I mean practice saves, so you’re reasonably proficient at that and/or have proper tutorials available.
- You have my recommended mods installed to make your life a bit easier (do a mod-free game only when you’re really good at MSC).
- You intend to build the 15K basic Satsuma with all new wearable parts and the recommended street-legal aftermarket parts, so construction of the engine will be delayed until you can afford the new parts.
The First Day
Your life begins at 1400 so your #1 priority is to get to the store ASAP to stock up on supplies before it closes for the night. Your #2 priority is getting the kilju bucket and fish trap from the island. Because I’m assuming you have “Carry More”, you have 2 options: 1) drive the Jonnez to the store tonight and visit the island tomorrow, or 2) put the Jonnez in the boat, sail to town, use the Jonnez to move groceries from store to boat, and also visit the island as you pass by coming or going. The boat option is rather risky. First, the Jonnez might glitch overboard and be lost. Second, you’ll be coming home in the dark, making it hard to find your home dock unless you’re really familiar with the map. So, I recommend driving the Jonnez to town (you get an achievement for this) and dealing with the island tomorrow.
Note: If you don’t have “Carry More”, then you’re only viable option is to drive the tractor to town (but you get an achievement for this, too).
So, put on your helmet, jump on the Jonnez, and head to the woodshed to grab the diesel jerrycan. The gasoline jerrycan can wait–you don’t need it until you’ve got the Satsuma completely built (or are stealing the Ruscko). Then hustle to the store. Fill the diesel jerrycan and pay for it before doing anything else. Now buy 1 pack of cigarettes, all the sausage packs, all the sugar, all the juice concentrate, 1 yeast, 2 milk, 3 coffee, 2x 2-cycle fuel, 2 charcoal, and 4 cases of beer. Perhaps some spraypaint in colors you like, if you’ve into that. You will now have 1 grocery sack and 9 things that don’t fit in sacks (diesel, 2-cycle, charcoal, and beer), for a total of 10 objects, the max you can carry with “Carry More”. Load up and head back home.
Upon return, check your mailbox and for uncle’s van just to get in the habit (nothing to see yet, just get in the habit). Then drop the diesel at the woodshed then pile your other loot in convenient places around the outside of your house (nothing needs refrigeration). Set the coffee, 3 sausage, 3 sugar, and the milk aside (for Grandma’s future orders). Drink the fruit concentrate and carry the resulting empty bottles, the remaining 6 sugar, and the yeast into the sauna (for later kilju production). Hit F on the cigarettes to have the pack on you when needed for stress relief.
And then be sure to install the trailing arms on the Satsuma body. This will start the random countdown to get your uncle to appear the 1st time. Then attend your physical needs, take a shower, and save/exit the game.
While outside the game, fire up MSCEditor to see where the junk cars and GT parts are on the map. This allows you to plan trips to acquire them, if any look doable with your current means. Write the locations down and restart the game. Then immediately go to bed because you’re still tired.
The Second Day
You have 2 main tasks for today: raiding the island and filling the trailer with firewood. The order in which you do these depends on whether Jokke woke you up at 0200 during the previous night. If he did, either stare at the TV to get sleepy and go back to bed, or chop firewood first so the sun will be up by the time you’re done. This makes it easier to navigate the boat. If Jokke didn’t call, go to the island first thing in the morning.
Either way, immediately upon your return from the island, set the fish trap beside the dock. Then take the bucket inside and mix up a batch of kilju in the shower. While you’re home today, expect a phone call from the firewood guy. Depending on your level of fatigue when you get the call, you can probably deliver the firewood this same day, too. If not, consider drinking coffee. But in general, you should be able to do all these things: chop and deliver the wood, raid the island, and start the kilju. You might even be able to get a second load of firewood chopped before it’s too dark to see.
Thereafter
Every few days (depending on your “Firewood Job Cooldown” setting), you’ll deliver firewood. Every few days, you’ll have a batch of kilju complete, which you must deliver and then go to the landfill to reclaim the empty jugs. You will also periodically need to deliver groceries to Grandma. Make resupply runs (like to refill the diesel can) to the store as needed.
What About the Satsuma?
Apart from the vital step of installing the trailing arms to meet Uncle, remember that any time spent on the Satsuma is non-profit. Concentrate on getting the 7084mk needed for all new parts. You can, however, build the suspension and interior if you have some spare time with nothing else to do.
Mainly though, you’ll need to collect the rims. The stock ones are in the haunted mansion and the GT ones are in a barn near the Ventti house. You’ll need to make a trip out there to get them, so you Fleetari can be putting tires on them (which takes a day or so).
(Re)-Building the Engine
You need to replace a total of 13 parts, which is more than you can carry with “Carry More” if you buy them all at once. If you don’t have the van or Ruscko, and don’t want to risk them falling out of the tractor’s trailer, you’ll have to make at least 2 trips. Fortunately, you don’t need all the parts at once and buying them in batches lets you get started sooner, before you have the money for all of them.
To even get started on the engine, you need the following 7 parts all at once: crankshaft, 4x pistons, head gasket, and rocker shaft (total 3369mk). So that’s half the number and half the money. Then, when you have the rest of the money, go back and the rest of the parts.
General Advice
Plan your moves ahead since saving and loading the game takes away several in-game hours. While this can help fix the day/night cycle after Jokke messes with it, try not to save too often or you might miss important places before they close.
To play well, think about combining different tasks into one trip. For example, when going to the store, take the tractor so you can grab a broken car on your way back. You could also visit Grandma and collect empty bottles from the dump during the same trip. Since each playthrough is different, there’s no perfect guide to follow. Just enjoy the game and try to stay alive.
Some General Tips
Be aware of fluid spilling out of the hood when the engine is overheating. Also, take a look at temperature gauge (in between the clock/rpmgauge and speedometer on top) often. The working temperature is in the middle, so everything above that is overheating. If your car overheats excessevily check your oil level, you can do that by finding dipstick and clicking F on it. The closer spot is to the MIN level – the more your engine overheats and parts wear. Also, it could be dead water pump (if your car has a sound like a turbo but loud, idk how to explain).
When starting a new game don’t assemble the engine with the parts in the garage, instead save up 10,000 mk and purchase brand new engine parts from Fleetari.
Dont buy steering wheels for less than 300PLN or you will get pieceof crap that rotates 90 deegrees and 45 deegrees is recognized as full rotation.
jemali