
More M&B2: Bannerlord Guides:
- How to Make Gold (Fast Method).
- First Mission: Investigate Neretzes’s Folly.
- How to Win Tablut Gambling Every Time.
- Companion Location List.
- Main Questline Guide.
Introduction
This guide will explain how resources move around in the game as it is right now in early access. It will also cover how you can use this information to trade with your group, especially in the beginning and middle parts of the game. We’ll also talk about how this affects whether you should build workshops or create caravans.
Musa of Mali was a real historical figure, a ruler of the Mali Empire in the 14th century, who is famous for his wealth, particularly in gold. His control over the gold trade significantly impacted the economy of the time.
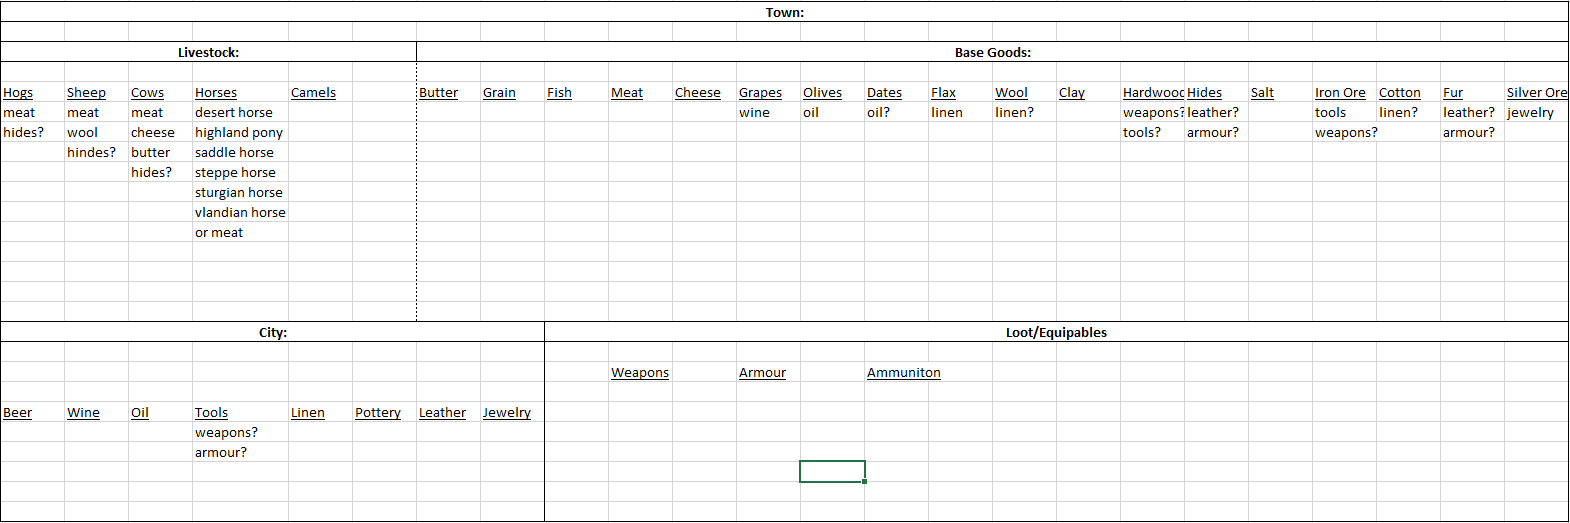
Item Categories (Trading Perspective)
The game contains 3 categories of items in regards to trading. All items are produced at a town or city, with the exception of weapons, armour, and ammunition which can all only be bought, plundered, or sometimes crafted. Each town specializes in one base item, which can sometimes have related items (i.e. towns that raise cows also produce butter and cheese). The item categories are:
- Loot / Equipables
- Livestock
- Goods
Loot / Equipables
These are items that are often plundered off the battlefield. It consists of all weapons, armour, and ammunition. Mounts and food not included.
These are often best used to upgrade your player and companions and then either sell at the nearest town or in the case of weapons smelt at the smith’s for crafting resources.
Livestock (2 Sub-Categories)
Livestock includes all animals and mounts.
- This first subcategory includes traditional livestock animals that are used for food and resources. These are hogs, sheep, and cows. They are all raised in towns around the Calradian countryside.
- The second subcategory includes all mounts. They can be used for food, although this is obviously ill-advised and costly. Their primary purpose is increasing travel speed, increasing carrying capacity, and providing mounts for knights and war.
Livestock is important in that they have a couple different purposes and usually create related goods through their raising.
Goods (2 Sub-Categories)
This includes food items, as well as purely trade items that may boost certain town and city stats (need to test).
- Natural Goods: These are items produced in towns and are reaped directly from the natural resources of the land. Examples include: Iron, Flax, and Grains.
- Manufactured Goods: These are items produced in towns and are created by processing Natural Goods into more complex and valuable items. These are also far less abundant than Natural Goods. Examples include: Jewelry, Tools, and Linen.
Goods are important as they are your primary source of income, and their supply and demand are more impacted by natural abundance than other items.
It is important to understand the good chain, so as to know where goods will be abundant or scarce. See Chart below. Good chains are speculative and not yet proven*. Any marked with a question mark may be outputs or not.
Item Flow (Supply and Demand)
Each area is abundant in certain goods and scarce in others. By understanding where goods originate from you can understand where they will sell cheap and where they will demand a hefty price, it’s all about arbitrage. Remember too, their are other merchants and caravans, as such, to get the highest price for your goods you have to go far from their destination of origin as many caravans help spread the goods further outward. Another option is to go where they are in exceeding demand, often large prosperous manufacturing sectors looking for inputs or kingdoms at war.
Keep in mind, towns have the lowest prices for Base Goods, especially in provinces with many towns producing the same good. Cities, therefore, also have the cheapest prices for Manufactured goods they produce, especially in provinces that have the Manufactured Good’s Base Good input in large abundance. The vice versa is true for where things will be very expensive.
The game will highlight prices in green that are cheap and highlight prices in red that are expensive. This is important to note as generally when you buy you want prices to be green, and when you sell you want prices to be red. It can be confusing as when you go to sell it shows a red price, this means it is more expensive not that your profit will be negative.
The trader skill tree also has perks that say it will show your average price and profit and loss.

The above map shows Calradia’s Kingdoms at the start of the campaign. Each roughly encompasses a different environmental region with different regions having different natural resources.
- Red: Vlandians (e.g. Western Europeans/Normans)
- Green: Battanians (e.g. Celtic Tribes)
- Blue: Sturgians (e.g. Slavs/Norsemen)
- Teal: Khuzait Khanate (e.g. Turkish Tribes/Mongols/Balkans)
- Yellow: Aserai (e.g. Arabic Tribes/Caliphs)
- Red-Purple: Western Empire (e.g. Western Rome/Military Party)
- Pink-Purple: Northern Empire (e.g. Rome/Republic Party)
- Blue-Purple: Southern Empire (e.g. Eastern Rome/Monarch Party)
Each one shares similar characteristics to their historic influence. As such, they share similar natural resources as their historic counterparts, and similar trade patterns. Their behaviour and differing preferences may also lead to changes in goods supplied and demanded. A perfect example is the lack of quality horses in Vlandia yet a heavy reliance on heavy mounted knights. Create a large demand for quality horses.
Vlandians:
They have very cheap hogs, however, cattle can be very expensive. They have less manufacturing capabilities and thus their prices are low for most Base Goods and high for most Manufactured Goods. Their wine and oil are often very cheap in some more mediterranean locations. Their military favours heavy mounted knights and thus has a high demand for war horses, particularly desert horses.
Battanians:
Overall very cheap prices. Abundance in natural resources like grain, sheep, hogs, hardwood, iron ore. Lacks manufacturing sector and thus Manufactured Goods tend to be more expensive, with Jewelry commanding extremely high prices.
Sturgians:
Furs, Furs, Furs, and some flax and linen. Terrific for cheap furs which are in large demand the more south you go and the harsher the land you find yourself in (looking at you Aserai). Similar conditions as Battanians and Vlandians, with some demand for wine, dates, pottery, and olives.
Khuzait Khanate:
Lots of herding animals in the far eastern regions past the mountains. Very good for hides, cows, sheep, and meat. Some areas demand salt. Other really like olives and wine. Iron ores are fairly abundant and tools appear to be quite cheap in the South Eastern parts. Steppe horses can sometimes command a decent price in lands with few available mounts (Cough* Battanians). Some good sources of linen and pottery. Sometimes demands silver ores and leather. Almost always wants some amount of furs for their stylish coats.
Aserai:
Dates, grains, salt, horses, and fish. That is about all they have, for the trade-off of having it all! Sometimes oil can also be quite cheap. Manufactured goods seem to demand high to medium prices depending on recent caravan activity. Generally most food items are cheap, however, items like hardwood and iron ores can garner profits in a land with no trees. If you ever wanted to be a horse merchant this is the place to gather your stock. Can re-sell to horse hungry Vlandians for easily double the price.
Empire:
The Empire has a lot of goods and similarities in common, with less pronounced difference between the three. They have a mixed bag of Base Goods and Manufactured Goods demand and supply. Often their territories have the most volatility in ownership. As such, you can profit off of short-term demand spikes while passing through to faraway lands. Overall, there is more city by city variance and thus opportunities for arbitrage at shorter ranges but with generally less consistency and magnitude (unless you get lucky and can sell to a city after a siege :)).
I suggest experimenting and finding your preferred trade route. It can be fun to role-play and run with the lore of the game, specializing in certain products or trade niches. However, some diversification is always healthy for profits. This is doubly true if you are trading in food, as it can be slowly eaten at by your soldiers, although it does not seem to go bad. Speaking of soldiers, as of March 2020, it is fairly easy to maintain a personal party of at least 25-35 men. You barely, if at all, need to level them up to keep most hostile parties at bay (actually fighting them is a different matter). Keeping them low level is very advantageous in the beginning as you are often operating on a shoe string budget and don’t have the ability to be footing large monthly expenditures between origin and destination. A final note, it can be worthwhile to buy cheap horses and mules to increase your speed, item turnover, and thus profits. It is also a good idea to become a part time horse merchant, as horse carry your people and items, often valuable, and walk themselves.
Item Production Maps
Maps show where each item is produced by province, or which cities manufacture which items. A province being either a town and its bound villages or a castle and its bound villages. Order shown is input Base Goods and then Manufactured Goods where applicable.
These are a prefect guide to understanding where supply and demand will be. I recommend you draw your own trade routes and try them out using these as a guide. Below each map are simple directions to travel to make profit.
I have tried to compare relative goods, and ensure visual clarity, I apologize for my poor image editing skills.
If anyone has any interest in my data files listing villages, towns, and their resoruces let me know. I’ll look for a way to share them wiht you and others online.
Hogs, Sheep, and Cows:
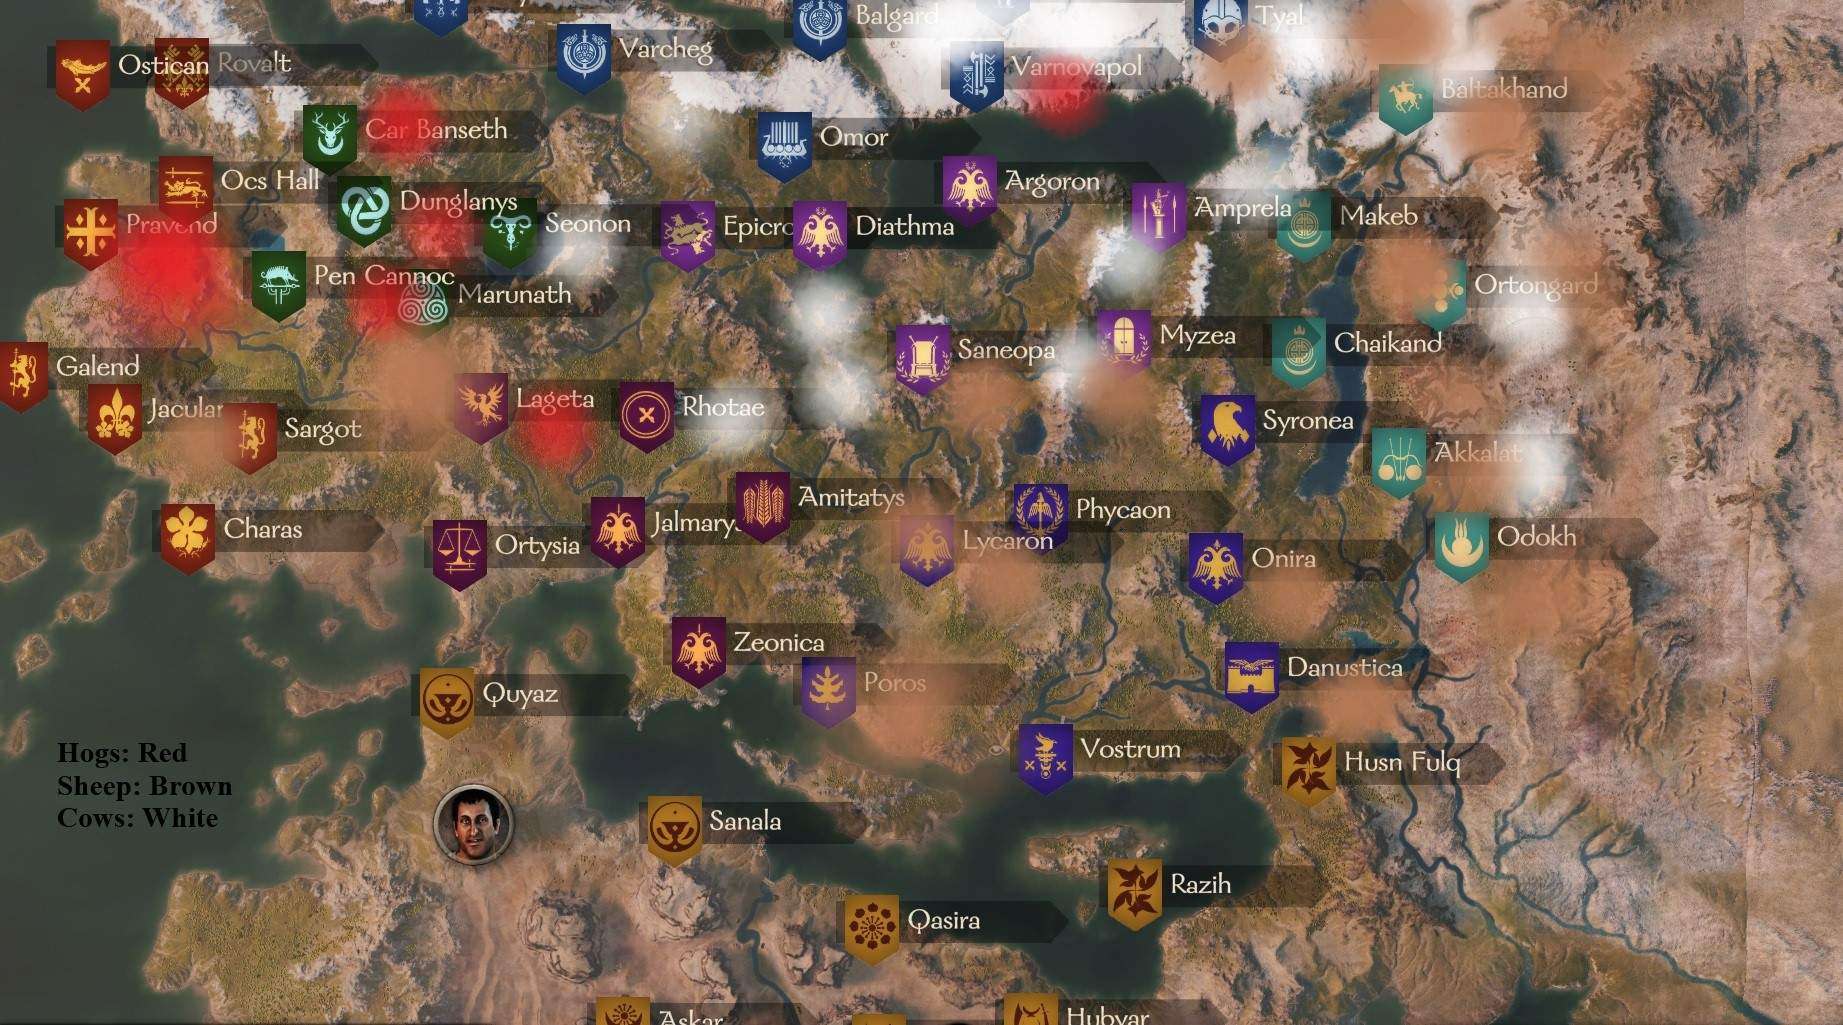
- Hogs go East and South.
- Cows go West and South.
Horses:
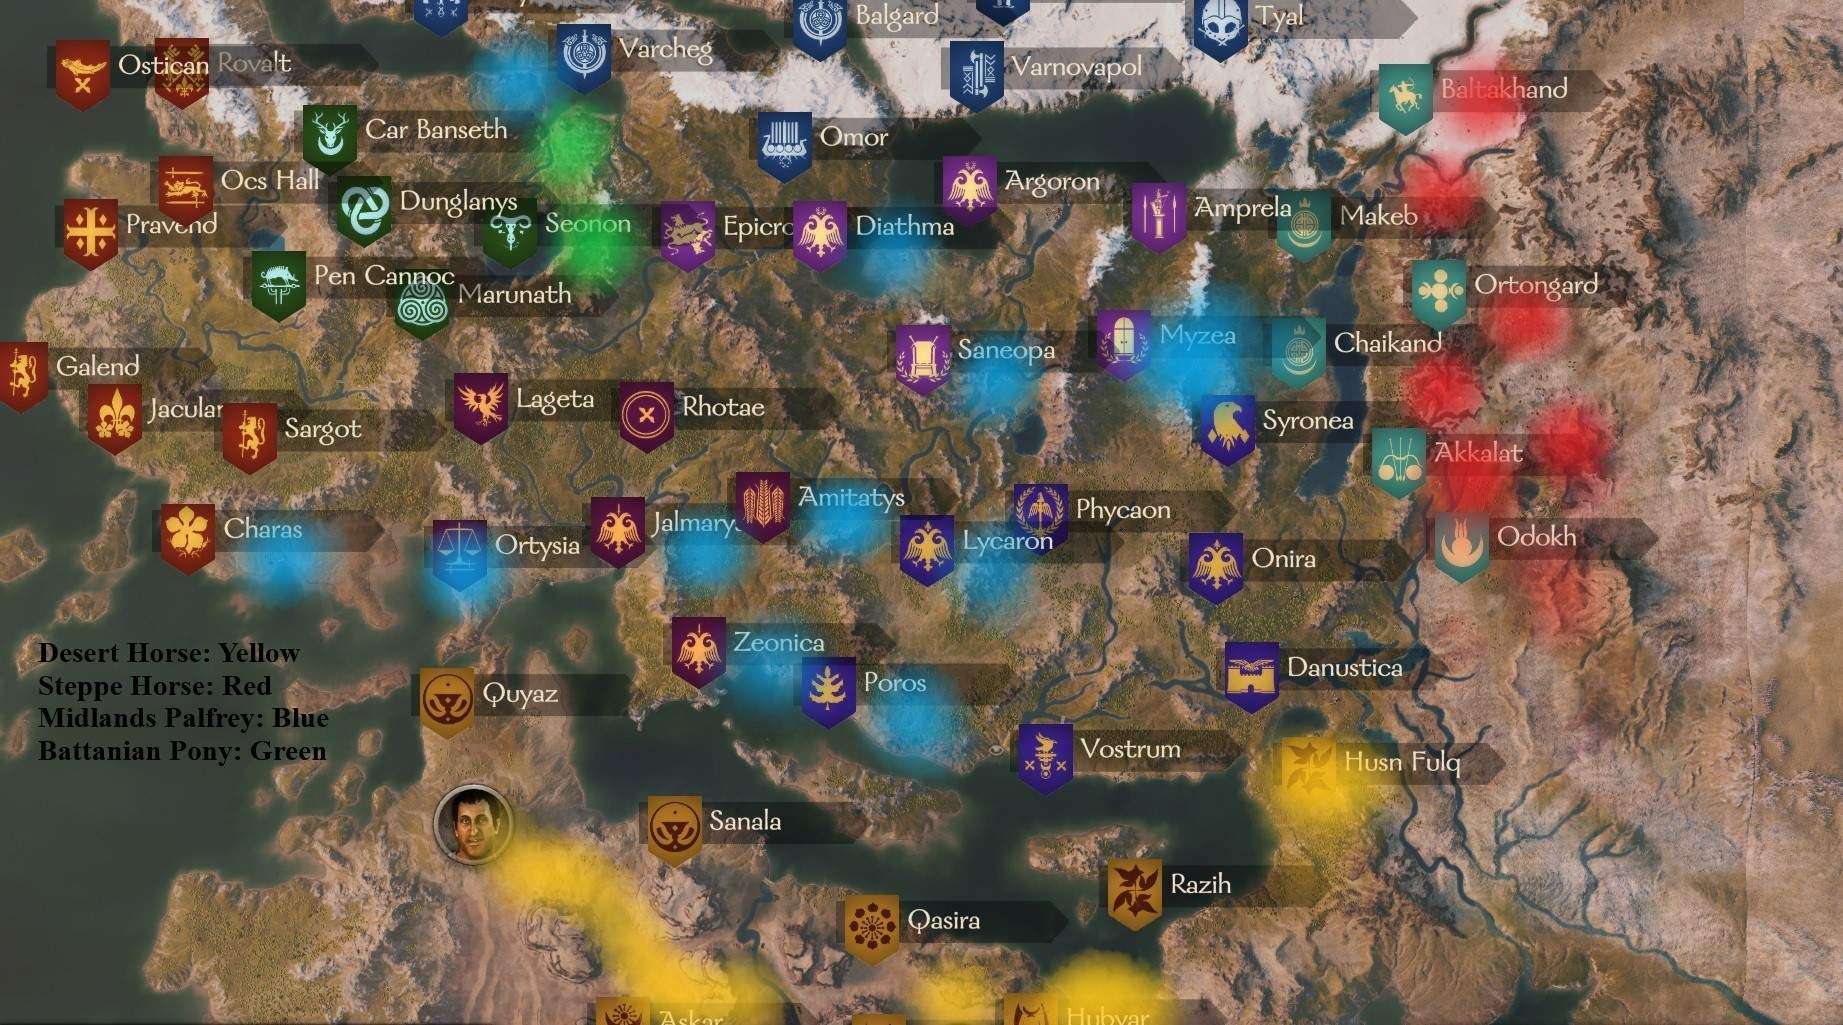
- Desert Horses go North and West.
- Steppe Horses go West.
Grain, Olives, Grapes, and Dates:
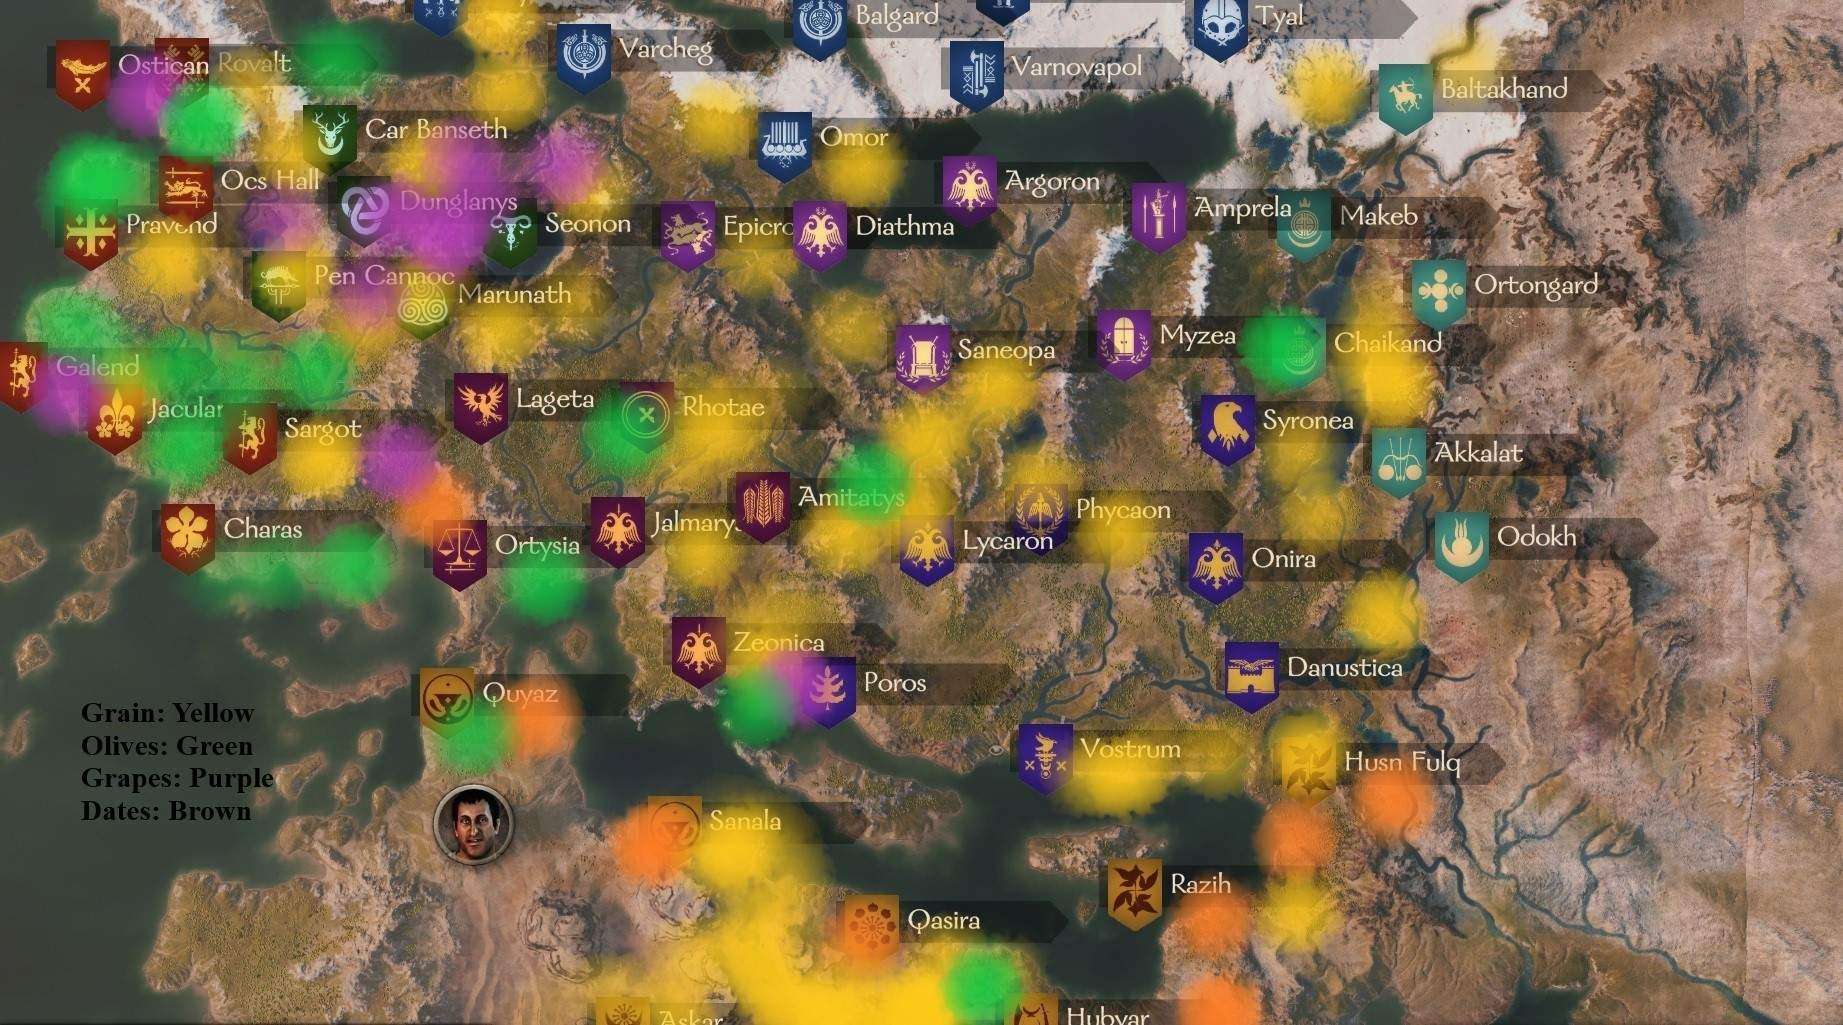
- Olives go East for consumer and South for manufacturer demand.
- Grapes go East for consumer and South for manufacturer demand.
Brewery, Olive Press, and Wine Press:
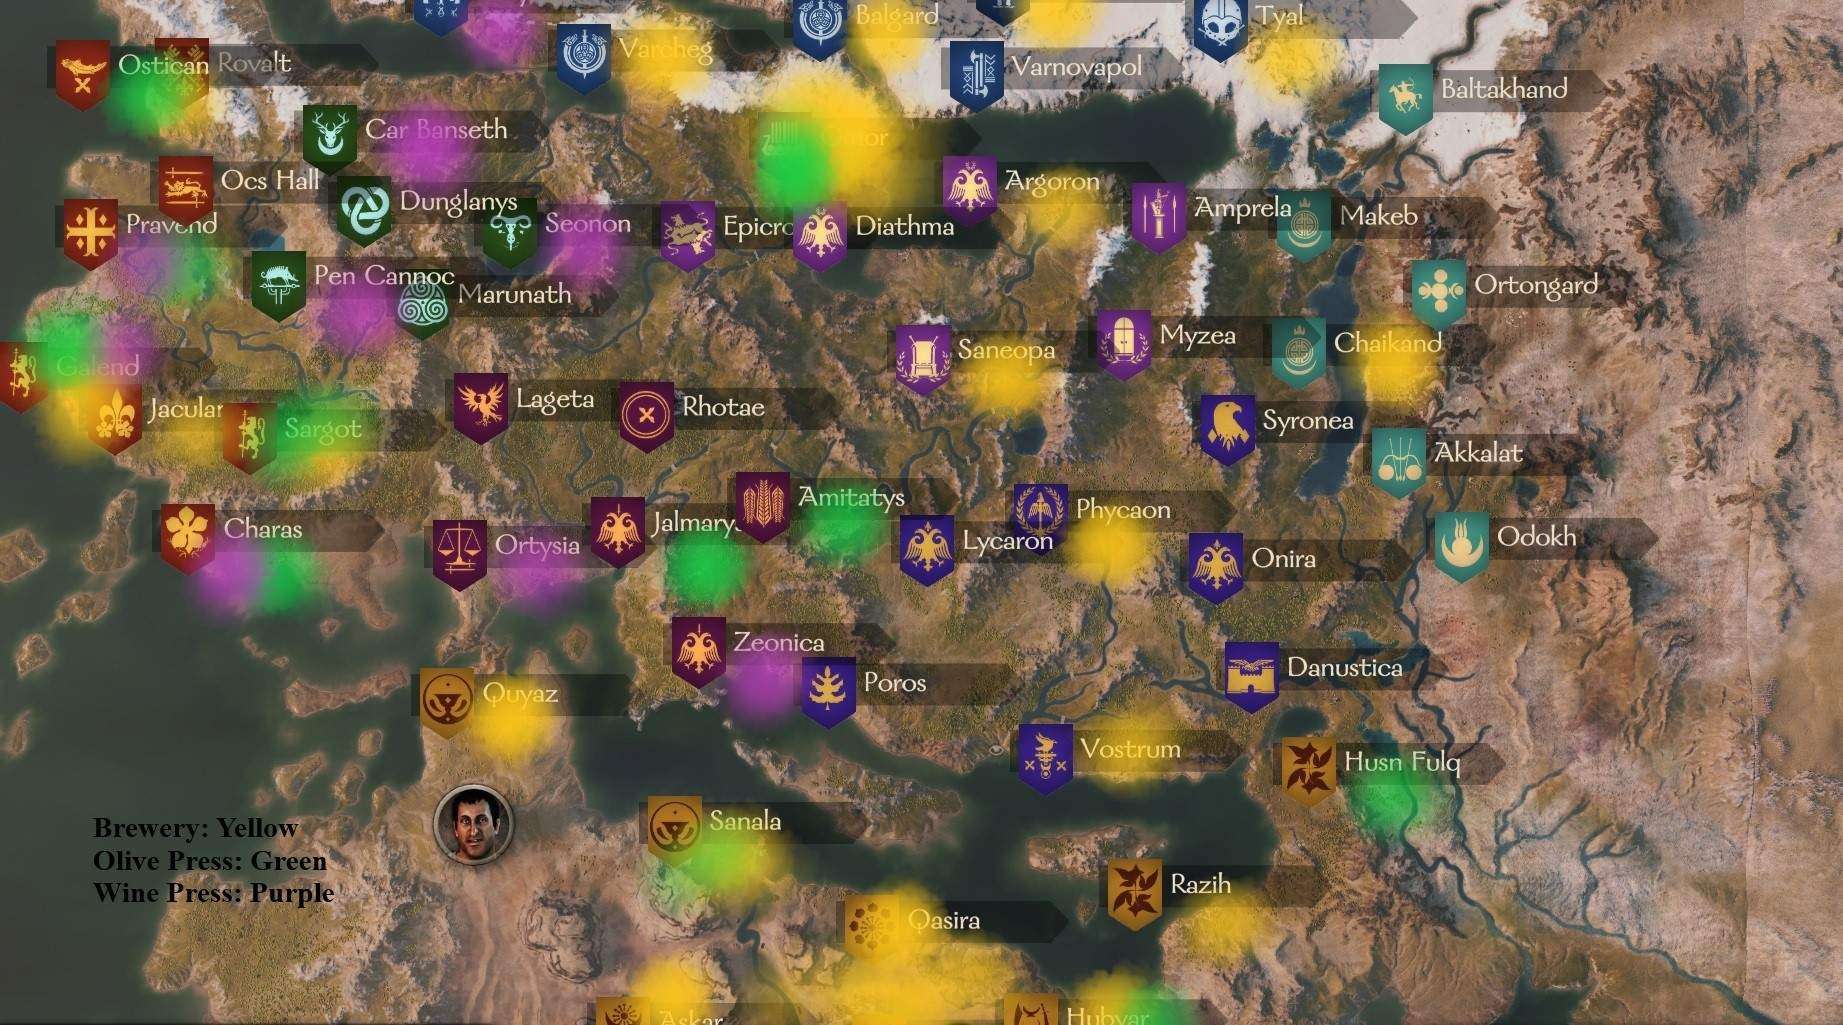
- Oil goes North and to the Centre of the map.
- Wine goes North East.
- Beer is difficulty but can go to the Centre of the map.
Furs, Cotton, and Flax:
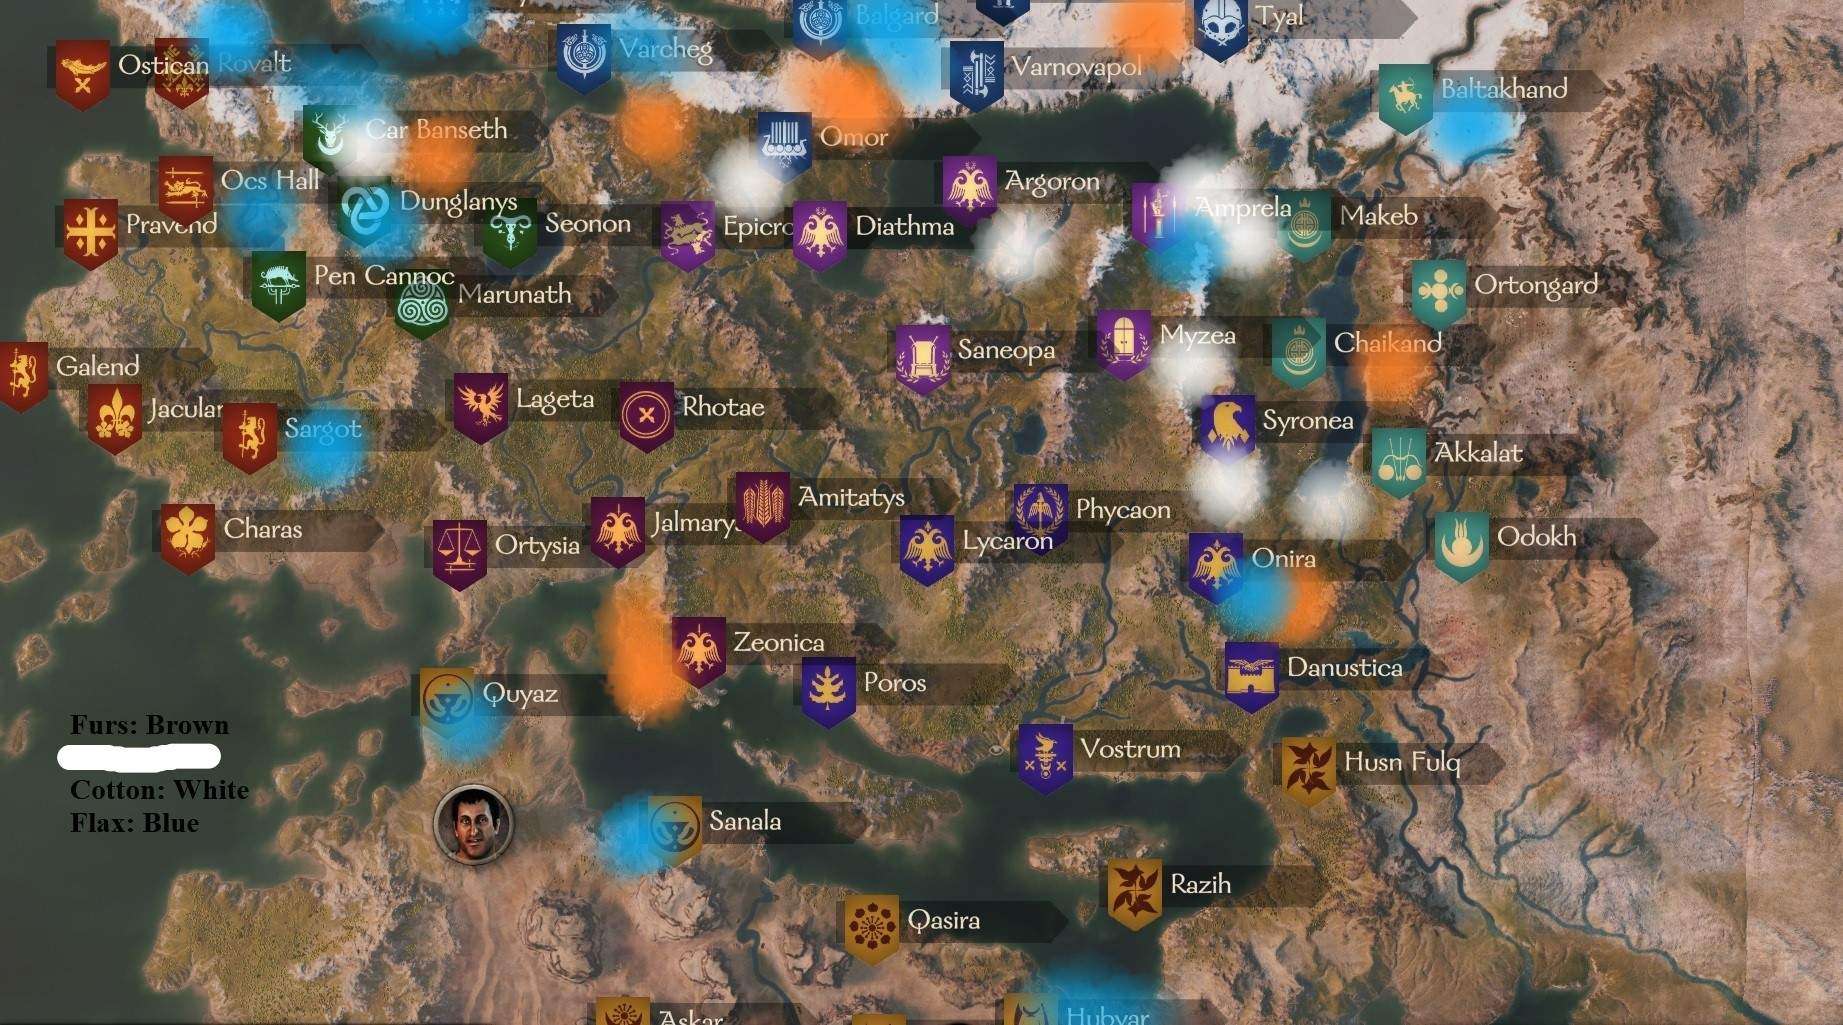
- Furs go South as far as possible.
- Cotton goes South West.
- Flax goes Central or to Manufacturers.
Velvet Weavery, Wool Weavery, Linen Weavery, and Tannery:
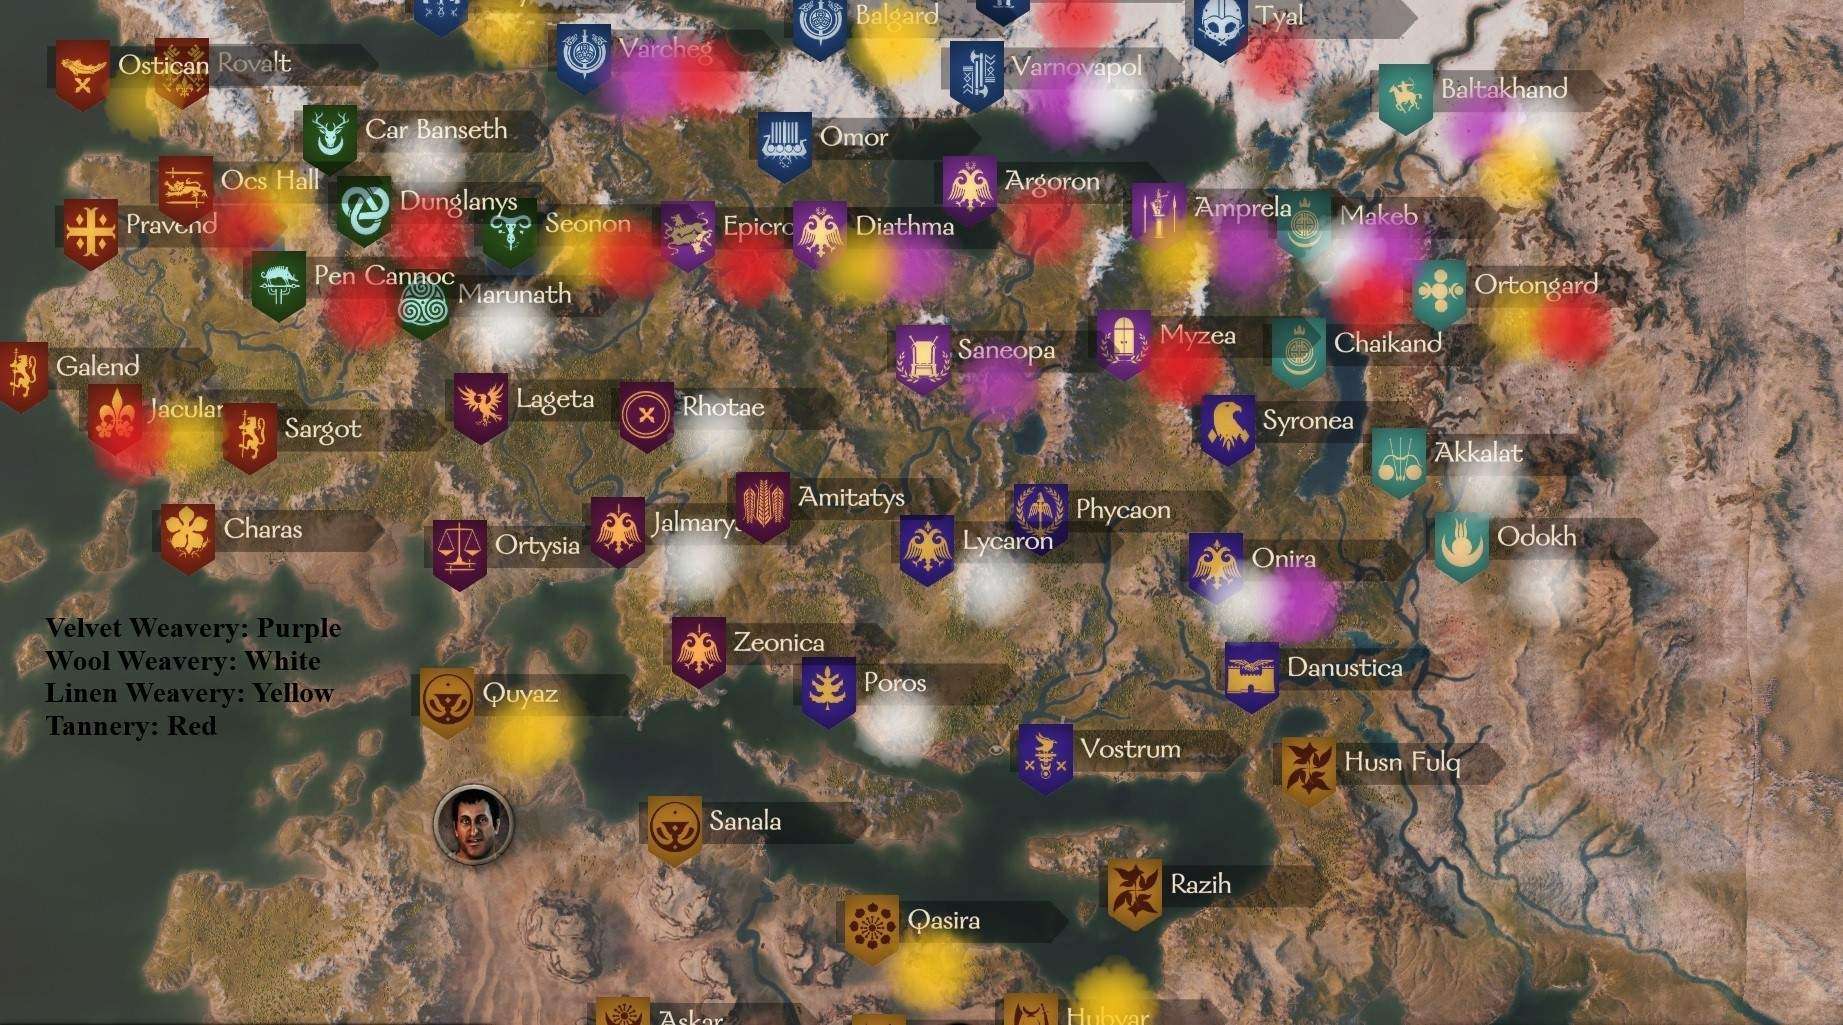
- Velvet goes West and South.
- Linen goes West and Central.
- Leather goes roughly South.
Clay, Hardwood, Iron Ore, and Silver Ore:
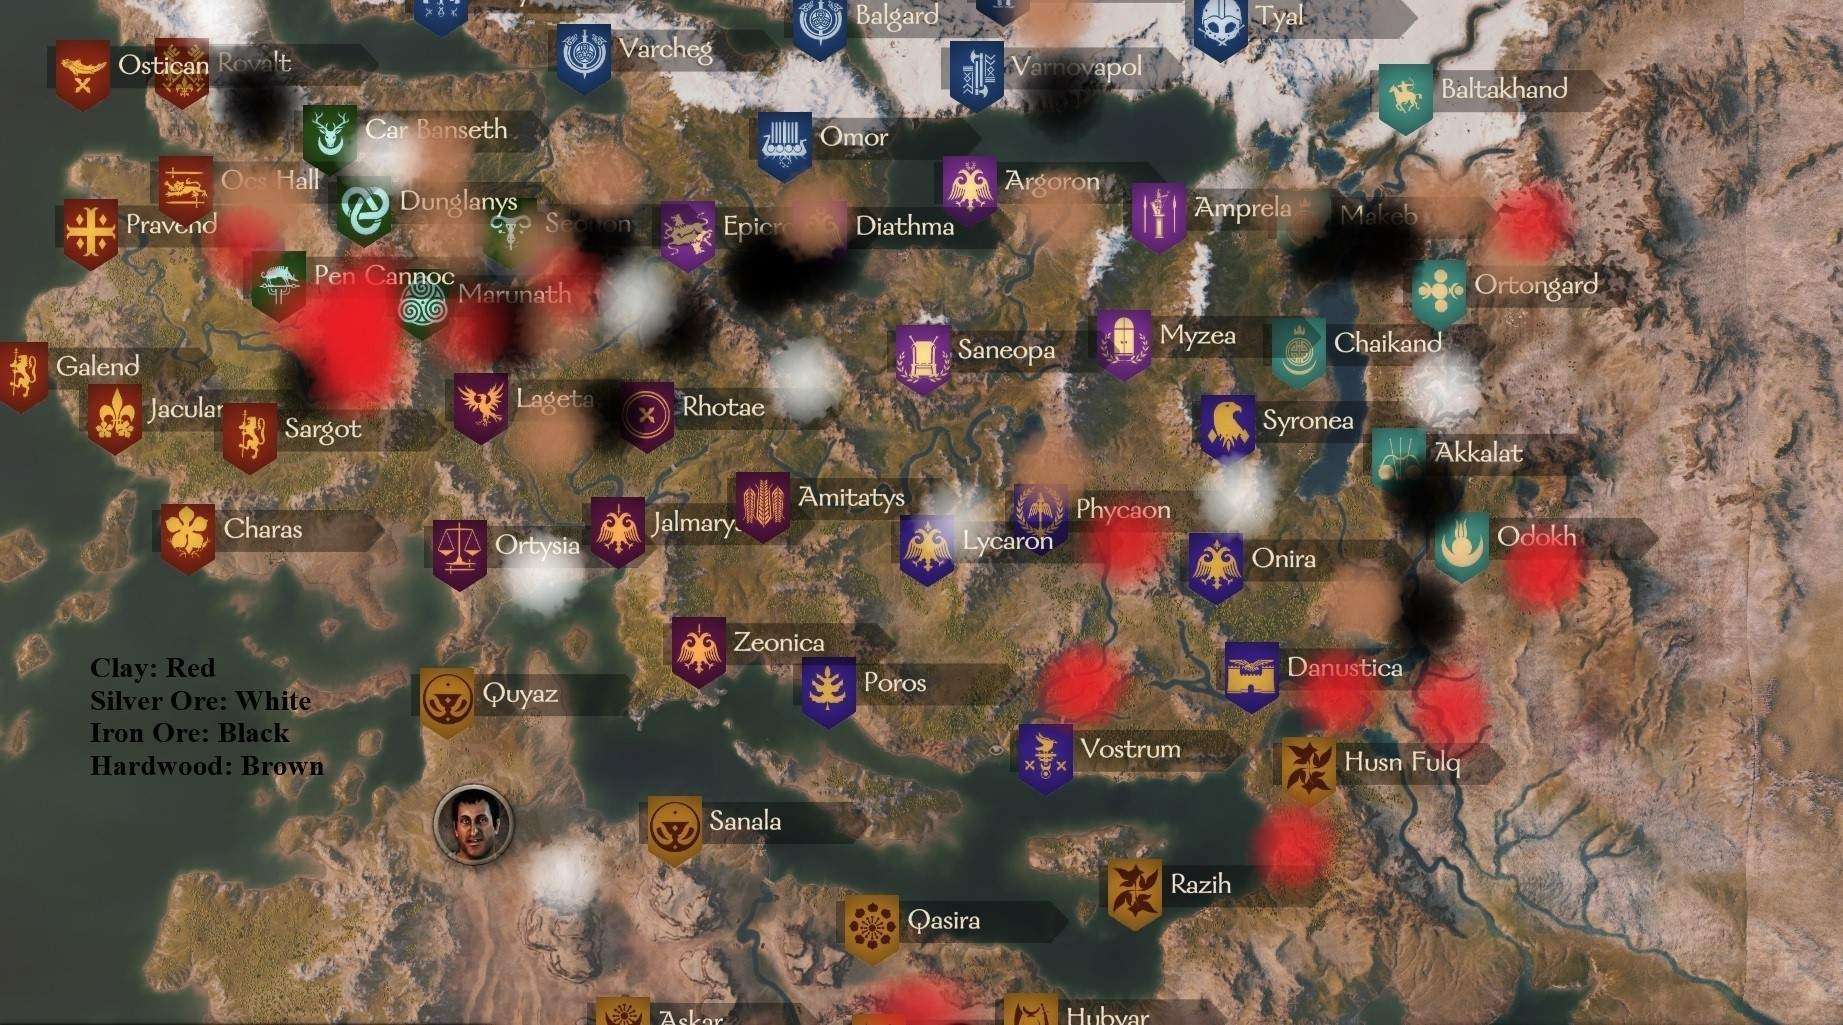
- Clay goes Central, or to areas with Pottery Shop.
- Silver goes to Manufacturers with shortages, or to the South or West.
- Hardwood goes South.
- Iron Ore goes South.
Pottery Shop, Wood Workshop, Smithy, and Silversmith:
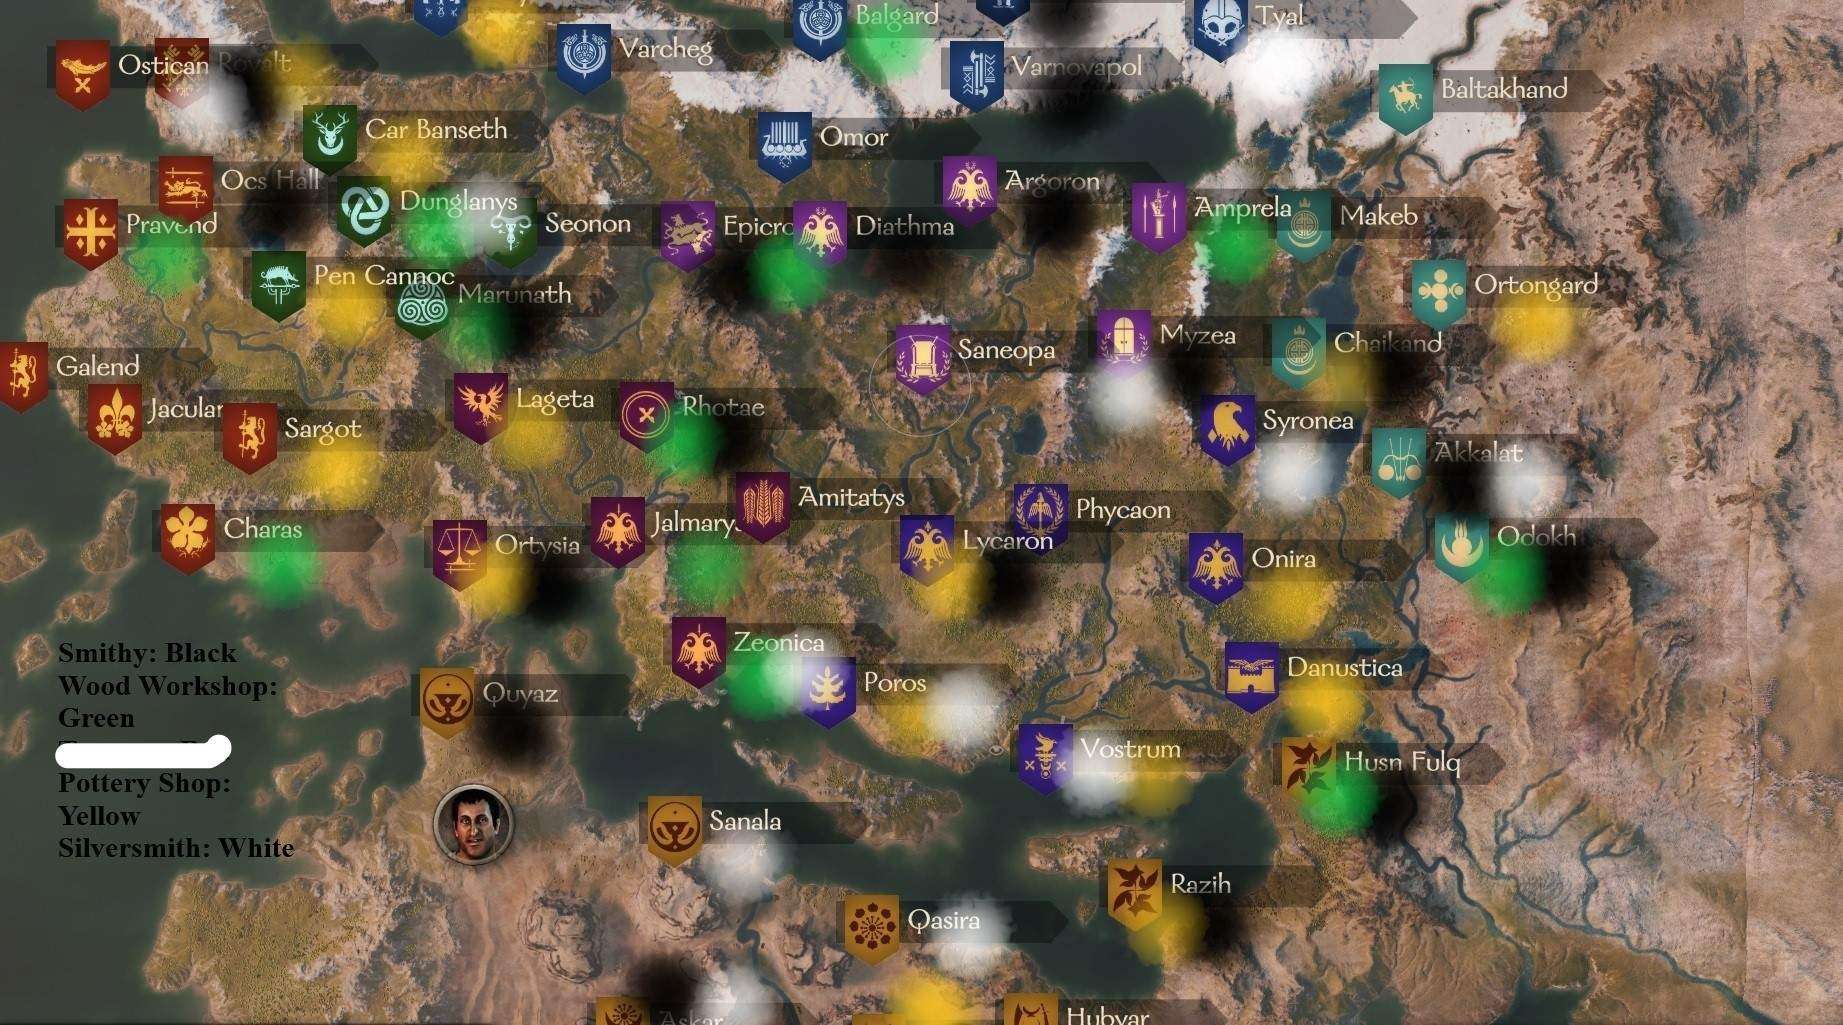
- Pottery Goes North and Central.
- Tools go to wars, before, after, or during.
- Jewelry goes West.
Fish and Salt:
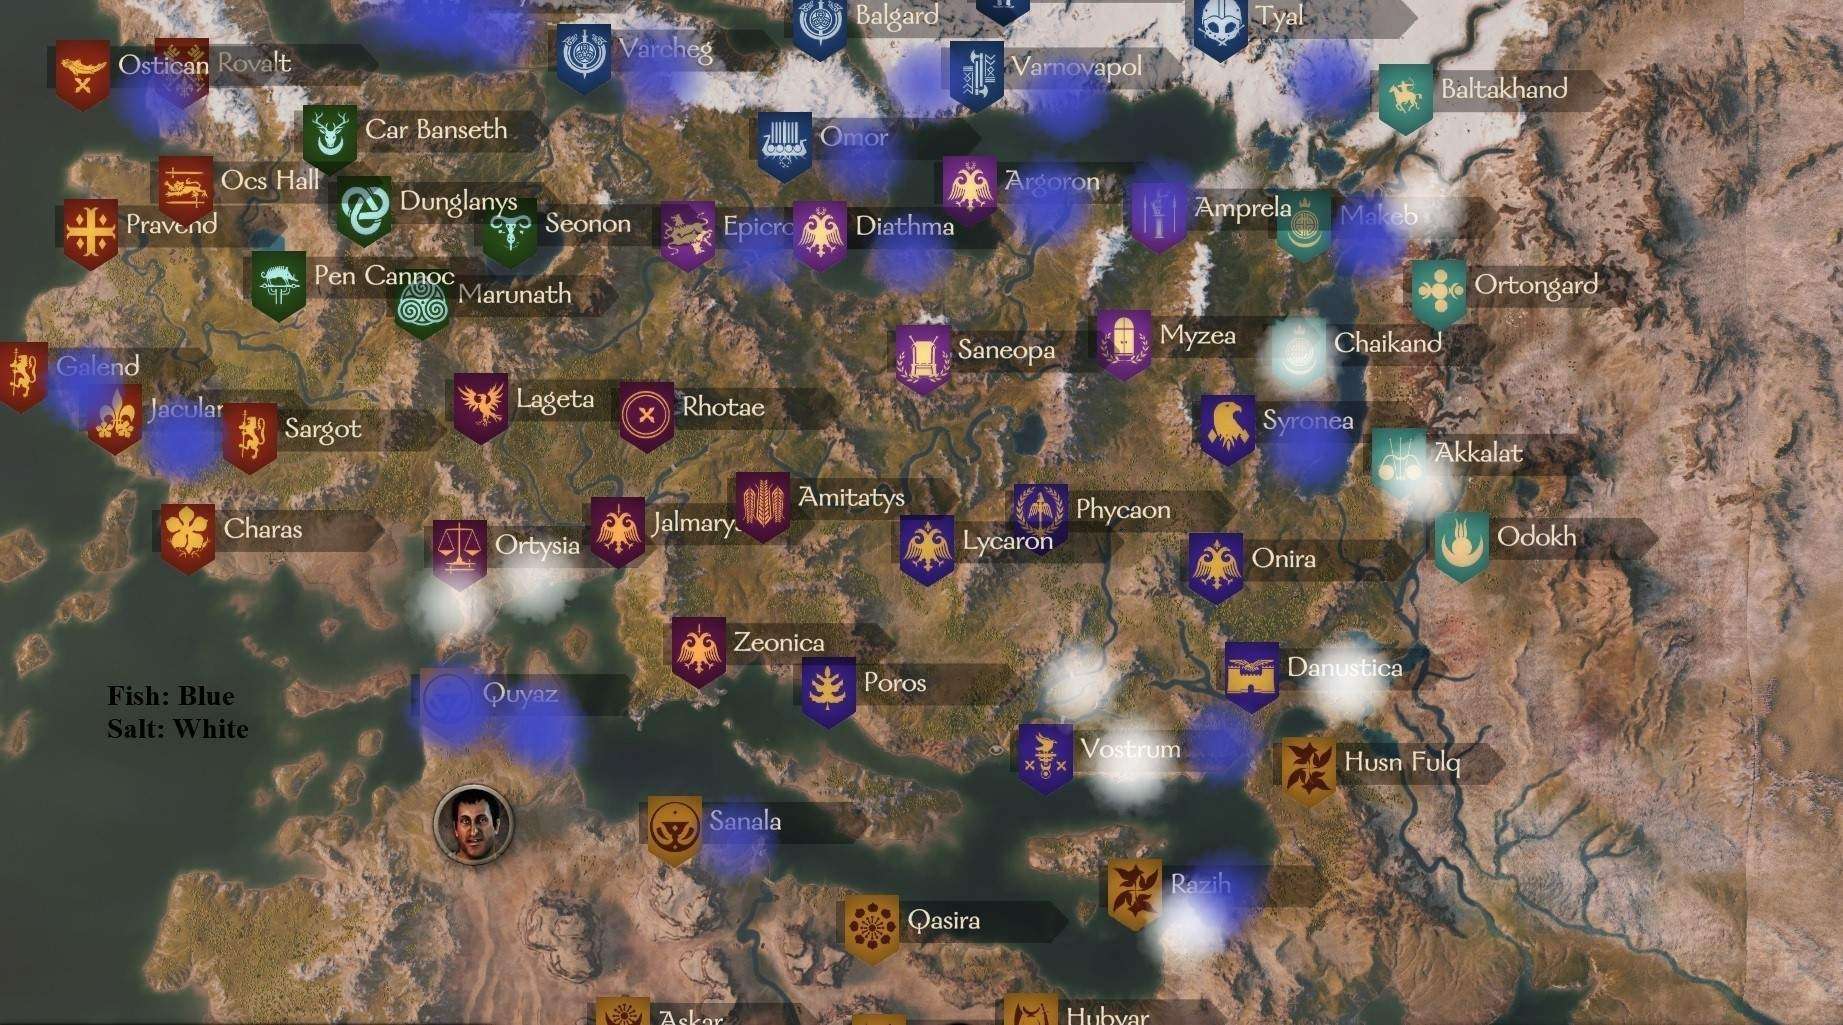
- Salt goes West.
- Fish can go Central, somewhat difficult.
Caravans, Workshops, and Fiefdoms
Caravans are likely best started at the edge of the map, so that they are more likely to travel to farther lands and experience more extreme changes in environment and resources.
Workshops should be placed in territories where input goods are cheap and available. Greater risk can be achieved by placing in territories that have fewer input goods (but still some) and have a lack in manufacturing for that good, monopoly opportunities :). An example could be manufacturing Jewelry in the Western edge of the continent, however, this is untested and may require you to buy silver and transport it there. Considering their may be caps on workshop profit this may further reduce the gains from taking risk and opening up manufacturing in capital low areas.Another thing to consider is competition. Each town has 1-3 workshop slots, you should pay attention to what is being produced there and if it will compete with your workshop or allow you to monopolize. AS well, you may be able to setup workshops that benefit your trade routes and allow you to more easily connect certain items from producers, to makers, to consumers.
I have yet to have much experience with fiefdoms, so I cannot say much. However, where you own fiefdoms it may be advantageous to also own manufacturing. It might also be in your interest to ensure a healthy good supply into your towns and cities to promote development and prosperity. Especially food, keep their stomach full and they will serve.
As a kingdom you make want to focus on conquering provinces with goods that you need, or towns that contains 3 workshops slots and will thus be able to produce more than towns with only one or two. This may heavily influence the success of certain clans and nations.
Profitable Trade Route Examples
One route is going between the western areas of Calradia (where the Vlandians, Battanians, and Western Empire are) and the Aserai lands. You can buy Aserai horses, like the desert horse, and sell them in western Calradia for a lot of money. Then, you can buy goods in western Calradia that aren’t worth much there, but that the Aserai need, like grapes, hardwood, wine, olives, furs, and hogs, and sell them for a profit.
Another good path is between the eastern part of the Aserai territory, the Khuzait Khanate’s lands, the Empire, and the Sturgian areas in the north. You can buy furs up north and sell them in the south for a big profit, sometimes two or three times what you paid. Then, on the way back, you can buy horses, oil, linen, tools, pottery, and other stuff at different towns and trade with the Empire and the Khanate. Sometimes you can even go further west and sell animals like cows from the Steppes, along with other cheap goods you picked up along the way.
Be the first to comment