This guide details each mission within the Ork Campaign and gives players insight into when they can pause to battle AI enemies, research technologies, and build up cities between missions.
Guide to Orks Campaigns
The campaigns in Gladius add an interesting twist to the standard 4X game formula. However, they can sometimes be frustrating instead of fun. It’s disappointing to lose a game you’ve spent a lot of time on, especially when you were close to winning, just because of an event time limit or a large invasion force attacking you.
There are three main campaign mission types:
- Explore.
- Produce.
- Battle.
During Explore and Produce missions, it’s frequently possible to put your campaign progress on hold while you deal with AI enemy factions or build up your forces, but you rarely know what the campaign will ask of you next.
In this guide, we’ll take a quick look at the Ork campaign chapters to make it easier for you to decide when to march forward through the campaign and when to hold back.
Chapter 1: Boyz Is Bored

Produce
Producing 100 Influence is a trivial mission for any faction, but the Orks gain bonus Influence from fighting. That makes for one quick mission.

Produce
The other chapter 1 mission isn’t much mission-y-er. It simply requires you to build 1 Orkoid Fungus. Considering that they’re such an important boon to your cities, you’ll probably do this sooner rather than later.
Chapter 2: Headz-a-Poppin

Explore
Oddly enough, producing that Orkoid Fungus doesn’t start the next mission, anyway. Chapter 2 seems to be keyed to the turn counter and/or encountering a certain number of enemies in addition to completing the previous mission. I’ve seen it start between turns 25 and 28, which gives you time to scout and build up your forces.
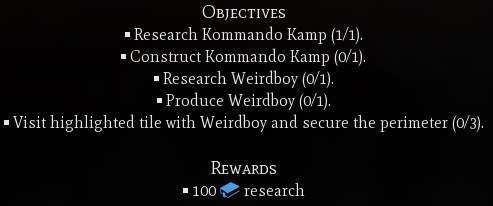
If desired, you can also stop right here in terms of campaign progress. It’s certainly simple to not visit a particular tile with a particular unit type, but the next mission is in your hands, too. So it’s probably worth grabbing the 100 Research as soon as it’s practical to do so.
Note that, unlike some “secure the perimeter” missions, no additional enemies spawn when you visit the last location. You simply need to clear the immediate area of neutral enemies like you would normally.
Chapter 3: Wot’s Dis Fing?

Explore
In my opinion, this is the best place in the campaign to pause your progress, fight some AI enemies, learn some new technologies, and build up a decent army. Note that you’ll need to found a new city in a specific location to progress further in the campaign, so don’t go too crazy with founding new cities. The Loyalty tax of too many cities can hinder your progress rather than helping it.

Battle
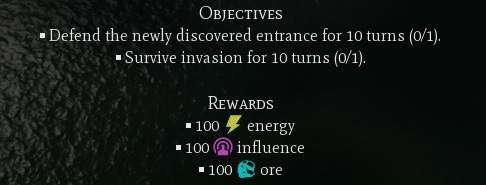
For such a war-like species, it sure took the Orks a while to get to their first battle mission, but at the end of chapter 3, you’ll certainly get a fight. Though this is far from the hardest battle mission out there, it features a big enough opposing army that you’ll want a decent force of your own before it begins.
In my last playthrough, the first wave consisted of the following units: 4 Tactical Marines, 3 Assault Marines, 2 Devastator Marines, 1 Predator, 2 Captains, and 1 Chaplain. That was followed by three additional waves that appeared every other turn, each of which had six to eight units that were a mix of Tactical Marines, Assault Marines, Devastator Marines, Hunters, and Predators.
Surviving for 10 turns or eliminating all the enemies will complete the mission and take you into chapter 4.
Chapter 4: Da Keyz, Da Secretz

Explore
Well, maybe. If you’ve already done a decent chunk of exploring, you might have completed this mission before it even starts, making this the shortest chapter in Gladius.
Chapter 5: Red Wunz Go Fasta

Battle
You might have been able to take a break and do some exploring in chapter 4, but in my playthrough, I went straight from the chapter 3 invasion battle with the Space Marines into this siege battle with the Imperial Guard (Astra Militarum).
In addition to the city itself, I faced the following units: 16 Guardsmen, 4 Heavy Weapons Squads, 6 Scout Sentinels, 8 Hydras, 4 Basilisks, 4 Battle Tanks, and 1 Kommandant.
You’ve probably got a decent army by this point, but if you don’t have it in the right place, you’ll find yourself scrambling for a few turns to take out this force that’s almost equivalent to an additional AI faction.
Chapter 6: Bad Moon Rising

Produce
Again… maybe. If you already produced a Squiggoth (and you probably did because they’re such a powerful unit), then you’re heading straight into another big battle.

Battle
This is an invasion style battle with nine waves of enemies that appear every other turn. Waves usually consist of seven units, but you’ll see an occasional six or eight. I even saw one five. There appears to be a point cost system behind the scenes because none of the waves are complete pushovers, nor are any waves completely overwhelming.
In similar fashion to the chapter 3 battle, you can survive for 20 turns or can destroy all the enemies and finish a little early. The battle is also more diverse than some of the epic Gladius fights, because it features a broad range of enemies from all three other base-game factions.
During the battle, the Imperial Guard forces included Guardsmen, Heavy Weapons Squads, Tempestus Scions, Hydras, Basilisks, Baneblades, Thunderbolts, and Marauder Bombers. The Space Marines brought Tactical Marines, Assault Marines, Devastator Marines, Predators, Vindicators, Land Raiders, Stormtalon Gunships, and Stormraven Gunships. The Necrons had Necron Warriors, Triarch Praetorians, Immortals, Heavy Destroyers, Transcendent C’Tans, Annihilation Barges, Doomsday Arks, Doom Scythes, and Monoliths.
That’s not quite every base game unit, but it’s sure a lot of variety, which made the battle feel more dynamic than waves of a small selection of foes. Once you take them all down (or survive 20 turns), congratulations, you’ve defeated the Ork campaign!


Be the first to comment