
The Shrinker, a necessary device required to progress in Assembly Planter, for without it you would run out of room and not be able to exponentially create new resources. Learn how to use the Shrinker, with pictures!
Guide to Shrinker for Newbies
Introduction to the Shrinker
This guide does not discuss the Self-Feed Collector as I only just unlocked it and haven’t yet used it.
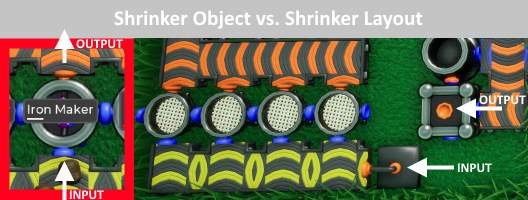
The in-game manual (default keybind: ‘b’) does an excellent job of explaining the Shrinker but does so without any images (currently), which makes it difficult to imagine for a visual/hands-on learner such as myself. The general idea is: the Shrinker plot allows you build out an assembly line of your design, using a Puller as the input and a Collector as the output. This assembly line is then condensed into a single tile object to place in your garden, where you then feed it the ‘input’ resources and receive the ‘output’ resources.
Equate any object with the blue sides as “the Puller as an input” and the orange side as “the Collector as the output.”
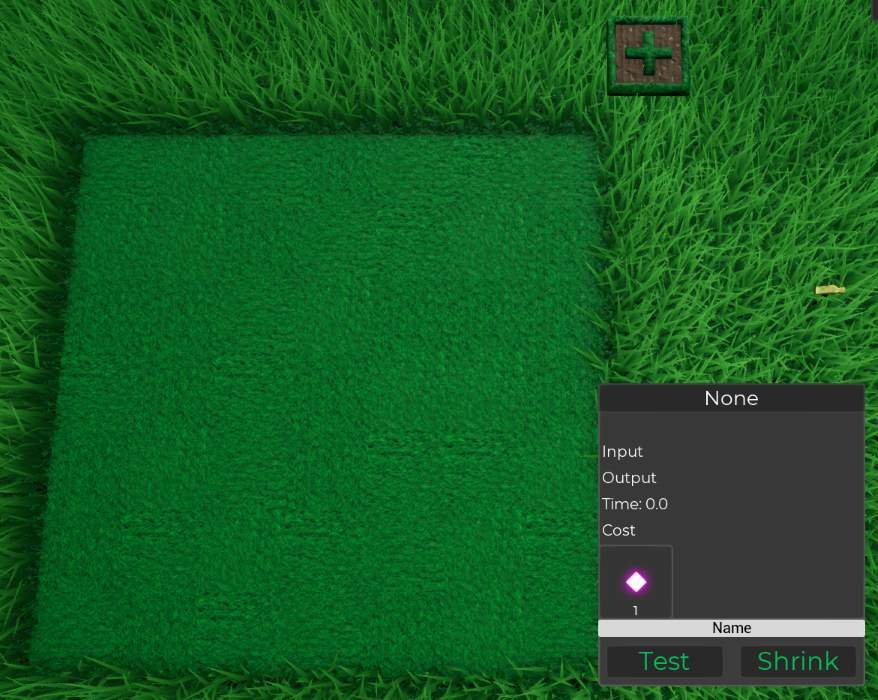
An empty plot of the Shrinker is shown after you complete Level 8 and receive a key (use the key and click).
This empty plot has been upgraded 2 times, so your introductory plot will be smaller.
You can design any assembly line you like, however the following rules need to apply:
- There must be a Puller for the input and a Collector for the output.
- The design cannot loop in on itself (For example: You cannot have a Compost Bin turn Biomass into Dirt, which then cycles back to the beginning into Sieves for the Seeds to be replanted) – I believe this is what the Self-Feed Collector is for, to create a self-sufficient shrinked assembly line. You will receive an error if you create a loop.
- It needs to actually make something.
Assembly Design
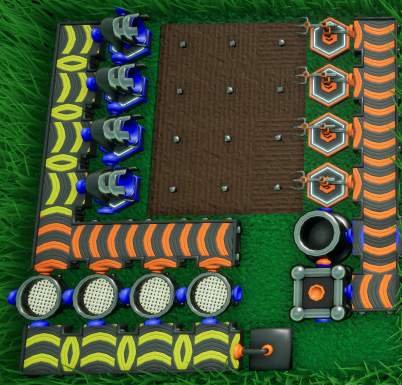
Here is an example of a valid assembly line (Technically the first image is invalid because I didn’t configure the Puller, but the design is valid).
This assembly line could produce any simple resource, such as Automatoe, Copper, Gold, Iron, Oilives, Sand or Wood. It will not create Compact Sand, Earth Orbs, Glass or Plastic because these are not “grown” but rather crafted in an assembly table (or using an automated assembly object).
The example here is crafting Iron Ingot:


Inputs and Outputs
The Puller at the bottom sends dirt and is the ‘Input’. Unlike a regular Puller in your garden, what you request here does not materialize from your inventory (when the assembly line has been shrunk and in-use)! During a test, if I chose “12 Dirt” then 12 Dirt would come out once to simulate what will occur. Outside of the test (when it is shrunk and placed in your garden as a one-tile automation block), you will need to conveyor items into the shrunk assembly line; it will not start production until it has received what your pullers are configured for. In this example, the shrunk assembly line will do nothing until “12 Dirt” have arrived and are stored.
When you are designing your assembly line in the shrinker, you should keep this in mind. If you design in such a way that you need Seeds, then you must feed in Seeds (requiring you to sieve dirt outside of the assembly line). Or, another example, if you require multiple items as the input (Bronze Ingot and Small Crates, perhaps). This isn’t necessarily the most effective use of space, but it’s my personal recommendation to have a consistent input across your shrunken factories (such as Dirt) so that you do not have a mess of splitters or filters trying to get items into the correct shrunken assembly line. By keeping things consistent you can ensure it’s nice and clean and easy to reproduce/duplicate for other resources.
The Collector at the bottom right is the shrunken assembly line ‘Output’.
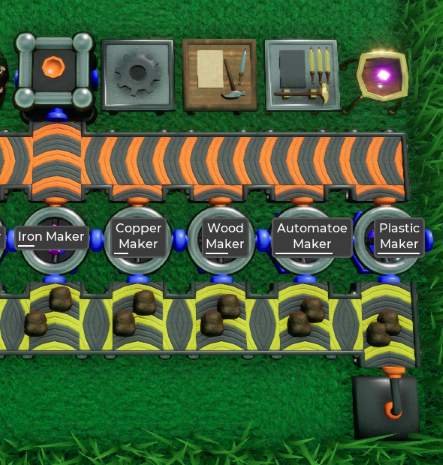
An example of several shrunken factories in my garden, where the input is dirt for all of them and the output is both dirt and the cultivated resource. The white bar represents the progress to completion for that assembly cycle, similar to any other automated crafting table.

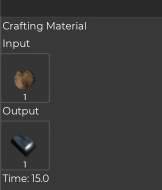
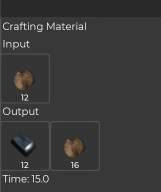
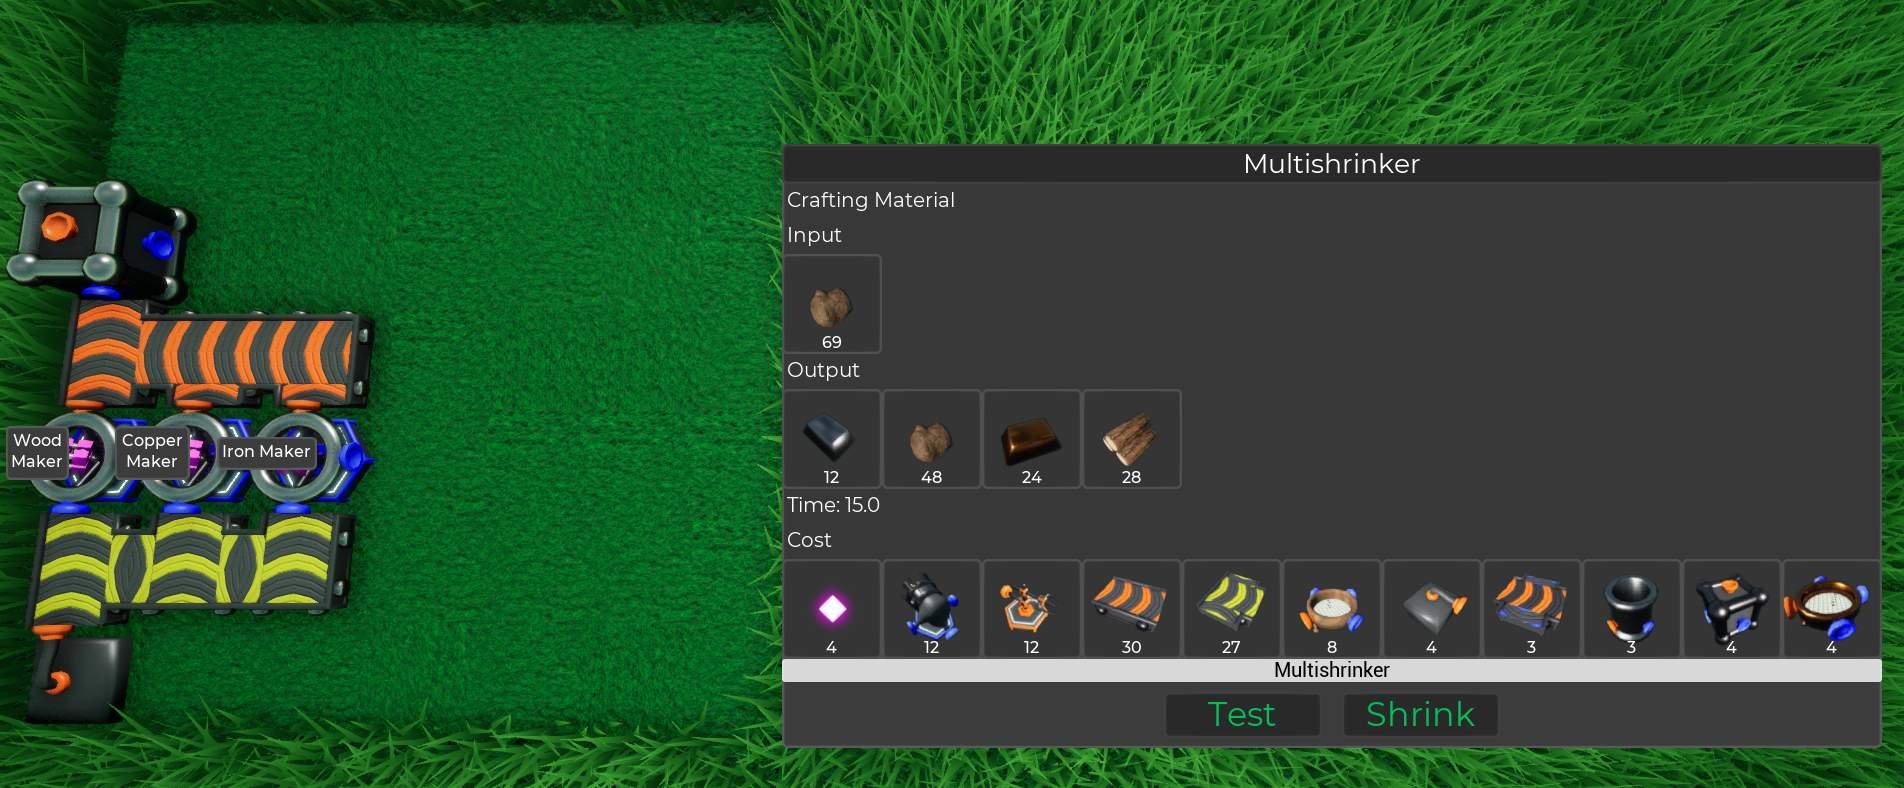
As it pertains to inputs in your shrunken assembly line: when you are configuring the Puller (once the assembly line is complete), take careful observation of the window explaining the Outputs and the Time. Using the assembly line example above, if I choose “1 Dirt” as the input, it will take 15 seconds to create 1 Iron Ingot. However, if I up the input to “12 Dirt” then the output becomes 12 Iron Ingot AND 16 Dirt but still takes 15 seconds! The reasoning: this assembly line has 12 cultivated plots so all 12 plots will receive a Seed, and the Compost Bin will receive 12 Biomass (but will only use 10) to output 16 Dirt (The Iron Compost Bin converts 5 Biomass to 8 Dirt in 5 Seconds). With “1 Dirt” as the input, only 1 Biomass is created and this isn’t enough for the Compost Bin, so only Iron Ingot is the output. Additionally, if I push this to “13 Dirt” as the input, we’ve increased the output to 13 Iron Ingot (still 16 Dirt because we only make 13 Biomass; need 15 Biomass for the next 8 Dirt output) but the time has doubled to 30 seconds! This is because there aren’t enough cultivated plots in this assembly line. It will need to wait another full rotation just to make 1 more Iron Ingot; totally not worth it. So pay attention to this display!

Edits and Duplication
The Custom Crafting Table stores your shrunk assembly lines for easy duplication. You require all of the objects to make a duplicate shrunken assembly line.
The icons do the following:
- The pencil let’s you make a copy of this assembly line inside the Shrinker. This will allow you to duplicate your design for another resource, or make edits to it. Note that it’s not a “true” edit. If you shrink an assembly line it will make a second design in your Custom Crafting Table.
- The crossed-hammers let’s you create a shrunken assembly line object to place in your garden.
- The trash bin allows you to delete the design, however it will also delete all of this design from your garden.
Note: If you hammer a shrunken factory or if you use this delete button, you will receive all your objects back except for the Compact Cube.

Shrinker Within Shrinker
It may not be obvious, but once you get a good setup going, you can put shrinkers inside a shrinker – further increasing your resource gains! This goes back to my earlier recommendation of using a single base material (Dirt) as the input, because it makes this kind of setup very easy to compile.
Be the first to comment