
There are many factors to account for when selecting your army, so this guide will focus on core principles such as a hero’s Role and Positioning.
Contents
Guide to Basics Principles of Army Composition
All credit goes to Intaglyph!
Introduction
In Bestiary of Sigillum, each player summons an army of legendary heroes to destroy the opponent’s castle. Because an individual hero’s effectiveness is largely determined by ally synergy and enemy matchups, your army’s formation alone can potentially determine victory or defeat. There are many factors to account for when selecting your army, so this guide will focus on core principles such as a hero’s Role and Positioning.
Classes and Roles
There are 3 classes of heroes in the game: Strength, Agility and Intelligence.

A hero’s primary role in battle is largely determined by their class, but it is common to see heroes that can cover multiple roles as a result of their three unique abilities. Versatility is generally an important thing to consider, as it allows for more flexibility in both army composition and battle strategy.
Now, let’s break down the primary roles of a hero.
The Controller – This role has three primary functions:
- Control and manipulate positioning.
- Tank effectively enough to hold a position independently.
- Boost or otherwise enable the Attacker’s offensive.
An ideal Controller should have at least 3 Hit Points and abilities that provide utility for map manipulation and Attacker synergy. Direct synergy with the Supporter is less vital, but it’s always valuable for characters to have additional ways of assisting each other. Being able to control positioning is the most crucial part of this role’s duty, as it enables allies to safely move where desired.
Examples: Ferrarius, Vinctum, Tempus, Manus.
The Attacker – This role only has one primary function:
- Deal damage to the enemy army as quickly as possible.
Though it is the most simple of the three, this role is the core of any army’s offensive. To be effective in this role, the hero must be able to inflict a minimum of 2 damage, and ideally target multiple opponents per turn. The goal is to rapidly move into an offensive position in order to deal maximum damage to the opposing army for as long as possible. The rest of your army should support this offensive rush by either increasing the Attacker’s survivability, boosting their damage output, or repositioning enemies into their range.
Examples: Architectus, Saxum, Ballistarius, Cerberus, Cornibus, Arborus.
The Supporter – This role has two primary functions:
- Support the Attacker’s survival to prolong your offensive.
- Support from afar with ranged abilities.
Because the Supporter is the least mobile of the roles, the defining feature of this role is abilities that can function at long range. As such, obtaining a safe position early in order to support the Attacker from afar is essential. Synergy with the Controller isn’t as necessary, but is still a nice thing to have when possible.
Examples: Armus, Redux, Fidea, Goetium, Messum.
Having an army that contains all three roles is the key to success.
Battle Positioning
When dispatching your army, take care to consider where each Hero best operates from. The battlefield is divided into hexes, forming five vertical lanes: A1-A3, B1-B4, C1-C5, D1-D4, E1-E3. The hexes can be divided into types based on location:
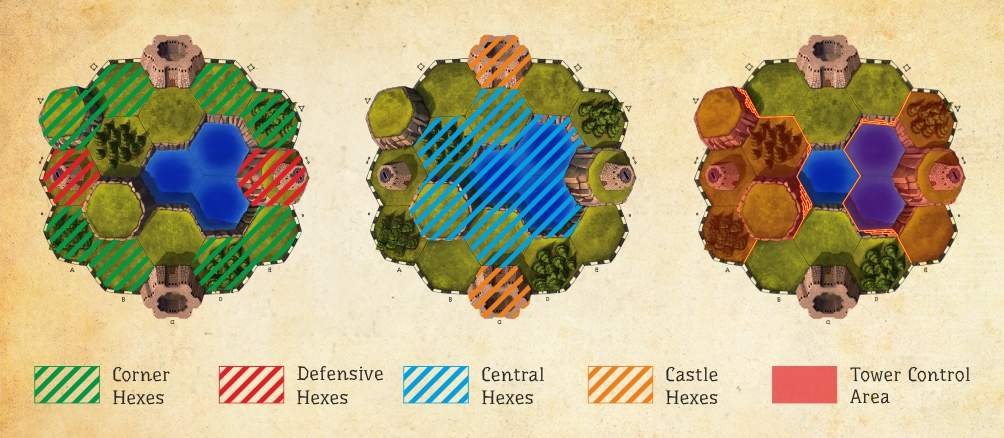
Corner Hexes (A1, A3, B1, B4, D1, D4, E1, E3):
- Allows for wide area coverage for ranged attacks.
- Defensive position with few adjacent hexes to be attacked from.
- Ideal positioning for ranged heroes such as Ballistarius and Frigus.
Defensive Hexes (A2, E2):
- The most advantageous position for controlling a tower.
- Opponents can’t easily force a hero on this hex out of the Tower Control Area.
- Ideal positioning for heroes such as Saxum and Iratus that are effective when surrounded.
Central Hexes (B2, B3, C2, C3, C4, D2, D3):
- Main area of direct conflict between armies.
- Center lane (C2-C4) is perfect for breaking through an opponent’s defense.
- Ideal positioning for heroes such as Ferrarius and Mortum with wide-area abilities.
Castle Hexes (C1, C5):
- Safe zone that is immune to your opponent’s abilities and attacks.
- Heroes killed will respawn in this hex if it is unoccupied.
- Ideal positioning for very fragile heroes such as Goetium and Messum.
Tower Control Area (Left: A1-A3, B2-B3. Right: D2-D3, E1-E3):
- These hexes are important for gaining control over the two Siege Towers.
- Controlling a tower will allow you to directly damage the opponent’s Castle.
- Taking a tower is often more valuable than attacking, due to the strategic value it holds.
Now knowing the information about the various hexes, how do we evaluate character effectiveness on the battlefield? Let’s take Ballistarius, for example. His attack damage is determined by each unoccupied hex between him and the target. If the target is directly adjacent, then it will force him to use his Optical Sight ability to inflict any damage at all! If we instead position Ballistarius on one of the corner hexes, he has the potential to deal 3-4 damage at maximum range (depending on Optical Sight usage). In addition, he can only be approached from 3 directions, making him a much more difficult foe for the opponent to deal with.
Considering that most players will utilize Ballistarius as the Attacker, due to his high damage potential, we should next look at compatible heroes to play the remaining two roles. For this example, let’s take Ferrarius as the Controller and Tempus as the Supporter. Ferrarius, in addition to just being a hardy frontliner, can both manipulate an opponent’s positioning and stun an opponent to prevent them from moving on their turn. These abilities can be used to great effect in order to set up powerful attacks for Ballistarius. Meanwhile, Tempus can use his abilities to reduce ally cooldowns and allow them to move without sacrificing their attack, enabling Ballistarius to potentially make big attacks every turn. This focused synergy with the Attacker creates a dramatic difference in the overall effectiveness of one’s army.
For a second example, let’s look at Manus. His attack damage is equal to the number of adjacent allies (0-2), he can boost the defense of adjacent allies, and he can pull a hero into an adjacent hex. His high versatility allows him to play any role, but he is entirely dependent on keeping his allies and enemies in close quarters. Knowing this, his ideal placement on the battlefield is in the central hexes. If he were placed in the corner hexes instead, he would not only have less adjacent hexes for heroes to occupy, but would also be unable to pull an opponent out of the opposing Tower Control Area.
This simple matter of inefficient placement can result in a rapid loss of both turns and field advantage, which will ultimately lead to defeat.
Order of Selecting Heroes
Knowledge of roles and army composition also allows a player to plan out the order in which they select heroes for their army. You want to avoid revealing your strategy too soon, and you also want to give yourself the flexibility to change your plan to adapt to your opponent’s choices.
With these principles in mind, the first pick should ideally choose a versatile hero that is able to function in multiple roles. For a beginner, the best choice would be to choose a Controller that can also function as a secondary role, as this role is an easy foundation from which to build a cohesive army. Ferrarius is a good example of a hero that can play any role, with 4 Hit Points, a multi-target attack, a ranged stun, and the ability to manipulate an opponent’s position. After this choice, it would be advisable to pick the Attacker, and finally the Supporter. However, if your first choice hero has any gap in the roles it can perform, the second choice should be a hero that can fill that gap. For example:
- If your first hero can function as a Controller and Attacker, your second hero should be a Supporter.
- If your first hero instead functions as a Controller and Supporter, your second hero should be an Attacker.
On either case, your third hero should be chosen after accounting for both potential synergy with your current army and how to best counter your opponent’s army.
If you were to instead choose a first pick that lacks the versatility of filling multiple roles, the opponent would immediately have the advantage of choosing heroes to counter this element of your battle strategy. Fidea is an easy example of a poor first pick. Her low Hit Points and damage output locks her into the Supporter role, and her restriction of only being able to attack a debuffed opponent further limits flexibility in selecting the remainder of the army.
Conclusion
Before summoning the heroes onto the battlefield, players should first ask the following:
- What roles can this hero fill? Is it versatile enough to allow for flexibility during hero selection?
- What hexes are ideal positioning for this hero? Does this positioning help or hinder their allies?
Answering these questions will help you form a balanced army, as well build an understanding of team synergy and counter picks. Master these principles, and victory will be in the palm of your hand!
Be the first to comment