
This guide we’ll be going through do and do not’s to do during the early game. This guide will cover most details throughout the early game and until chapter 15 (ish).
Beginners Guide Explained
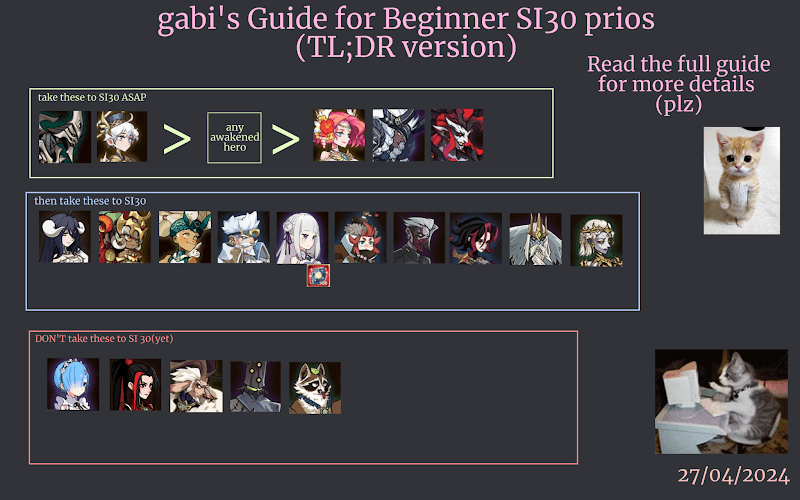
Let’s start with deciphering the Noob’s Beginner’s guide.I will split up the image into multiple pieces so it is easier to understand.
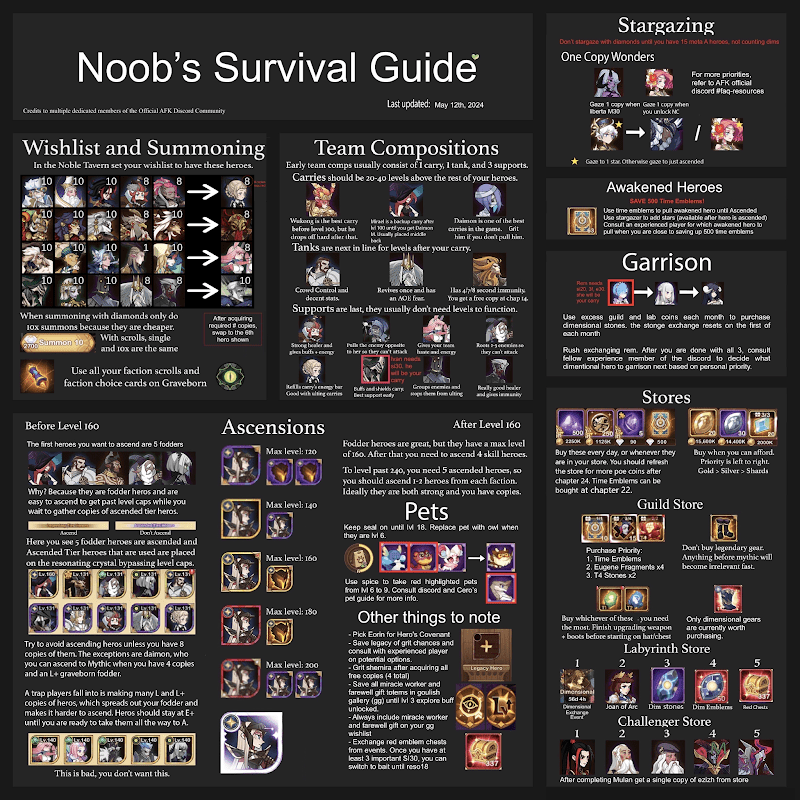
Wishlist
First of all we have the wishlist section. This wishlist is how you’ll want to set up your wishlist in-game.

The small numbers top right of every hero is the amount of Elite copies you’ll want of each hero. For example here we can see that the top left Lightbearer hero is Jerome. He wants 10 copies. After you get him to 8 copies, you swap him out with Rosalina.
Other heroes don’t need as much copies, such as the Wilder hero Eironn, whom you only want 1 copy of before swapping him out.
This is because some heroes function at different ascension levels. You’ll only want to do 10x pulls to save diamonds since every 10 pull costs 2700 diamonds rather than 3000 (which is the price of pulling 1 hero pull 10 times).
The game will give you a lot of free scrolls. There are 2 types of scrolls. Faction and normal scrolls. Normal scrolls you can pull as normal, and they are similar to doing 10x pulls with diamonds. Faction scroll you want to focus on using them on the day the graveborn faction is chosen.
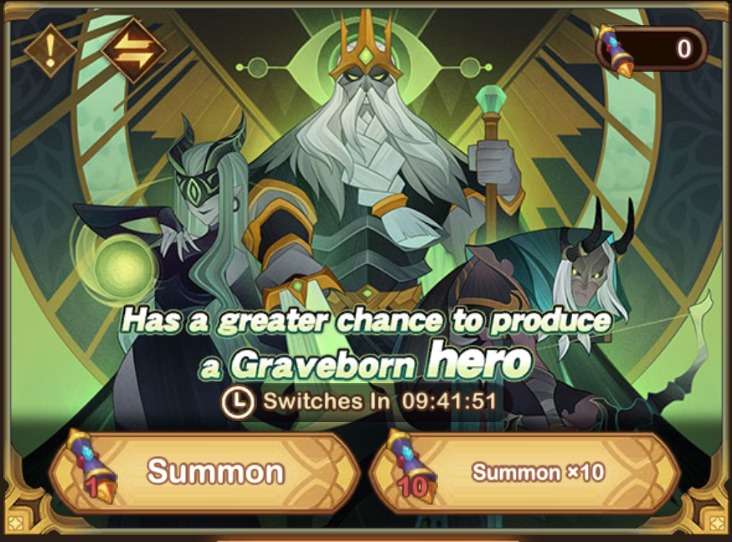
Don’t spend 300 diamonds to swap factions. You’ll want to stockpile all your scrolls over 4 days, and use them all at once rather than swapping and using them whenever you get some.
Before Level 160
This part can get a little confusing. How do I level my heroes? Why can’t I randomly ascend heroes whenever I get some extra copies of them? I’ll try to answer this simply.
A lot of heroes do not work without investment. With investment I mean for example getting a hero’s signature item to level 30, or getting 9 of their furniture or engraving the hero’s to engraving level 60. All of these powerups cost a lot of resources and takes a lot of time. This means most heroes will not work until you have either one of these criterias, up to all 3.
We want to focus on ascending Fodder heroes. These are heroes that only has 3 abilities, and you can find these heroes at the bottom of the Portraits tab (inside the heroes tab) in each of their respective factions under “Legendary tier heroes”. These heroes have an ascension limit at Legendary+.
There’s a level lower than these heroes and they are called “Common tier heroes”. These heroes are completely irrelevant, and you do not have to think about them. If you go into the rickety cart within the “Ranhorn” tab, you’ll be able to “auto-retire” these heroes within the “retire hero” tab. This will let you get hero coins which can be used later for more useful content.
This leads us to figuring out which 5 heroes we want to focus on ascending. We only want to focus on ascending 5 because of the function of the resonating crystal. In this game you level up 5 heroes, and the rest of your heroes follow the level of the lowest level hero in your crystal. There’s also a level limit for only the 5 heroes on the crystal, which is determined by their ascension level as you can see on the image on the right side.
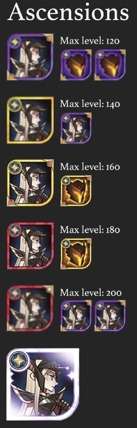
Our goal is aiming to get level 160 with 5 fodder heroes, and later on use these heroes to propel our proper Ascended tier heroes into further ascensions and levels.
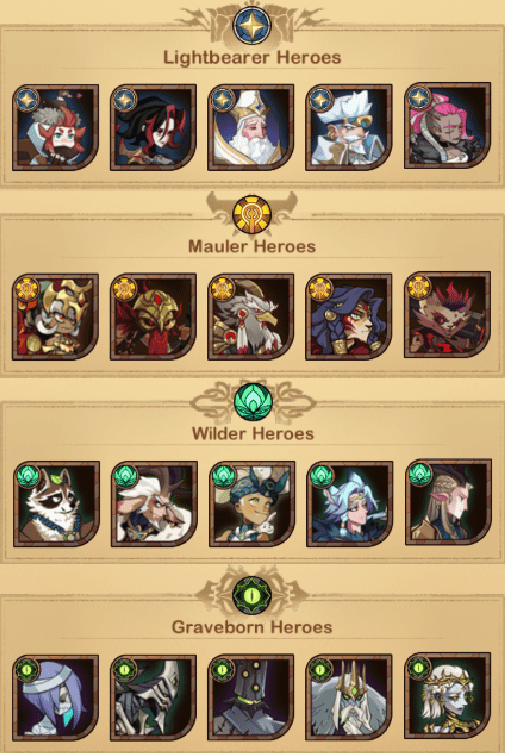
Now we just have to focus on some Fodder heroes to ascend. We’ll pick 2 lightborn heroes, 1 mauler, 1 wilder and 1 graveborn. There’s more lightborn fodder heroes in the game, which naturally makes your lightborn box the biggest. It also helps that both of the heroes are actually heroes you’ll want to use during the early game.

From left to right we have Mirael, Hogan, Golus, Arden and Silvina. We’ll get more into this later, but you’ll want to use Mirael as your damage dealer, and Hogan as one of your tanks.
Your goal now is to ascend these heroes to Legendary+ and get a box looking like this:

At the same time you’ll only want to ascend Ascended tier heroes to E+ (which requires 2 E copies of the same hero, and can be done using “auto ascend” in the temple of ascension). Do not ascend them above Elite+ (E+) for now.

Having a combination of those 2 images is the result you’ll want to go for. This is the most optimal route so whenever you get enough copies of the ascended tier heroes, you can use those legendary+ fodder heroes to further ascend the ascended tier heroes.
You do not want to have a box that looks like this:

After Level 160
Your goal here is simple. After all you get all your fodder heroes to their cap, which is Legendary+ and level 160. You most likely won’t be able to ascend heroes above Legendary+ straight away, which is fine. Your goal now is to get 8/8 copies of a hero, then use the fodder to get that hero to ascended.
Final goal here is getting all heroes to level 240, which will let you break resonating crystal, and from there on out you just level 1 hero at a time.
Pets
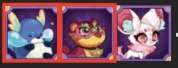
Pets early game are kind of simple. You want to just pull pets until you unlock wishlist. When you have wishlist unlock, you’ll put these 3 pets on.
You do not have to think too much into this until one of those pets gets to level 6.
For your rare pets, just level them up either evenly or focus on main attribute, doesn’t really matter afaik.
Draconic Faction
The draconic faction just released. This content is simply not F2P newbie friendly. Do all the free events that you can do related to the faction. You can choose to save the Dragon Faction scrolls if you want to, or just pull. Do not spend diamonds on this.
Do not spend your “Draconis Insignia” and just save for a few months. Pity has not been confirmed, and seems to be up to 100 at times.
If you play during the release of this faction and do recieve a lot of free scrolls, I recommend using them. You can make L+ fodder with this and use that hero to increase overall level.

TLDR:
- Save ->

- Spend / Save ->
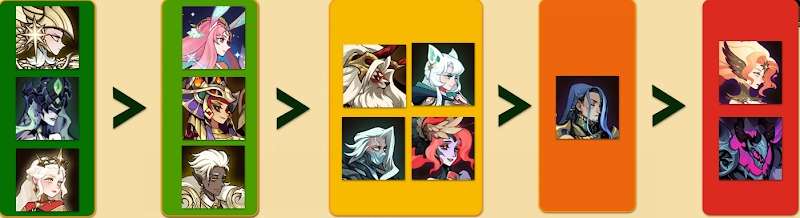
Signature Item Priority
Here’s a picture guide:
Stargazing
Stargazing is a summoning mechanic that lets you summon which hero you desire, most important Celestials and Hypogeans. You do not want to use this summoning mechanic to summon normal faction heroes simply because it is too expensive, and getting celestials/hypogeans will net you a lot more value.
During the early game, you’ll mainly want to only use SG cards to stargaze. These can be received from places such as Campaign rewards (this is later, around after chapter 31), king’s tower (main resource imo) and thrilling voyage + more. You do not want to use DIAMONDS to stargaze until you have about 15-20 meta Ascended heroes.

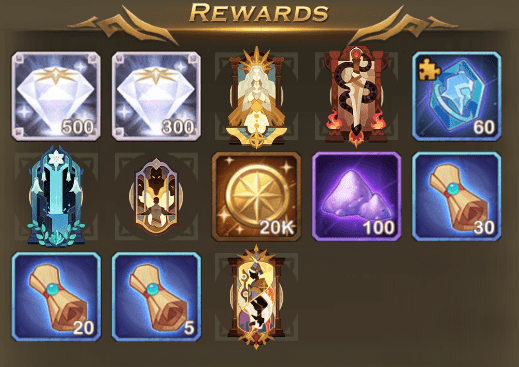
There are some heroes that work at even 1 copy for celestials/hypogeans as well. Getting an early copy of these before you start building a more resource heavy hero can be crucial. The beginner’s guide gives you the options you see on the right as 1 copy wonders.
Current prio focus is:
- E Daemia -> M Liberta -> E Mehira -> 1* Liberta -> 1* Daemia -> A Alna -> 1* Lavatune
After that, strongly consider saving cards at this point as new celestial and hypogean heroes are likely to come out and may be higher priority than these somewhat more niche heroes. If you are ready to pull though:
- 1 Star Lucilla -> 1 Star Veithael-> 1 Star Chimera ->M Khaz->1 Star twins->Kraken territory
This is also a good general outline.
However it is also open to more interpretation based on personal taste. For example some people like to do Khazard much earlier or stargaze to speed up getting Mortas M.
Awakened Heroes
Next up is the current strongest category of heroes (might change with new dragon faction). There’s another summon mechanic which you will unlock later in the game which will let you summon for an Awakened version of a hero. Currently, there’s over 10 heroes you can pull for, and not all of them are best. There are tierlists, which you can see below this paragraph.
The general consensus here is to save 500 emblems before you start pulling for a hero. This is because a F2P player averages building an awakened hero within around 4 months, meanwhile the game releases about 1 woke hero every 2 months. This means you’ll be around halfway done with your hero by the time a new hero releases. If this new hero is better than yours, then you’d have wasted your resources less optimally, and this can leave a nasty taste ngl on god fr fr.
In my opinion, saving pulls for first awakened can possibly be skipped due to how good Awakened Shemira simply is. She’s a tier above all else, and is useful everywhere in the game. I would recommend pulling for her from day 1.
After getting a hero to Ascended rank, you’ll be able to pull the rest of the copies to get the stars from the Stargazing summons. Make sure you get the last copies to go from Ascended 0 stars, to ascended 1 star using stargazing. This will save you about 150 cards, and you’ll want every single one of your cards used properly.
TLDR: Pull for Awakened Shemira. After getting her to 1*, start saving 500 for next woke.
Garrison
Garrison is a mechanic which will allow you to hire heroes from allies and use them as your own. This only works with dimensional heroes. You technically own these heroes in every way, other than the fact that you have to request to hire them from someone that owns them every month.
You have 4 currency types, and you want to use 3 of them to get the 100 exchange stones needed to hire the hero you desire. You’ll want to focus using hero tokens first, then labyrinth and lastly you’ll use up guild coins. You never want to use Challenger coins here since the ratio is very bad, and you’d rather use them to buy your own dimensional heroes in the Challenger store (more on that in the next part).
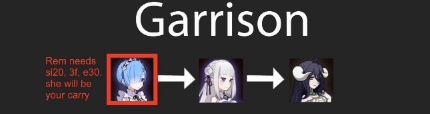
Above this text you’ll see which heroes you want to focus on first. You’ll want to start with only garrisoning Rem (hero furthest to the left) until you reach chapter 31. You won’t get much value out of Emilia (hero in the middle) until you’ve invested some resources into her, so there’s no point in getting her for now.
You can garrison by heading over to the friends tab, and select the Garrison tab within there. On the top right you’ll be able to exchange for Dimensional stones.
Stores
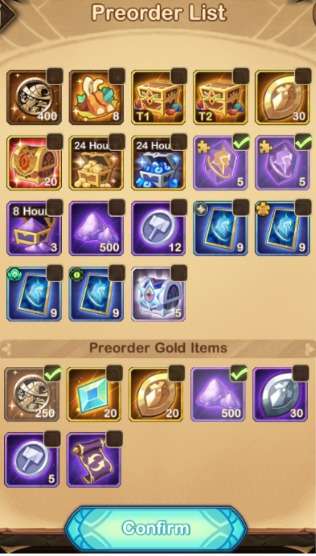
Normal Store
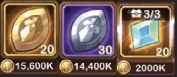
Next up we have stores. We’ll go from stores left-> right. In the first shop you can set up preorder list. Just copy the image on the right. If you can afford it, add these 3 with priority:
- Gold > Silver > Shards.
Guild Store
Next up is the guild store.

There’s not many choices here, since the currency is quite limited. Your focus will be buying this first -> After that you’ll want to get as many Eugene shards as you can afford.


Barracks
Don’t touch this store.
Labyrinth Store

You’ll want to focus on getting Joan of Arc. Buy nothing here. This will take about 1-3 months depending on events, so just focus that for now.
Challenger Store

Here you’ll just want to get Mulan. This will take about 3-4 months.
Now Onto the Early Game
I will try to make this as much of a step by step guide as I can. There’s obviously going to be a few differences between what I describe, and how your account will develop.
The Tutorial
The game will force you into a tutorial, and you’ll have to play along with it until it ends. The tutorial is quite simple. Just level up your Mirael as many times as you can, and keep doing your campaign stages until you finish Chapter 1 – Stage 12.
Ranhorn
Summoning and Wishlist
Upon finishing Chapter 1, you will be introduced to Ranhorn. This is the area where you can use different types of currencies to summon, and evolve heroes. The game will force you into the summoning area (The Noble Tavern), and make you summon a hero. This hero is guaranteed to be Elite tier, and sadly is completely random depending on your current wishlist. You cannot change your wishlist before doing this single pull.
Gift Codes
Now it’s time to use the available gift codes in the game. For those using an android or emulator, simply download AFK Redeem from the Play Store. This application is constantly up to date with all available codes, and it will let you redeem all codes at once.
These gift codes often contain summoning scrolls, which is what we are aiming for. After getting these, head over and summon to your heart’s content (make sure your wishlist is completed before you do this).
Early Game Carry (From Level 1-100)
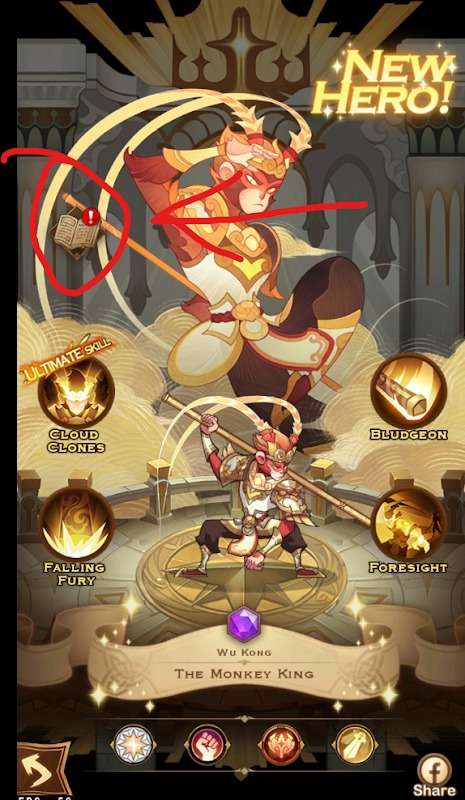
At this point in the game you will have access to Wu Kong, The Monkey King. Although you have to “share” the game to get him into your accounts. You can do this by extending the toolbar on the left side. You should have “Purchase Gift” at the top, with an arrow with an exclamation mark at the bottom. Press that and head into the Events tab. In here you’ll find Wu Kong.
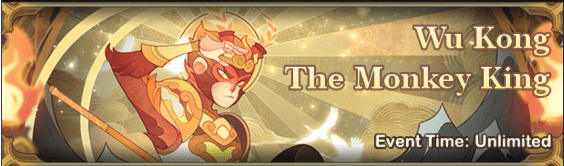
Open this up and click share. Nothing will happen if you don’t have any social accounts linked to your account. IF you do get a popup, simply close it as it does not matter if you truly share the game. When you return to the game you will be able to Collect Wu Kong (same button location that you clicked Share on).
Wukong will be your main carry until level 100. You can now head over to Ranhorn, into the Rickety Cart at the bottom right. Go to Retire Hero and enable “Automatically Retire New Common Heroes”. This will make every Common tier hero, whom are completely useless, automatically retire and get replaces by 50 hero essence and Hero Coins. Hero Coins is required to Garrison Rem.
Go back to Reset Hero and Reset everyone (probably only Mirael if you followed the guide, and 1 level on ira since the game forces you). This reset is free since you’re resetting Legendary Tier heroes.
When you’ve gotten this far all you focus on is leveling up Wukong to the highest level you can, and then force yourself through the campaign. When you get stuck, head back to Wukong and level him up again. Rinse and repeat.
Early Game Awakened Hero Pull
Did you get lucky and pull an awakened hero in the early game? You can use this hero as your carry instead of Wukong as long as it is not AEzizh and ATalene. You’ll also be able to level this hero up more since Awakened heroes start at the Legendary Tier.
Guilds
The moment you unlock guilds, try to find an active guild to join. The strength of the guild doesn’t matter as much as long as it is active. Active means being able to unlock the second Guild Hunt, which is the monster Wrizz. You can attack Soren, which is the default Guild hunt, daily. An active guild can open the fight against Wrizz once about every 1,5-2 days.
These attacks will give you many different rewards like gear, gold and experience. What you mostly want is Guild coins. This is the last currency you’ll want to save up to Garrison Rem.
You’ll want to do these Guild Hunts at the end of the day.
Ascending Heroes
Simply put you can always “Auto Ascend” if the option is available at the bottom right of the GUI found within the Temple of Ascension. You’ll want to be careful with using Smart Ascension since this will randomly ascend fodder, and can sometimes delay making enough E+ fodder of 1 type, which in turn will delay making that specific fodder to L+. Other than that make sure you have at least 8 copies of a hero before starting the ascension of the hero. This is because this game is a gacha, which means if you have 6 copies of a hero and you think “let me just ascend Ulmus since I’m so close to 8 copies anyways”, you can suddenly not get a single copy of Ulmus for months. This will technically “waste” the fodder copies since you could’ve used them to ascend the Raku that you initially had 3 copies of, but over the months got to 8 copies.
Dark Forest
Arcane Labyrinth
The Arcane Labyrinth unlocks when you complete Chapter 2-4. This is a really important part of the game, and you’ll want to do this whenever it becomes available for you. You can clear it once every 2 days. This will give you many different rewards, where the most important one is the Labyrinth coins. You’ll want these to Garrison Rem.
You’ll probably want to wait with pushing Arcane Labyrinth for a bit, since when you reach Chapter 7 you’ll be able to hire better heroes from your friends/guild/mentor. This hero can be used as many times as you want within the Arcane Labyrinth, which will make this gamemode a breeze to do.
Peaks of Time
This feature unlocks when you complete chapter 6-4. You’ll gain access to multiple modes within the area. The first one, which is called the “Historic Ventures”, is focused on clearing maps to get rewards. There’s guides for these online on reddit. The second area that is open right away is the tab furthest to the right called “Wondrous Pouch”. Over here you can play Candy Crush and Vampire Survivors 2.0. Candy Crush is a very important mode since it rewards you with a lot of Hero Essence chests, diamonds and scrolls. I recommend grinding this whenever you can. Vampire survivors also provide a bunch of rewards, but personally I find them a bit taxing to do.
Voyage of Wonders
This feature contains Misty Valley, which is a bit unrelated to you for the early game so we won’t delve too much into it at the moment. You can also find occasional events that requires solving of puzzles or similar, like in Peaks of Time, where you can get time limited rewards.
Thrilling Voyage
Thrilling Voyage is a feature you won’t look too much into during the early game if you’re F2P. This feature is permanent and is just free rewards waiting for you to claim them when your hero box gets big enough.
Fantastic Beasts
The Fantastic Beasts part each has maps that contain 25 stages, where clearing each stage rewards diamonds, and collecting enough stars by defeating the stages, reward you with more specific rewards such as 10 TE, cores etc. You can do these any time you want, but there’s a limit of 80 attempts PER WEEK. This attempt counter does not state when it updates, so you’ll have to remember the day where you used them (or it might reset with the weekly reset, I’m honestly not quite sure).
When battling the stages within this mode, you’ll have access to fully built heroes no matter how much investment you’ve thrown into them. The only requirement is that you actually need at least a single copy of these heroes to be able to access them within this mode. The first 4 maps at the tops in my opinion are the hardest ones, and will be harder to clear and get 100% on F2P early accounts. I’d recommend starting from the bottom. You’ll also be required to use pets for some to achieve 3 stars, but most maps don’t require you to get 3 stars on all maps to receive all rewards.
The team I recommend using is any variation which includes Awakened Shemira, Liberta, Daemia and Ivan. You can also use Jerome, Naroko or any other strong hero, but the first 4 should be strong enough to carry you through this gamemode. Pet choice differs, but you should at least have the black ball pet which should mostly work fine.
Hunter’s Notes
This mode is similar to Fantastic Beasts in the rewards and map aspect, but this time you only use the heroes you have invested into yourself.
Judgment Chronicles
This part of the voyage contains limited events which are rather difficult. I don’t think you’ll be able to clear this during your first month or two of playing. I won’t be explaining the gamemode in a lot of detail due to that.
King’s Tower
King’s Tower is a tower that you can climb using your strongest 5 heroes until the game forces you to stop because your power level is not high enough. The rewards within each floor is rather subpar, but they do stack up. Reaching milestones like every 20, 40, 60 or 100 floors will give campaign rewards such as 5 TE which is very welcomed. You’ll unlock faction towers later which requires you to use the specific faction heroes to play. These towers have a bit better rewards since after around floor 150 you start getting 5 Stargazer Summons for every 10 floors.
During the early game you’ll just want to put in levels into some heroes to make them live longer, and let the black ball pet kill everyone. This pet shines a lot during the first 100 floors, so don’t forget to grind this part of the game when you do unlock it.
Arena of Heroes
This is one of the main PvP modes. There’s 3 permanent modes that will always be available to you. This includes Arena of Heroes, Legends’ Challenger and Legends’ Championship.
Arena of Heroes is simple 1v1 1 round matches against other players of your choosing. You get daily and weekly diamonds depending on your ranking. Remember to set up your formation in the bottom right. Just use your 5 strongest heroes.
Next is Legends’ Challenger Tournament which is a 3v3 1 round matches again against other players of your choosing. This mode generates Challenger Tokens every hour based on your ranking. I recommend trying to reach for at least 300 tokens, or 350+ if you’re playing competitively. You can do a trick here which is only making good teams for team 2 and 3, and just put junk in team 1. This is because a lot of people have really good teams from Team 1 to 3, and your hero box is not strong enough to make 3 teams. You also only need to win ⅔ fights which makes this more optimal.
Lastly we have Legends’ Championship. You won’t be able to do much here unless you’re whaling, since this gamemode takes the 5 strongest people in Legends’ Challenger Tournament and pits them against each other. What you CAN do is do battle wagers to get around 1M gold each time. You can pick someone to vote for, and check whoever voted most for who, then swap if you wish. The other way to see who’ll win is by clicking their portraits and check their elder tree level. Whoever is highest level is most likely to win.
Bounty Board
This feature is unlocked when you get to Chapter 3-20. Simply fill out the required heroes depending on their faction to get free loot after x hours.
Abyssal Expedition and Temporal Rift
You won’t unlock this until a bit later, so I won’t talk too much about them here (might be added later when I have more motivation).
Merchants
Merchant Ship
This Merchant will reward you free diamonds and elite stones daily. Make sure to collect them.
VIP Levels
You’ll get VIP experience every 10 levels you level up your account. This will level up your VIP level which will get you free rewards. You also get more VIP experience the more you spend in the game. Each level unlocks new perks/increases limits, and is overall just a welcome upgrade.
Noble Society
Here you’ll have the option to select a reward type for the 3 different available societies. Do not do anything here until you can select the collect reward type.
- For Champions of Esperia you’ll want to select Red Chests,
- For Twisted Bounties you’ll want to select Baits,
- For Regal Rewards you’ll want to select Superb Elite Hero Soulstone.
After selecting, you can’t change for the rest of the month, so make sure you take the correct ones.
Events
Features That Use “Attempts”/Trialing Heroes
There’s somethings in this game that you have x amount of attempts to do each day, like the Guild Hunts. There’s also events that come around every 2 weeks when new heroes are released. These events includes a “Trial” mode where you get to try the new hero for 3 days. From the release date of the hero, you’ll have 14 days to start the trial. You always keep the hero for 3 days no matter which day you start the trial.
To get the most value out of both of the usages above, I recommend waiting until the last moment before using up said “Attempts” and “Trials”. This is because during the early game you get exponentially stronger every day. You will have a big difference in your strength during the start of the day, and towards the end. This means try to save the Guild Hunt attempts for the last few hours of the day. This is applicable if you are NOT STUCK everywhere else in the game. If you are stuck, simply ignore this tip.
Trialing heroes on the other hand I recommend waiting with no matter what. The strength of the hero you trail depends on your 5 strongest heroes. You have 2 weeks to trial this hero, and during that time you can get probably 5 times stronger, which will get more value out of the trial when you do eventually start it. A lot of heroes do not work without investment, and when you trial day 1, you simply won’t get much value out of the trial.
Early Game Events
There’s multiple early game events tied to having a fresh account. These events currently include Soldier’s Supplies, Hero’s Covenant, Bootcamp and Assembly of Heroes. Most of these are self explanatory. Simply do the quests required and collect the rewards.
Hero’s Covenant on the other hand requires you to choose a hero. The best option here is Eorin. Simply pick him as your Covenant Hero.
Garrison Rem
You’ll want to keep pushing campaign until you unlock Garrison. This feature will be available within the Friends tab when you complete Chapter 6, and start Chapter 7-1. This will be the method you’ll receive Rem, your main carry for the rest of the game.
When you unlock her the game will tell you to link her to someone. You’ll want to link her to the highest tier hero you have available. This can be either an Awakened hero if you were lucky to pull, or a fodder you’ve gotten to L+.
After unlocking Rem you start investing everything into her. You’ll want to always keep her 40 levels above everyone else. The game will force you to level up other heroes before you can keep leveling her up, so do it in intervals where you get Rem for example to level 80, and every other hero to 40, where the next step is getting every other hero to 60 then pushing Rem to 100.
Your next investment goals are getting Rem’s signature item to level 20, getting her furniture to 9 and getting her engraving to e41. Give her all your best gear. There’s special rules for the use of Custom Furniture Scrolls, and for Rem we’ll follow 1 simple rule. Only use 1 single card to get her from 2 -> 3 furniture if you wish for it. Do not spend any more than this singular scroll.
Gear
You’ll want to gear up your main carries, which for the early game will mostly be Rem. There’s many different tiers to gear, and the only one that matters is the Mythic tier gear. Do not upgrade any gear until you get to the Mythic rarity gear. There’s multiple sources for gear which includes AFK Rewards, Campaign rewards, Guild Hunt and Arcane Labyrinth.
Hero Essence / Gold / Experience Chests
The game will throw a lot of chests your way. These chests include the chests you can see in the title of this paragraph. You’ll want to save all of these, but even more so with the Hero Essence chests. This is simply because every Chapter you complete will increase the overall daily gain you get of each resource. This increase is massive compared to the income in chapter 1, and chapter 28.
This is the daily income for chapter 1:

Compared to chapter 28:

The most optimal route is to SAVE absolutely every Hero Essence chest you get until chapter 28. The rate for dust does not increase after you complete this chapter.
The rest of the chests you can use if needed. Only use the amount you need to for example level up your carry to max level available. There’s no point in just using them whenever you get them.
There’s also 1 more type of reward you can get which will give you the option to select between the 3 different chest types. For these, you’ll only want to take Hero Essence chests when available.
All in all, Hero Essence is one of the most valuable currency for you while playing this game.
Fast Forward Rewards
You do not want to spend extra diamonds to fast forward rewards in the early game. You can keep ignoring this until chapter 16, which is where you’ll start using the first 50 diamond option to fast forward 2 hours.
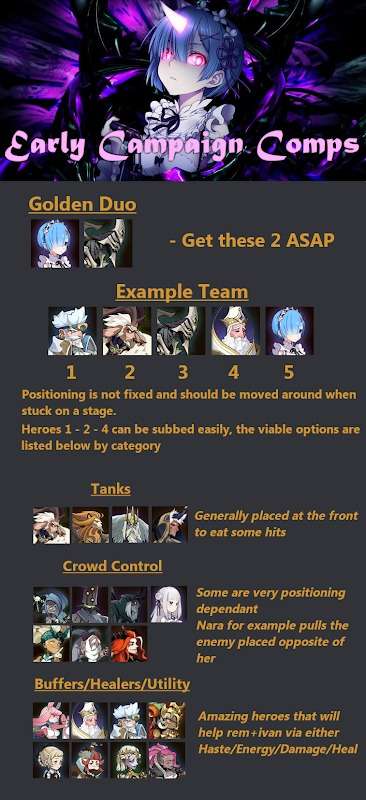
Early Game Comps
Click to enlarge…
Useful Tip
Hero 100 Gems
Every new hero you get has their own story. You can access this story to get free 100 diamonds. If you do this for every hero, you’ll get about 18000 diamonds for free.
You can either click the book button when you pull the hero for the first time,or head over to the Heroes tab at the bottom, and select portraits. Every hero with an exclamation mark has the 100 diamonds unclaimed. You only have to click on the story tab to the 100 gems.
Be the first to comment