
Whether you just want a quick Tier list of the cleaners / weapons and a few builds that’ll get you through Veteran / Nightmare to in-depth analysis of everything, this guide has you covered!
Contents
- Hot and Fast Tier Lists for Weapons and Cleaners
- Cleaner Tier List and Details
- Gun Tier List
- Shotguns
- Melee Weapons
- Assault Rifles and LMGs
- Sidearms
- SMGs
- Snipers and Ranch Rifle
- Cleaner Classes
- Scavenger
- Medic
- Close Range Damage Dealer (Generalities)
- Melee Tank Build [Axe Go Brrrrrt]
- Power Swap Shotgun Build A [ADS Allowed]
- Long Range Damage Dealer (Generalities)
- Barrett Reload Sniper Build
- Misc. Card Selection Notes and Thoughts
- Regarding Gun Damage, Especially Glass Cannon
Hot and Fast Tier Lists for Weapons and Cleaners
All credit goes to NeedsMoreDakka !
Okay look, if you just want to know which weapons to use and which to avoid, here ya go.
Cleaner Tier List and Details
Okay, so since you’re so kind to scroll down to this point, I’ll give a basic synopsis.
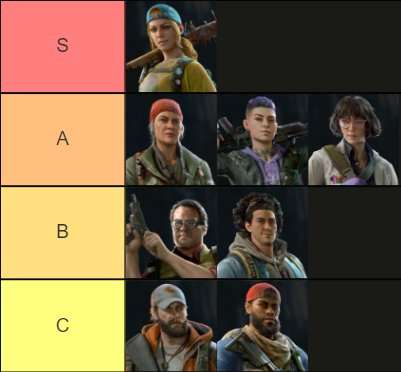
For Veteran / Nightmare:
- S: Holly
- A: Mom, Karlee, Doc
- B: Hoffman, Evangelo
- C: Jim, Walker
Reasons:
Holly: You’re using her as a melee build. That means several things.
- No ammo consumption
- Plays the same between all difficulties
- Highest potential damage, DPS, and overall kills
- Essentially unkillable (don’t play stupid with the Tallboys / variants)
- Fire axe go brrrrrrt
- No seriously, she’s a melee machine, especially with Adrenaline Fueled + Meth Head cards
Mom: Team Extra Life. That’s about it. With this, everyone can be downed twice on Veteran or Once on Nightmare without dying, increasing survivability / damage / chance of success. Also, being able to carry 2 medkits for Doc is also really helpful; while this has diminishing returns as you buy team support slots or get additional cards, hey, it’s two more medkits!
Karlee: Detecting sleepers behind walls (to avoid hordes on Nightmare), and starts with a Tec9 (combine with Ammo Stash card for infinite range horde clear. Or just coordinate with someone else to take Ammo Stash, and give them the Tec9 and then go melee).
Doc: Mainly for Team Trauma Resistance and the 3 Free Heals. The extra healing helps
Hoffman: Team Ammo Capacity, spawns ammo (inconsistent but at least he gets a shot at it), can carry more pipe bombs
Evangelo: Team Speed
Jim, Walker: Both rely on sniper weapons and precision kills, which are subpar in a game as chaotic as B4B. Tallboys die to holly, hordes die to Karlee + Tec9 and Holly, and the other cleaners have far better passives. Also, these two’s damage buffs (Jim’s stacking buff and Walkers 10% buff) don’t boost weakspot damage!!!). Jim is superior for the team weakspot damage, but loses his bonuses whenever he gets smacked.
Gun Tier List
PSA: “Firepower” stat is useless, ignore it.
Been talking to people on the B4B Discord and came up with the following Tier List.
Assume intentional card loadouts / optimization and ideal attachments.
Side note worth keeping in mind: Assault Rifle is kind of at a premium throughout higher difficulties. Virtually every weapon that uses it (minus the Revolver and Ranch Rifle) is weak and shoots full auto. If you hear anything about AR ammo being ‘premium’ or ‘rare’, this is why. Shotgun ammo tends to get chewed through somewhat quickly for AA12 users as well, but SMG and Sniper ammo reserves generally won’t be eaten through quickly.
Anyway the tier list.
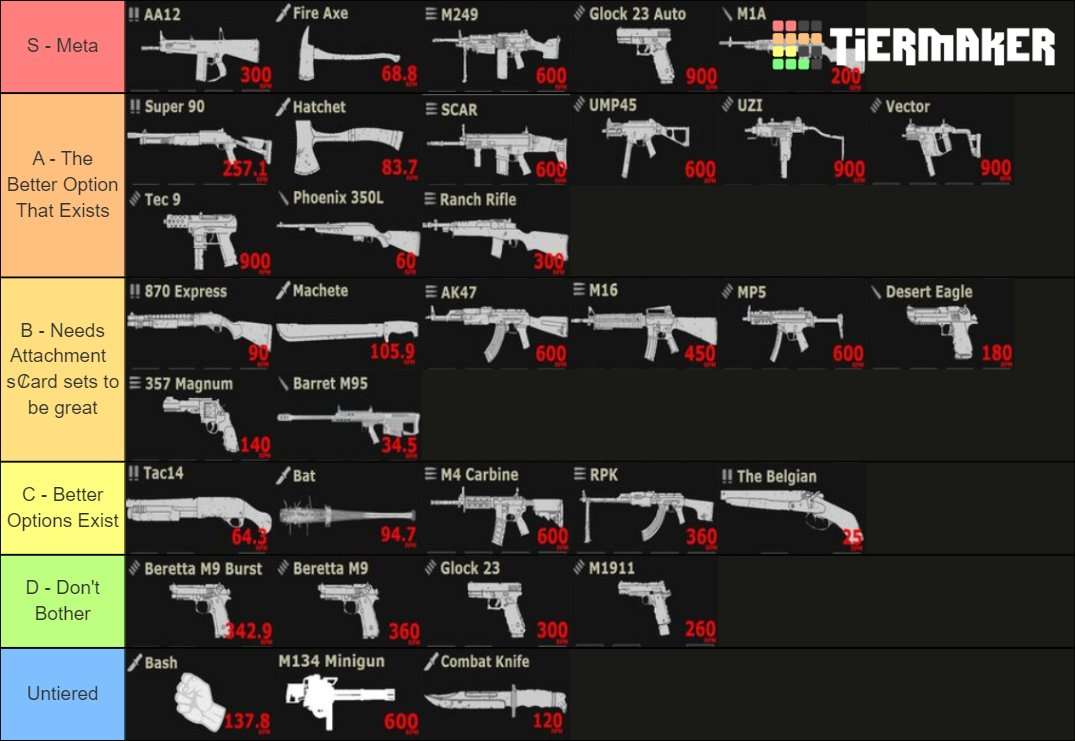
- S – Meta: AA12, Fire Axe, M249, AutoGlock, M1A.
- A – Awesome: Super90, Hatchet, SCAR, UMP45, Uzi, Vector, Tec9, Phoenix, Ranch Rifle.
- B – Good, but trade up when you can: 870 Express, Machete, AK47, M16, MP5, Deagle, Revolver, Barrett.
- C – Mediocre: Tac14, Bat, M4, RPK, Belgian.
- D – Don’t Bother: Berettas, SemiGlock, M1911.
- Untiered: Bash, Minigun, Combat Knife.
It’s a little easier for me to explain if I go by weapon category. I combined the Ranch Rifle with the snipers since it has a similar role but it is an assault rifle according to the game.
Shotguns
FYI the AA12 and the Super90’s range starts dropping off at about 2.5 meters, the 870 Express at 5 meters, and the Tac14 and Belgian at 7.5 meters.
Damage values assumes all pellets hit. This is possible with multiple accuracy cards but try not to exceed 100% with them…bad things happen if you do.
AA12 has weaker damage per shot but shoots full auto and has a box magazine, reloading all at once instead of reloading shell by shell. It’s somewhat inefficient with the ammo consumption, but pretty much anything you shoot other than bosses is going to die in one magazine.
- White: 69 – 23.4 Damage if all pellets hit
- Green: 79.1 – 27.4
- Blue: 90.7 – 30.9
- Purple: 104.2 – 35.9
- Bullet Penetration: 2nd in line takes 17.5% damage
Super90 can compete with (but falls behind the) AA12 for overall DPS and is worth taking over the two pump shotguns.
- White: 73 – 24.7 Damage
- Green: 83.5 – 29
- Blue: 95.7 – 32.6
- Purple: 109.5 – 37.7
- Bullet Penetration: 2nd in line takes 17.5% damage
870 Express is…a pump shotgun that loads a single shell at a time. It shoots slower and does marginally more damage than the AA12 and Super90. It’s solid, but not great.
- White: 73 – 24.7 Damage
- Green: 87.2 – 30.5
- Blue: 103.9 – 36
- Purple: 124.1 – 42.3
- Bullet Penetration: 2nd in line takes 25% damage
Tac14 is notable for scaling harder in terms of damage than the other shotguns. In terms of raw damage it’s essentially a 3-shot Double Barrel Shotgun. …But you’ve only got 3 shots. It’ll work in a pinch, and a Purple Tac14 shreds, but you’ll be reloading all the time. Please note, Purple Tac14 and Purple Belgian do -about- the same damage if all pellets hit. Also, Tac14 scales in a way so it’s doing -about- the same damage as 2 Super90 shots, with a notable lull between shots. Becomes viable for 2-Gun builds if juggling Admin Reload and Power Swap. Don’t use it against commons though, it’s…pretty bad for horde clearing. Benefits from a purple magazine by gaining +3 rounds instead, doubling capacity!
Oh by the way this gun does more raw damage than the Barrett.
- White: 130 – 44.3 Damage
- Green: 162 – 55.7
- Blue: 202.2 – 69.7
- Purple: 257.1 – 87.9
- Bullet Penetration: 2nd in line takes 32.5% damage, 3rd in line takes 7.5%
Belgian is a special case and should be combo’d with the Power Reload / Admin Reload pair of cards. Be careful of ammo consumption if using this card combo, as it fires two shells at once. Reload cards also directly boost this weapon’s DPS.
- White: 134 – 45.3 Damage
- Green: 167.2 – 56.9
- Blue: 209 – 71.8
- Purple: 260.9 – 89.9
- Bullet Penetration: 2nd in line takes 32.5% damage, 3rd in line takes 7.5% damage.
Melee Weapons
Fire Axe does approx. 6 times the damage of the Bat and approx. 5 times the damage of the Machete. Heavy Attack / Mean Drunk cards can let you one-shot specials. Only downside is the vertical swipe [crouch and aim almost exactly down to deal with exploding heads btw].
Hatchet is a Axe-lite and is notable for letting you move faster. Just over half the damage of the Fire Axe. Vertical Slash.
Machete-go-brrrrrrt builds are REALLY fun but not being able to effectively deal with special infected kinda hurts. Horizontal Slash. Faster and marginally more damage (enough to kill in one slash with white rarity iirc) than the Bat.
The only good thing about the Bat is that it does more stumble damage to specials. If you’re going with a melee build, it’s better than nothing. Upgrade when you can.
Assault Rifles and LMGs
I tied the Assault Rifles and LMGs since they have similar roles. You can find the Ranch Rifle in the Snipers section
M249 is the second to only AR/LMG with anywhere near decent base magazine size [‘belt’ length, but whatever]. Viable on hipfire builds since it has reverse hipfire accuracy degradation [the accuracy gets BETTER as you shoot!]. 6.5 sec (white rarity) reload hurts, but honestly it’s one of the more brisk beltgun reloads I’ve seen in video games. It also has EXCELLENT base bullet penetration (only losing 25% damage or so), which is important not only for cleaning through hordes but also dealing with armored specials (and tallbois; you can shoot through multiple hitboxes to hit their weakspot if they’re walking straight at you!)
- White: 13 – 8.3 Damage
- Green: 14.9 – 9.6
- Blue: 17.2 – 11
- Purple: 19.8 – 12.7
- Bullet Penetration: 2nd in line takes 75% damage, 3rd in line takes 50% damage, 4th in line takes 25% damage
SCAR is notable for being the only assault rifle (excluding RPK / M249) having more than 50% bullet penetration. Bounces a bit while shooting full auto, but otherwise essentially a straight upgrade to the AK47. Note: Purple SCAR actually has superior DPS vs the LMGs, but the 20 round magazine hurts.
- White: 15 – 9.6 Damage
- Green: 18 – 11.5
- Blue: 21.6 – 13.8
- Purple: 25.9 – 16.6
- Bullet Penetration: 2nd in line takes 61% damage, 3rd in line takes 36% damage, 4th in line takes 11% damage
AK47 is a SCAR-lite. Marginally worse damage / DPS (again, ignore Firepower stat), only slightly faster reload speed, allegedly slightly worse accuracy, worse Bullet Penetration (50% to SCAR’s 39-ish%)… only thing going for it is somewhat better recoil when shooting full auto. Note: Purple AK actually has superior DPS vs the LMGs, but the 20 round magazine hurts.
- White: 14 – 9 Damage
- Green: 16.8 -10.8
- Blue: 20.2 – 12.9
- Purple: 24.2 – 15.5
- Bullet Penetration: 2nd in line takes 50% damage, 3rd in line takes 25% damage
M16 -not- being good is easier to explain than why it’s good. The fire rate cap of it being a burst-fire weapon is a non-starter IMO, and not being able to even interrupt the burst easily (you -can- with a bash, but that’s time consuming) means you’re wasting ammo. Only reason it isn’t garbage is because it actually does good damage and solid range. Use against specials and you’ll see pretty much the only places this weapon shines…kinda.
- White: 14 – 9 Damage
- Green: 15.4 – 9.9
- Blue: 16.9 – 10.8
- Purple: 18.6 – 11.9
- Bullet Penetration: 2nd in line takes 38.5% damage, 3rd takes 13.5 damage
M4 does SMG (uzi, Vector) damage while using the premium Assault Rifle ammo, having worse hip-fire, worse mobility, and the only benefit is marginally better bullet penetration (as in having -any-; 50% damage reduction vs the other SMGs having 67-82% damage reduction). The only reason it’s not D tier is that it can shoot full auto.
- White: 10 – 6.4 Damage [Seriously why is it only doing SMG damage]
- Green: 11.5 – 7.4 [Can’t pop heads vs Monsterous Commons at max range]
- Blue: 13.2 – 8.5
- Purple: 15.2 – 9.7
- Bullet Penetration: 2nd in line takes 50% damage, 3rd in line takes 25% damage.
RPK honestly has a few things going for it. Good damage [better than Range Rifle!], good range and a decent magazine size. Too bad the fire rate and reload speed are literal garbage. Usable for its raw damage output. Fire in single shots though, the recoil is pretty bad, too. Scales harder with higher rarities; usable with blue/purple rarity.
Author’s Note: On an Admin Reload build, especially if you’re doing 2-Gun this gun actually isn’t bad at all. You can then take Magazine Size attachments and do damage superior to the Ranch Rifle.
- White: 18 – 11.5 Damage
- Green: 21.6 – 13.8
- Blue: 25.9 – 16.6
- Purple: 31.1 – 19.9
- Bullet Penetration: 2nd in line takes 75% damage, 3rd in line takes 50% damage, 4th in line takes 25% damage.
Sidearms
AutoGlock: Honestly if you prefer the Tec9 over the AutoGlock, that’s fine. The Glock is superior for a few reasons: Marginally superior DPS, better raw damage (enough to headshot with one bullet with lower rarities), and a better recoil pattern than the Tec9.
Tec9 has a slightly larger magazine size than the AutoGlock but several worse stats. Worth picking up, though!
Deagle and Revolver are very similar with the following niches: Able to 1-shot body shot commons, -good- damage penetration values, letting them clear hallways with a degree of success, trash overall DPS thanks to a long reload speed, and bad hipfire accuracy.
Deagle is superior for better raw damage, better bullet penetration, and using the more rare Sniper ammo vs the Revolver using the commonly-needed Assault Rifle ammo.
Berettas, SemiGlock, M1911: Literally don’t pick up. This isn’t Killing Floor, don’t use your sidearm to plink heads. Well, okay, the M1911 is good for body damage, but it has a trash reload. Also even on recruit, white Berettas can’t one-shot headshot!
SMGs
No S-tier SMGs. They don’t do enough to compete with the S-tier guns.
Uzi, Vector, UMP45 are all A-tier for different reasons, but as a category are worth using on a few support builds.
Uzi doesn’t scale as well damage-wise as the Vector or UMP45 but it has good DPS.
Vector has the best DPS out of the SMGs and is better than the SCAR/AK at lower qualities, but doesn’t scale as well in terms of raw damage. Lowest recoil, use with a Laser sight for excellent hip-fire! Pretty much can only mow down a single special before needing to reload. In short, always a solid choice!
UMP45 does damage in between the M249 and the AK47 and competes with them as a general purpose ‘assault rifle’ and sports a slightly faster reload speed than the AK47. It even has ok damage penetration (62-ish%), making it basically an AK47 that uses pistol ammo with somewhat worse range and damage penetration.
MP5 is an inferior Uzi with anti-aircraft gun levels of recoil. DPS is slightly better than the M4.
Snipers and Ranch Rifle
I’m putting the Ranch Rifle here because it has a similar use.
M1A is probably the rifle that needs the most amount of raw skill due to needing to accurately hit multiple followup shots. DPS potential just behind M249 / RPK / AK47 / SCAR.
Ranch Rifle is extremely fun to use and is very good! M1A’s faster, weaker, less-recoil little brother. DPS is beaten in raw damage only by the shotguns, RPK, and other snipers.
Phoenix is the more forgiving, weaker Barrett. Special Infected deletion tool. Use with Reload build (reload cards improve bolt action cycling!). Matter of preference between this and Barrett.
Barrett is the less forgiving, stronger Phoenix. Special Infected deletion tool. Use with Reload build (reload cards improve bolt action cycling!)
Cleaner Classes
So if you got this far, you’re probably wondering if I have any card builds that are any good.
Well yes my friend i have plenty of good builds for you. In fact, allow me to fill you with KNOWLEDGE on what you should be doing on Veteran and Nightmare.
Oh, yeah, this is for “Not speedrunning”, but “moving through the level in a reasonable timeframe, minimal downs,” etc etc. You know, going through the level “normally”.
There are 4 roles:
- Role 1: Scavenger
- Role 2: Medic
- Role 3: Close Range Damage Dealer (DD) / DPS
- Role 4: Mid-Long Range Damage Dealer (DD) / DPS
Scavenger
Your Scavenger should be Karlee. Evangelo is OK.
Here’s your Deck. You can mess with the order of cards if you want. I prefer some melee cards up front to help get me going.
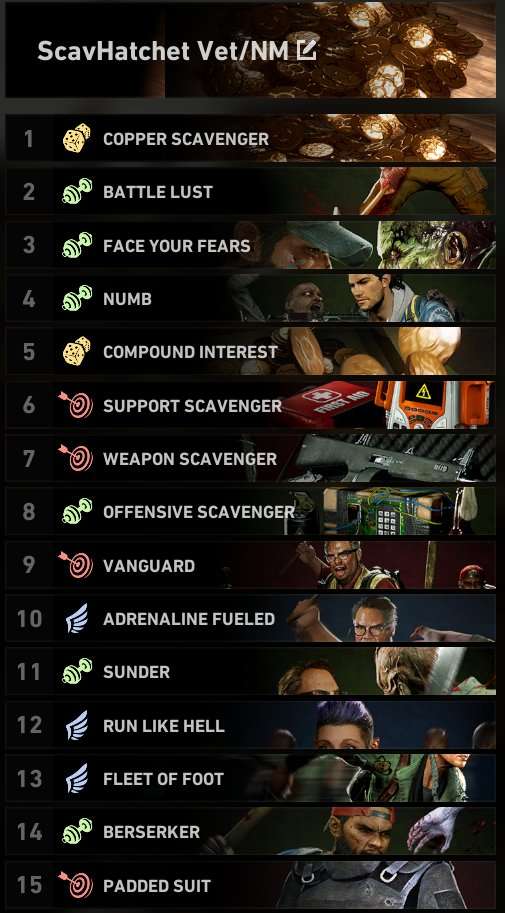
- Copper Scavenger
- Weapon Scavenger
- Down In Front!
- Offensive Scavenger
- Support Scavenger
- Compound Interest
- Run Like Hell
- Fleet of Foot
- Berserker
- Vanguard
- Adrenaline Fueled
- Battle Lust
- Numb
- Padded Suit
- Sunder
Copper Scav is your first card.
Compound interest should be taken as reasonably early as possible. At the end of each round, have everyone dump their cash by the safehouse door, and then you take it to get the bonus.
Your Tactics as a Scavenger
- Carry toolkits and use them on stash doors.
- You are the secondary melee user on the team. You will find and carry a Machete as your secondary weapon and use it vs Common Ridden. On early stages you won’t have the cards necessarily to truly shine as a melee guy, but that’s okay; get your scavenger cards early.
- Copper Scavenger and Compound Interest are high priority picks. Compound Interest works by multiplying your cash between map transitions. It is your job to remind your teammates to get off their butts and give you their money before closing the saferoom door.
- You are NOT a primary damage dealer. You are a mule / scavenger. Don’t get yourself killed by overextending.
Other Notes
- If you don’t want to run a melee build, that’s…fine, I guess. Just replace the melee stuff.
- Take Heavy Hitter, though, if you’re not running a melee build. Bashing common enemies will kill them (you won’t get HP regen though) and you can stunlock specials somewhat easily
- You don’t need utility scavenger.
- Down In Front! is mandatory on all builds except the main melee dealer. If you’re anywhere near other players, you crouch, ESPECIALLY if you’re next to your main melee guy.
- No seriously, take Down In Front! as early as you can and crouchwalk when you’re anywhere near your melee guy. Your melee guy is building for raw damage and WILL two-shot you.
- If you can fit it, take Money Grubbers. It’s the best copper scavenging card.
Medic
Your medic NEEDS to be Doc. Zero exceptions. This needs to be your first pick on your team, and whoever takes Doc NEEDS to operate as the team healer. This is mandatory. Figure this out first.
Here’s your Deck.
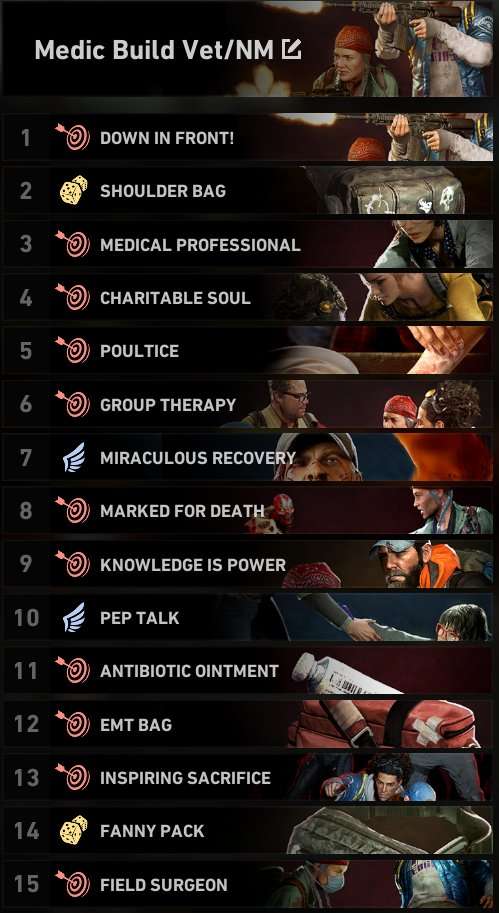
- Down In Front
- Shoulder Bag
- Medical Professional
- Charitalble Soul
- Poultice
- Miraculous Recovery
- Marked for Death [Special Note: Anything after this, order can be whatever based on team composition]
- Pep Talk
- Antibiotic Ointment
- EMT Bag
- Inspiring Sacrifice
- Fanny Pack
- Group Therapy
- Field Surgeon
- Knowledge is Power [Replacable; only useful for sniper builds]
Regarding Deck Order
- Down in Front is first. Always.
- Shoulder Bag is worth taking as a first card draw (2nd card position) because then you go from 1 to 3 support slots. Don’t worry about the damage dealt.
- Medical Professional is a mandatory early pick. If you do not have this card, you do not play Doc / Medic role.
- Charitable Soul, Group Therapy, Poultice are in variable order but should be taken as early as possible. Special note, Poultice makes simply giving someone pills a viable technique, since they get temp health and slowly heal additional permanent health.
- Anything after Marked for Death is variable in terms of order.
Your Tactics as a Medic
- You have a good degree of flexibility for what weapons you run, but you are NOT to take a melee weapon (unless you’re temporarily carrying it to your melee dudes, say if you find a higher quality one than they have)
- If you want to attack ANYTHING, you crouch. In fact, if you’re not actively moving somewhere fast, you should be crouchwalking. Thanks to Down In Front!, you neither deal nor take friendly fire damage when you crouch. So for THE LOVE OF GOD, crouch. Exceptions apply when you actively have to move to get away from something, but seriously, start drilling it into your head. This is important for all classes, but especially with the Medic, you should be healing people, not hurting them.
- This goes double if you’re ANYWHERE NEAR your melee guys.
- Stay back. If your teammates get hurt, they’ll come to you.
- Keep an eye on teammate health. Sometimes when they get hurt, they don’t realize how hurt they are. Also there are attacks that deal like 30+ damage, so sometimes they get smacked and don’t realize it. Use your mic to talk to them. You do have one, right?
- You carry medkits. Your Scavenger carries medkits. Your Mid-Long Range guy carries medkits. Your Close Range guy carries medkits (unless they’re a tank, in which case healing pills does them more good). If they want healing, they drop a med kit, and you use one in your reserve to heal them, and then pick up the medkit they dropped (not mandatory).
- Your scavenger is going to find health items on the ground a lot more. It’s up to you what you use on your teammates to keep them topped off on health, but you should be using what’s on the ground before your health kits (exceptions apply, say to heal Trauma damage via medkits). You as the Doc player need to take control of the situation whenever you see this sort of thing. Coordinate to make sure your melee guys are good to go first. If your long range guy is hurt (obviously something’s going wrong in your team, first of all), he’s the lowest priority over healing the melee guys.
- You have a free heal per player. Try to save it for the ending safehouse, but don’t be afraid to ‘burn’ it earlier.
Other Notes
- If you don’t have cards, don’t play Doc / Medic on higher difficulties. Unlock the cards first (hint: unlock the middle Supply Line to get all the medic cards)
- Remember, if you’re anywhere near your melee guys, crouch.
- Make sure you’re picking weapons that your Mid-Long range guy isn’t using. They’ll need the ammo far more than you will.
- If you’re going to attack, crouch.
- No seriously, drill it into your head, even on Recruit difficulty. Build the habit now before you shoot someone.
- If you want to get a money card, Money Grubbers is your best bet. You can probably get away with dumping Antibiotic Ointment for it.
- Another card worth looking into is Heavy Hitter. Don’t use it with a melee weapon though, just use your basic bash against commons if you’re getting surrounded.
Close Range Damage Dealer (Generalities)
Hokay. You have a little bit of leeway for what you do as a close range guy, but pick one idea and stick to it.
If you’re having trouble deciding, I’ll give you a few choices to get your mind thinking:
- Melee Tank, utilizing Mean Drunk / Meth Head / Heavy Attack
- Shotgun Build
- SMG Build
Your chances of success will be significantly better with your Close Range DD working their magic as a melee tank.
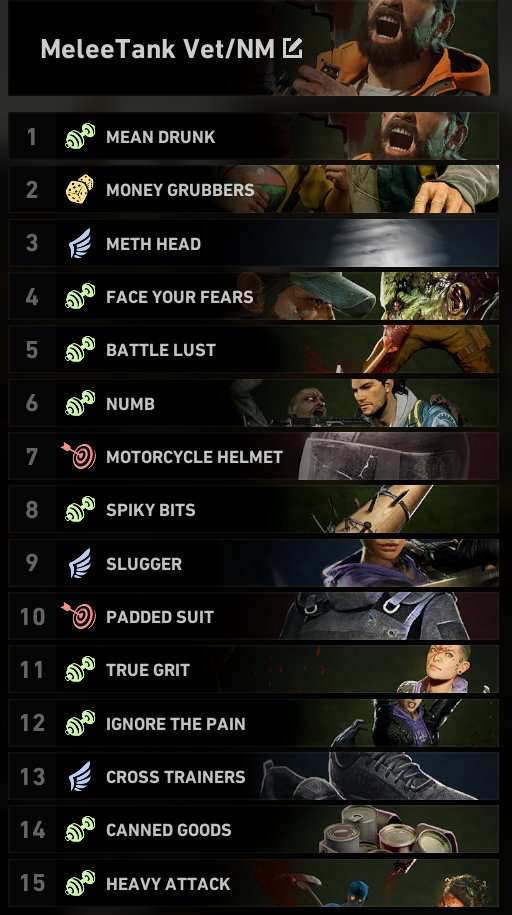
Melee Tank Build [Axe Go Brrrrrt]
If you decide to melee tank, then welcome to Axe Go Brrrrrt.
Your Melee Tank NEEDS to be Holly. Zero exceptions. You don’t need a primary Melee tank, as your Scavenger can get away with dealing with commons. However, you will have a LOT of success with this build.
Here’s your Deck.

- Mean Drunk
- Meth Head
- Battle Lust
- Face Your Fears
- Numb
- Motorcycle Helmit
- Spiky Bits
- Slugger
- Padded Suit
- True Grit
- Ignore The Pain
- Cross Trainers
- Canned Goods
- Heavy Attack
Regarding Card Order:
- Mean Drunk is your first card. No exceptions. Losing out on sprint is a game changer and hurts, but it turns your melee attack into a large AoE, letting you hit more than just one enemy.
- Meth Head needs to be an ASAP pick. The Melee Stamina Efficiency isn’t enough to offset constantly using it in battle, but it will go a long way.
- Face Your Fears is superior to Battle Lust, but can be taken in either order; along with Numb, all three should be taken as early as possible.
- Heavy Attack honestly should be taken as early as possible. It’s a game changer, being able to one-shot most mutations.
Your Tactics as a Melee Tank
- You will pick Holly. Evangelo is ok thanks to the breakout and mobility but if someone else picks Holly then you’re not playing melee.
- You will end up killing the most Ridden. You will end up killing the most Mutations. This is fine. Enjoy the glory of battle.
- You will find an Axe. You will use that Axe. You will love that Axe, or at least appreciate dealing insane levels of damage.
- If you find a Hatchet first, that’s ok to use, but you will upgrade to an Axe as a high priority (after clearing threats first)
- You will not be able to aim down sights with this build. This is fine. You do not need gun. Well, you might, sometimes.
- You are slow. You will tell your teammates you can’t sprint. You will tell your teammates not to run out in front of you. You will tell teammates to crouch if they are near you. You will tell teammates to crouch if they are shooting.
- If they do not have Down In Front! and they shoot you, you have my permission to incap them and then leave them there.
- You are not to care if teammates are in the way. You shall attack without regard to friendly fire. Deal with the threats in front of you. It is their fault if they take friendly fire damage.
- Okay, fine, don’t be an ass if they’re trying to run away from something. At least try to not hit them.
- It’s still their fault if they walk in front of you while you’re meleeing people.
Okay, but seriously, everyone but you should be taking Down In Front! for this reason. You have the potential to two-shot friendlies with higher grade axes, even on Veteran. It’s their fault for getting in front of you. Make this clear to your team. If anyone puts up any fuss, you tell them with as much respect and professionalism as you can that you’re going to be swinging a bat that can possible incap them in one attack, and they do NOT want to be in the way of you doing your job as a melee tank. - Accidents will happen. Take responsibility, apologize earnestly, and move on to dealing damage to more threats. If friendly fire incidents occur often, you can start getting mad at your teammates.
- They should be behind you anyways since you can’t sprint.
- If teammates are shooting commons, consider telling them to stop and “Let the tank (that’s you) do [your] job.” You get health back from killing commons as well, so it’s especially good for you.
- If they shoot a few common Ridden, on occasion, it’s fine; let them. After all dead enemies are best enemies. Better to clear the map safely and quickly.
- Heavy Attack the Mutations. Watch them fall under your might. Just make sure to hit the weakspot.
- You’re gonna wanna treat Tallboys / variants like you’re playing Dark Souls. Dodge their attacks, then slap their heretical butts.
- Fire and Acid commons hurt. Move far away once you kill them, as they leave ‘puddles’ that can keep hurting you after they’re dead.
Other Notes
- Emphasize to your team you can’t sprint or aim down sights. They need to be behind you, and they need to be taking out threats at longer ranges.
- You need the Axe since it’s doing 5-6 times the damage of the Machete/Bat.
- No seriously Heavy Attack Axe swipes do more raw damage than the Barrett. Or any of the shotguns, especially the Belgian / Tac14.
- Keep/Take/sometimes consider buying Pain Pills for yourself. Keeping Numb going is important on higher difficulties, since damage resistance is always good. Hopefully you’ll find a Team Support Slot in one of the safehouse buy stations and you can carry 2.
- Buy/Take Stun Guns as your Utility item. Try not to burn it if you have teammates nearby.
- If you get pinned, say “Holly is pinned and needs help!” instead of “I need help!” your teammates might not recognize who you are by voice, but they’ll know who Holly is. Also make sure you say whether you need to be bashed (Hocker) or have the Mutation shot (Stalker, Crusher, Hag)
- You might need to burn a Stun Gun if you get grabbed by a Hag.
- Chances are you won’t get many hits on a Hag before they run away.
- You have a good chance of one-shotting Snitchers with your Heavy Attack.
- Consider Stun Grenades for your Offensive Equipment.
- You probably won’t getting much use out of your primary weapon. Possibly consider it as a mule slot and let people know if you find anything good (whether it’s good attachments or weapons outright). You’re welcome to just hold onto that weapon until you find attachments to cycle through on the ground.
- If you have a gun with a good attachment, call it out to the team and ask if they want it. Blue, Purple, or Gold attachments are the good ones. If you want to drop the attachment, you’ll have to wait until you find another one of a similar slot [Barrel, Magazine, Stock] on the ground to exchange it with.
- The above two notes also works for the Scavenger, but keep in mind your Scav is worrying about other things, generally.
- Aside from buying stun guns, you probably don’t ever need to buy anything in safehouses.
- Don’t forget to scavenge ammo, and drop it for teammates if they need it.
Power Swap Shotgun Build A [ADS Allowed]
Because THATS A LOTTA DAMAGE!
Alright, so the general concept: We want shotgun stuff and lots of it. We’ll be showing off two builds here today. First one is a general purpose build that lets you stay pretty mobile while utilizing Power Swap.
Cleaners:
Evangelo is a decent choice for his Stamina Regen and Move speed.
Holly is a decent choice for the Damage Resistance and Stamina recovery on kill. You can stay super mobile with her.
Walker is a decent choice thanks to the bonus accuracy, improving hipfire spread when you get a Precision Kill. His damage, while it doesn’t boost Weakspot damage, is also decent since the shotguns will hopefully be collectively dealing triple-digit damage.
Hoffman is a sleeper choice for this build. His bonus offensive inventory isn’t something you build for at all,
Mom isn’t great for this kind of build but at least she can get going on Map 1 thanks to spawning with a Belgian. Her Team Extra Life also lets her do a lot of good, and she triples as a Support Inventory Mule, and will likely be on the front lines to revive someone if they go down and Doc can’t get there.
Jim loses his base damage stacks whenever he takes damage. He could make this class work, though, since he can get multiple stacks per Weakspot hit; one shotgun shell could be enough to bring him to full stacks. The bonus ADS and Team Weakspot damage is great, but really he should be doing something else.
Doc has better things to do.
Karlee has better things to do.
Here’s your Deck.
- Down In Front!
- Money Grubbers
- Hyper Focused
- Ammo Stash
- Cocky
- Admin Reload
- Power Swap
- Hunker Down
- Buckshot Bruiser
- Numb
- Silver Bullets
- Scattergun Skills
- Shell Carrier
- Cross Trainers
- Run Like Hell
Regarding Deck Order
- Down In Front! isn’t as necessary on this build since you’ll want to be close to enemies to deal max damage, but there’s a good chance you’ll accidentally hit someone else with your inaccurate shotgun spread or perhaps accidentally panic-fire enough damage to really screw someone else’s chance at life. We’re taking it anyway.
- Money Grubbers is best cash card. Get it, live it, love it.
- Hyper-Focused is third but isn’t a first-pick priority. However, take this ASAP.
- Cocky is an early grab to help start the Admin Reload as early as possible
- Ammo Stash to keep your Belgian from eating too far into your shotgun shell reserves.
- Admin Reload so you can keep shooting while your other gun is reloading, Dr. Freeman
- Power Swap completes the combo, so now your shotguns are doing +20% Damage.
- Hunker Down is more because you’ll be crouching anyway. The accuracy bonus only affects hip-fire, and the
- Buckshot Bruiser only is any good against mutations, since one pellet is needed to kill Commons
- Numb to take advantage of your temp health by giving bonus Damage Resistance
- Silver Bullets is multiplicative to both base damage and weakspot damage, so now your damage does even more damage
- Scattergun Skills can go anywhere really, take it whenever to keep the damage rolling. Can make fully reloading a Super90 during the Power Swap combo w/Belgian all the more fun.
- Shell Carrier is kind of late in the build but I couldn’t find anything earlier that i wanted to take ahead of it. Virtually everything else is more important to take.
- Cross Trainers, because the last few missions you’ll want some more speed
- Run Like Hell, because the last few missions you’ll want some more speed
Your Tactics as a Shotgunner
- Power Swap is love, Power Swap is life.
- You want a Belgian as your secondary.
- You want a AA12, preferably, but a Super90 is good too.
- You have exceptional damage capability but have a good chance of taking lots of damage from Mutations. Buckshot Bruiser will be the way you stay alive, as every shotgun blast will give you about half of a Pain Pill use against Mutations.
- Actually, you’ll likely take more True HP damage than you can buff with temp health due to the fact that commons die to one shotgun pellet (which means you only get 1 temp HP…which burns off quickly.
- Your job is simple. Blast stuff.
- Ok it’s mildly more complicated than that. You gotta get close to the bad guys to do your damage, right?
- And of course hit the weakspots.
- Remember to be quick and nimble when you need to be.
- Oh yeah, try to line up shots. While shotgun penetration isn’t all that great, they continue through and hit targets behind your initial target, and against common you only need one pellet to kill, so the rest should(????) continue on.
Other Options for filling out the rest of your deck
- Trading out Hunker Down is a possibility
- Large Caliber Rounds is better than Shell Carrier in terms of Raw Damage boost (since it boosts Weakspot Damage
- Ammo Stash isn’t mandatory, but this is taking into account the Power Swap combo.
- The 870 Express and Tac14 both benefit with a faster fire rate when taking reload cards / attachments. Since both guns do more raw damage than the AA12 or Super90, it’s possible to be somewhat competitive with the raw damage boost.
- Two-Gunning shotguns isn’t the best of moves, but replace Ammo Stash for this card if you choose to. See the Double Shotgun Build for that.
- True Grit is a decent option while fighting mutations. Taking a single burst over 15 is (hopefully) going to eat into your Temp HP, and then this activates and restores your True HP.
- I wouldn’t take Reckless Strategy, but Ridden Slayer is good for more Weakspot Damage.
- Large Caliber rounds may be good alongside Silver Bullets.
- Shredder?????? No idea, needs testing.
- Throw in some more movement speed cards to go FAST AS [censored], BOI. Fleet of Foot is a good choice.
- You have some extra wiggle room in here to include Team Support Inventory [Box O’ Bags] or Team Offensive Inventory [Surplus Pouches] or Needs of the Many [Team Extra Life]
Other Notes
- If you find a legendary Reload/Mag Size card, you’ll have good success on the 870 Express with it. Also the Tac14 but that’s not going to be something you use for this build.
- You don’t have to take a Belgian, but if you don’t, take either a Deagle, Revolver, Tec9, or AutoGlock. With this build, you have infinite ammo in your sidearm, so you can use whatever vs commons while your primary does a backpack reload.
Long Range Damage Dealer (Generalities)
Alright, Long Range! You’ll be squatting (Down In Front!) in the backline, using Snipers or Assault Rifles/LMGs to deal damage at range. You have a lot more leeway here with builds and even Cleaners here, but here’s a few worth thinking over:
Mom: For the Extra Life, and muleing extra MedKits.
Walker/Jim: their damage bonuses don’t apply to critical damage, but having more health or giving the team more Weakspot Damage is always welcome. You want preference to Jim.
Hoffman: Increase to Team Ammo is always nice, and occasionally causing ammo drops, even if it’s random which ammo drops, is nice.
Evangelo: Team Speed, and having Breakout helps
There’s a few ideas you can work with
- LMG build [M249 is Meta, but RPK is ok for the raw bullet damage as well. You can get away with a Blue-or-better Mag-Size attachment SCAR as well. AK in a pinch.]
- M1A Build
- Barrett Reload Build [Reload speed boosts weapon cycling speed: Pump Shotguns and Bolt Action Rifles!!!!!]
- Double Primary Build
Some other things to keep in mind (this also applies to SMG/Shotgun builds):
- Admin Reload will save you SO much time if you pair it with Cocky.
- Doing the above with Power Swap means you can drastically increase your DPS
- Belgian Power Swap / Admin Reload / Cocky sub-builds should be strongly considered.
- A lot of bad guns are made better with the Admin Reload / Cocky combo. RPK, Belgian, Tac14… Just remember to give it some time between weapon swapping (there IS a such thing as TOO fast!) to give the weapons time to reload.
- Either pick the Two-Primary card or Ammo Stash card.
- Power Reload requires you to HOLD the reload button to gain its benefit, but lets you have two volleys with the Belgian.
- If you can find space, throw Money Grubbers in.
- Don’t build for “Damage”. Build for Weakspot Damage (Hyper-Focused, always; Reckless Strategy if you can fit it) and Bullet Damage (Shredder, Silver Bullets, Large Caliber Rounds).
- Above note: “Damage” just boosts weapon damage, but doesn’t boost weakspot damage. You should be hitting weakspots anyway. Bullet Damage boosts BOTH
- The Ammo + Firearm-category-damage cards only boost base gun damage, not weakspot damage, but are worth taking if you’re going to be using that ammo type. Generally only take the AR one (Tactical Vest), maybe the Sniper one (Stock Pouch) if you’re planning on maining an M1A.
- Let your team know if you WON’T be using an Assault Rifle or LMG in your build. Assault Rifle ammo is at a premium on higher difficulties since there’s less of a reserve and it’s burned through so quickly.
- Try not to use C or D tier weapons if you can help it.
- Speaking of weapons, let your team know ahead of time what you’re looking for in terms of guns. You get priority as the Long Range Damage Dealer for weapon choice, and ideally you’ll have one or two guys running melee weapons (and your medic running an SMG/Shotgun/Sniping occasionally), so they can bring you ammo
- For the love of everything Holy, take Down In Front! and remember your ABC’s: Always Be Crouching.
- I’m assuming you’re not an idiot and know to walk / sprint when needed. You’re here for Veteran / Nightmare tips, right? So you know that you do friendly fire on higher difficulties. Look, just… don’t be an idiot. Down In Front! solves a lot of problems that are caused by shooting at enemies while you got your melee guys dancing around.
- Oh yeah, when you’re assuming this role, you are NOT point man. Unless your Scav / Close Range guy are idiots (find new friends) or distracted (let them take care of their priorities), they’ll take care of breaching and clearing. You can scavenge what’s there on your own time.
- Remember it’s a game. You’re here to beat a challenge and have fun with it. Try not to get angry for every little transgression.
- Remember your melee guys DON’T GIVE A FLYING CRAP about friendly fire when they’re swinging their Axe and Machete. You see them anywhere near you? Crouch.
- There will be times you’re next to your melee guys. Again, Always Be Crouching.
- Let the Melee guys do their thing, as well. They don’t need to be babied.
- Controller players might need to be babied.
- You don’t want to be playing on higher difficulties with people that use controllers.
- I’m sorry, the lack of turning speed and lack of precision are killers for a chaotic FPS like this.
- Speaking of melee players, you’d do a lot of good by shooting the Mutations for them. That’s kind of the reason you exist as a Mid-Long Range Damage Dealer.
- Like, that’s your job.
- You see a Mutation, you take it out.
- Except Snitchers of course
- but you knew that
- If they’re screaming already then yes you shoot them jfc don’t even ask
But yeah you got a few choices, just pick an idea and stick with it.
Barrett Reload Sniper Build
Hokay, here’s your general concept.
The Barrett Sniper is pretty slow, right? This build will boost its reload speed AND WEAPON CYCLING SPEED while boosting weakspot damage and giving you a few other options.
You preferably want Jim for the ADS speed and Team Weakspot damage. Mom is sub-par for damage, but helps with the extra support inventory slot and the Team life.
I don’t have a solid build 100% tested yet, but this’ll get you started:

Cards
- Down In Front!
- Hyper Focused
- Cocky
- Widemouth Magwell
- Steady Aim
- Admin Reload
- Ammo Stash
- Knowledge is Power
- Money Grubbers
- Variable after this based on preference. I’ll provide some ideas, and get back to you once I have a good build.
Regarding Deck Order
- Down In Front! is first, duh.
- Your 2nd to 6th cards will be your first draw. You want Admin Reload somewhere in there.
- Otherwise, your remaining cards from 2nd to 6th should be: Aim Speed, Reload Speed, Weapon Swap Speed, Weakspot Damage. Good Cards for this are: Steady Aim, Widemouth Magwell, Cocky, Hyper-Focused. Specific order is not important.
- Ammo Stash is 7th card, very important. You don’t have to take it as soon as it comes up, but having it early is always a boon. You won’t need it in the first map.
- Ideally you’ll have Money Grubbers early. Constantly getting bonus cash for the team is essential
- Knowledge is Power should be taken on the Mid-Long range build no matter the specialty. Letting teammates know how much health something has gives them the ability to execute on a kill or focus on something else.
- Mobility cards should be later. It’s ok if you move Cross Trainers up the list, but something like Run Like Hell should be a last draw.
Your Tactics as a Sniper
- …
- bruh
- Do I really need to spell it out for you?
- …
- HA
- GOTEM
- Okay, fine, here’s the basics.
- First off, the specifics to rocking a Barrett apply to Scavs / Medics that want to snipe as their primary as well. They just won’t be able to spec for it (Scavs have some wiggle room but honestly they should be taking SMG/Shotgun stuff since they’ll be taking the lead)
- You want to find a Barrett. A Phoenix is fine too but switch to the Barrett when you find one unless it’s two grades below the Phoenix. Like if you have a blue Phoenix, don’t pick up a white Barrett. If you have a purple Phoneix, don’t pick up a green Barrett.
- You want PURPLE RELOAD SPEED ATTACHMENT for that bad boy. A golden mag with reload speed bonus is ok too. Blue is fine too. But you NEED a reload attachment.
- Other Attachments: Purple ACOG (2x) or Sniper Scope (4x) for the +15% weakspot damage. Long Barrel will probably help, but consider a suppressor as well for those sneak attack hits. ADS stock; if you find a legendary stock that boosts ADS speed, take it.
- Every time you wanna shoot, you crouch. Remember your ABC’s, Always Be Crouching.
- Hit their weakspot.
- Using Snipers in hallways is OK; you have 100% bullet penetration, so one bullet will clear an entire line of enemies.
- For Christ’s Sake please remember your ABC’s: Always Be Crouching
- If you’re ANYWHERE NEAR THE MELEE DUDES, YOU WILL CROUCH, DO NOT TEST YOUR LUCK
- or just run away from them lol
- If they’re anywhere near you you’d better either: be in the saferoom, holding against a horde in a room (with you in the back of the room), them dropping ammo for you (after you ask POLITELY), or else you’re crouching.
- I mean use your best judgement if you’re just following them and there’s no threats then yes you can walk
- You’re not an idiot but I’m explaining for clarity/clearing my mind/covering my butt/humor’s sake
- oh yeah you want a Tec9 or AutoGlock as your sidearm unless you’re planning a Power Swap build (not all that viable for snipers).
- Revolver is less than ideal because it uses AR ammo, and if you’re not the one using it, someone else will be.
- Deagle is fine. Sniper ammo is uncommon anyway, and the Deagle one-shots commons.
Options for filling out the rest of your deck
- If you take Stock Pouch, you take it for the bonus ammo, not for the damage increase. The damage bonus doesn’t apply to Weakspot Damage.
- Large Caliber Rounds and Silver Bullets are still viable with snipers due to the multiplicative damage increase (boosts gun damage and then also double-boosts Weakspot damage) The Bullet Penetration is better served for other guns, as the M1A, Phoenix, and Barrett have Perfect Bullet Penetration and will do max damage in hallways.
- Using Power Swap with a Belgian isn’t as viable with snipers due to your…excessive range. But you could make it work.
- You’re going to want a few mobility cards. Run Like Hell and Cross Trainers are two solid picks. Mad Dash is alright as well but you might not have the cards for it.
- Try to fit Money Grubbers into your build and take it early, and remember to drop your cash for your Scav at the end-round safehouse.
- Heavy Hitter at the moment is bugged??? You can use your bash attack against Commons to one-shot them (aim for the head). It doesn’t count as a kill but has a HUGE cleave AoE AND knocks them back.
- You probably don’t need more than one ADS card. IMO you don’t even need that if you take Jim and take ADS stocks.
- With Hyper-Focused, Reckless Strategy, and Knowledge is Power, you probably don’t need Ridden Slayer.
- Consider: Confident Killer, Broadside, Guns Out if you don’t have Cocky, Tunnel Vision if you don’t have Steady Aim, Reckless Strategy if you don’t have Hyper-Focused, Pep in your Step. Ammo Belt, Ammo Pouch, Patient Hunter, Needs of the Many [Team +1 Life? Heck yeah!], Any Team Inventory Slots (Surplus Pouches, Box O’ Bags)
- You probably shouldn’t take: Sadistic, Shredder, In The Zone, Power Reload (but it’s a great option by itself!)
- You definitely shouldn’t take: Glass Cannon, anything that disables Aim Down Sights, Anything that increases Accuracy (that’s for Hip-fire. And lemme tell ya, while Hip-Fire builds are super fun, that’s not what you’re doing here), Hunker Down (You’ll be in the back anyway), Marked For Death (No room for it)
- Any card not listed shouldn’t be even looked at. Let the other guys take care of what they’re good at.
- Remember to specialize. Don’t be mediocre at a lot of things, be great at one thing.
Other Notes
- Remember to crouch
- Commons tend to swarm from all over so you’re gonna get hit from the back a few times. Annoying, but oh well.
- Not a hard rule but you should be conserving sprint for when you have to get out of Retch piles, get some distance from a Mutation that’s gotten WAY too close to you
- Build for Weakspot damage.
- Be Polite.
- Be Efficient.
- Have a plan for killing every Ridden you see.
- or you could just run lol
- Remember, you’re the gun guy. Let your melee dudes do their thing, sure, but you’re there to cover them vs larger threats. Your sidearm is to help keep them off your own ass.
- You won’t be the one doing the most damage or kills. You’ll be scoring the most important kills, though.
Misc. Card Selection Notes and Thoughts
This section is more or less just some random thoughts about certain cards. You may benefit.
- Someone should run Needs of the Many. The Extra Life is going to help so much. Your Medic can probably get away with adding it into their build, but so can your Sniper or AR build. This stacks if more players have it.
- Box O’Bags and Surplus Pouches should be considered. Your Scavenger probably has room for them, but they stack.
- Out of all the Copper cards, try to take Money Grubbers if you have space.
- Non-melee builds should consider Heavy Hitter; using Bash attacks (you know, the weak punch) will one-shot commons if you hit them in the head, does a whole bunch of AoE cleave, and stumbles specials! It won’t kill them either, giving you time to run away and shoot them (or throw a grenade).
- Buckshot Bruiser only gives 1 HP if you’re shooting commons because you’re one-shotting them with one pellet. The card becomes a TON better if you’re fighting Mutations or clearing hordes.
- Take Combat Knife out of your build. Either you’re going melee build or you’re going gun build.
- Remember to specialize. You can take a few team cards if you want but you’re gonna want to max out on what you’re doing.
- Keep in mind the penalties. Losing Stamina is fine if you’re not running Melee. Damage resistance loss is ok if you’re a long-range guy. Disabling Aim Down Sights is fine for hip-fire or melee builds. Losing ADS Move Speed is completely fine, this isn’t Call of Duty. Losing Accuracy when getting hit is fine if you’re always aiming down sights or never shooting at all (melee builds).
- BE CAREFUL ABOUT DISABLING ACCESSORIES. Medic taking Rousing Speech is the only one you really should even consider.
- Put a mobility card or up to 3 in your deck. Cross Trainers and Run Like Hell are probably the best two. Fleet of Foot is also good but should be taken after Run Like Hell; move movement means enemies don’t really get to you as much (since you can outrun them).
- Shredder should be considered on AR / SMG builds. They’re only useful against bosses and perhaps Tallboy variants, though.
- You don’t really ever need Utility Scavenger. Better to buy what you need and bring it through the level. The most Toolkits you’ll need is 2 in any level. Your melee guys might want additional Stun Guns, and your medic might want a defib or two, but they’d rather have Utility Slots [look for Team Utility Slots!]
Regarding Gun Damage, Especially Glass Cannon
- Cards that say they increase “Damage” only increase base damage, and they don’t increase weakspot damage. These include Glass Cannon, Shell Carrier, Tactical Vest, Stock Pouch, or Mag Carrier. Take the latter 4 for the specific ammo capacity boost, not for the damage.
- Bullet Damage (Combat Training, Large Caliber Rounds, Silver Bullets) DOES increase Weakspot damage on top of base damage, and applies twice! Kinda.
Btw use Knowledge is Power to see gun damage values.
Btw shout out to SwingPoynt for help with concepts here!
Lets say you’re using a white M4 Carbine (please don’t first off), dealing 10 damage per hit.
Hitting the weakspot of a Common does that 10 damage again (since that’s the Weakspot damage that the gun deals…or maybe it’s the damage modifier?
If you use KiP, you’ll see that you’re doing the base 10 damage, and then a second value of 11 damage (because +10% weakspot damage).
Now if you throw on Silver bullets, which increases BULLET damage by +10%…..
- The gun damage is now 11 Damage.
- But the weakspot damage is now 12.1 Damage.
What does this mean?
Bullet damage cards are multiplicative with Weakspot damage!
Incidentally, cards with the same “type” of damage (bullet damage, weakspot damage) are additive within their own “category”. So having Hyper-Focused and KiP will only give you +60% Weakspot damage, not 1.5*1.1=1.65x damage.
So in general, you want to take Bullet Damage over just Damage.
Glass Cannon is +25% damage but doesn’t boost Weakspot damage. Our crappy white M4 is doing 12.5+11 on Weakspot hit with KiP. And these numbers round up to the nearest Tenth. so really that’s 12+11=
Meanwhile Silver Bullets is doing 11+12.1 on weakspot hit with KiP
But the numbers start to really matter if you include other Weakspot damage cards! …And of course, better weapons.
Glass Cannon, KiP, Hyper Focused: 12[s].5[/s]+16 Damage.
Silver Bullet, KiP, Hyper Focused: 11+ 17.6 Damage! Not only are you doing more damage, but you also have far greater bullet penetration, and more health!
Okay but then lets use a stronger gun.
- A purple Barrett does 225 Damage.
- Glass Cannon, KiP, Hyper Focused: 281.25+360=641[s].25[/s]
- Silver Bullet, KiP, Hyper Focused: 247.5+396=643.5
Now, look. You’re probably telling yourself “what’s the difference?”
The difference is that:
- Some enemies take even more weakspot damage.
- You’re losing max health with Glass Canno.
- Losing 5 copper per Mutation is extremely minor.
- Bullet Penetration is insanely important for non-sniper builds, especially when attacking Tallboys.
In short, try to diversify your damage cards. Hyper-Focused and Reckless Strategy, maybe Knowledge is Power; Large Caliber Rounds and Silver Bullets, and then Shredder for automatic builds, Patient Hunter, Power Swap. Mind you, I’m unsure if Shredder/Patient Hunter/Power Swap is multiplicative, buuuuuuuuuut!!! Free damage!
Oh by the way! Melee damage works like bullet damage in which it increases raw melee damage AND Weakspot damage! Go crazy! But make sure you diversify your damage!
- Glass Cannon White Bat Weakspot hit: 18.8+16.5
- Spiky Bits White Bat Weakspot hit: 18.8+20.6!!!
Don’t take Glass Cannon.
Oh by the way Walker’s damage bonus does not boost Weakspot damage.
Jim’s stacking damage doesn’t boost Weakspot damage, either. His Team Weakspot Damage buff obviously does, though.
Against Mutations this gets crazy. In SwingPoynt’s Video, he takes a white M1A (38 damage), and with just KiP and Hyper-Focused, he does 60.8+91.2 Damage to a Bruiser.
So that means, what, exactly?
It means he’s doing 1.6x+3.26x base M1A damage.
Now according to statty.net, Bruisers have a 1.5x weakspot damage multiplier.
So what’s happening?
When you attack something, your gun does its normal gun damage.
When you hit a weakspot, your gun does additional damage according to your Weakspot multiplier. For all guns it’s a base 1.0x bonus damage, and this increases in an additive manner the more Weakspot damage cards you add. Hyper-Focused for example adds +50% damage, so that second impulse becomes 1.5x the normal damage, and now you’re doing 2.5x (about) damage. And yes, it’s a second impulse of damage.
By the way! Mutations also have a Weakspot modifier! The’re different between variants as well.
What this means to YOU is that with these two cards alone and precise aim, you’re doing at least 4.5x damage per bullet!
…verses Glass Cannon’s +25% damage.
Okay lets be fair.
- Glass Cannon+KiP w/white M1A: 38*1.25*1.5+38*1.1*1.5=133.95
- Hyper-Focused+KiP w/white M1A: 38*1.5+38*1.5*1.6=57+148.2
Wait why is that different than his numbers? he got 60.8+91.2=152
- 60.8/38 = 1.6, which is his weakspot multiplier
- 91.2/38 = 2.4 =1.5*1.6
So that must mean…
When you shoot a weakpoint, your base weapon damage is multiplied by Weakspot damage…
…and then that second impulse that you do for hitting the weakspot is itself multiplied by the Mutation’s Weakspot damage multiplier.
So in this case it’d be…
Glass Cannon Bruiser Weakspot hit with White M1A: 38*1.25 + 38*1.5 = 104.5 since Glass Cannon doesn’t boost Weakspot Damage.
Hyper-Focused Bruiser Weakspot hit with White M1A: would be: 38*1.5 + 38*1.5*1.5 = 142.5
And if we just do Silver Bullets: 38*1.1 + 38*1.1*1.5 = 104.5
Oh wow, Silver Bullets vs mutations (at least vs Bruisers or enemies that have a 1.5x weakspot multiplier) is the same. What if it’s a 2x?
- Glass Cannon: 38*1.25 + 38*2 = 85.7
- Hyper-Focused: 38*1.5 + 38*1.5*2 = 171
- Silver Bullets: 38*1.1 + 38*1.1*2 = 125.4
Don’t take Glass Cannon.


Be the first to comment