
This is a guide aimed for new and intermediate players, as there is not currently information easily available on a wiki, or many tutorial / guide videos. This guide is intended to enrich the enjoyment of players who may only have a limited time budget to spend on the game, as an explanation of the basics will leave players more time to make actual gameplay decisions.
Definitive Guide to Basics
As the guide expands, it may also serve as a guide to exhibit a bit more of the potential depth of the game. A typical question that often comes up is, how do I use X weapon, especially when paired with the starting weapon of either Ship. Some pairings are easy to misplay or may seem bad at a first glance, so having a basic outline to follow may be useful to players who feel RNG is too impactful in game balance.
Disclaimer
As a reminder, besides the mechanics stuff, most of the tips offered in this guide are simply my opinion as a player. I will not claim that these strategies are the100% most optimal or powerful strategies. But as of the current demo patch, I would consider 99% of Breachway demo runs winnable regardless of RNG simply by playing efficiently and having a good understanding of some basic mechanics and strategy.
General Game Tips
Tl;dr Highest Impact Tips
For players who are struggling with the game and just want to get their first win without caring about spoilers, the best pound for pound advice is as follows.
- Draft efficient cards. As with most deck builders, some cards are just flat out more efficient than others. Check the tips sections for card recommendations/analysis, and the sample builds section gives you an idea of what a winning hand looks like for a given weapon combination.
- Use your crew powers. At 3 morale regen per node, you can afford to play one morale power per combat. Damage powers like +50% to the next shot or -3R cost allow you to cheat and break an enemy weapons system or kill an enemy one turn early. Spending your morale will consistently will significantly reduce the amount of hull damage taken.
- The Marauder draw crew power is currently incredibly strong in the demo right now, and arguably breaks the game. Knowing how to build the deck and execute it massively improves both the power and consistency of the Marauder ship. Sample builds and some links to game footage are provided in later sections.
- Do not overdraft cards.Taking too many cards results in the following problems
- You are constrained by resource production per turn + your consumables / upgrades. Putting an excessive amount of attack cards in your deck that exceeds your resource generation won’t actually improve your damage per turn, as you won’t be able to play them all.
- Cards that can’t be played do not help you block. You’re more likely to bleed to RNG when you draw into a full hand of attacks and no blocks.
- Attempting to balance this by drafting additional shield cards is bad, because for most combats, you do not need more than 1 shield card per turn. Any additional shield cards drawn are often dead cards. If you’re forced to discard an excess shield card, it wasted one draw and did nothing to help you. If you’re forced to hold it, now it’s consuming an additional draw per turn you hold it and further reduces the consistency of your deck.
- As a corollary to the above, the primary weapons of both the Arbalest and Marauder are fully capable of acting as a primary damage source, without relying much on the secondary weapon systems
- As you gain additional Reactor power / cards that produce resources, draft additional attack cards to keep up with increased resource generation.
- If your secondary weapon system is situational like Ion or Railgun, it’s often correct to simply draft one, or even no additional cards for the secondary weapon system.
- Do not be greedy about holding cards, especially to setup 3+ card combos. Holding one card in a 5 card hand is fine. Think very carefully before holding 2 or more cards. Drawing through your entire deck is very important for consistency
- Besides drafting good cards, the other biggest increase in power comes from upgrading your Ship’s reactor, which allows you to play more cards per turn.
- As of the current patch, fighting enemy ships and particularly Elites is the best source of credits. Elites in particular offer a very high amount of potential credits if you sell the guaranteed augment (150+ per Elite fight).
- Most Elites are built around a particular gimmick. Following the correct strategy will often significantly reduce the amount of damage taken from Elites. As killing an Elite spikes your power level, every additional Elite killed often takes less effort, until you’re so far ahead of the curve killing them is just free lunch.
General Basic Tips
Terminology
- For the purposes of this guide, resources Ordnance, Energy and Mass will be referred to by their colour abbreviation. Ordnance is R (Red), Energy is G (Green), and Mass will be B (Blue).
- Depletable cards are interchangeably referred to as Consumable cards
Pathing Tips
Fuel is only consumed when traveling to a secondary node. Fuel is not consumed when moving from an optional path back to the main path.
As of the current demo patch, reward wise, the “optimal” strategy is to path into as many enemy ships and Elites as possible.
- Pathing into ships offers both a credit reward AND a chance to improve your deck via card drafting.
- Completing the data broker’s quest in the demo also requires fighting either 6 regular ships, or 2 elites, and offers a reward of 150 credits
- 150 credits is a good amount that usually allows you to buy the next Reactor upgrade, which is an immediate power spike
Combining the two tips above, always look for opportunities to visit extra nodes by traveling as far back along the main path as possible.
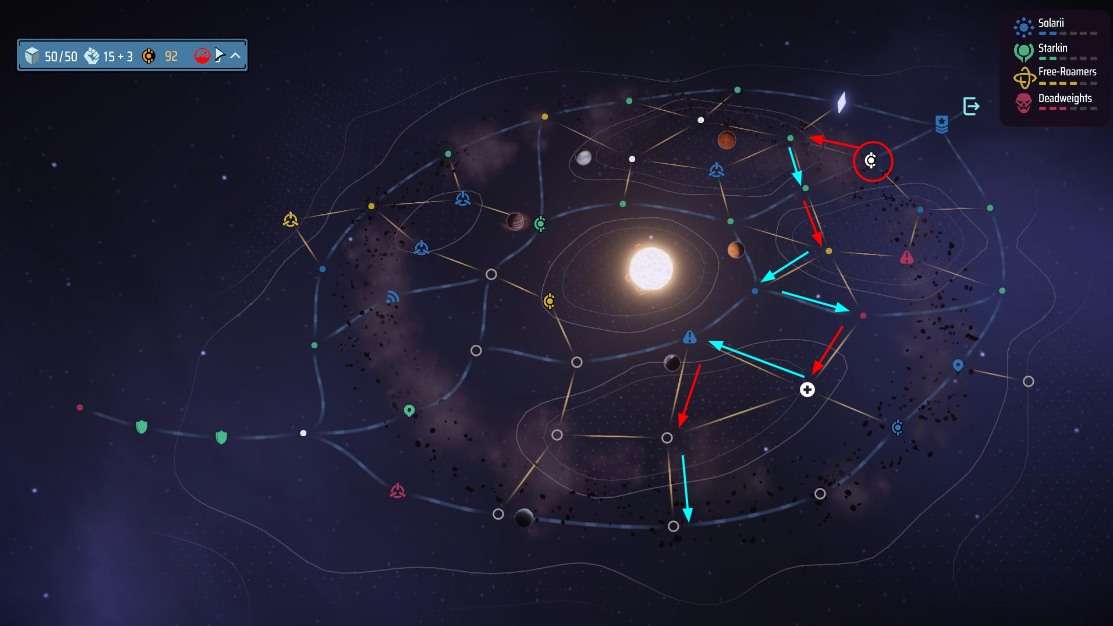
Here’s a pathing example commonly used in the current demo to visit the lower nodes after traveling the top to the white station. Costs 4 Fuel total.
- Red Arrows represent moves that cost 1 fuel
- Teal Arrows represent moves that do not cost fuel
- Starting at the White Station (circled in red), going down right would cost 3 fuel to get to the Yellow node, rather than 2
- The 2nd teal arrow travels to the main node on the left, as moving to the node on the right is free
- Rather than proceeding directly to the blue station, going up left instead allows you to visit 4 more nodes for 1 extra fuel spent.
Elites in particular are particularly valuable, as they offer both double the regular credit reward (70+), AND offer an Augment.
- Augments typically cost 100-200 to buy from a Shop, and thus offer a lot of value
- Unlike Slay the Spire relics, Augments not applicable to your build can be sold at Station shops for half value. So on average, the augment can be sold for 70-100.
- Thus the value offered by taking an Elite fight is potentially somewhere between 150-300 credits.
- Of course, you must take into the account the extra damage you will receive from fighting the Elite. Repairs at a neutral station cost 4 credits per 1 hull repaired. And of course if the Elite kills you, the run is over.
- That being said, similar to Slay the Spire low ascensions, taking as many Elite fights as possible is the preferred strategy to build advantage
Mechanics FAQ
Damage Rounding
- Damage % rounding is always downwards. Unlike games like Darkest Dungeon where a small boost like +10% will round up to +1 damage or healing, you need to have enough % damage to pass the breakpoint to have any effect. This damage % is applied after additive damage modifiers.
- Example 1: The +50% damage to next attack Arbalest Crew power is triggered before playing the Paired Pulse card (3 damage x 2). This will result in a final damage of 4 x 2.
- Example 2: The Catalyst Pulse card is played first (+1 damage to Pulse Cards) before applying the +50% damage crew power. This will result in a final damage of 6 x 2. Base damage is boosted to 4 before applying +50% which results in an additional 2 bonus damage. If the multiplier applied first, the final damage would be 5 x 2.
- Example 3: A -25% damage debuff is applied to the players first attack every round form a system event. Firing Sling (6 Ion damage) as the first attack will deal 4 Ion damage (-1 damage is applied per 4 base damage, and due to rounding down, a total of -2 damage is applied.)
Heat and Heat Dissipation
- Adding power to a player subsystem (Ordnance, Energy, or Mass) costs +1 power per unit added. Removing power (right click) does not cost heat. This heat is applied after the player plays their next card, or ends turn.
- This means the player is not unfairly punished for adding and removing power while figuring out the right balance of power. Playing the next card will lock in the power changes and apply the appropriate heat for the net change.
- When heat changes are triggered by hitting end of turn instead of playing another card, there is a small difference that is occasionally relevant. When Heat changes are triggered by playing a card, Heat is obviously added before Heat dissipation occurs at end of turn. If end of turn is instead pressed, Heat Dissipation occurs before Heat from power changes is applied. This is relevant if the player was at zero heat.
- Example: Player removes 3 power from Ordnance, and adds it to Mass instead. The player is currently at 0 heat, and hits end turn. Dissipation removes 0 heat, as the player currently is at 0 heat. 3 Heat is then applied due to the power changes. Player starts the turn with 3 heat.
- Since Heat dissipation occurs before Heat damage calculation, by default, you can safely exceed your heat cap by 1 without taking hull damage from heat. The default heat cap for the player ship is 3. This is because Heat dissipation occurs at the end of the players turn, while damage from overheating is calculated at the start of the player turn. So the reduction happens first.
- Example: The Reactor overload card (Sustain 4 heat, gain +1 reactor power) is played. This raises the player’s heat to 4 with a heat capacity of 3. At the end of turn, the player’s heat is reduced to 3. At the start of the player’s next turn, the game checks and sees the player is at 3 heat, which does not exceed the heat capacity of 3. The player takes no damage.
Draw and the Cooldown Pile
The cooldown pile in Breachway does not function like the discard pile of a traditional deckbuilder. In a traditional deckbuilder like Slay the Spire or Monster Train, cards in the discard pile are typically only shuffled back into the draw pile when the draw pile is empty. In Breachway, when a card finishes it’s cooldown, it enters the draw pile directly, rather than staying in a separate discard pile. This actually has some very important implications.
- In Slay the Spire, with a 15 card deck and 5 cards drawn and either played or discarded per turn, you are guaranteed to see every card in your deck by turn 3.
- In Breachway, say you have a 15 card deck with 5 cards drawn/discarded, and all the cards have a 2 turn cooldown. For the sake of simplicity, let us refer to the 1st 5 cards as H1 (Hand 1), the next 5 cards as H2, and the final 5 cards as H3.
- At the start of turn 1, there are 15 cards in the draw pile. The player draws a 5 card hand (H1), and there are 10 cards in the draw pile (H2 + H3).
- At the start of turn 2, 10 cards (H2 and H3) will be the draw pile, and the 5 cards in the original hand (H1) will be coming off cooldown next turn
- At the end of turn 2, there are 5 cards in the draw pile (H3), and 5 cards each in the cooldown pile with 1 cooldown (H1) or 2 cooldown (H2) respectively
- At the start of turn 3, there are effectively 10 cards in the draw pile. These would be the original 5 cards at the bottom of the deck (H3), as well as the 5 cards from the 1st hand reshuffled into the draw pile (H1). Keep in mind, the cards shuffled in from H1 are not placed after H3.
- In this scenario, let’s say you had one specific key card in your deck that you really want to play ASAP, and it was in the 3rd hand. What are the odds you draw this card on turn 3?
- As with most probability calculations, it’s easier to calculate the reverse scenario: What are the odds every card in the 5 card hand is not your desired card. Which would be 9/10 x 8/9 x 7/8 x 6/7 * 5/6.
- Multiplying, most of the numerators and denominators cancel out, except for the 5 and 10. This results in a 5/10 => 50% chance. So you have a 50% chance to not draw that one specific card, which is the same as 50% chance to draw it.
- Let’s go one step further. Suppose you did not draw the card you needed on turn 3. What are the odds you draw it on turn 4?
- It’s actually the same exact same 50/50 roll, as there will again be 10 cards in the draw pile, as 5 cards from H2 will be shuffled in. While the specific cards in the draw pile will likely be a mix of H1, H2 and H3, you’re still looking to draw 1 specific card in a 5 card hand from a total of 10.
- Not being able to see the entirety of your deck by turn X obviously greatly impacts the consistency of your deck.
- Of course, this is a contrived example. The average Breachway card has a cooldown of 3, but most decks will be composed of a mix of 2-5+ cost cards. Deplete or Upgrade cards are effectively removed from the deck on play, but are most effective the sooner you can put them into play.
- Thus, if you have keystone cards that your deck is built around (e.g. +1 damage upgrade card, +8 red from Burnout, etc.), you need to be a lot more careful about managing deck size. Otherwise, you may never see the card within the 1st 5 turns of combat.
Flak and Shred / Shredding Basics
- Shredding5 means the weapon needs to deal 5 hull damage to inflict 1 Shred stack. 10 damage would deal 2 Shred. Most Flak weapons do randomized damage, and the base attacks are really bad at inflicting Shred.
- For the purposes of the demo, most weapons will realistically only inflict one shred stack per attack.
- Example: Light Barrage is 2-5 damage, Shredding 5, so without any shred stacks applied to the enemy, it only inflicts a Shred stack if it rolls the max damage of 5, which is really bad odds. (only 25% chance at base)
- In terms of actual gameplay with the starting Marauder deck, what you’re supposed to do is this.
- Fire Opening Shot, which has guaranteed Shred 1 on hull damage, if the enemy ship has no shred stacks.
- Twin Barrel is 2-6, so with Shred 1 the damage range is now 3-6. So firing it is a 50% chance to apply 1 stack of Shred, if you roll either 5 or 6 on the damage.
- Light Barrage would still only be a 33% chance to Shred, since a damage roll of 3 or 4 would still fail to Shred, only 5’s work. So when available, always fire Twin Barrel first, as it has a higher chance to Shred than Light Barrage.
- Ideally you want to grab some other good Flak cards .
- Flak Barrage is a staple card, 3R1B for 3-7 damage.
- At Shred 0, rolls of 3-4 will fail to Shred, while a 5, 6, or 7 will Shred. This results in a 3/5 => 60% chance to Shred.
- With Shred 1 already applied, it’s 4-7 damage. So only a 1/4 chance to roll a 4 and not shred. 3/4 => 75% of the time, it’ll Shred.
- At Shred 2, the damage range is 5-7 which means it’s guaranteed to Shred. Once you’ve got Shred 2, your odds that every attack is going to Shred is quite high, and it just snowballs from there.
- Flak Barrage is a staple card, 3R1B for 3-7 damage.
- Keep in mind you can also use crew powers to help. The Marauder Gunner Crew power +25% Flak damage this turn turns 4 damage into 5. So with Shred 1 applied, that would push Twin Barrel to 75% chance to Shred, or Flak Barrage is guaranteed Shred.
- As of the current patch, there are also some weapon augments that help with this by effectively improving Flak minimum damage. +1 damage to attacks is like having an extra stack of Shred applied.
Combat / Weapon Tips
Lasers
- Weapons of the laser class typically fall into one of two categories, Precise, and Ignite weapons.
- Lasers primarily have a Red cost, with a secondary cost of G
- Precise (Pulse) Lasers
- Offer reasonable raw damage per R cost spent
- Laser Pulse is 3R for 4 damage, Paired Pulse is 4R1G for 3×2 damage, Heavy Pulse is 8 damage for 5R2G, Quick Pulse is 2R1G for 3 damage. So typically around or somewhat less than 1.5 damage per R spent, with any R reductions typically transferred into extra G cost.
- Deal excellent targeted systems damage, second only to railguns
- This makes precise Lasers an excellent defensive tool, as they effectively “block” damage by breaking enemy weapons, typically 3 Laser cards break a 12 HP system
- Conversely Lasers can also be an offensive enabling tool, as they can break the enemy’s shield generator, allowing you to tee off on the enemy ship with a hull damage type weapon (Missiles, Flak, etc.)
- Heavy Pulse with the +50% damage power from Arbalest Gunner crew power offers 12 system damage in a single card
- Has synergies with playing multiple pulse laser cards in the same turn (Catalyst Pulse, Overload augment, Booster Pulse)
- Be careful about trying to hold too many cards or a combo. Holding too many combo pieces will severely affect your ability to draw into additional combo pieces
- Often the better way to assemble a Laser combo is to hold one key piece, and play/discard the rest of your hand. Being disciplined in your card selection and controlling your deck size will let you see the rest of your deck turn 2.
- Example: You want to combo Catalyst Pulse with Paired Pulse and only draw one of them turn 1 with a basic Laser Pulse. Subject to R cost, it’s often better to immediately play out the basic Laser Pulse or discard it, to maximize your chances to draw into the Paired pulse.
- Offer reasonable raw damage per R cost spent
- Ignite Lasers
- Ignite lasers tend to be non-precise, and focus on dealing damage and heat to the enemy ship
- Many of these cards have a duration and ongoing cost attached to the weapon
- Example: Cutting Beam has an initial cost of 3R1G to fire the weapon, but will continue to fire at the start of the next 3 turns, with an ongoing cost of 1G per turn fired
- Because of this, you need to account for the total cost when evaluating the weapon.
- While Ignite lasers seem to deal excellent damage per R spent when compared to their pulse cousins, there are some very real drawbacks
- Unlike Precise lasers, Ignite Lasers deal poor system damage, if they deal any at all. Hull damage in general is worth less than system damage, so simply comparing the raw damage is not an accurate evaluation
- Ignite lasers often deal their damage over several turns. This often results in damage being lost due to firing into Enemy shields. Pulse lasers can play around enemy shields by waiting a turn for them to halve before firing, duration based lasers do not have this option
- Enemy debuffs that reduce player damage completely wreck the low damage of duration based lasers. Eutetic Armor (-2 laser damage) combined with the Blind debuff (-1 damage) from enemy hacking system can result in the repeat laser dealing zero damage.
- As of the current build, Ignite Heat damage is not very effective in the demo without the specific augment Infrared Emitters (heat applied on laser hull damage)
- Heat damage only applies once it crosses the enemy ship’s dissipation threshold. This means low amounts of heat application has zero effect. You need multiple Ignite cards to trigger the effect
- Heat from Ignite is only dealt on hull damage. If the duration laser is being used to remove shields, all potential for heat based damage is lost.
- While stacking a bunch of heat damage looks like it should scale well on paper (e.g. total damage would be like 5+4+3+2+1 across 5 turns, in practice it’s difficult to apply enough heat using Ignite cards alone. Surpassing the enemy heat threshold may take 4 turns, and fights also have a limited duration. So you will not get the full damage value of the enemy ship counting down to zero heat.
Ion weapons
- Ion weapons are typically good at breaking enemy shields, with a secondary focus on delaying enemy actions through ionize. Ion cards typically often have conditional effect that
- Ionize cards primarily cost G, with a secondary light R cost
- This typically makes them an efficient pairing with high R cost weapons, like Flak and Precise Lasers, as they do not compete for the same resource
- Example cards: Sling and Ion Javelin cost 1R2G for 6 Ionize, dealing 12 Ionize on activating their condition.
- Ion cards offer a very high shield damage per R spent (6 per R, or 12 per for Sling and Ion Javelin)
- Ionize removes 1 pip from a random enemy system per 6 Ionize applied
- Unlike Flak system damage, Ionize will not attempt to remove pips from an enemy system that has no pips.
- This means the more Ionize you apply to the enemy ship, the more likely you will delay a priority system as there are less enemy subsystems with pips to choose from
- Applying 12+ Ionize stacks in the same action that removes 2+ enemy pips can remove those 2 pips from the same enemy equipment. It’s not guaranteed to remove 1 pip from 2 different systems.
- Ionize can remove pips from broken enemy subsystems that are being repaired. This can be quite useful, as once an enemy system is broken and starts the 3 turn timer, additional weapon damage won’t delay repairs. Great for ensuring a key enemy system never goes off.
- Removing pips from enemy systems is what gives Ion weapons their defensive utility.
- While the Ionize system targeting effect is randomized, when compared to shield cards, Ion cards can be played proactively as soon as you draw them. Shields on the other hand often have to wait for an enemy incoming attack, which in a worst case scenario would take up an effective card draw for several turns.
- Thus taking Ion weapons often let’s you draft less shield cards, which reduces the likelihood you draw something you can’t play right away. This improves the consistency of your deck.
Flak Weapons
- Flak weapons are focused on dealing semi-scaling Hull damage
- Flak cards primarily cost R, with a secondary cost of B.
- Efficient Flak cards like Flak Barrage have a light B cost (3R1B), while cards like Covering Fire have a heavy B cost (3R3B)
- As of the current patch, Flak cards deal only light damage to enemy systems, as the damage is randomly split over enemy subsystems, is probably subject to reduction from damage % rounding, and appears to subject to some randomization on top of that, as of the current patch.
- As a rule of thumb, expect only about 50% or less of the Flak cards printed raw damage to be dealt as system damage.
- Stacking Shred only scales Flak cards up to a cap of the max flak damage printed on the card. Evaluating some common Flak cards at their max damage from sufficient Shred
- Light Barrage (3R) for 5 damage barely out damages the basic Pulse Laser (4 damage) for the same R cost while completely lacking the ability to do targeted system damage. Not a very good card without synergies.
- Flak Barrage (3R1B) is 7, which is a good improvement over Light Barrage (1B for 2 damage). Unlike Light Barrage, Flak Barrage has a reasonably good chance to apply Shred by itself, and is not reliant on having high Shred stacks, which makes it a significantly better card. Staple card for Flak weapons.
- Covering Fire (3R3B) for 6, is quite expensive for the damage it deals and does not shred. Marauder tends to have good R generation, if your primary limitation is B, you’d rather fire 2-3 Flak Barrage instead.
- Most of the true damage potential from Flak cards come from having excellent weapon augments that apply only to Flak Weapons, as well as incredible synergy with the Marauder draw crew power
- Followup spawns a Flak Shell (0-3 damage) whenever you play a Light Barrage card, Covering Fire, or Spread Shot card. Effectively adding 3 damage to those cards massively improves their damage output (5 to 8, 6 to 9) and has strong synergies with other Flak augments.
- Momentum Amplifier adds +1 to Flak max damage every time a Flak card hits for Max damage for the duration of the turn. As high shred guarantees a Flak card hits for max damage, playing a chain of Flak cards with Shredding effectively is a +1 damage bonus per card played for the turn. The extra Flak Shells from Followup really let you cash out the high end of this bonus, it’s common to them see fired at +5 damage or higher in an OTK setup.
- Ammo Allocator reduces Flak card R cost by 1 when a Flak card deals minimum Flak damage. With high shred, the minimum damage is equal to the max flak damage. So Flak cards are guaranteed to trigger both minimum and max effects at the same time. Combined with Momentum Amplifier, this makes it much easier to fire off a chain of Flak cards, especially when combined with the Marauder Crew Member’s Draw power.
- Aim Correction adds +1 max Flak damage per 2 Flak cards played. Synergy with Followup producing Flak cards. Not nearly as powerful as the other 3 augments though, as you only get the damage bonus starting the 3rd Flak card played on that turn, and without the Marauder’s draw power, that’s likely already most of the way through your hand.
Railgun Weapons
- Railgun weapons precise weapons primarily focused on dealing high Systems damage. This often takes the form of deal X damage + Y bonus system damage (conditional, or +% based). The “average” Railgun card tends to deal 6+ system damage per card.
- Railguns are primarily Red/Blue heavy
- Pinpoint is an exception to this rule (2R3G)
- Tungsten Round is 2R3B for
- Due to dealing higher system damage per card, it often only takes 2 Railgun cards to break a 12 HP system. Lasers tend to take 3 basic cards to do the same. This typically let’s a railgun break a system earlier as both costs less, and requires you find less cards
- Tungsten + Pinpoint costs 4R 3G 3B to deal 12 system damage, and comes as starter cards for the Railgun Mk. 1
- 3 Laser Pulse would need 9R to do the same amount of system damage
- Railguns tend to require less raw R to deal system damage, but have a higher secondary resource cost, which is often favourable
- Railguns secondary effect is often tied to dealing hull damage, or breaking an enemy system
- This tends to make Railguns weak to shields, as they often deal less raw damage per Red spent than the average weapon, shields prevent the secondary effect till broken
- So if paired with another weapon that’s not great at breaking shields (e.g. Flak), it’s often a strong consideration to use the Railgun to break the enemy shield system.
Missile Weapons
- Missile cards are typically marked with the Deplete tag, which is the same as the Exhaust mechanic from Slay the Spire. This typically makes Missile cards one time use per combat.
- For the Arbalest, this often results in regular encounters being ended by the time all missiles are spent.
- Elites however are much more likely to survive the initial missile barrage
- Thus it’s important to make sure your other weapon system is capable of picking up the slack of spending the R that becomes available, once the Missile Pod cards are exhausted
- Missiles have a very high raw damage per Red spent ratio
- Basic Starflares are 6 damage for 2R after 1 turn => 3 damage per R spent. Light Torpedos are 8 damage for 2R, but take an additional turn to arrive. Torpedo is 12 damage for 3R after 2 turns. Both are 4 damage per R spent.
- This makes them incredibly efficient for dealing hull damage to enemy ships, or cracking enemy shields. The drawback is of course the delay to the damage dealt.
- Certain enemy Elite buffs like Eutetic Shield (-2 damage to player Laser weapons until X Hull damage is dealt) are also very vulnerable to removal by missile damage
- Missile damage is calculated at the time of launch, and is not affected by modifiers after the fact.
- Example 1: Paint Target debuff applies +30% missile damage to enemy ships hit by Laser for 2 turns. If you fire a Light Torpedo (8 damage in 2 turns) at an enemy ship with 1 turn remaining on the Paint Target Debuff, the missile will be launched with 10 damage. This damage will not decrease to 8 when the Paint Target debuff falls off the next turn.
- Example 2: Light Torpedo is fired, and then a Laser Pulse is fired to apply the Paint Target debuff on the same turn. Light Torpedo damage stays at 8.
- Enemy ship AMS massively reduces the damage efficiency of Missiles, as it puts constraints on when you can fire your missiles
- With Precise weapons + Missiles, it’s often a top priority to break the AMS system immediately over anything else. Missile raw damage can break through shields just fine, but outright losing them to an AMS burst will cripple your damage output
- Prep Volley can be used to overwhelm enemy AMS, but it’s a slow card and doesn’t immediately protect 2 turn delay missiles. The 1st option is still preferred.
General Ship Tips
Arbalest
As the ingame description says, the Arbalest is the balanced ship of the roster. The best word to describe the Arbalest is efficient. Compared to the Marauder starting equipment cards, Arbalest cards tend to pack more value into each card at a lower cost. The Arbalest has some very good block cards (Barricade, Shield Amplifier), and Pulse Lasers are great for disabling enemy systems, both offensive and defensive. Typically the Arbalest wins by controlling enemy damage output, grinding the enemy out over several turns.
- Starting power tip: Most early combats do not require you to block more than twice per combat. Barrier is the only card in the starting Arbalest deck that requires B. This means you can immediately change the default power setup to be 4R, 2G, 0B. Doing so will allow you to play 2 Laser cards immediately on the first turn if you draw them, and every 3 turns, you will be able to play an additional laser card. The very first two combats in the demo do not require the Arbalest to block at all, as you can guarantee drawing and playing all 3 Laser cards by turn 2. 12 system damage is enough to break both starting enemies weapons, so there’s no incoming damage to block.
- 4R production per turn is enough to repeatedly play the basic starting Laser cards every time they’re off cooldown. 2 Laser Pulse costs 6R every 2 turns, which equates to 3R production. Catalyst Pulse costs 3R every 3 turns, which equivalent to 1R production. If you don’t immediately get value from Ordnance Surge (e.g. draw all 3 Laser cards turn 1 + Surge), it can be safely discarded as resource production per turn will keep up.
- Paired Pulse is arguably the best damage card for the Arbalest’s starting laser. 3×2 for 4R1G is a good cost, and it gets double the bonus damage from Catalyst Pulse, and augments like Weapon Stabilizer (+1 damage to attacks from this weapon) and is downright vicious with Overload (3rd laser attack this turn deals +3 damage). Overload Paired Pulse can crack a full 12 HP system by itself.
- As noted above, the +50% Gunner crew power is most often paired with Paired Pulse boosted by Catalyst Pulse or Heavy Laser. This boosts the damage from 8 to 12, allowing you to disable a dangerous enemy system with one less card.
- Barricade (3G1B) is a very efficient block card that scales with G production, and is almost strictly superior to the basic Barrier starting shield card.
- Excess credits can be used to remove Barriers in the station, and draft additional Barricades to replace them.
- The only caveat to using Barricade is it is dependent on current G production. Cards that disable G production like Forced Optmization (convert all G and B production to R) will result in only the base 2 shields generated. Solution is to simply play Barricade first. The other scenario this comes up is Ionization. But Arbalest can often outright block Ion cards to keep Ionization below 6.
- Shield Amplifier (3G) offers a good amount of block for the cost, but unlike Barricade is conditional on already having shield to play. Arbalest crew member Rin’s Emergency Shield power can be used to create shield on demand, but is very expensive (5 Morale) and should be reserved for emergencies.
- If the enemy ship tends to attack in bursts, playing a Barrier or other Shield card in advance can be a good way to enable Shield Amplifier without the Barrier clogging up your hand. If not hit, the Barrier will provide enable Shield Amplifier for the following 2 turns (end of turn effect halves to 3 shield, then 1)
- Conservation (every 2R spent this turn refunds 1G) tends to be fairly flexible and powerful G generator. As above, Laser’s are R heavy with G secondary, Conservation helps with being able to pay the G cost of the more expensive Laser cards, like Repeater Pulse or Boost Pulse (both cost 3R3G). Unlike other resource generation cards that either Deplete or have a long cooldown, Conservation has a standard cooldown of 3, which means it can be played multiple times in one fight.
- Do not feel obligated to hold onto Conservation on the first run through the deck, it’s perfectly fine to play it with just one other laser card and earn 1G. Drawing deeper into your deck is often more important, and holding 2 cards will greatly decrease your deck consistency.
- Ordnance Surge is Arbalest’s way to cheat out extra Red early. As this card does nothing if you end your turn with 4R, it is often correct to play out your basic Laser Pulse cards if you draw them before seeing Catalyst Pulse.
- With just the 3 lasers in the base deck and 4R production, Ordnance Surge often only finds value in the first cycle through the deck. With a cooldown of 2, the 2 Laser Pulses only require 3R generation per turn to break even. The remaining 1R pays for the Catalyst Pulse, which costs 3R every 3 turns. So for early fights without a 2nd weapon, do not hesitate to play out Ordnance surge early for a net +1 or +2 red, or discard it if found too late.
- Unlike Marauder’s Rearm, Ordnance Surge has a high 5 turn cooldown. So the Arbalest starting deck is much worse at generating consistent Red per turn than Marauder (Rearm produces 2 per turn). This means you’ll be looking to add R generating cards to the Resource Bay, like Ammo Dump, Forced Optimization, and Burnout.
Marauder
Unlike the Arbalest which is fairly straight forward to play, the Marauder is currently best played as a combo deck type ship. The starting attack cards of the Marauder are worse than those of the Arbalest, Light Barrage is not a good card without Flak synergies and support, Flak can’t target systems to mitigate incoming damage, and the basic Shields deplete which makes sustained battles of attrition a problem. The only real saving grace of the starting deck is Rearm, which often consistently generates 2R per turn.
In exchange for a worse starting deck, the Marauder has significantly more powerful crew abilities than the Arbalest. Double Time is a deck defining crew power, and currently the strongest crew power in the game by far, offering incredible amounts of value. With a properly constructed deck, Double Time can very consistently draw the entirety of Marauder’s deck turn 1, and completely negates the only downside of “free” deplete cards that grant Resources, the fact that they take up a card draw. The Arbalest may have a more stable start, but the Marauder has a much higher power ceiling.
- As described in the Mechanics section above, the Marauder’s starting Flak cards are very unreliable for applying additional Shred, even with Shred 1 with opening shot. Acquiring a Flak Barrage or other similar card that can reliably get to Shred 2 is a high priority.
- Finding Opening Shot helps a great deal as well. Even a staple card like Flak Barrage goes from a 60% chance to Shred to 75%. Looked at in reverse, going from a 25% chance to fail to 40% means firing the Flak Barrage at 0 shred is 60% more likely not to shred. If you only have one Flak barrage, you want to pair it with Opening Shot.
- This also means that if you fail to draw Rearm or Opening Shot turn 1 and are not planning to use your crew draw power, it’s often best to discard Light Barrage, and sometimes even Twin Barrel. Using up Light Barrage’s without Shred stacks only makes sense if Rearm is going to refund 2 of the 3 Red spent. Light Barrage only has a 2 turn cooldown, and can be used to sink excess R once Shred is up.
- Marauder’s starting attack cards offer a below average damage per red spent ratio without Shred applied. This is compensated by the Marauder effectively gaining +2R per turn from Rearm. Drawing down to find Rearm is a high priority, and as the game goes on, drawing your consumables and Upgrades are equally important.
- The Marauder’s starting deck has no repeatable G cost, and only costs 3G total.
- A common power strategy early is to either set the starting power to 4R 0G 2B, or start combat with the default 3R 1G 2B, and immediately change it. 3R 0G 3B is also an option too.
- Starting with 6R is not a large advantage like it is on Arbalest, as early game you want to lead with Opening Shot, which only costs 2R, playing an additonal card is only 5R total. You will need to swap one power to G for one turn in order to play the 2nd Shield Pulse.
- Starting with the default power and changing it turn 1 means you likely don’t need to adjust power again mid combat.
- Starting with 3R 3B helps with one specific scenario, you draw both Rearm and Opening Shot in your starting hand, which requires a total of 5B to play. This means you do not need to draw Mass Surge on the same turn to play everything.
- A common power strategy early is to either set the starting power to 4R 0G 2B, or start combat with the default 3R 1G 2B, and immediately change it. 3R 0G 3B is also an option too.
- Marauder’s Resource Bay is well suited to stacking consumable +Resource Deplete cards.
- The Marauder’s starting Resource Bay has 6 slots unlike Arbalest’s 4. This allows you to take more consumable cards, and you’re picking 4 optional cards, rather than the Arbalest’s 2.
- Cards that grant +4 a resource like Ammo Dump and Asteroid Ore allow the Marauder to dump it’s entire hand or even entire deck turn 1. The +4 green Capacitor is less valuable as none of the default Marauder starting equipment cards require much G, but can be useful to power specific secondary weapons, especially Ion weapons.
- War Effort is another standout card, while it does have a casting cost unlike the Depletable cards, it also draws a card and is not depleted, having a reasonable 4 turn cooldown. This gives the Marauder a little more sustained firepower if things go sideways.
- Drawing a card is actually quite impactful when attempting to draw your entire deck. Some cards are too expensive to play 1st time through the deck, discarding those cards and drawing 2 instead allows you to dig 1 card deeper. This greatly increases the likelihood you find a consumable and can start chaining cards.
- Playing both War Effort and the starter Mass Surge will put you at 4 heat, which is the maximum default heat the ship can handle without taking hull damage.
- Cards that grant +4 of a resource temporarily are less good, as they usually generate Heat. The default Marauder deck already generates 2 Heat
- While Marauder can OTK the demo boss with the crew draw power, the power is still excellent even without the possibility of an OTK
- Playing out of most of the deck turn 1 allows Marauder to reliably apply Shred to the enemy before they can put up their shields. This allows regular Flak cards to used as efficient shield breaker cards in later turns if necessary.
- Elites with the Whipple Shield buff, (Flak min damage is set to zero while the enemy ship is shielded) are the only caveat. Typically you want your secondary weapon to counter this. A precise secondary like Laser or Railgun can disable the shield turn 1, while Ion weapons can efficiently break the shield when it goes up. Secondary Flak weapons may come with Charged Shot, which does guaranteed max damage to shields and thus ignores Whipple Shield.
- Playing the common defense cards (2 Shield Pulse + Hasty Defense) immediately generates 20 shield with duration 1 for 2G2B and 3 HP, which is offset by Repair Kit. This makes Marauder fairly impervious to attrition bleed from ships that attack immediately on turn 1 (double Flak Elite).
- Video examples
- Example Tyrant OTK with Double Flak + proper Augments: link.
- Part 2 video link in the Marauder Flak / Laser has examples of drawing the whole deck turn 1.
- Playing out of most of the deck turn 1 allows Marauder to reliably apply Shred to the enemy before they can put up their shields. This allows regular Flak cards to used as efficient shield breaker cards in later turns if necessary.
Enemy Specific Tips
Elites
Elite ships tend to provide a much stiffer challenge than regular enemies, as they tend to have significantly more health, and a much higher damage output. Elites also come with a random buff, which can range from something relatively unimpactful (+5 Heat capacity when your ship applies no Heat damage) to absolutely devastating. Some standout Elite buffs:
- Eutetic Armour is an elite buff that applies -2 damage to player Laser cards until the Elite ship takes 20 Hull damage. Given the basic Laser Pulse does 4 damage, this can potentially cut your damage output in half.
- Arbalest can compensate somewhat by using Catalyst Pulse to add +1 damage, but removing the Eutetic armour still takes many hit with lasers alone. Firing Catalyst Pulse + 2 Laser Pulse together deals only 2 + 3 + 3 = 8 damage every 3 turns, which means you would only break Eutetic armour on turn 7, if you hit nothing but the enemy ship hull every turn.If the enemy has Shield cards, it’s even worse. It goes without saying that giving the enemy ship 7 turns to fire on you is a very bad proposition that may lead to you taking a ton of damage.
- Quick Pulse (3 damage) and Cutting Laser (3 damage, fires at the start of each turn for 3 turns) are impacted tremendously, doing only 1 damage after reduction.
- Thus it’s often a big consideration when the Data Broker offers a secondary weapon, if your primary is a Laser, it’s often wise to pick something that’s not a second Laser. Missiles are an excellent way fo stripping Eutetic Armour, as their very high raw damage let’s them chew through shields and hull.
- Diffraction Field is Eutetic’s armour somewhat less devastating cousin. It applies -2 damage to player Laser’s while the enemy Elite has it’s Shields up.
- Diffraction Field is typically less devastating than Eutetic Armour. Unlike Eutetic, it’s effect is not active during the player’s 1st turn, as the enemy won’t have played any shield cards yet.
- This allows laser focused ships to pre-empt Diffraction Field by simply targeting and destroying the Elite’s shield generator before it can play a card
- As the only requirement is to drop the enemy shield to remove the laser damage penalty, both Ion weapons and Missiles can often remove enemy shields with a single card. Eutetic’s 20 hull damage is a much steeper requirement to fill
- Whipple Shield is the equivalent Elite buff that counters a pure Flak build. Flak Minimum damage is set to zero while the enemy is shielded.
- This makes taking down enemy shields with most Flak weapons a complete diceroll
- Effects that force Flak attacks to deal maximum damage ignore the 0 min damage. (e.g. Charged Shot deals it’s default max damage of 7 to Shields, Predictive Aim forces max damage on next Flak attack)
- It is thus highly recommended to pair Flak with a different secondary weapon.
- This makes Ion a very good pairing with Flak, as it’s incredibly efficient for tearing down shields, Whipple are no exception
- If you have resources to burn, it’s possible to buy Missile Pods from the shop, which go in the External Attachment slot. While they do not grant an extra card draw like main equipment it does give you answer to (Whipple) shields, if all you have is double Flak.
- This makes taking down enemy shields with most Flak weapons a complete diceroll
- Stability adds +1 pip to a random enemy card, if they took no damage that turn.
- Sometimes this effect essentially does nothing, particularly on Elites that have no shields, it’s trivial to damage them every turn (e.g. Double Flak Elites)
- Starkin Elites (e.g. SK R01a Elite) with the Fortify shield can be devastating against an unprepared build. Enemy Fortify shields start at generating 6 Shield every 2 turns, increasing by 1 every time it’s played, capping at 12. If the random pip from Stability is applied to the shield, this can result in the shield being played immediately again next turn. This can put the player in a no win situation, most early builds do not have the ability to generate enough damage to break 9+ shield every turn or 2 turns. The Elites Spinup Laser also reduces in cooldown every time it’s played, to a minimum of 1 turn, which results in the player being unable to generate enough shield to keep up.
- Thus in this situation where your ship only has middling damage output, it’s often an immediate priority to break the enemy’s shield as soon as possible with precision weapons, before Fortify can get out of control. This often means you have to leave the enemy weapons up, which results in taking some extra damage. But it’s better than letting the enemy scale out of control and dying.
- Increased Hull (+20%) makes enemy elites tankier, 60 HP Elites go up to 72 HP, which is just shy of the 75 HP the Tyrant boss ship has. If your ship struggles with dealing sustained DPS, the extra health on Elites can often result in them taking another cycle of damage to kill, which may translate into 1-2 additional rounds for them to fire back.
SOL-R01a Elite
Double Flak Elite that lacks a shield. Gimmick for this ship is it has fairly consistent damage output, with the 2 Flak cannons firing every turn for the few first few turns.
- Knocking out the 2nd Flak Cannon (12 HP) on the ship cripples it’s damage output. The 2nd Flak Cannon plays more dangerous cards that mess with you like Covering Fire (10% chance to discard player attack card per hull damage).
- 1st Flak cannon fires Opening shot has low base damage (2-4), as does Light Barrage. (2-5)
SK-R01a Elite
Elite comes with a Fortify Shield with 15 HP, Basic laser (4 damage / 2 turns) and Spinup laser (3×3 with 3 turn cd, cd reduced by 1 every time the spinup laser is played)
- As the enemy subsystems have a fairly beefy 15 hp, it’s often difficult to break all the equipment and you have to choose what to prioritize
- Typical targeting order is to knock out the Fortify shields, followed by the Spinup laser just before it goes active at the end of player turn 4.
- While the spinup laser looks scary, it does take 4 turns to resolve. So it’s almost never to target it first
- The basic laser on the ship has fairly mediocre damage output, 4 damage / 2 turns.
- Finally the Fortify shields can really cut into your damage output once they get going. Punching through 9+ shields often wastes a lot of damage, and this only gets worse over time
- If your 2nd weapon is the Ion Cannon mk1, you can skip targeting the shield first.
- Sling does 6 ion damage, and an additional 6 on shield break. This lines up perfectly with Fortify shield’s first tick generating 6 shield.
- On Fortify Shields’ 2nd proc of 7, Ion Spear will break the shield and disable a target system for 2 turns. If you were ignoring the shield, odds are you broke the spinup laser, and simply disable the shield. This gives you 3+ turns to unload on the enemy ship and kill it before the shields can be repaired
- As Ion Spear has a 3 turn cooldown, and the 2nd enemy shield is active at the start of player turn 5, you can safely immediately discard Ion Spear if it appears in your hand turn 1 or 2. It’ll be back in your draw pile by the time you need it turn 5.
- Typical targeting order is to knock out the Fortify shields, followed by the Spinup laser just before it goes active at the end of player turn 4.
- The main punish is if you immediately bee-line to take ou the spinup laser without having a plan to deal with the Fortify shield, which then scales out of control.
- Due to how slow this Elite is, as long as you can generate a turn 4 kill, it does fairly minimal damage. So it’s generally not threatening unless it spawns with a good Elite buff.
SK-R01b Elite
A fairly unique enemy, the primary threat from this enemy ship comes from the special missiles it fires, which ignore shield and targets one of the player’s 3 resources, destroying up to 6 and dealing the same amount in damage.
- As this ship punishes you for overstacking resources, think carefully before spamming consumable cards that add resource, or cards like Conservation that result in an overstack of G.
- Depower additional resource production you don’t need. Besides the missiles, the enemy ship only has a basic 4 damage laser for 2 turns before it plays a 2 pip Heavy laser for 8. Consider how many shield cards you actually need to play, and remove excess G production.
- As the enemy missile essentially does minimal damage if you manage your resources correctly, it’s entirely possible to ignore the missile subsystem, and target the shield first, so that you can DPS the ship and kill it ASAP.
Boss (Tyrant)
While the boss of the demo looks quite intimidating at first, sporting 5 equipment and seemingly overwhelming damage output with effectively 3 attacks, the boss is closer to a gimmick or puzzle boss.
- As this is the final boss encounter of the demo, don’t forget to use your crew abilities. There’s no benefit to ending the fight with spare morale available.
- Of the 3 boss attacks, only the Flak Cannon directly pressures the player every round. Starflares fire only every other turn and take a turn to arrive, and the Improvised Flak card only triggers on turns where the player deals hull damage to the boss.
- The Flak cannon of the boss does fire consistently every turn until it reloads, but mixes in some lower damage cards that make the average damage lower than Improvised Flak without Shred.
- The effective damage of the boss increases sharply with Shred applied. This typically happens if you fail to block a Flak Barrage + Improvised Flak on the same turn. The boss has a Concussive Shell card that heavily punishes the player ship for accruing Shred stacks, and the buffing equipment has the Barbed Shrapnel which also increases damage for being Shredded.
- So the damage output from the boss is snowbally.
- If you’re leaking only minor bits of damage and the boss can’t shred you, the incoming damage is reasonable.
- Letting Shred pile up can result in the boss hitting you for double digit damage on each attack.
- The shield of the boss is actually quite slow, taking 2 turns to charge and activating on turn 3 for 12 shield duration 1. The next action will always be a Shield Amplifier, which will have no effect if the boss has zero shields. This is followed by a 1 turn cooldown and the cycle repeats.
- This means that if you immediately zero out the bosses shields on turn 3, the boss is only producing 12 shield per 4 turns. That’s actually quite weak compared to things like the Elite Fortify that has a scaling shield played every 2 turns.
- This also means breaking the shield subsystem often isn’t the first priority. Using your precision attacks to break a different piece of equipment and holding an extra attack or two going into turn 3 to guarantee 12 damage to break the shield turn 3 is often a better strategy.
- Special note on Ion Spear: as the Tyrant system HP is higher than normal, Ion Spear’s conditional effect to disable equipment for 2 turns on shield break shines here. Ion Spear only does 8 base though, so you will need to play another damage card prior to break shield.
- Retribution -> Improvised Flak is arguably the attack that puts the most pressure on the player.
- While it can be played around somewhat by holding attack cards in hand and unleashing them in bursts, the larger damage range of Retribution means it’s often the priority target to break with precise weapons.
- Dealing shield damage will not trigger retribution, so dealing exact damage to zero out the shield turn 3 can avoid Retribution.
- Be careful about playing Covering Fire (% chance to discard enemy attack cards on hull damage) too early in a turn. Retribution draws the improvised Flak card on damage taken, so hitting the Tyrant after Covering Fire will simply bring back the Improvised Flak card.
- Conversely with Ion weapon, it’s best to play out your damage attacks, then play Ion cards at the end for a chance to disable the now activated Improvised Flak card.
- As you have control over whether to hit the boss or not and thus triggering Improvised Flak, consider not hitting the boss if there’s already too much incoming damage that turn. E.g. Starflare missile is inbound and regular Flak is shooting as well.
Sample Demo Card builds
Arbalest
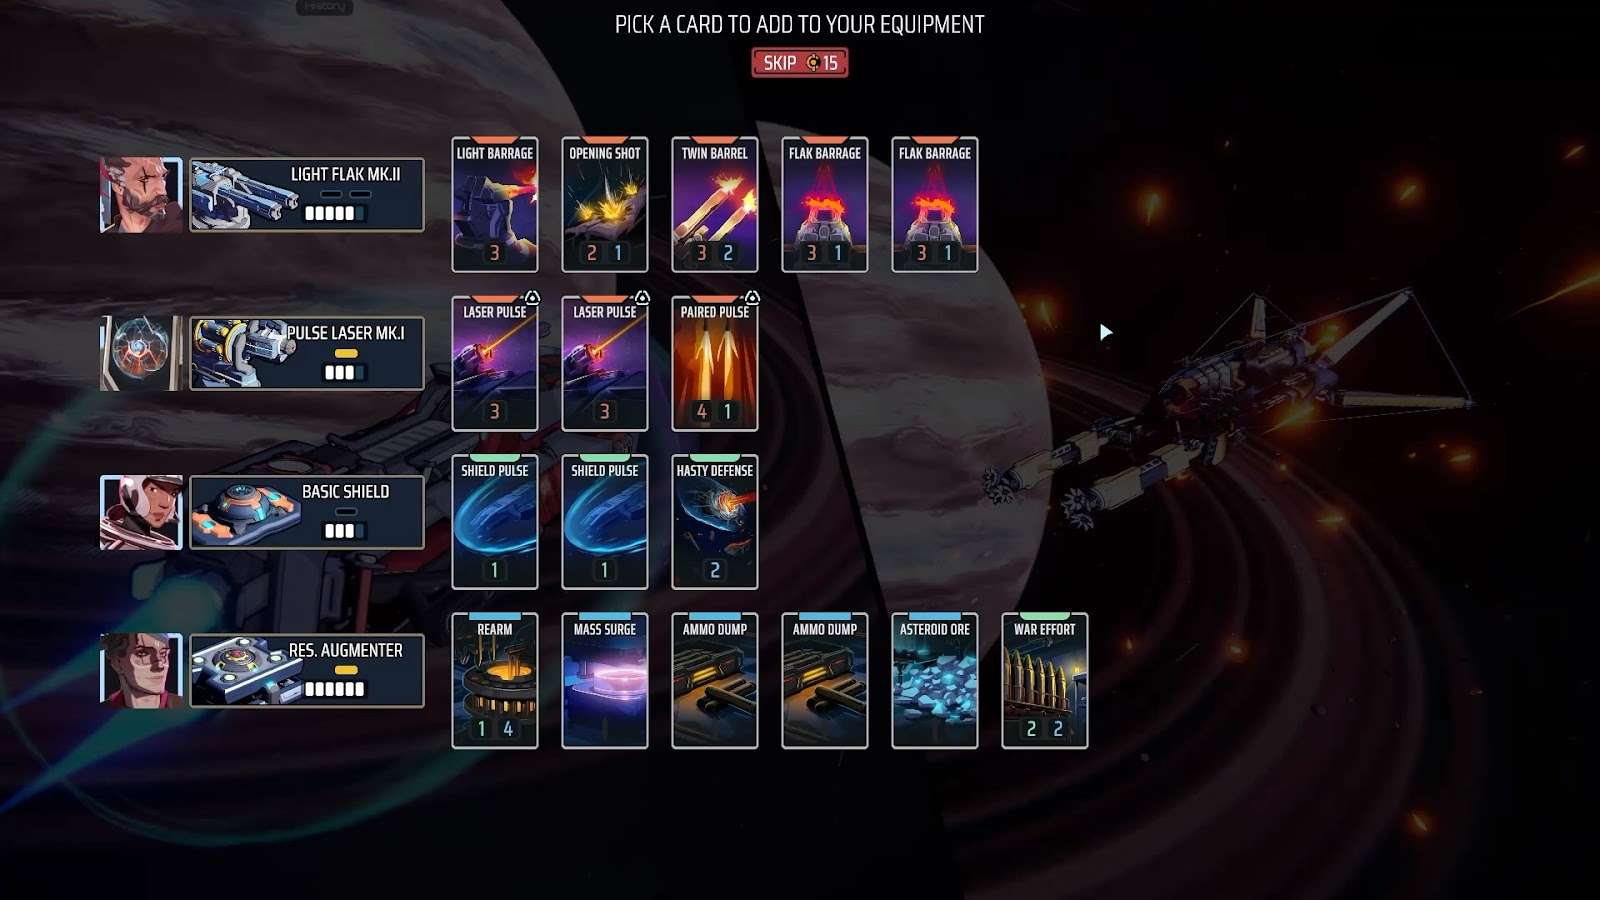
Laser / Flak
Laser / Missile
Laser / Ion
Marauder
Flak Laser
Youtube LInks to video of the run:
Flak / Ion
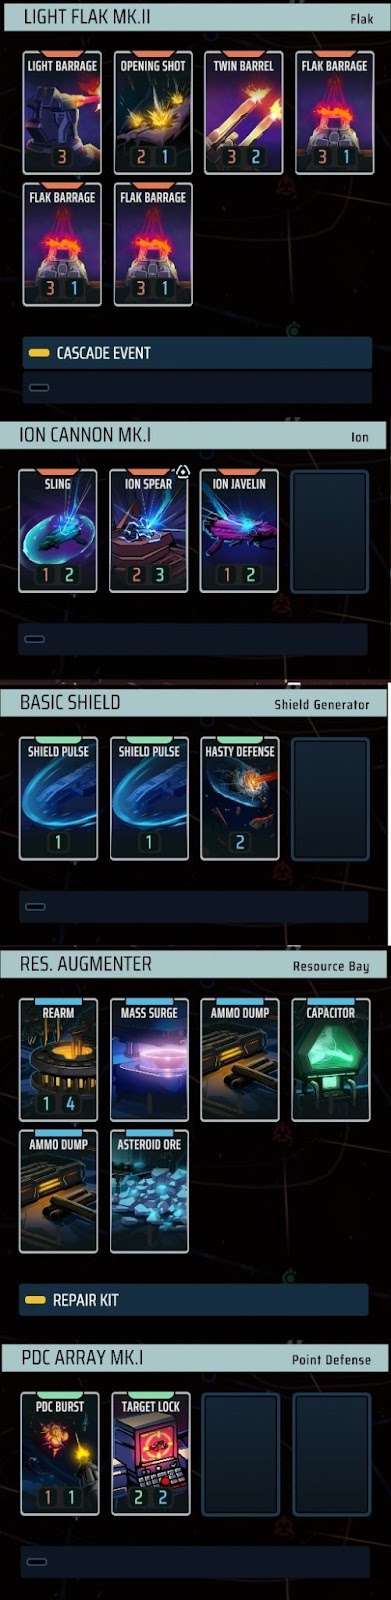
Flak / Ion
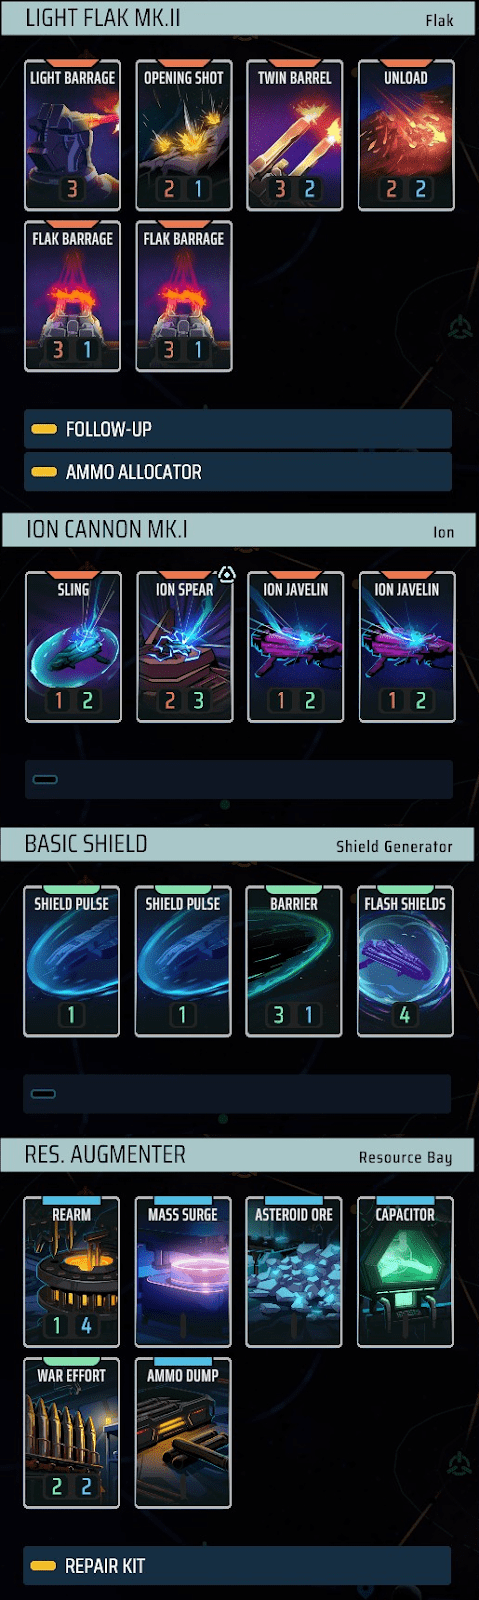
Flak / Heavy Flak
Note: Effective Holdup (Res. Augmenter) and Mass Surge (Res. Booster) are cards being offered, and are not actually part of the deck.
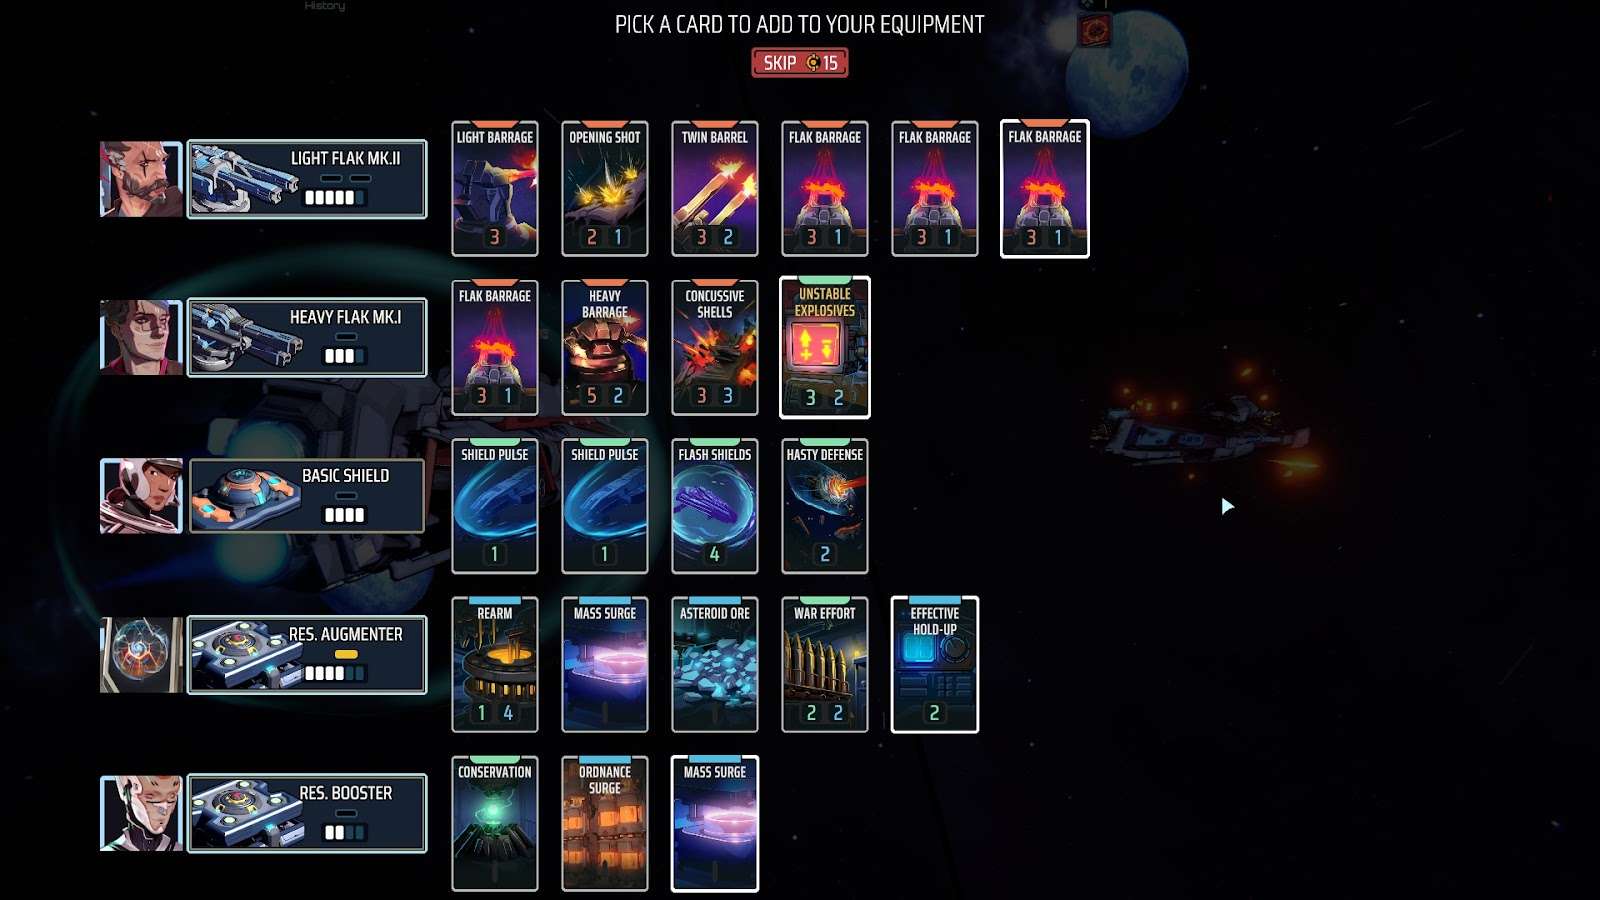
Flak / Railgun
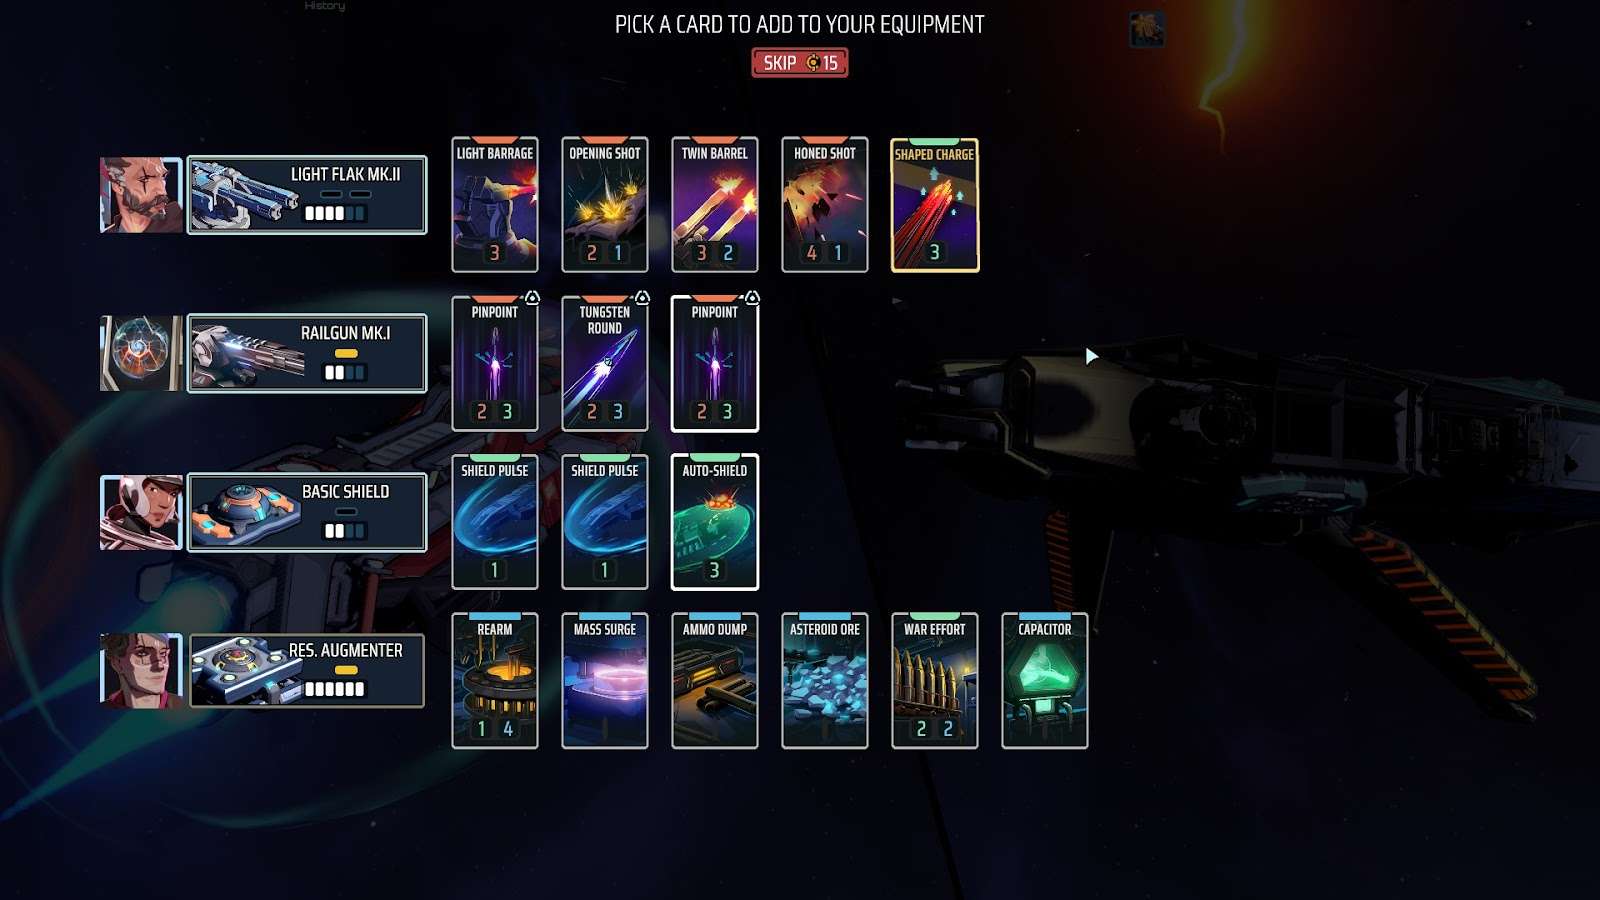
Note: Shaped Charge (Light Flak Mk II), 2nd Pinpoint (Railgun Mk. 1) and Auto-Shield (Basic Shield) are cards being offered, and are not actually part of the deck. This was from about 2/3 of the way through the run, additions for Tyrant were Flak Barrage, Unload, Hasty Defense, and Flash Shields.
Be the first to comment