
Basic intro to the game by a dude with too many hours in it.
Beginners Guide
Quick and General Advice
George, I don’t want to read this whole guide! What advice would you give new players just in general quickly?
- For the rest of the guide scroll down. Its lengthy. Its split up in to Several Sections including general Merc advice at the bottom.
- Gain more skills quickly by leveling low level mercs. Skills are class-based not merc based. Leveling two Commandos will grant 10 points instead of 5 to use for skills.
- Limiting how many enemies on screen at once can be critical. Some missions have items you can collect or search, such as a Duffel Bag. Do not collect the Duffel Bag during combat! This limits how many enemies appear on their combat field. All items can be collected post-combat.
- Fire and blinds are important. Fire causes a blind on the enemy, and blind enemies in general can be ignored since they miss so often.
- Sharp weaponry is currently the most powerful weapon type by far. Sashimi is simply too strong since it has no duration limiting it. Aside from that it causes the enemy to be crippled, lowering their damage output by up to 80%.
- Blunt weaponry is fine to use, in the early game raw weapon damage is often more important than weapon synergy.
- Snipers are bad. Do not use them.
- The Support “Slade” on the “Help Slade” Mission is the most important support to invest intel in to. You can abuse the trader’s 75% off and re-sell to him to earn profit. This is intentional and not a bug.
- Starting merc type (for a new game) only impacts the first fight of each mission. Pick your favorite. While Combat Focus(50% chance to have a free card) is useful depending on your main merc’s type, it in general has little impact. I still recommend an Enforcer or Commando for your main merc though since they have high health.
- You can swap merc positions on the field by hovering their card and hitting the Arrow Keys.
- Item upgrading is entirely dependent on the higher level of the two items. There is no damage loss. If you have a blue rarity plank thats level 1 and later on get another blue rarity plank thats level 10 then it will become a level 10 purple rarity plank with no downside.
- There are “checkpoints” throughout the game that will give better weapon types. Early missions will only give stuff like Planks, whereas mid-game stuff will start to give Heavy Pipes or Sledges. Late game will give Heavy Sledge. A later stage weapon will always be stronger than its early game counterpart. A level 10 sledge is always stronger than a level 10 plank of the same rarity.
- The “Checkpoints” will also unlock that weapon type in the trader. For example, Oil Refinery will start to give stronger weapon types once its available.
- Assignments can give you a great damage boost in the early game, do not ignore assignments if you are having trouble.
- A well rounded team performs better than a team made up of only a few mercs.
- Get your squad filled out ASAP. More mercs is better mercs.
- Repeat early missions to gain more levels to gain more skills. Skills are the driving factor of this game. More skills more power.
- Don’t get hung up on the color of your weapon. Stronger is better. So what if its a unique weapon? toss it if its weaker than your new white rarity item.
- Running or Losing is fine. There is no detriment to it except losing IRL time spent.
- Unarmed training is not important. It does increase your parry, but a weapon training will give you more bang for your buck.
- Multiple Solutions is the strongest skill.
- Fight as many enemies as you can. Current build favors fighting enemies rather than avoiding them. You get far more experience fighting an entire mission than avoiding the Unaware enemies.
- Item levels are based off your main merc. Level 10 main merc means you can find up to level 10 items.
- I like using guns, but it causes too many enemies! help! Early game its a bad idea to use noisy weaponry as you can quickly become overwhelmed. Once you gain more skills for your mercs loud weaponry is manageable, but still avoid it super early on.
Map Interface
First let me explain the mission screen since there is a bit to unpack there, first section here is the mission interface and the second is the general map interface.
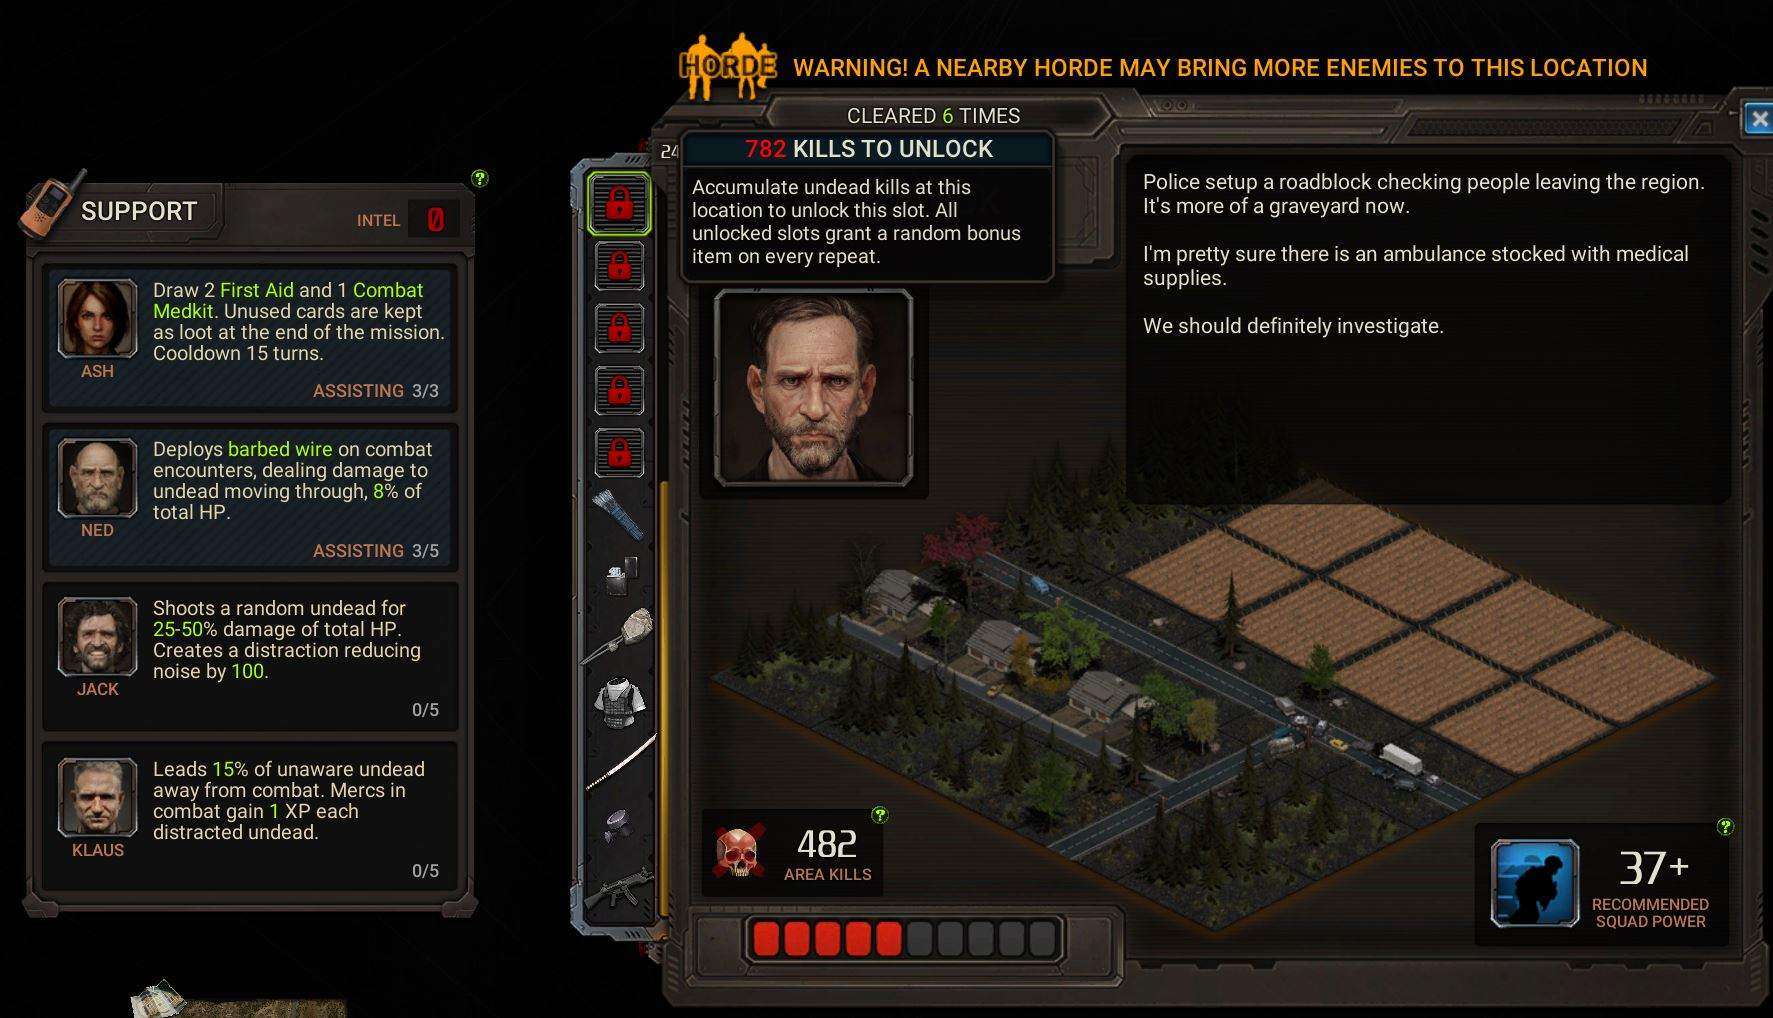
- Along the left side you will see a section named Support with several portraits underneath; once you clear the mission you gain 1 Intel point which can be spent on the cleared mission on any of the characters shown. Click the box to gain the first tier of their support. For example Klaus will distract 15/30/45/60/75% of enemies for points spent on him. There are different supports for each mission.
- Important: There are two special supports, namely Slade and Ramon. Slade is available on the Help Slade mission. Slade give a chance at discounted items in the trader/vendor. Ramon is available on Gas Station, Lost Convoy, and Army Truck. He is the only way to gain new mercs to recruit in the “recruit” section of the gear menu.
- The red locked icons are bonus items. Each time you kill a set number of zombies the next lock will be unlocked. When you complete the mission you will gain a bonus item up to the number of the unlocked amount. In the example shown I have unlocked 7 items, so my next clear will give me 7 additional items. The 8th lock requires me to kill a total of 506 zombies. You can see your kill progress towards the bottom of the map-mission screen. The items shown are not what you will get upon a clear; it simply shows what you got for your last clear. The max bonus items is 12.
- The half-filled red bar below the Area Kills is the difficulty for the mission. 1 pip filled means enemies will be at their default mission value; every pip increases the health or health and damage of the mission. It seems to be mission dependent as some missions will only get more health the first few replays whereas others will have health and damage increases in the first few pips. It maxes out at 10 pips.
- In the bottom right there is recommended squad power; typically a general indicator of how much power you’d need to clear the mission. Typically speaking as long as you are above half of that value for an uncleared mission it should be doable with some effort.
- Finally the top section mentions “horde is nearby” This just means the enemies in the mission will have a special attribute that allows them to add more enemies to the current stack of available enemies. If unsure what i mean by stack this will be explain in the combat interface section.
Okay! so now here is the general map interface
Click to enlarge…

- The left side shows a counter with some text undernearth. The counter is how many missions you’ve cleared. The text underneath is a brief re-cap of what happened during the mission.
- Along the bottom you will see a half-blue half-red bar. This is the Region Noise Indicator. When you complete a mission it will give you a score based on how loud or quiet you were. If you complete a mission while the quiet score is higher then you get a bonus in the blue section; for example you can get +30% health for your next mission. Blue are typically all positive modifiers whereas red are half good and half bad; an example being the enemy gets 10% more chance to bleed you.
- along the right side we see the Assignment section. Every X number of assignments you finish you will unlock another slot to obtain a new assignment. All assignments (except one) will take multiple clears, typically 2 clears. These assignments grant you a choice between two weapons or cold hard cash(supplies).
- Squad power is the strength score of your party. I have a general idea of how this score is made. I believe its your mercs rank divided by 2, the damage value of their melee weapons attack divided by 10, and their ranged weapons attack divided by 10 all added together. For example my rank 26 merc is worth 13 points, his 185 damage weapon is worth 18 points, and his 376 damage SMG is worth 37 points.
- Supplies is your spendable currency. If you need to buy an item from the trader it will cost supplies. If you need to combine two items it will costs supplies. Supplies are earned by selling extra items or opening containers in a mission such as the duffel bag.
- Reputation is earned at a 1 to 1 ratio of enemies available in a mission. Some maps give extra reputation; but this is a general rule of how to get reputation. You do not need to kill all enemies in an area to gain all the reputation. Reputation is used to recruit new mercs once you unlock them with Ramon. Re-training your merc (explained in the gear section) will cost reputation. Refreshing the vendor to a new set of 15 items will cost reputation. You will be hard-pressed for reputation early on. Save up for those mercs!
- The Lab is self-descriptive once you unlock it. The only noteable advice here is to use items to gain more lab % points. Drinking water (consumable item that can be bought or found in a mission) has a chance to give you Natural Camel points. Same with field medic, food, ammo, explosive repair items, or simply suffering bleed damage; so I won’t go in to further detail on the Lab.
Thats all for this section! The next section should be about the gear interface.
Gear Interface
Here we have the Gear Interface. In this section I will cover Squad, Training, Recruits, and Upgrades. The upgrade will have an important tip. I won’t go over “The Fallen” next to the fame buttons. Fame is just achievements and “The Fallen” is more for a little bit of twitch interaction since you can make custom named enemies to fight. Its a flavor thing.
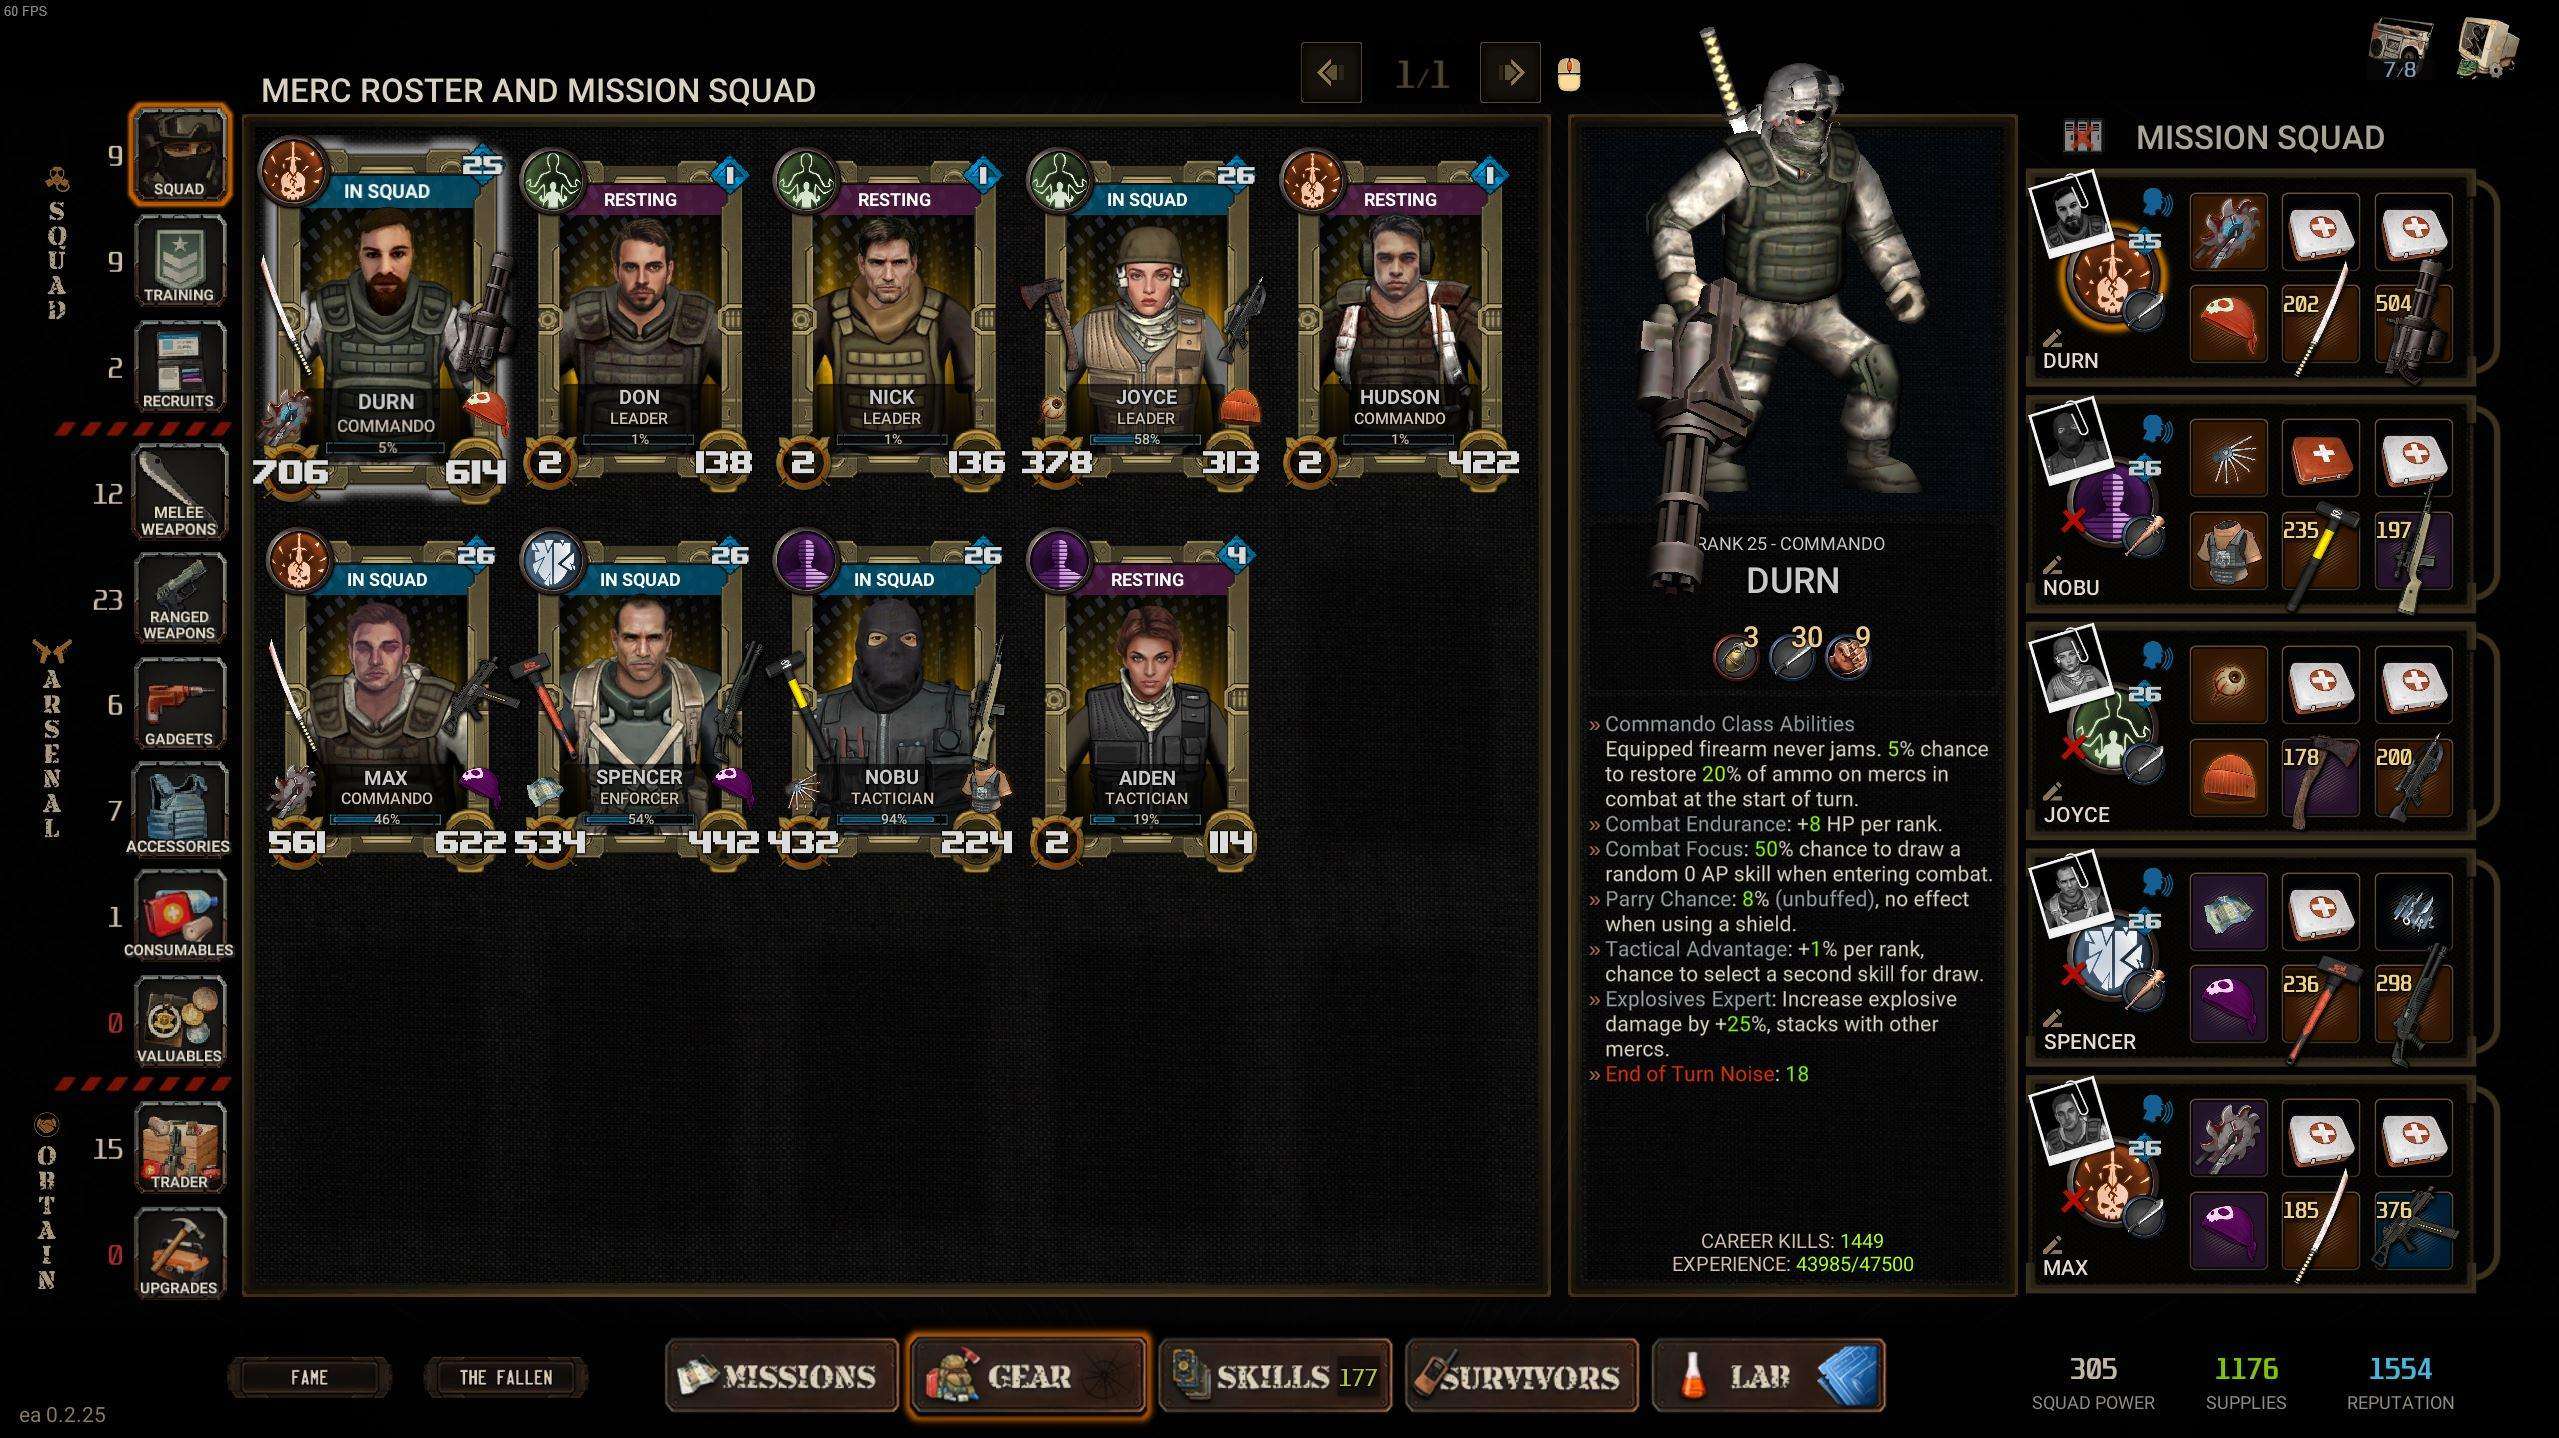
- In the Squad Section is your list of available mercs. By clicking a merc here it will add it to your Mission Squad list on the right hand side; do the reverse by clicking a merc on the right hand side to return it your your Squad section.
- By hovering a merc in the squad section you can get a view of that mercs specialties. It will show their name, merc type, rank, total kills, current and needed experience, and class specific attributes. For example the commando’s firearm never jamming.
- The values shown on the mercs card are simply: left number is total weapon damage and right number is their health. The little blue bar below their class type is experience in % form.
Training!
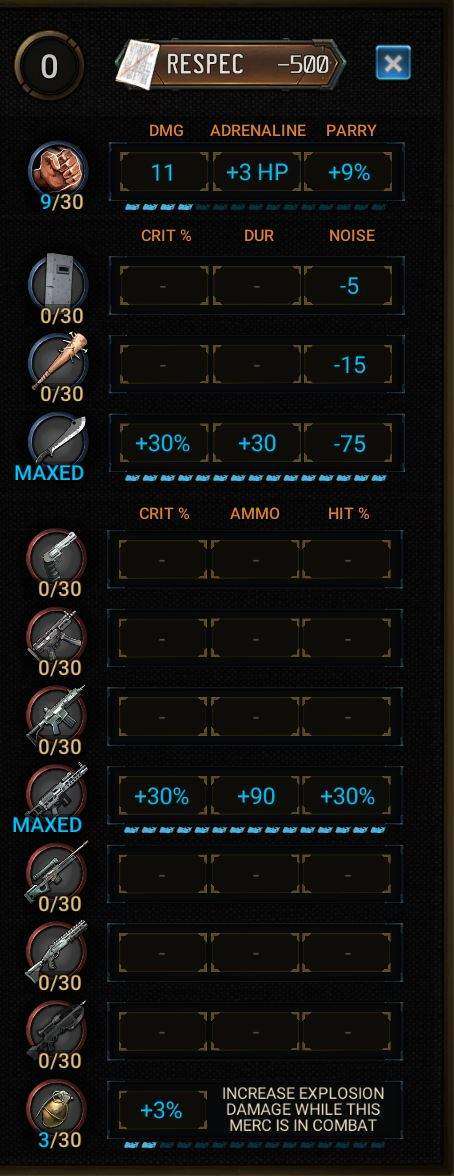
- This menu shows available upgrades for weapon types. Each rank (level up) your merc gains he gets 3 additional points to spend for training. It also will cost 20 reputation more per rank to respec the points.
- There are 4 categories shown:
- Unarmed
- Melee
- Ranged
- Explosive.
- Unarmed increases will power up your melee weaponless strikes. It does not add damage to your weapon only to your unarmed attacks. It will also increase the amount of healing you get per unarmed attack. Every 3 points is +1 more health on an unarmed strike. It also increases your parry % with or without a weapon.
- Melee weapons will gain crit %, durability increase (static value of +1 per point so a 20 durability plank with maxed out blunt training will have 50 durability) and noise reduction (static value again)
- Ranged weapons will give crit %, ammo count, and hit chance.
- Explosive is a raw 1 for 1 % increase to explosive damage.
Recruits!
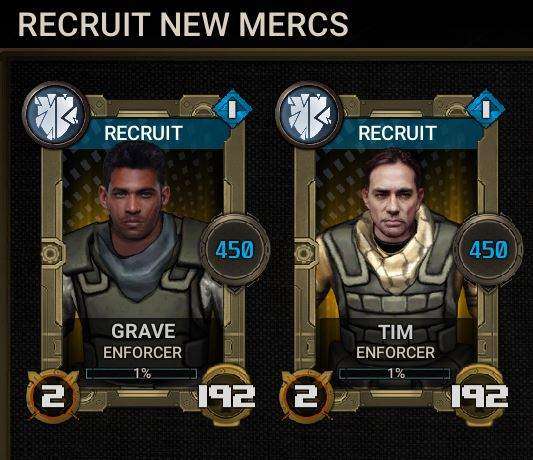
- This section shows which recruits you have available. You gain 1 new recruit for every point spent on Ramon (explained in Map Interface section). Each recruit recruited costs more reputation than the last one. This is where most of your early reputation will be sunk.
Upgrading
- Whenever you have two items of the same type and rarity you can upgrade them.
- Rarity Types: red is degraded the lowest. White is Standard. Green is Improved. Blue is Fine-Tuned and purple is Exceptional.
- Orange is Unique; you cannot upgrade to Orange – it is its own thing. These are special weapons/items.
- Important Upgrade is entirely dependent on the level of the first item. If you have a level 20 plank and a level 1 plank it will upgrade to the same item as two level 20 planks. If you have an old item upgrade it by buying or finding a higher level item.
Combat Interface
Alrighty, what people have been waiting for in terms of “what are these cards at the top and what are these doo-dads on the left!” There is a lot to unpack here so bear with me.
Important tip from this section: You can swap the position of your mercs by hovering their card and pressing left/right arrow keys.
- Starting with the top left we have the difficulty setting followed by a number in brackets and then the mission name. Remember the pips from earlier? that is what that number represents.
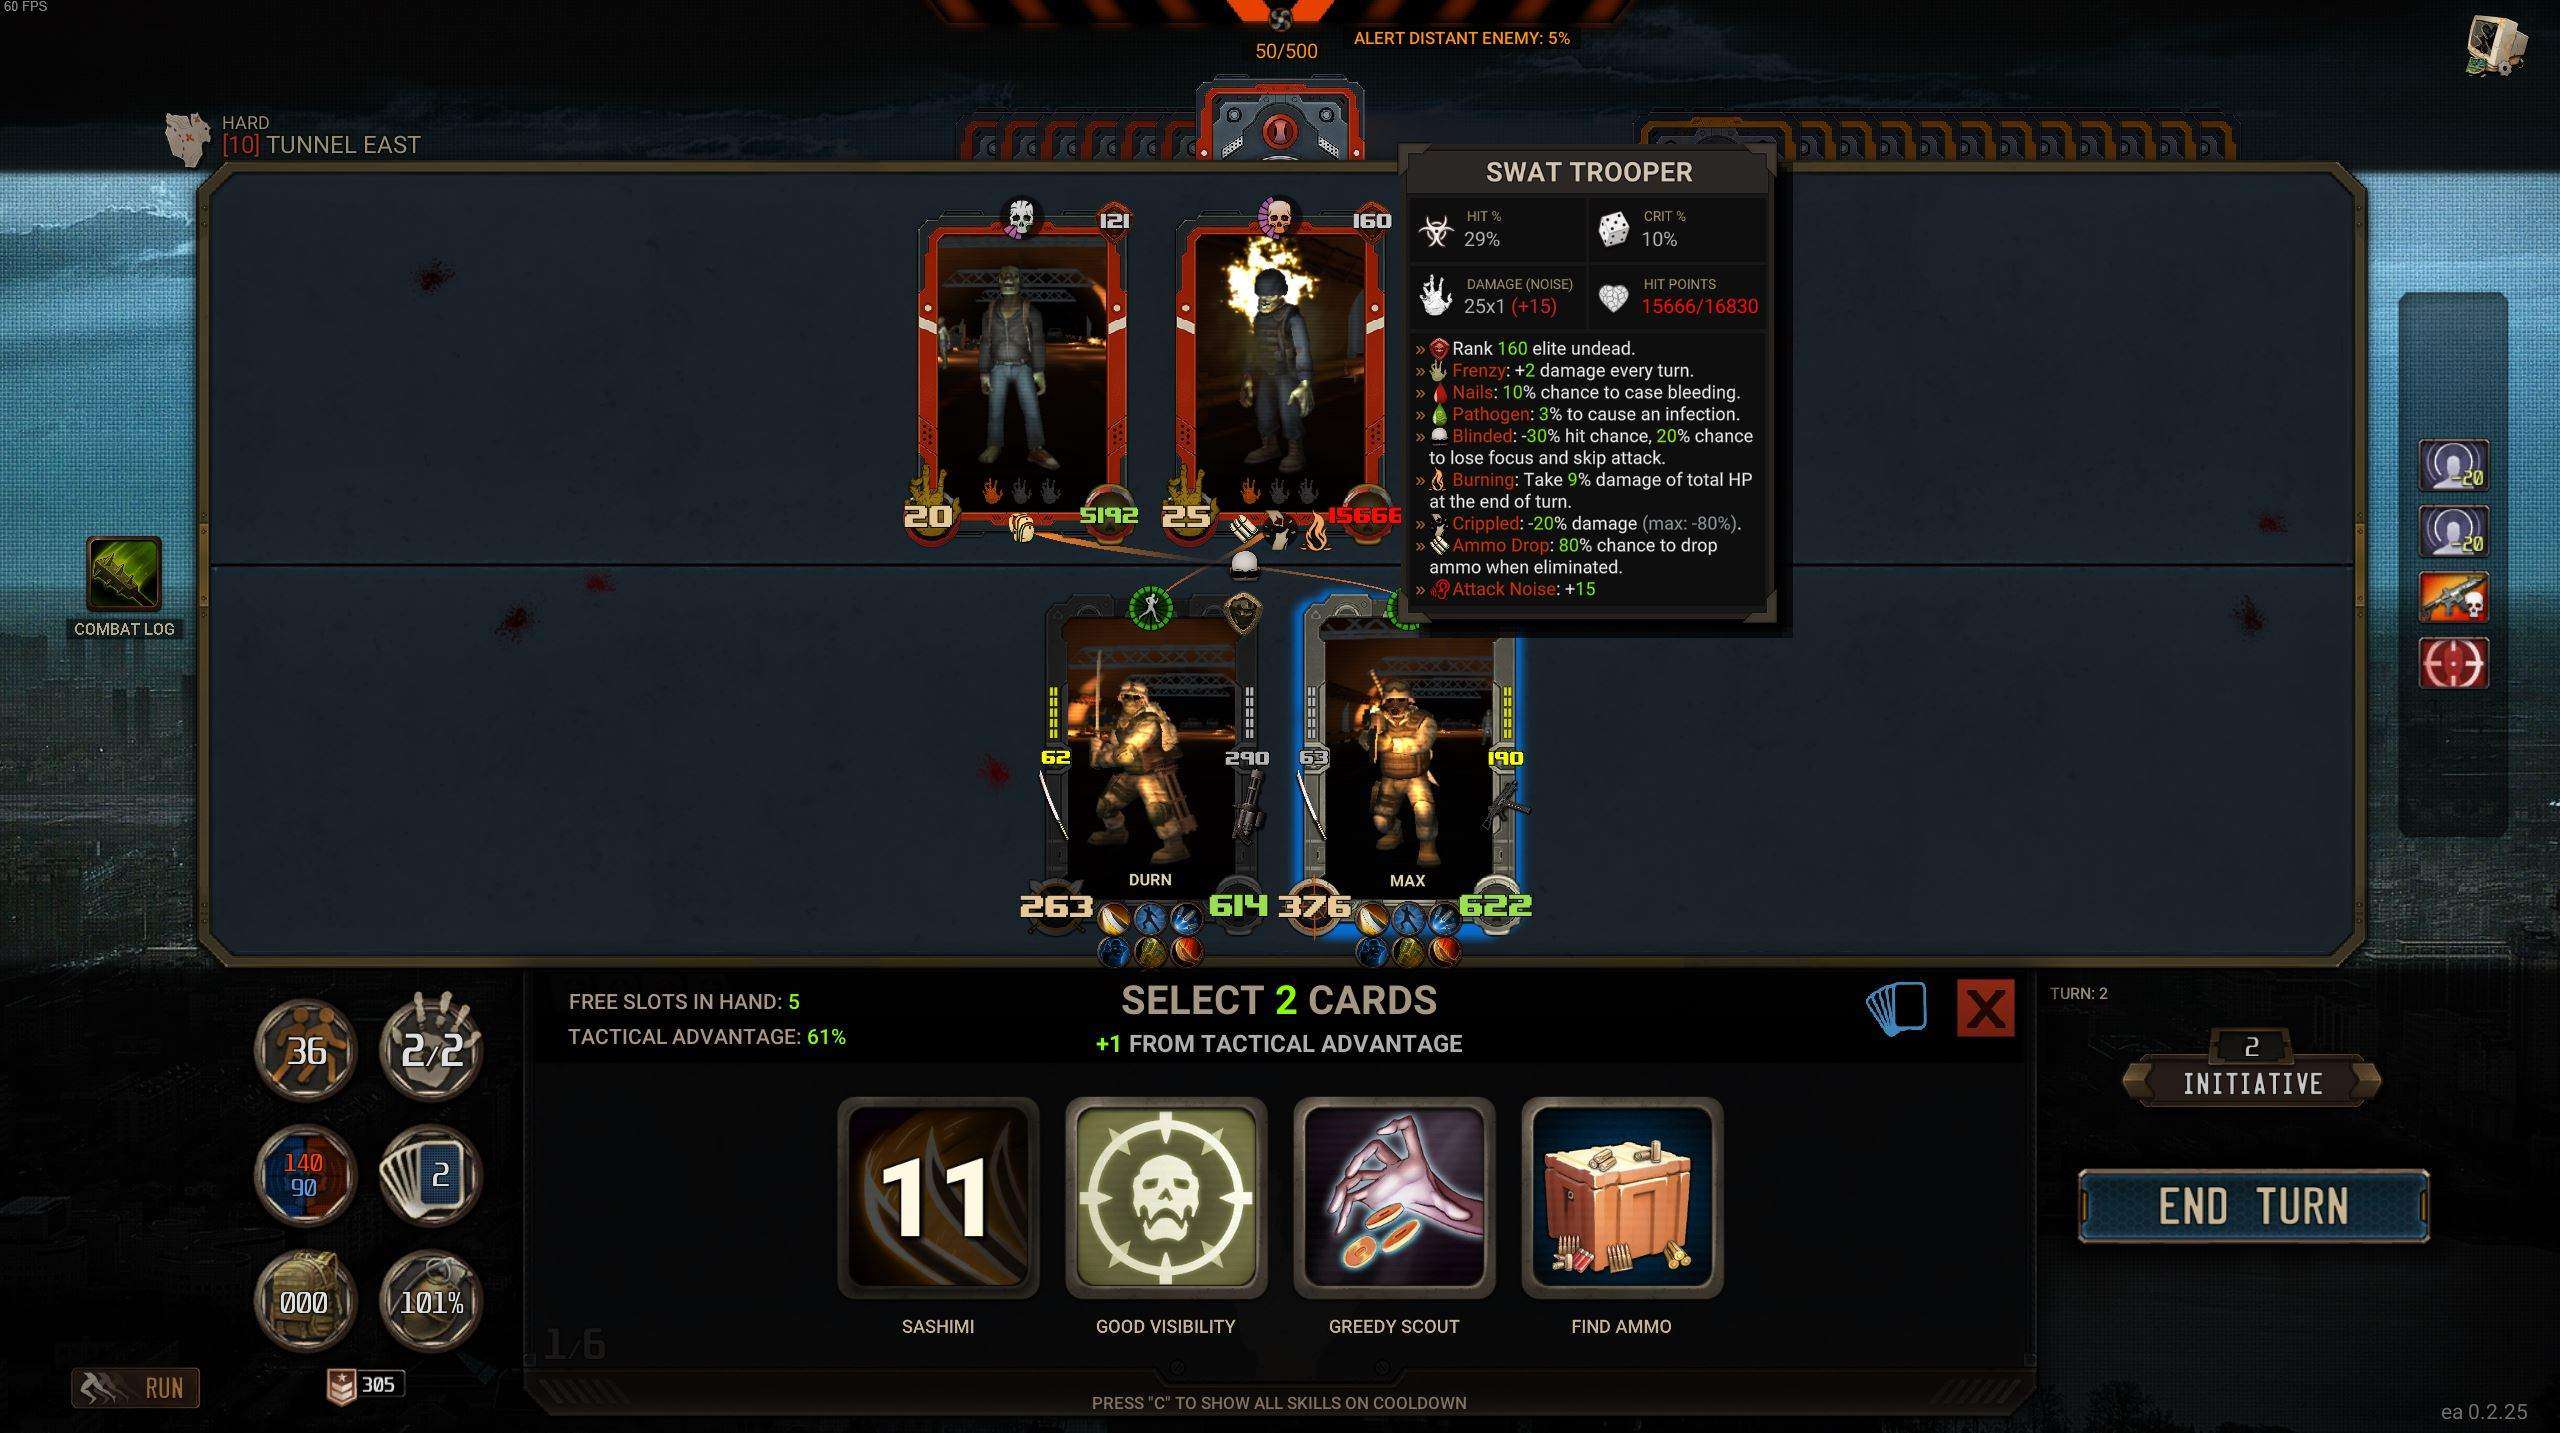
- Across the top we have Some red cards, some orange cards, a number out of a number and “alert distant enemy”
- The red cards are the Imminent threat cards; which I will call the Aware stack. A raised red card indicates that enemy will attempt to join the enemy combat zone on their next turn. The enemy combat zone can contain 8 active enemy cards.
- The number above the Aware stack is your Noise Indicator, mine being 50/500 for example. Every 100 noise you adds an additional raised card from the available red cards, up to a max of 4 more enemies (making 5 total); 500 does not make an additional card become in the raised status. So for example if the enemy zone only has 2 active enemies and you have 5 raised cards then all 5 will join the fight on the enemy turn.
- The orange cards are unaware enemies. These enemies can join the battle based on the “alert distant enemy” value. This value is determined by your current noise divided by 10. at 500 noise there is a 50% chance each enemy turn of the unaware stack adding a zombie to the current enemy zone. If the board is full of enemies the card will instead be added to the red stack.
- Occasionally (and sorry its not shown) there will be a green card in the red stack. This is an event card. Good or bad things can happen when its the enemies turn. You can trigger them on your turn by using Initiative though (explained below) I’ll leave this one to your imagination on what can happen! spooky.
- On the right hand side we have the Region Noise Indicator in short form. Its the same as on the map that shows you your current noise bonuses so you can review them again while in combat.
- On the lower right side we have a button called Initiative with a number attached to it. Each turn you can press that button for as many active mercs you have on the field.
- Initiative does a few things so be careful of using it!
- It restores stamina to your mercs, but also causes the enemy to gain Rage pips (explained below).
- It will also cause the current raised card in the Aware stack to immediately enter the enemies combat zone if a spot is available. If there is only 1 enemy on the field and you press that button 5 times then 5 enemies will be added to what you are currently fighting.
- If the enemies active fighting zone is full of enemies then initiative will then instead add an unaware card to the aware stack! so be careful!
- The middle is comprised of two sides. The enemies combat zone/field and your mercs zone/field. I use zone/field interchangeably, sorry about this.
- Your side can only contain your mercs, a taunt dummy, an ammo pack, or by using an item on an enemy that makes it fight for you for a few rounds.
- The enemy zone can contain Zombies, Interactive objects, barricades, or explosives.
- The enemy card has a pop up appear when you mouse over it. It shows additional information about the enemy. You can read this part yourself as it just shows how much blind they have, current fire damage, etc.
- The Default card has a few icons on it. There is the rage icon, the level icon, the attack icon, the amount of attacks icon, and the health icon. Most of these are self explanatory. I will explain how rage works though.
- Rage is divided in to 18 pips. Each attack the enemy makes adds 3 pips. each attack you make adds 1 pip – this includes each individual shot from a ranged attack. 6 shots means 6 pips.
- there are 3 stages of rage. Purple, Yellow, Red. This is doubly represented in the amount of attack icon that shows a colored-in hand at the base of the card.
- For each rage stage the enemy gains 1 attack. Purple is 1 attack, yellow is 2, and red is 3 attacks.
- If an enemy is attacking and they are at least 7 pips their attack will bring them in to yellow rage which will immediately grant them the second attack. Same with yellow in to red rage.
- The lower left of the screen has six icons:
- The first icon, the two people, is how much noise your mercs make at the turns end.
- The hand icon is how many action points you have for this turn.
- The blue/red icon is loud vs quiet levels – this feeds in to the region noise indicator to determine your bonus for being loud or quiet at the missions end.
- the multiple card icon is the overflow deck, if your hand is full a card will enter this overflow deck. On your next turn if a hand slot is available 1 card inside the overflow deck gets added back to your hand, in order of it entering the overflow deck.
- The backpack icon is how many raw supplies you’ve gained so far from the mission.
- The grenade icon is your current additional explosive damage. Some mercs add explosive damage so this is an easy way to track it.
- Lower left shows the run icon, click it and then the red pop up to flee the battle. There is no penalty.
- Combat Log on the left side shows additional information such as damage dealt or received.
- There is no need to have the log open unless you are specifically looking for damage values on a combo.
- Your squad’s combat power is shown next to run.
- The bottom of the screen (currently) contains the card selection screen. At the start of each turn you can select 1 or 2 cards to add to your hand depending on your “Tactical Advantage”. If you succeed the % roll check of Tactical Advantage then you can choose 2 cards that turn instead of 1.
- Tactical Advantage is baseline 10% chance to occur. Each merc type has a built in modifier to Tactical Advantage. Additive. For example Commando and Enforcer have a 1% chance multiplied by their rank(level). Leaders add a 2% chance per level and Tacticians add a 3% chance per level.
- So lets say you have a level 10 Commando, Enforcer, Leader, and Tactician. That is the baseline 10% + Commandos 10% + Enforcers 10% + Leaders 20% + Tacticians 30%. For a total of 80% chance to draw 2 cards instead of 1. Yes this value can reach 100%.

- This picture shows your current hand. The little blue pips represent Action Points just like the hand icon on the left.
- Action Points start at 1 and you gain 1 point per turn; the very first turn if you have a second merc you gain a special card that immediately grants 2 more action points on the first turn.
- As shown, you can drag items to the bottom of the screen to store that item in your backpack for its AP cost. Any item left in hand when you finish a part of a mission will go in to the overflow deck for the start of next combat in a mission. This is the only thing that carries over to the next sectioned combat in a mission aside from health/durability values.
- The number in the bottom left is your hand size. Tactician can grant +1 to this hand size.
- Top portion shows currently equipped consumables on your mercs. Drag them to your hand in order to use them.
Merc Type: Commando
In this section I want to talk about the Commando merc class. What is their role, how good they are, should you pick one or many, what their skills are like and stuff of that nature. Skills are at the end of the section.
First things first, what is unique to a commando?
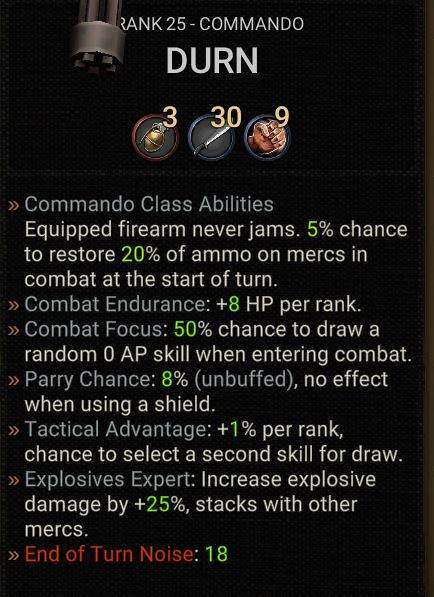
- A commando can never have their firearm jam and they have the chance to restore ammo at the start of each turn. This has a chance to occur with each commando you have. Three commandos, 3 chances at that 5% to occur.
- Combat Endurance means for each rank/level your commando has he gains 8 additional health. Just by leveling to 10 it means you’d have 80 additional health.
- Combat Focus is just a chance to draw a free skill when you start a combat or summon a new merc to the field.
- Parry chance is self explanatory
- Tactical Advantage of a commando is 1% per rank, this will not change. A level 25 commando offers 25% additional advantage.
- The commando brings 25% explosive damage as long as its on the field. Only the Tactician and commando have this class ability; though the Tactician is 50%.
Well thats good and all, but what is the Commando good at in terms of weaponry?
- Commandos are Sharp weapon specialists. They gain class skill bonuses from using sharp weaponry. Namely they have four specific talents for sharp weaponry.
- Razor Sharp is a skill that increases your sharp weapon damage by up to 20% when its maxed out.
- Sashimi gives your sharp weapon a chance to strike between 3-5 times for 90% damage per swing when maxed out. This affect actually stacks. If you play Sashimi on the same target it becomes 180% for 3-5 swings each attack. The effect lasts until the current combat ends.
- They have Blade Mastery. All sharp and ranged crit chance is increased by 25% as long as a sharp weapon is equipped.
- Execute is a raw damage increase for one attack. The damage increase is a simple multiplier. 1/5 gives 200% damage, meaning if you deal 100 the next swing will instead deal 200. All moves except Power Strike (enforcer) behave this way for % increases.
- Does this mean Commando can’t use Blunt weaponry and Shields? Not necessarily, your playstyle can use whatever you like. It may not be optimal but even on hard difficulty you can play very sub-optimally and clear the game. Things like Flaming Strike work even with blunt weapons(not shields). And a blunt weapon can be combo’d with Flanking Maneuver and an enforcer’s skill for interesting effects! No spoilers here, discover that one on your own with this hint!
- Commandos are also Ranged specialists for pistols, rifles, SMGs, and MGs.
- Commandos have two main ranged weaponry playstyles. Pistols and full auto weaponry. The skills for these two weapon types have some overlap but things like “Full Auto” don’t work with pistols; but the Urban Gunslinger does affect your automatic weaponry with its ranged buff.
- Commandos are the only class capable of reaching 100% accuracy with automatic weaponry specifically due to the effects of Full Auto.
Okay so now we know how a commando is useful, but what about his skills, what should I focus?
- Out of all the commando skills available the most powerful ones are: Sashimi, Flaming Strike, and Flanking Maneuver. Breach is a close fourth, but not as useful early on.
- Sashimi can be further empowered by using Execute on the same target as Sashimi. So if you have 100 base damage, use a full-rank Sashimi to gain 90% damage and then apply a 1/5 rank (200%) Execute then instead of each swing dealing 90 damage each swing will instead deal 180 damage.
- Flanking maneuver pairs with Flaming Strike very well since any attack with a blunt/sharp weapon counts as a weapon strike so flanking maneuver will cause Flaming Strike to be applied upon enemy entry to the combat field.
Conclusion: Should I pick a Commando?
Commandos are all-rounders that are generally good to have 1 or 2 of if you want a well rounded comp. They are high damage deals and very tanky; and their skills are quite powerful. You can even have your team mostly comprised of commandos if you so wish! they are just that good. No merc is required to clear the game; the only merc i’d venture to say is the closest to being required is bringing at least 1 Tactician; still very doable without it though.
Important Note
A noteable thing about skills! the more a skill is used the more health your merc will have! This is a bonus inherent to every single skill. Skills that activate passively can bring great health boons to your merc. But be aware! if you have no ranks in the skill, such as being 0/5 in it you will NOT gain the health bonus! This is not to say that you should take every skill. Pick the ones that suit you the best so they appear more often in your selection in combat.
Merc Type: Enforcer
In this section I want to talk about the Enforcer merc class. What is their role, how good they are, should you pick one or many, what their skills are like and stuff of that nature. Skills are at the end of the section.
First things first, what is unique to an Enforcer?
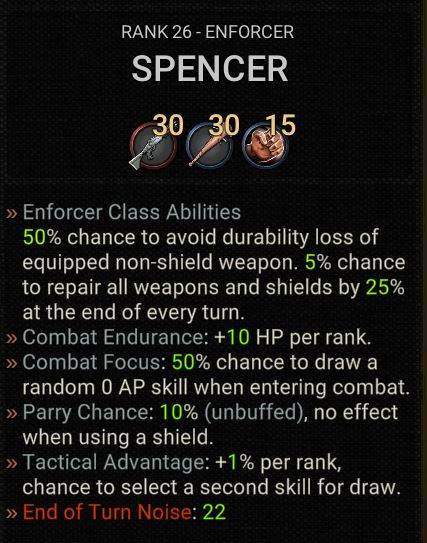
- Enforcer has a 50% chance to avoid durability loss upon swing. They also have a similar 5% chance per enforcer to repair weapons by 25% every turn. Enforcers are made to last with their ability to ignore dura loss. This includes when swinging at enemies with armor!
- The Enforcer is the second tankiest merc (if not using a shield that is) with a whopping 10 health per rank/level on your merc. Commando wins out due to how much health scaling they get from passives on skills.
- Combat focus is the same across all mercs.
- They have the highest base parry in the game at 10% initially.
- Similar to commando they have 1% per rank/level of gaining Tactical Advantage.
Well thats good and all, but what is the Enforcer good at in terms of weaponry?
- Enforcers are shield, blunt, and shotgun specialists.
- Enforcers have an entire skill tree dedicated to shields. Every single skill in that tree is based on a shield. The skills allow them to multi-hit, repair, arm a new shield, and even auto attack with a ranged follow up on using a shield attack.
- Enforcers also have nearly an entire tree dedicated to blunt weaponry. They can gain more crit, more raw damage, and auto-stun if a blunt weapon is equipped by using the Pummel skill.
- Enforcers are shotgun masters they can gain a skill to multi-hit with shotguns for a powerful one two punch.
Okay so now we know how an Enforcer is useful, but what about his skills, what should I focus?
- Since Shield and Blunt are not useable together I will say what shield skills are better in a different section. This section will focus on Blunt/Shotgun playstyle.
- For Blunt/Shotgun the most important skills are Pump-Action, Assist, Blunt Mastery, Power Strike, Pummel, Melee Proficiency with Improved parry being a close runner up.
- They have quite a bit of skills that are good! I would advise following the Bruiser skill tree first since it up front offers the most bang for your buck in terms of early game power. Blunt Mastery offers raw crit, Melee Prof offers free early game damage, and Power Strike offers instant stamina regeneration.
- Important: Power Strike does not currently stack with Execute or Pummel. (it will be fixed in the next experimental branch update). Power Strike also is 1 stage higher for damage output. 200% is actually a 3x modifier instead of 2x modifier. so 100 is 300 instead of being 200 damage when used with a 1/5 Power Strike.
- For shield users the most important are the following:
- Pump-Action, Shield Mastery, Closure, Skull Crush.
- Pump-Action is fueled by Closure, which allows the Enforcer to follow up a shield attack with a ranged weapon strike. This is combination with Shield Mastery(chance to attack again on shield attack) can allow for an infinite combo of zombie destruction.
- Skull crush in combination with Shield Mastery can allow even a non-pump action Enforcer to deal heavy damage by gaining a 5x bonus to targets that are stunned. Skull Crush stack indefinitely as well. You can even have 5000% bonus damage instead of just 500%!
- Assist is good in general because it allows extra attacks per turn. Plain and simple.
Conclusion: Should I pick an Enforcer?
An enforcer is quite a powerhouse alongside a Commando. They work well in tandem with durability repair and the commando’s ammo regeneration. Even on their own they can wipe out zombies with a vengeance due to their pump action skill. Not required to beat the game by any means, but a powerful contender in your arsenal.
Important Note
A noteable thing about skills! the more a skill is used the more health your merc will have! This is a bonus inherent to every single skill. Skills that activate passively can bring great health boons to your merc. But be aware! if you have no ranks in the skill, such as being 0/5 in it you will NOT gain the health bonus! This is not to say that you should take every skill. Pick the ones that suit you the best so they appear more often in your selection in combat.
Merc Type: Leader
In this section I want to talk about the Leader merc class. What is their role, how good they are, should you pick one or many, what their skills are like and stuff of that nature. Skills are at the end of the section.
First things first, what is unique to a Leader?
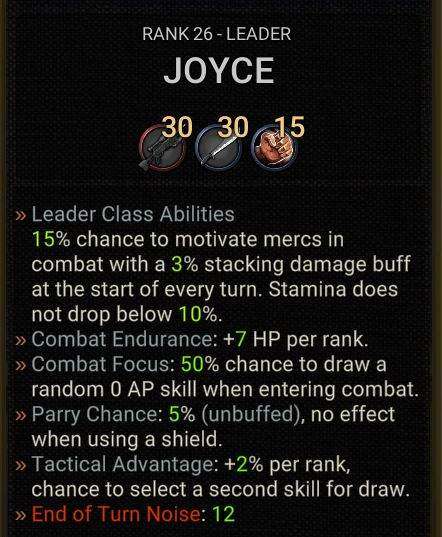
- They have a 15% chance to cause a stacking 3% damage Buff(modified by a skill!). What does this actually mean? This mean that per Leader you have on the field all mercs can gain 3% more baseline damage every turn. If your base weapon deals 100 damage and this buff procs you will have 103 damage. Then 106 damage, then 109 damage. its 3% for the baseline 100. Additive not Cumulative.
- They gain 7 health per rank/level.
- Combat Focus is the same as other mercs
- Their Tactical Advantage is 2% per rank instead of 1%! This means a level/rank 10 Leader grants an additional 20% to your advantage.
Well thats good and all, but what is the Leader good at in terms of weaponry?
- Well unfortunately, they have no weapon strength. No weakness either. Leaders are dependent on the other mercs you picked. If you have a Commando then Sharp weaponry is good due to Sashimi.
- My recommendation however is Sharp for a melee and a bow/crossbow for the ranged weapon.
Okay so now we know how a Leader is useful weapon wise, but what about his skills, what should I focus?
Leaders are my second favorite in terms of utility skills. They have so many useful skills for controlling the enemy or buffing your team.
- Mass Calm, Calm Down, Adept Initiative, Retaliation, Swift Retribution, Leadership, Quick Reflexes, Apocalyptic Pet! Hoo, they have a lot thats good here.
- Mass Calm and Calm down allow you to control the rage of the enemy, effectively neutering their damage output. The more ranks in these skills the longer the effect lasts.
- Adept initiative gives you a chance at a free attack while Retaliation gives a chance to strike back upon parry
- Swift Retribution and Quick Reflexes allow you to strike again, and again, and again!
- Apocalyptic Pet gives stamina back and ranged accuracy! This is vital to early game.
But George, all of these skills are in different trees which Tree should I focus first?
- My advice is the Motivator tree with getting 3/5 in Calm Down from the Neutralizer tree. The Grandmaster tree is more of an optional tree.
Conclusion, Should I pick a Leader?
I would highly recommend one. Command and Enforcer are strong, but they can still be overwhelmed if too many enemies appear on screen. A Leader allows you to control the enemy while buffing your team. This is quite powerful in combination with other abilities. Not required, but highly recommended. Leaders have one downside: Low Health. Their abilities and passives do not occur as often as Enforcer and Commando, on average they will have half the health of your Enforcer and Commando.
Important Note
A noteable thing about skills! the more a skill is used the more health your merc will have! This is a bonus inherent to every single skill. Skills that activate passively can bring great health boons to your merc. But be aware! if you have no ranks in the skill, such as being 0/5 in it you will NOT gain the health bonus! This is not to say that you should take every skill. Pick the ones that suit you the best so they appear more often in your selection in combat.
Merc Type: Tactician
In this section I want to talk about the Tactician merc class. What is their role, how good they are, should you pick one or many, what their skills are like and stuff of that nature. Skills are at the end of the section.
First things first, what is unique to a Tactician?

- All noise is reduced by 15% for each Tactician. 10% chance to remove noise and increase hand size. Simply put this means with a Tactician you are less noisy, thus reducing the amount of enemies coming in to the combat field on the enemy turn. By simply having a Tactician on the field your hand size is 7 instead of 6.
- Tacticians have the lowest health gain at only +5 per rank/level
- Combat Focus is the same across all mercs
- They have the lowest parry chance at only a baseline of 3% parry
- Their Tactical Advantage is a whopping 3% per rank/level. At level 10 they give a huge 30% additional chance for advantage!
- They grant a huge 50% explosive damage for each Tactician in play. You can entirely have an explosive build with a few of these bad boys.
Well thats good and all, but what is the Tactician good at in terms of weaponry?
- Well unfortunately, they have no weapon strength. No weakness either. Tacticians are dependent on the other mercs you picked. If you have a Commando then Sharp weaponry is good due to Sashimi.
- My recommendation however is Sharp for a melee and a bow/crossbow for the ranged weapon.
Okay so now we know how a commando is useful weaponry wise, but what about his skills, what should I focus?
- Smoke Grenade, Multiple Solutions, Quick Learner, Spike Trap, Barricade, Snap Lighter, Pyrology. Dynamite and Siphoned Petrol are runner ups.
- The Surveyor tree is mostly not worth it. Smoke Grenade is a phenomenal skill, but the pay-out for this tree is Leader Them away which returns enemies back to the Aware Stack. Early game its simply not worth it to invest so many points in this tree as you will be heavily weakened because of it. Highly Recommend Smoke Grenade however because no damage income is good damage income.
- The Strategist skill tree is the most important as it has Multiple Solutions in it. This is by and far the strongest skill in the entire game. Cooldown reduction is so huge that I almost want to say a Tactician is required for your group; but the game is still entirely doable without one even on hard difficulty.
- Spike Trap causes the enemy to damage itself, the more rage they have the faster they will die.
- Barricade is useful since it can block up to 4 enemy slots, severely limiting the amount of enemies you have to face.
- Snap Lighter and Pyrology offer % based damage and blinds. Do not underestimate a blind!
All in all, the best tree to focus is Strategist. Multiple Solutions is simply too powerful.
Conclusion, should I pick a Tactician?
I want to say yes. You don’t have to, its not required, but if I had to recommend any merc its 100% Tactician. Cooldown reduction is far too strong to pass up and will make your early game so much more bearable if you are new. Almost any weird combo can be enabled by Multiple Solutions! bring 1 Tactician always!
Important Note
A noteable thing about skills! the more a skill is used the more health your merc will have! This is a bonus inherent to every single skill. Skills that activate passively can bring great health boons to your merc. But be aware! if you have no ranks in the skill, such as being 0/5 in it you will not gain the health bonus! This is not to say that you should take every skill. Pick the ones that suit you the best so they appear more often in your selection in combat.
Be the first to comment