Keep in mind that a factor of this game is intended to be the discovery, failure, and repetition of runs, and this will mostly concern some early game tips, as after a certain point you have either scaled to a point that your chosen difficulty is achievable, or you will have cascaded into run failure. This guide is mainly based on the first Elder that you can select and before unlocking the later memories- ie. just starting the game.
First Winning Game Guide
Starting Out
In short, a ‘strong map’ is one with a bunch of open space, a ton of forest adjacencies and a handful of stone adjacencies. Meaning; open, available tiles adjacent to either of these tiles. Placing your town centre somewhere in the open space is ideal, but if you can’t, you can make it work later with some hassle. Open spaces next to stone get a bit stronger with the water extraction tech ‘mountain spring’.
My first suggestion is to research your 2 per turn research station first thing – literally doubling your research early when pips are short is too powerful, and lets you get early hunting/bbq. (the bench/dwelling adjacency tech tree is straight much stronger in my opinion for having easier adjacencies, being better with Scriptorium, and being twice as space efficient at third level). Place near forageable items, as these are temporarily stronger than the Forager building and will support you until you can grow your population some. Only get as much food as you need, don’t let pips get hungry or they’ll add to Domain counters with effects you can’t counter until later.
Boom woodcutting to get houses to get pips to get food to get… Grow pops, throw any idle pips on Foragers until you need them. Get so much wood. Huts will also help you expand your territory, and are even affected by the +1 territory boon. A tip, however- there is no benefit to adjacent housing, but a ton of things gain huge bonuses for adjacency to houses. Cabin rings are your friend in mid-game.
Depending on your difficulty, split this population boom priority with boosting research and gaining several instances of the early Domain techs. These are the social buildings under the Community Tab for Hope, The Cold/Heat items under the same, and the Health buildings under Education. On day 10, you will know what omens you have and what your Doom is. Focus on the Domain Buildings for which you have Omens or a Doom event.
If you look ahead in the tree and see you have no Omens in Cold/Nature/etc, you can get away with ignoring it completely if you want to focus your research- yes, even if there is an event, until it generates two threat. This is because the scale of the event failure scales with the red number; it will only count up to around 5, and then stun one of your pips for three turns or do something very minor. Keep in mind that there is a lag of several turns before you can start researching, then countering a Domain.
The higher your difficulty, the more of your production and research you must focus on Domain Tech, the slower you will boom and stabilize.
My suggestion is that after getting about 6 research per turn, exclusively pay attention to Domain Tech and Food Tech until you feel you are stable – ie, able to manage a potential event from every Domain. You don’t need to stock up food a lot, even if the game tells you it’s crucial for winter. The ultimate goal is to reach a point you can sustain Domain buildings and the pops that sustain or staff them sufficiently to win the game.
Food, Food, Food
Why Foods Per Action?
My take here is that you can judge all things in this game through ‘what proportion of my pips are dedicated to food’, because less actions spent on Foods mean more actions spent on progressing your production, population, research, etc. I encourage you to conceive of the game this way for more success in higher difficulties even if you don’t use my specific advice.
Foraging
All things must be compared to Forager – Berry Picking. Bang a cheap building next to any tree, and a single pip can produce 2 Foods Per Action, meaning you can sustain your entire game indefinitely through any season (yes, even Winter) if half your pips are picking berries. We’ll call this value Foods Per Action (FPA). This gets even harder to beat after the +1 to all outputs with forest adjacency boon in Prophecy IV.
Tomato Plants
Tomato Plants will give you 3 FPA with only adjacency to a water source. ( 24 / 8 = 3, where this is 64 tomatoes; 24 for 6 harvesting actions, one Forager seed gathering, and 1 water gathering.) With tilled fields, this increases to 4.5 FPA. ( 36/8 = 4.5, where 68 tomatoes; 36 for … ) This value increases slightly with mountain spring or better water tech.
Hunting/Fishing
Compare to Hunting/Fishing. Build one hunting lodge per animal tile or fishing shack per fish tile. If there are three within 2 tiles of the location, you can use the upgraded version without adding micro to your between turn phase and wasting early tech/resources. With 1 Hunting/Fishing, a dwelling and barbeque, your pips gain 7 food a turn for 3 actions for 2.8 FPA with a base wood camp. A wood stack makes this about 3.1 FPA.
A warning- if using the Great BBQ (GBBQ) with adjacencies, the food efficiency actually decreases. The difference is 1 fish/7 food for the BBQ, or 2/10 for GBBQ, which could only be said to gain a free pip and one wood per turn – that is, 4.44 FPA with a wood stack at double the cost in raw fish (which can be hoarded for winter).
The GBBQ, therefore, only provides about 70% of the food per fish in addition to needing a 30 research and specialized job. With upgraded hunting, three BBQ and a single wood stack, you can make 21 food per turn, for a combined roughly 4.42 FPA (4.75/21 – 3 BBQ, 1 Hunter’s Lodge, 3/4 wood from wood stack). This is a better use of the pips than most other food jobs anyway. To pull back from the math for a second, if you get 2 of these groupings of 3 animals, you can feed 42 pips with 9 pips. That’s near good enough to finish some playthroughs. Good stuff.
Finally, time for a doozy. Bread.
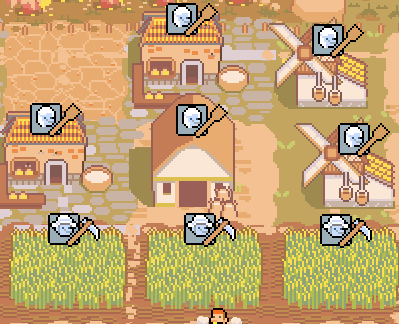
Windmills + Bakeries:

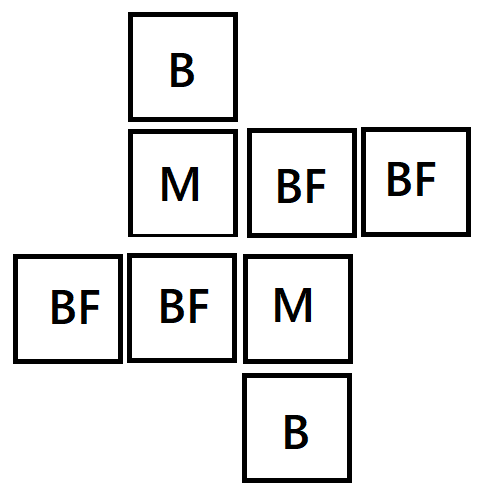
Four Barley fields (BF), two mills (M), and two bakeries (B) generating (434 = 48) Barley over an 8 turn cycle. This is sufficient to allow a 100% uptime on the mills, consuming 3 Barley per turn apiece for (328=48 Barley) and producing (48=32) flour over the 8 turn cycle. The bakeries, similarly, consume (228=32) flour, and in turn produce (508=400) Foods per 8 turn cycle. As a bonus, this does not require tilling the fields, and you can always do so later to expand. (Yes, you can till a tile already planted, it’s great.)
At 4 growing actions, 8 Milling actions, 8 baking actions, 2.66 seed foraging actions (8/3) for a total of 23 actions, we come to water.
This process requires a whopping 52 water (328, +4 from crops) per 8 turn cycle. In terms of tech, at one water per action, this is (400/(52+23)) for 5.3 FPA. At 2 water per action, this is (400/(26+23)) for 8.16 FPA. Finally, at 4 water per action, this is (400/(13+23)) for 11.1 FPA.
Sorry for the basic picture, but I started three runs this morning looking to get a picture and only got the Rain Mill set three times. I’ll post one if someone sends it to me.
Soy Milk Maker, Milky Bakery, Rain Mills:

For the most basic starting setup, ((6+8+6)*3) Barley that we get with a straight line of 3, we get 60 Barley in an 8 turn cycle, which is more than the 48 required to keep two Rain Mills running for the 8 turns for a total output of 400 foods in an 8 turn cycle for one flour per turn spare. In Actions, this is (9+3 growing, 58 processing = 52), or (400/52 = 7.6) FPA in a nice little 3×3. You can throw a couple of fields in to the left of this and slot a house in the empty space for your brewery if you choose to expand that way. This one does require you till the spaces.
Okay, that’s it for bread.
Threat
Threat: As defined by the game, the total sum of pips above the Domain. This affects how strong the Omen events are, as well as acting as a exponential increase in how much of their element they will produce during an Event for you to overcome. It is opposed by Protection, which is the opposite of Threat and what you generate.
This Threat tracker progresses at 1/3/7/13/20/30/45 for each Omen event. Tripping an omen will always increase the track in addition to your difficulty modifier. Two highest tech buildings with best adjacencies are often sufficient to match or straight beat out the 45/turn requirement. Three will close to guarantee it with max Threat (around 75-100 +Domain) unless you have some serious afflictions going on that can add to the 45/turn Domain value. During the Apocalypse or Doom, these values will increase an additional -/-/-/5/7/10/15 for a total of -/-/-20/30/40/60 each turn plus any difficulty modifiers as normal.
Your Protection value will reset after each and every Event or Doom. There is no particular need to exceed it, as while the game hints you can gain greater rewards, the break points are unclear, doing so can be costly in terms of resources, and the result is extremely random.
You can in fact freely save-scum the result of Domain Events if you choose to do so immediately after they roll, but there is presently a visual bug associated with it that may occur involving the Domain tab being very large. Quitting out and restarting the game is necessary to fix this issue.
Final Notes
Be warned that performance issues may begin to exist around 50-60 pips. At 67 pips I sit at 22-30 FPS with a GeForce RTX 4060 Ti and Ryzen 5 3600 6-core. This will also cause temporary freezing during sorting and allocation operations.
Consequences for events and omens get much more harsh at higher pops. Failing a health event at around 60 threat with 70 pips rendered about 30 of them sick, which added +30 to the Health Domain Threat per turn. This was a problem, as there was an event straight after that killed 40. Short version – while high pop is strong, be warned the events will become incredibly threatening especially in sequence and you will suffer.
While Bourgeois citizens can perform the highest end jobs, they cannot do anything else. Don’t make any more than you need.


Chickens and egg gatherers are also not bad, if you have foragers. You can get 3.0 FPA or 3.5 if you make it bigger, year round. Doesn’t require any replanting or management after it is set up and is generally low tech. The 3.0 FPA version goes like this.
E=egg gatherer C=chicken pen D=dwelling
ECECDC
CDCECE
It can be expanded in rows or columns following the same pattern. Adding a third row that is the same as the first increases the overall efficiency to 3.5 FPA. Also you will need one forager collecting seeds per chicken pen.
Tomatoes should also not be dismissed outright. If you have access to a regular well you can build them in a cross-shape with the well at the middle. With tilled soil this allows two pips to continously harvest for 12 food per day. Including the need for water, seeds and sowing you should end up with an action cost of 2 (Harvest) + ~0.3 (Seeds) + ~0.3 (Sowing) + ~0.15 (Water) = ~2.75, which equals ~4.3 FPA.
That aside: I do agree that Foragers are critical to enable the early game population boom and supply your town until you can establish the more efficient food production chains & sufficient storage space for winter.
Hello & thanks for the guide!
Two notes regarding your Bread (and Tomato) calculations:
(1) Growing a crop does not take a pip action, so it shouldn’t be counted towards the FPA.
(2) The Bread setup can be optimized a lot.
If you run a 2×2 tilled Barley field, a Mill with 4 adjacent fields of any type & an unstaffed Mill with two Bakeries you get ~7 Barley -> 3 Flour -> 37.5 Bread per turn at a cost of ~1.6 (Barley field harvesting + Sowing & Seed & Water Production) + 1 (Flour) + 1.5 (Water) + 1 (Baking) + 0.5 (Baking every other day in the second Bakery) = 5.6 actions, for ~6.7 FPA (under near worst-case circumstances, e.g. low tier water production, no additional Barley field adjacency, etc.).
So not only does a properly developed Bread chain provide better FPA, but it also needs less space: 4 Barley Fields + 2 Mills + 4 Adjacency Fields + 2 Bakeries + 2 Wells + 1 Seed Forager = 15 tiles (which would produce 30 Food per turn via Foragers).