
Elden Ring can be especially challenging for new players who don’t know how to build a character efficiently. And even if you have a build planned, where do you go first? What do you do? I have compiled and tested several effective methods for leveling a new character, each build a unique playstyle.
Builds and Walkthroughs
Guide Introduction
Elden Ring can be especially challenging for new players who don’t know how to build a character efficiently. And even if you have a build planned, where do you go first? What do you do? I have compiled and tested several effective methods for leveling a new character, each build a unique playstyle.
So far I have a guide on how to make a bleed build which excels at boss fights, an intelligence build for people who enjoy casting sorceries, and a faith build for people who want to cast incantations. Each guide begins with a list of things to do that will power-up your character, and a section that shows which stats to level up in order as you acquire runes throughout the game.
I didn’t write strength or dexterity build guides because they are very similar to the bleed build. All you do differently is instead of speccing into arcane, put the rest of your points into strength or dex, keep upgrading the bloodhound’s fang, and use whichever strength or dex weapon you like once you have enough smithing stones to upgrade it.
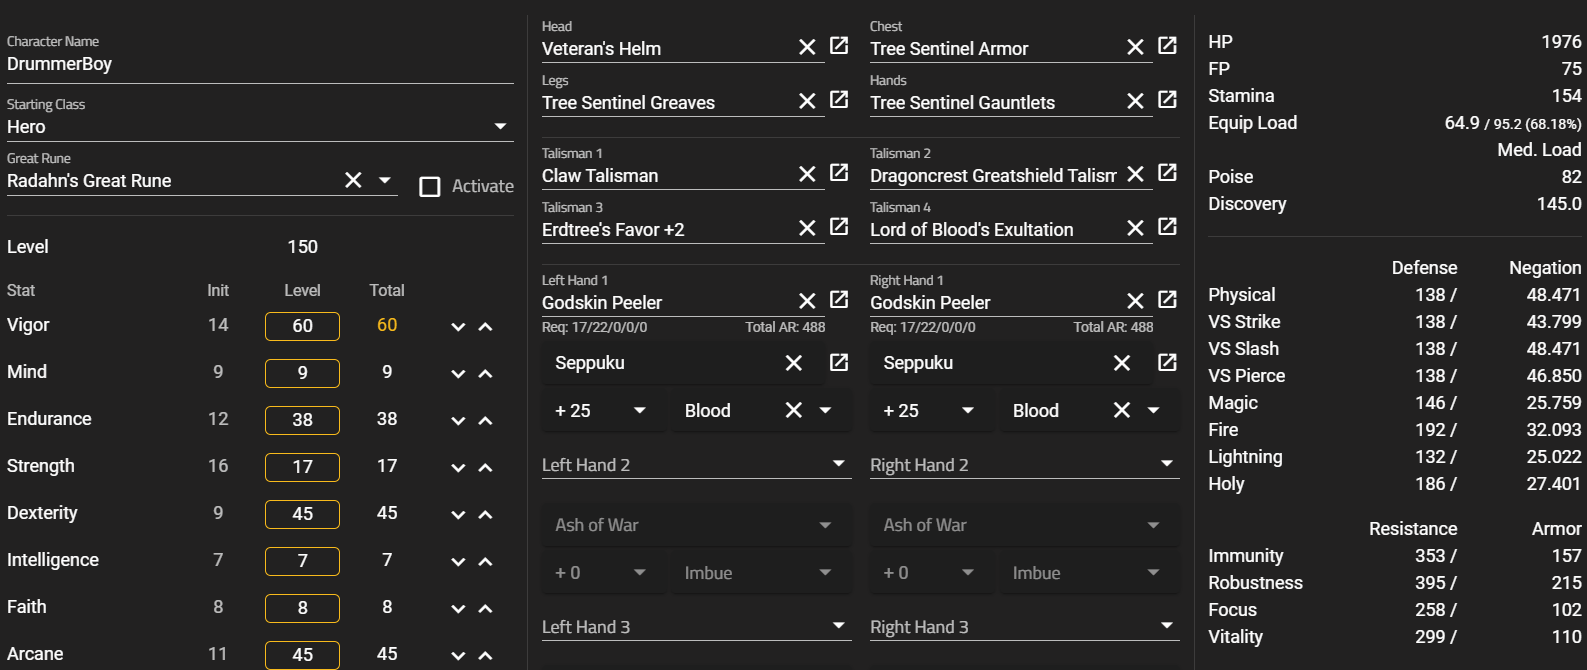
Bleed Build Introduction
My bleed (hemorrhage) build is designed to dish out the maximum amount of bleed buildup reasonably possible. This will let you melt any boss that’s not completely immune to bleeding, and one-shot weaker foes with low bleed resistance. The best way to do this is to dual-wield godskin peeler twinblades and jump attack. Jump attacks aren’t the only move you can use however, and I also provide alternate weapon options if twinblades aren’t your style.
The reason twinblades are such powerful bleed weapons isn’t just because their jump attacks hit 4 times, curved swords have the same ability, but because twinblades apply the same amount of bleed buildup as greatswords, while their attack speed is much faster. I like leveling with a bleed build precisely because bleed has been nerfed so many times. Now the build is more balanced and doesn’t make the game too easy. If you follow the bleed build guide, you’ll see that bleed is still very strong if you build for it.
Bleed Build Early Game Points of Interest
This is a short list of things that will increase your character’s power early on. This is not a speedrun, so make sure to explore all over and level up before trying to complete the later steps on this list. I linked a map with the level ranges of each zone at the bottom of the guide.
- Choose the hero class and pick the golden seed starting gift. You can alter your appearance in-game too. At a site of grace you can allot the charges of your flask of crimson and cerulean tears. I recommend putting everything into your flask of crimson tears. You can do some of these next steps out of order, though the later steps are more difficult.
- Run north to the church of Elleh and talk to merchant Kale, head up the road northeast and pick up some kukri near a fire, then head up to the gatefront ruins site of grace where you acquire Torrent.
- Grab the map below a pillar in the center of the ruins then look for a staircase on the south side of the ruins leading underground to a chest containing the whetstone knife.
- Ride north past the stormgate and talk to Roderika. Grab the golden seed and stonesword key nearby.
- Kill the mounted Godrick Knight patrolling the east-facing cliff in Stormhill to get the golden vow ash of war.
- Warp back to the gatefront ruins site of grace and ride down the road to the east and talk to Boc the seamster who’s disguised as a bush. During daytime, cross the bridge and pick up a somber smithing stone 1 from a corpse sitting on a chair. Keep going until you are east of the lake and loot the great épée from a chest guarded by several enemies atop a hill.
- Level up your dexterity to level 17 at a site of grace, two-hand the great épée, then use it to kill the Bloodhound Knight in the Forlorn Hound’s Evergaol to the south. The great Epee’s weapon art “impaling thrust” deals high damage and has long range, perfect for dealing with the dangerous and mobile Bloodhound Knight. A couple of these should stagger him allowing you to ripost for considerable damage. Keep in mind that heroes only start with 9 mind stat, so don’t miss the weapon art or you’ll run out of FP and be forced to resort to jumping attacks to finish off the Bloodhound Knight. Once you’re victorious, equip the bloodhound’s fang curved greatsword he drops and level it up to +1 at the Church of Elleh smithing table.
- Take the road east from the gatefront ruins site of grace to the Third Church of Marika to get the flask of wondrous physick, then enter the portal just north of the church to warp to the Beastial Sanctum.
- Resting at a site of grace in Dragonbarrow will grant you access to Roundtable Hold. Talk to everyone in the Hold, and buy a dagger from the Twin Maiden Husks for 400 runes. Apply golden vow to the dagger. This can be used in your second main-hand slot to apply the buff before boss fights. Buy the knight armor set excluding the helmet for 10,500 runes as soon as you can afford it. You’ll be wearing this set for a while.
- Talk to Gurranq, the beast clergyman, in the Beastial Sanctum. Snag the golden seen down the road, then parkour onto roots below the southwest cliff next to the Beastial Sanctum and down the stone pillars to grab the dragoncrest shield talisman. Wear it if you like living.
- Back in Limgrave, take the road south across a bridge until you reach the Weeping Peninsula. Grab a nearby stonesword key, and further south down the road you can find a somber smithing stone 2 just east of Castle Morne that you can use to further upgrade your weapon. Next, buy a lantern from the isolated merchant at the western part of the peninsula for 1800 runes. Use the lantern to illuminate dark places.
- The isolated merchant in the southwest corner of the weeping peninsula sells a lantern for 1800 runes which is enormously useful in dark places. The lantern can go on your hotbar, alongside the ring to summon torrent, the flask of wondrous physick, and your flask or crimson tears.
- Starting in Limgrave, take the road east to Caelid, run past the Rotten Avatar and into the minor erdtree catacombs. Grab the imp head (wolf) inside the catacombs, it’s a direct upgrade to the knight’s helmet.
- Warp to the Bestial Sanctum and run south across the main bridge this time, past the dragon, down the road, then make a sharp left up the hill to Fort Faroth. A golden rune 12 worth 7,500 runes can be found in the fort, as well as half of the Dectus medallion. Use bloodhound’s fang’s innate bleed status buildup to kill the Great Dragon Greyoll. Make sure to use a gold pickled foul foot right before Greyoll dies to receive 30% extra runes from killing it. Use the runes to level up according to the stat section of the guide.
- Grab the other half of the dectus medallion from atop Fort Height in Limgrave, south of the third church of Marika where you collected the flask of wondrous physick. Kill the Godrick knight inside the fort to get the blood blade ash of war.
- Kill the Erdtree Avatar in the Weeping Peninsula to receive the crimsonburst crystal tear and opaline bubbletear. Equip them in your flask of wondrous physick.
- The erdtree’s favor talisman is found in Fringefolk Hero’s Grave near the starting area and requires two stonesword keys to unlock. Down the second ramp where the path narrows you can jump down the right side onto a secret platform, at the end of the tunnel is the talisman. You can throw a kukri to deactivate the fire breathing statue. Be warned, the talisman is heavily guarded so be swift. If instead of jumping down onto the secret platform, you continue down the ramp and turn right, you’ll find a spectral banished knight at the top of that ramp. Optionally, kill him to loot the dragon communion seal.
- Enter Stormveil Castle in northwest Limgrave and defeat Margit the Fell Omen to get a second talisman pouch, and equip the erdtree’s favor talisman.
- Pick up the claw talisman near the rampart tower site of grace in Stormveil castle, high up on the roof of a tower.
- After exploring a bunch and talking to all NPCs in Limgrave and the Weeping Peninsula, ride past Stormveil castle, hugging the east-facing wall, to reach the next zone: Liurnia of the lakes and pick up somber smithing stones 3 and 4 from corpses sitting on chairs north of the Academy of Raya Lucaria.
- Kill the Rotten Avatar in northwest Caelid to get the greenburst crystal tear. Equip it in place of the crimsonburst crystal tear.
- After exploring Liurnia of the Lakes, use the Dectus medallion to operate the great lift of Dectus in north Liurnia to access the Altus Plateau. Head up the road to the north, then turn west and jump down to the Second Church of Marika and kill Eleonora, the bloody finger, to get Eleonora’s poleblade.
- Head east up the road to the warpgate by the collapsed bridge that allows you to cross it, then head east up the road to Dominula, Windmill Village. Kill the Godskin Apostle at the top of the hill to collect the godskin stitcher. Apply the blood blade ash of war to the godskin stitcher with a blood infusion. Upgrade these two twinblades as much as you can and equip in place of the bloodhound’s fang, with Eleonora’s poleblade in your main hand.
Bleed Build Mid-Late Game Points of Interest
- Defeat two shard bearers (Godrick, Renalla, Radahn), and talk to Finger Reader Enia in Roundtable Hold to get a third talisman pouch. Equip the claw talisman in your third slot.
- Kill the Rotten Avatar in Dragonbarrow to get the opaline hardtear. Equip it in place of the opaline bubbletear
- On Mt. Gelmir is the Sainted hero’s grave where the dragoncrest shield talisman +1 can be looted.
- Past the wall defending the Capital Outskirts lies the Azura Hero’s Grave where the tree sentinel armor can be obtained. Equip the full set if you can.
- The final talisman pouch drops from Godfrey’s Shade in Leyndell.
- The erdtree’s favor +1 drops from the boss of the Subterranean Shunting Grounds.
- The lord of blood’s exultation drops from the boss of the Leyndell Catacombs, and should go in your fourth talisman slot.
- The seppuku ash of war drops from a teardrop scarab on the frozen lake in the Mountaintop of the Giants, and should be applied to your godskin peeler with a blood infusion.
- The Veteren’s armor set is purchasable from Enia in Roundtable Hold after defeating the boss of Castle Sol in the Mountaintop of the Giants. Equip the helm if you want to be more fashionable.
- Kill the Erdtree Avatar in the Consecrated Snowfield to get the thorny cracked tear. Equip it in place of the greenburst crystal tear.
- The dragoncrest greatshield talisman can be found near the roots of the Haligtree.
- The erdtree’s favor +2 can be found in the Ashen Capital after entering the area backwards from the Forbidden Lands.
Bleed Build Stats
This is how I recommend leveling up your stats as you progress through the game. It is not a rigid doctrine and has room for adaptation. This template is for a rune level 150 build.
- Start with the Hero class and golden seed burial gift.
- Level strength to 17.
- Level dexterity to 17.
- Level endurance to 15
- Level vigor to 20.
- Level dexterity to 22.
- Level endurance to 20.
- Level vigor to 30.
- Level endurance to 30.
- Level arcane to 30.
- Level vigor to 40.
- Level endurance to 38.
- Level arcane to 45.
- Level vigor to 60.
- Level dexterity to 45.
Bleed Build Weapons
This is a chronological list detailing the weapons I recommend using, followed by several alternative options to keep in mind. In short: the Bloodhound blade is a good weapon to get early that will carry you to the Altus Plateau where the strongest twinblades can be found. The goal of this build is to dual wield twinblades as they apply the highest possible bleed buildup and thus have some of the highest dps in the game.
Fun information about bleed: because twinblades and curved swords have jumping attacks that hit 4 times they are the two best weapon types for status effect builds, the strongest of which being bleed as it can be continuously applied with zero downtime. Bleed also deals a percentage of an enemy’s health in damage, enabling one to slay bosses with extremely high health pools with ease. Curved swords are the only weapon type with a running attack that hits 4 times, but twinblades are superior as they deal the same bleed buildup as greatswords, even though their moveset and attack speed is closer to light weapons like straight swords and curved swords which receive less status buildup from infusions.
Note that there is a penalty applied to dual-wielded weapons’ status buildup. Instead of dealing 200% buildup when landing two hits, only 140% buildup is applied. This means that instead of jump attacks dealing 400% normal bleed buildup when landing all 4 hits, only 280% bleed buildup is applied, though obviously that is still a ridiculous amount.
- The Bloodhound Knight in the evergaol east of the starting area drops the bloodhound blade, a curved greatsword with a unique weapon art that deals high damage and posture damage. This is a great starting weapon as long as you meet the minimum stat requirements. Feel free to upgrade it to +4, but don’t waste level 5 somber smithing stones on it, save those to upgrade more permanent weapons. The bloodhound blade is a dexterity weapon that also has some strength scaling. It has some bleed buildup but is too slow to proc bleed consistently. That’s ok as it has unusually high AR, and a passive ability that increases the damage of jump attacks by 10%.
- Eleonora’s Poleblade is dropped by an NPC invader at the Second Church of Marika in the Altus Plateau. This weapon has a unique ash of war that is too telegraphed for PVP, but deals high damage and posture damage in PVE. While it’s not the best weapon for an endgame bleed build, it’s great in the early and mid-game when dual wielded with a blood-infused godskin peeler, as both scale with dexterity and arcane. The biggest advantage is that because Eleonora’s poleblade is a unique weapon it can be upgraded with somber smithing stones, freeing you from having to divide your standard smithing stones between two weapons.
I recommend keeping this in your main hand at first, as during the first half of your initial playthrough you won’t have access to many good ashes of war you can put on the godskin peeler. Also, the godskin peeler will be a lower level and thus deal less damage than the poleblade until later in the game. Once you obtain the seppuku ash of war you should put the godskin peeler in your main hand, and the poleblade in your offhand.
- The Godskin Apostle in the Windmill Village of the Altus Plateau drops the godskin peeler twinblade. This is my preferred weapon for this build and the #1 thing to get in NG+ so they can be dual wielded. Because the godskin peeler is a common weapon with an interchangeable ash of war, you can give it the seppuku ash of war to enhance its already impressive bleed buildup. Once you have a second godskin peeler, you can two-hand the one in your offhand, cast seppuku, go back to dual wielding, then apply seppuku on your right hand weapon as well. Now spam jump attacks and you’ve basically unlocked easy mode.
Alternatively, if you care more about PVP or find yourself performing a lot of running attacks, curved swords are the second best weapon type to apply bleed, as they are the only other weapon who’s jumping attacks hit 4 times. They apply less buildup than twinblades but are lighter and possess the only running attack that hits 4 times.
- If that sounds appealing, you’ll want to farm two bandit’s curved swords. This is the longest, heaviest, and highest AR curved sword. The bandit’s curved sword’s base drop rate is 1.5%, and it can be farmed from the skeletal soldier who wields them in the graveyard behind the Church of Pilgrimage in the Weeping Peninsula. Just like the godskin peeler, you should blood-infuse these and give them both the seppuku ash of war for maximum damage.
- However, you don’t need to blood-infuse a weapon to make a bleed build, another option is to use a weapon that has bleed buildup by default and give it an occult infusion. Bleed buildup scales with the arcane stat naturally, and since the occult infusion causes a weapon’s damage to scale with the arcane stat, the occult infusion is a no-brainer. One of the best candidates for the occult infusion is the scavenger’s curved sword which can be looted in Mt. Gelmir. Though like the godskin peeler, the only way to obtain a second one is by going to NG+ or having a friend drop you theirs. There are no other curved swords with base bleed that can be used in an arcane build which is why twinblades are easier to level with. Blood-infused weapons deal more bleed buildup, but occult weapons typically deal slightly higher physical damage. If you want to try an occult build, drop dexterity down to 20, endurance down to 28, and raise arcane up to 80. The seppuku ash of war scales solely with the arcane stat, so it’s even more important for occult builds.
Bleed Build Ashes of War
Non-unique weapons can be infused with custom, interchangeable ashes of war, replacing the weapon-art system in Dark Souls III.
- Early game you can use bloody slash which is dropped by a Godrick knight atop Fort Haight. It deals high damage and scales with arcane.
- Golden vow boosts AR by 11.5% and damage absorption by 7.5%. The spell of the same name requires 25 faith but you can bypass this by putting the ash of war on a weapon like the dagger, and equipping that as your secondary weapon in your main hand. The ash of war gives slightly lower bonuses than the actual spell, but it can be acquired early in the game by killing the mounted Godrick knight northeast of the Warmancer’s Shack in Stormhill.
- Blood blade is dropped by a teardrop scarab in the Altus Plateau. Having a second blood ash of war allows one to dual wield blood-infused weapons. I prefer having bloody slash on my mainhand as it deals more damage than blood blade.
- Quickstep can be purchased from Knight Bernal in Stormhill, and bloodhound’s step is acquired by killing the night’s cavalry in Dragonbarrow. Quickstep is good for fishing for backstabs in pvp, while bloodhound step moves further. The main advantage of this type of ash of war is not only that they move you further than the regular dodge roll, but that the invincibility frames activate much earlier in the animation, allowing you to successfully dodge things when your reaction time would have been insufficient with a normal dodge roll. Once you acquire the black whetblade in Nokron the eternal city you can blood-infuse weapons with non-blood ashes of war like this one.
- Seppuku is an incredibly strong weapon buff that increases a weapon’s bleed buildup for 60 seconds and slightly increases its AR. It’s found by killing a teardrop scarab on the frozen lake in the mountaintops of the giants. It costs 15% of your health to cast but costs very little FP. Each cast procs the lord of blood’s exaltation talisman. Seppuku was nerfed in patch 1.07. It is still powerful, as there are few ways to increase the bleed buildup of weapons, but occult builds that relied on their high arcane to better scale seppuku now have a harder time matching the bleed buildup of blood-infusion builds. Occult builds still generally enjoy higher AR than bleed builds at least.
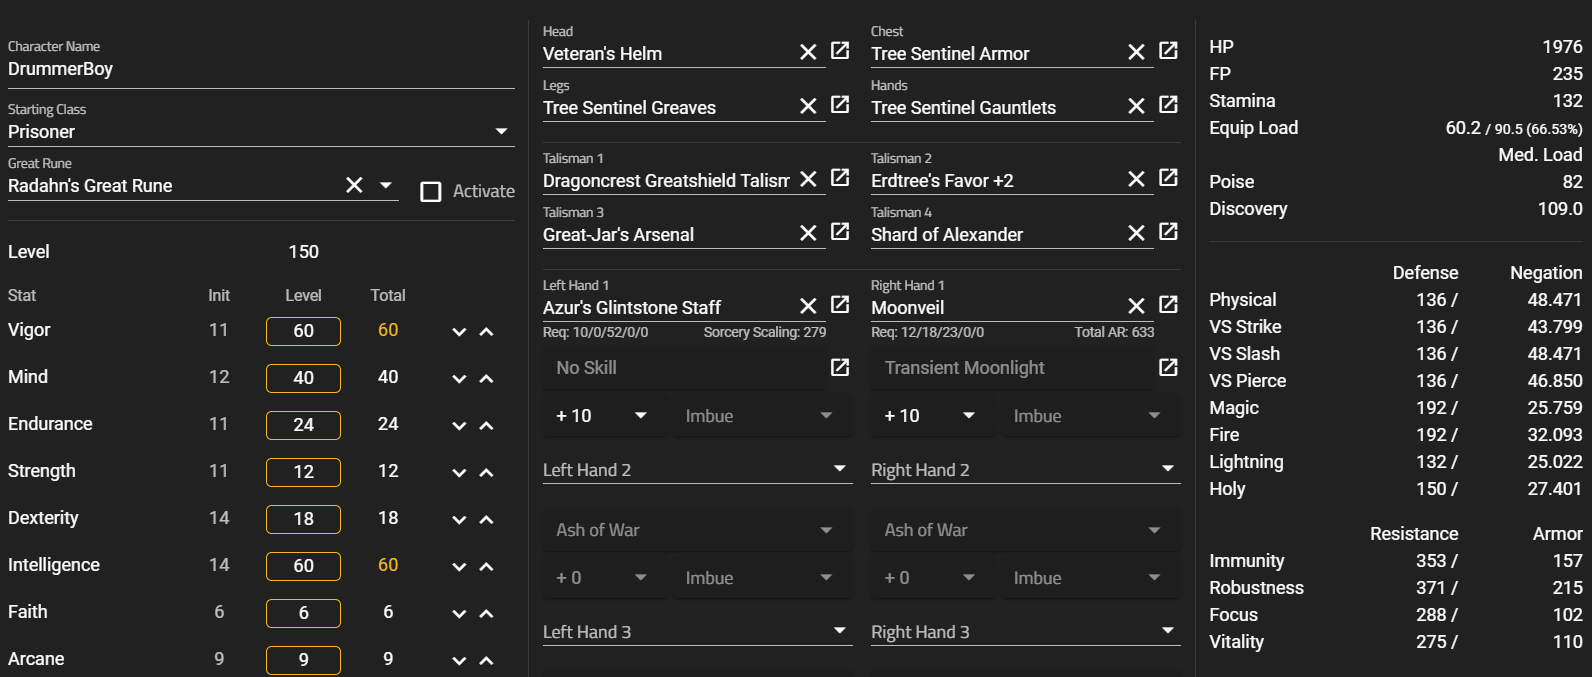
Intelligence Build Introduction
Full intelligence builds like this one offer a ton of build variety as they have access to every sorcery in the game, and are effective with nearly any weapon that can be cold-infused. Another reason to play an int build is so you can use one of the strongest weapons in the game: the moonveil katana. This was the primary weapon I used throughout most of this playthrough, as I’m really more comfortable with a melee playstyle.
Intelligence Build Early Game Points of Interest
This is a list of things to do that will increase your character’s power early on. This is not a speedrun, so make sure to explore all over and level up before trying to complete the later steps on this list. I linked a map with the level ranges of each zone at the bottom of the guide.
- Choose the prisoner class and pick the golden seed starting gift. You can alter your appearance in-game too. At a site of grace you can allot the charges of your flask of crimson and cerulean tears. I recommend splitting charges between the two 50/50. You can do some of these next steps out of order, though the later steps are more difficult.
- Run north to the church of Elleh and talk to merchant Kale, head up the road northeast and pick up some kukri near a fire, then head up to the gatefront ruins site of grace where you acquire Torrent.
- Grab the map below a pillar in the center of the ruins then look for a staircase on the south side of the ruins leading underground to a chest containing the whetstone knife.
- Ride northwest past the stormgate and talk to Roderika. Grab the golden seed and stonesword key nearby.
- Kill the mounted knight patrolling the east-facing cliff in northeast Stormhill to get the golden vow ash of war.
- From the gatefront ruins site of grace, ride southeast this time, down the road past the waypoint ruins and grab the sacred house scroll atop a ruined structure guarded by sorcerers.
- Follow the road northeast to the Third church of Markia to get the flask of wondrous physick. Take the portal just north of the church to the Beastial Sanctum in Dragonbarrow.
- Resting at a site of grace in Dragonbarrow will grant you access to roundtable hold. Talk to everyone in the Hold, and buy the knight armor set excluding the helmet from the Twin Maiden Husks in Roundtable Hold for 10,500 runes as soon as you can afford it. You need 17 endurance to wear it. Buy the memory stone for 3000 runes, and buy a dagger for 400 runes and apply the golden vow ash of war to it. This can be used in your second main-hand slot to apply the buff before boss fights.
- Talk to Gurranq, the beast clergyman, in the Beastial Sanctum, then parkour onto roots below the southwest cliff next to the Beastial Sanctum and down the stone pillars to grab the dragoncrest shield talisman. Wear this if you like living.
- Warp back up to the Beastial Sanctum and grab the golden seed down the road from the Beastial Sanctum, then take the path left of the bridge, down the hill, and across another bridge until you reach Lenne’s Rise. Use the nearby spiritspring to jump onto the roof and drop onto a balcony to get inside. At the top of the building is a chest containing a memory stone.
- Back in Limgrave, take the road south across a bridge until you reach the weeping peninsula. Grab a nearby stonesword key, then grab the morning star from a chest in a carriage down the road. Keep going south until you reach the castle Morne Rampart site of grace. Take the nearby spiritspring up the hill to reach Oridy’s rise. Read the plaque out front then kill the 3 phantom turtles that spawn nearby. One of whom is invisible, sitting in the nearby pond. Once inside the rise loot a memory stone from the chest.
- The isolated merchant in the southwest corner of the weeping peninsula sells a lantern for 1800 runes which is enormously useful in dark places. The lantern can go on your hotbar, alongside the ring to summon torrent, the flask of wondrous physick, and your hp and fp flasks.
- Starting in Limgrave, take the road east to Caelid, run past the Erdtree Avatar and into the minor erdtree catacombs. Grab the imp head (wolf) inside the catacombs, it’s a direct upgrade to the knight’s helmet.
- Follow the road into Caelid south to the astray from Caelid highway north site of grace. Just east is the Aonia swamp shore site of grace which looks over the swamp. Enter the swamp and ride north to the street of sages ruins where you can pick up the meteorite staff and rock sling sorcery. This staff is much stronger than the astrologer staff you started with.
- Warp to the Bestial Sanctum and run south across the main bridge this time, past the dragon, down the road, then make a sharp left up the hill to Fort Faroth. A golden rune 12 worth 7,500 runes can be found in the fort. Use the morning star’s innate bleed status buildup to kill the Great Dragon Greyoll. Make sure to use a gold pickled foul foot right before Greyoll dies to receive 30% extra runes from killing it. Use these runes to level up according to the stat section of the guide below.
- Ride past Stormveil castle, hugging the east-facing wall, to reach the next zone: Liurnia of the lakes. The academy scroll is just to the west in a graveyard. Keep to the east side of the zone and keep heading north until you reach the Carion study hall. The Carion glintstone staff is just before the second elevator. This staff is best used in your offhand to passively boost the damage of the Carion slicer spell by 15%. The meteorite staff should still be your main weapon as the Carion glintstone staff itself deals low damage.
- Head to the church of vows north of the study hall and give the royal house and academy scrolls to Miriel, pastor of vows. He will sell you the spells great glintstone shard: an upgrade to your basic glintstone shard sorcery, and Carion slicer: a spell that deals high dps at close range.
- Beneath the minor erdtree in the weeping peninsula is an erdtree avatar that drops the crimsonburst crystal tear and opaline bubbletear. Equip these in your flask of wondrous physick. You’ll find carion slicer is your highest dps spell, but great glintstone shard is a safer option while on horseback as you can easily create distance between yourself and the boss.
- The erdtree’s favor talisman is found in Fringefolk Hero’s Grave near the starting area and requires two stonesword keys to unlock. Down the second ramp where the path narrows you can jump down the right side onto a secret platform, at the end of the tunnel is the talisman. You can throw a kukri to deactivate the flame throwing statue. Be warned it is heavily guarded so be swift.
- Enter Stormveil Castle in northwest Limgrave and defeat Margit the Fell Omen to get a second talisman pouch, and equip the erdtree’s favor talisman.
- Just west of Raya Lucaria academy is a dragon guarding the key to the academy. You can simply run up, steal the key, and leave. Right before the first boss room in the academy is an empty bookcase that can be struck to reveal a hidden area. The comet spell can be found here but it requires 52 int so you can’t use it yet.
- North of the church of vows is another minor erdtree. If you’re brave you can rush in and remove a quarter of the erdtree avatar’s health with carion slicer. Use Torrent to evade its attacks and retaliate at range with great glintstone shard. Circling around it will cause it to kill its minions and is also a good tactic for dodging its projectiles. Once it’s dead you’re awarded the magic shrouding cracked tear which should replace the crimsonburst crystal tear in your flask.
- The Rotten Avatar in northwest Caelid drops the greenburst crystaltear which boosts stamina regeneration by 33%. This can replace the opaline bubbletear.
- Seek out Gael tunnel in western Caelid. There’s a site of grace at the end of the tunnel. Once you have at least 18 dexterity you should challenge the magmawyrm. Make sure you drink your flask of wondrous physick and cast golden vow with your dagger before the fight. Stay behind him and spam carion slicer. Pay attention to its attacks as it can 1-2 shot you. Once defeated it drops the moonveil katana: likely your new main weapon.
Intelligence Build Mid-Late Game Points of Interest
- Now to upgrade it: there is a somber smithing stone 1 just west of the waypoint ruins in Limgrave on a dead body sitting on a chair. A somber smithing stone 2 can be found in Gael tunnel. Somber smithing stones 3 and 4 can be found on corpses sitting on chairs in northern Liurnia. Stonesword keys can be looted or purchased from merchants and two of them will unlock a somber smithing stone 5 in a chest in Gaol cave, south of Gaol tunnel. A somber smithing stone 6 drops from the boss of Sellia Crystal Tunnel who is conveniently weak to magic. For later: grab the level 8 stone that drops from a teardrop scarab just south of the divine tower of Caelid in dragonbarrow. And down below the tower on the right side when facing it is a somber smithing stone 9. Use these to upgrade your moonveil katana as much as possible.
- Head east of the smoldering wall site of grace in Caelid to the abandoned cave, defeating the boss will earn you the golden scarab talisman that increases rune gain by 20%.
- If you haven’t already explored the Sifra river well in Limgrave, at the end of the Siofra river is a lift that takes you up to a canyon in Caelid. If you fight your way past two golem archers you can challenge the Great Jar’s champions. If you’re victorious the Great Jar will award you the great jar’s arsenal talisman.
- Defeat two shardbearers (Godrick, Radahn, Rennala) to receive a third talisman pouch from Enia in Roundtable Hold. Equip the Great Jar’s arsenal talisman. Once Caelid’s Starscourge Radahn is slain, a path underground to Nokron, the eternal city will appear in Limgrave.
- Grab the mimic tear summon from a chest in the later part of Nokron. After defeating Nokron’s boss, locate the nearby coffin that can take you to the next zone: the deeproot depths.
- Toward the end of the Deeproot Depths is a hollow, dead tree. Inside is a boss guarding a chest containing the crucible tree armor set. The gargoyles here make for a good mid-game rune farm. Nearby is another coffin that leads to the next zone: Nokstella, the eternal city. At the end of this zone is an elevator to the lake of rot. These three zones have a lot of upgrade materials, including somber smithing stones 7 and everything required to max out the mimic tear summon. Past the lake of rot is a coffin that takes you to a powerful optional boss.
- Once you have 52 intelligence and your moonveil katana is at least +9, start leveling up Azur’s glintstone staff to replace the meteorite staff. Once the staff is at least +7 it will hit harder than, and cast much faster than your other staves.
- Kill the Rotten Avatar in Dragonbarrow to get the opaline hardtear. It can replace the greenburst crystal tear.
- On Mt. Gelmir is the Sainted hero’s grave where the dragoncrest shield talisman +1 can be looted.
- Past the wall defending the Capital Outskirts lies the Azura Hero’s Grave where the tree sentinel armor can be obtained.
- The final talisman pouch drops from Godfrey’s Shade in Leyndell.
- The erdtree’s favor +1 drops from the boss of the Subterranean Shunning Grounds.
- The Veteren’s armor set is purchasable from Enia in Roundtable Hold after defeating the boss of Castle Sol in the Mountaintop of the Giants.
- The dragoncrest greatshield talisman can be found near the roots of the Haligtree.
- The erdtree’s favor +2 can be found in the Ashen Capital after entering the area backwards from the Forbidden Lands.
Intelligence Build Stats
Leveling up allows you to increase one of your eight core stats by one level. Most people don’t level past 150 or 125 in order to more easily matchmake with other players. In the endgame I recommend having 60 vigor and 40 mind in order to have enough max hp and fp, 24 endurance in order to wear decently protective armor like the crucible tree set, 12 strength and 18 dexterity in order to wield the moonveil katana, and at least 60 intelligence to scale your damage. This will make you exactly rune level 150.
- Level intelligence to 25
- Level vigor to 15
- Level endurance to 15
- Level dexterity to 18
- Level strength to 12
- Level vigor to 20
- Level mind to 20
- Level endurance to 24
- Level intelligence to 32
- Level vigor to 30
- Level mind to 30
- Level intelligence to 60
- Level vigor to 40
- Level mind to 40
- Level vigor to 60
Intelligence Build Weapons
You’ll find the game hard to beat without these. I personally prefer melee over spellcasting, but both are powerful and viable. In the endgame I recommend wielding the moonveil katana in your right hand, where you have easy access to its powerful weapon art, and hold Azur’s glintstone staff in your left hand allowing you to freely cast spells.
- The dagger can be purchased from the twin maiden husks in Roundtable Hold. It can be used to cast the golden vow ash of war and it won’t weigh you down much due to its light weight.
- The meteorite staff is found in the Aeonian swamp in central Caelid and is extremely strong at low levels as it can not be upgraded. The rock sling sorcery is also found here and the staff boosts this sorcery’s damage by 30%. This is good to grab very early in the game and is a big upgrade from the starting astrologer’s staff.
- The carion glintstone staff is found in the Carion Study Hall in Liernia of the Lakes and boosts carion slicer and piercer by 15% while held in either hand. This staff should only be used in your offhand, as it has low spell buff.
- The moonveil katana can be acquired from the magmawyrm boss in Gael tunnel in Caelid, enemies in this zone are stronger than in Limgrave or Liernia of the Lakes but the weapon is worth getting early. This is the build’s main weapon due to its devastating ash of war. Transient moonlight comes out fast, has long range, deals decent posture damage, and deals magic damage that rivals the strongest sorceries.
- The staff of loss can be looted from Sellia town of sorcery. The staff itself is unremarkable except for the fact that holding it boosts the damage of night sorceries by 30%. This buff stacks multiplicatively when dual wielding two of them, however only one can be obtained per playthrough so you would need to reach NG+ to dual wield them. The two sorceries this staff buffs, night shard and night comet are very powerful, and because of this staff it’s possible for night comet to outdamage regular comet in spite of costing less fp and requiring less int to cast.
- Azur’s glintstone staff increases casting speed significantly and is a great endgame staff. It’s found on the second floor of the church of the cuckoo in Raya Lucaria academy and requires some parkour to reach starting from the courtyard with the iron maiden.
- The darkmoon greatsword is a reward for completing Ranni’s entire questline. Its unique weapon art increases its damage and causes its heavy attacks to fire projectiles. If you get tired of spamming the moonveil’s ash of war, try this sword. If you like this sword enough, consider reducing your vigor to 55, and increasing your endurance to 24, and strength to 16.
Intelligence Build Spells
What is a sorcerer without their spells? Sorcery specializes in offensive spells that usually deal magic damage, which few enemies are immune to. The other spell class, incantations, scale with faith and are a bit more varied in what they do. More advanced sorceries require high levels of intelligence to use. Spells must be cast from a catalyst such as a staff. Same with spells, not all staves are created equal. You can have up to 10 spells equipped if you’ve found all 8 memory stones.
- Astrologers start with the basic glintstone shard sorcery.
- Carian slicer can be purchased from Miriel, pastor of vows, or sorceress Sellen after giving one of them the royal house scroll. It deals high dps but only in melee range.
- Great glintstone shard can be learned from Miriel, pastor of vows after giving him the academy scroll found in a graveyard west of the lake facing cliffs site of grace in south Liurnia. This spell is more powerful but less fp efficient than regular glintstone shard.
- Rock sling is found in the swamp in central Caelid alongside the synergistic meteorite staff. It deals physical damage and thus is crucial to defeating magic-resistant enemies. It also deals high stagger damage.
- Terra magica can be found in the academy crystal cave in Liurnia of the lakes. It creates a spot on the ground that increases magic damage by 35% and lasts 30 seconds. It’s really only useful for big boss battles.
- Comet is found inside Raya Lucaria and deals high damage at long range. It is the final form of glintstone shard dealing the most damage but costing by far the most fp.
- Carion piercer is dropped by a teardrop scarab in Caria manor in Liurnia and is a decent melee spell. It doesn’t have many advantages over similar melee spells but I think it’s fun to use.
- Lorreta’s greatbow is dropped by Royal knight Lorreta in Caria manor and has extremely long range.
- The cannon of Haima is found in the converted fringe tower in northeast Liurnia and has a large aoe for taking out multiple targets. Sorcerer Thopp’s questline must progress before you gain access to this tower.
- Carian phalanx is sold by perceptor Selvius in the three sisters region of Liurnia after progressing his questline. This spell deals high posture damage and has combo potential with other spells.
- Stars of ruin is found in Sellia hideaway in Caelid during sorceress Sellen’s questline. It’s a strong spell that fires a lot of projectiles.
- Probably the most powerful spell on this list is night comet due to the fact that it can’t be detected by enemy AI like other spells. Normally its damage is average, but because the staff of loss boosts its damage by 30% and stacks with itself, dual wielding staves of loss empower this spell to outdamage even its most powerful visible counterparts like comet. Night shard is more fp efficient and requires less int to cast than night comet, the only downside of dual wielding staffs of loss is that you can’t take advantage of the casting speed increase provided by Azur’s staff. However, night comet is perfectly viable cast from Azur’s staff with only one staff of loss in the offhand. Interestingly, casting night shard and chaining it into a night comet only takes the slightest bit longer than a single cast of night comet alone.
- Adula’s moonblade is a powerful melee sorcery that is dropped by the boss of the Cathedral of Manus Celes in Liurnia after progressing Ranni’s questline significantly. This is my favorite sorcery, it has a melee hitbox and a projectile, comes out fast, deals decent damage and posture damage, and even applies frostbite buildup.
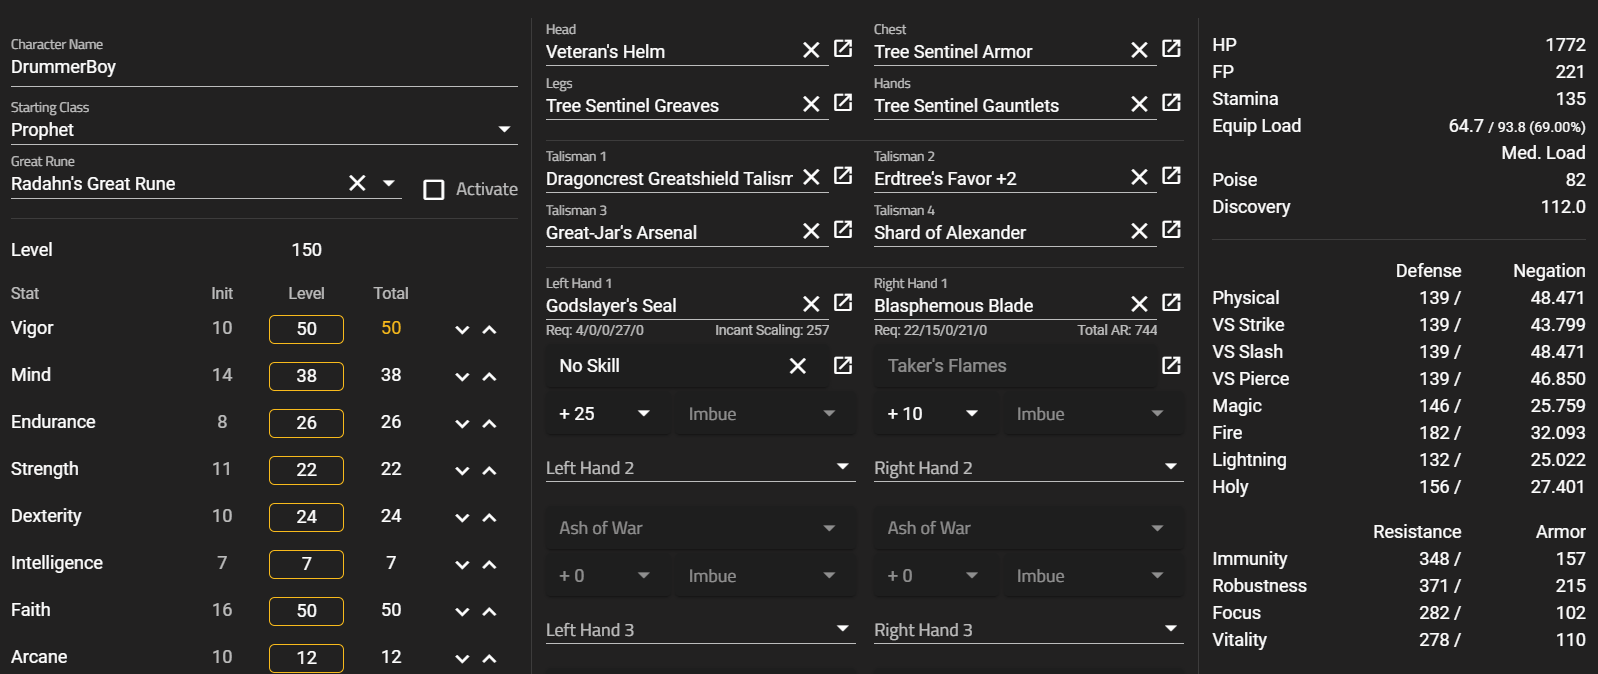
Faith Build Introduction
Full faith builds like this one offer a ton of build variety as they have access to every incantation in the game, and are effective with nearly any weapon that can be flame art-infused. Another reason to play a faith build is so you can use one of the strongest weapons in the game: the blasphemous blade. This was the primary weapon I used throughout most of this playthrough, as I’m really more comfortable with a melee playstyle.
Faith Build Early Game Points of Interest
This is a short list of things that will increase your character’s power early on. This is not a speedrun, so make sure to explore all over and level up before trying to complete the later steps on this list. I linked a map with the level ranges of each zone at the bottom of the guide.
- Choose the prophet class and pick the golden seed starting gift. You can alter your appearance in-game too. At a site of grace you can allot the charges of your flask of crimson and cerulean tears. I recommend splitting charges between the two 50/50. You can do some of these steps out of order, though the later steps are more difficult.
- Run north to the church of Elleh and talk to merchant Kale, head up the road northeast and pick up some kukri near a fire, then head up to the gatefront ruins site of grace where you acquire Torrent.
- Grab the lordsworn’s greatsword from a chest in a carriage next to the gatefront ruins site of grace. Grab the map below a pillar in the center of the ruins then look for a staircase on the south side of the ruins leading underground to a chest containing the whetstone knife.
- Run north past the stormgate and talk to Roderika. Grab the golden seed and stonesword key nearby.
- Kill the mounted knight patrolling the east-facing cliff in northeast Stormhill to get the golden vow ash of war, apply it to the lordsworn’s greatsword and give it a sacred infusion at a site of grace.
- From the gatefront ruins site of grace, head south this time and follow the road east to the Third church of Markia to get the flask of wondrous physick. Take the portal just north of the church to the Beastial Sanctum in Dragonbarrow.
- Resting at a site of grace in Dragonbarrow will grant you access to roundtable hold. Talk to everyone in the Hold, and buy the knight armor set excluding the helmet from the Twin Maiden Husks in Roundtable Hold for 10,500 runes as soon as you can afford it. You need 14 endurance to wear it. Also buy a memory stone for 3000 runes, and a dagger for 400 runes. You can apply the golden vow ash of war to the dagger to buff yourself before boss fights.
- Talk to Gurranq, the beast clergyman, in the Beastial Sanctum, then parkour onto roots below the southwest cliff next to the Beastial Sanctum and down the stone pillars to grab the dragoncrest shield talisman. Wear it if you like living.
- Warp back up and grab the golden seed down the road from the Beastial Sanctum, then take the path left of the bridge, down the hill, and across another bridge until you reach Lenne’s Rise. Use the nearby spiritspring to jump onto the roof and drop onto a balcony to get inside. At the top of the building is a chest containing a memory stone.
- Back in Limgrave, take the road south across a bridge until you reach the weeping peninsula. Grab a nearby stonesword key, then grab the morning star from a chest in a carriage down the road. Keep going south until you reach the castle Morne Rampart site of grace. Take the nearby spiritspring up the hill to reach Oridy’s rise. Read the plaque out front then kill the 3 phantom turtles that spawn nearby. One of whom is invisible, sitting in the nearby pond. Once inside the rise loot a memory stone from the chest.
- Starting in Limgrave, take the road east to Caelid, run past the Rotten Avatar and into the minor erdtree catacombs. Grab the imp head (wolf) inside the catacombs, it’s a direct upgrade to the knight’s helmet.
- Warp to the Bestial Sanctum and run south across the main bridge this time, past the dragon, down the road, then make a sharp left up the hill to Fort Faroth. A golden rune 12 worth 7,500 runes can be found in the fort. Use the morning star’s innate bleed status buildup to kill the Great Dragon Greyoll. Make sure to use a gold pickled foul foot right before Greyoll dies to receive 30% extra runes from killing it. Use these runes to level up your vigor to 14, endurance to 16, and faith to 27.
- Use one of Greyoll’s dragon hearts to buy the rotten breath incantation from the church of dragon communion in Caelid. You need 12 arcane to cast it. While you’re in the area, you can run behind fort Gael to pick up the “flame grant me strength” incantation.
- Kill the Erdtree Avatar in the Weeping Peninsula with two casts of rotten breath and catch flame to get the crimsonburst crystal tear and opaline bubbletear.
- Use two stonesword keys to unlock the Fringefolk Hero’s Grave and grab the erdtree’s favor talisman and the dragon communion seal. Equip the dragon communion seal in your second right hand slot after your main weapon and swap to it when casting rotten breath to deal 15% increased damage. Don’t actually cast incantations with the dragon communion seal as your basic finger seal has better scaling, you benefit from the buff by simply holding it.
Down the second ramp where the path narrows you can jump down the right side onto a secret platform, at the end of the tunnel is the talisman. You can throw a kukri to deactivate the flame throwing statue. Be warned it is heavily guarded so be swift. To get the dragon communion seal, instead of jumping down onto a platform, run the rest of the way down the ramp, take a right at the fork up a ramp and kill the spectral banished knight at the top of the ramp.
- Enter Stormveil Castle in northwest Limgrave and defeat Margit the Fell Omen with rotten breath to get a second talisman pouch, and equip the erdtree’s favor talisman.
- Use one stonesword key to get the godslayer’s seal and black flame incantation inside Stormveil Castle. The godslayer seal is the only thing you should be upgrading with regular smithing stones.
- Talk to Albus the Albirnauric in the village of the Albinaurics in southwest Liurnia of the Lakes to get part of the Haligtree medallion, then get Latenna’s ashes in the lakeside crystal cave to the east.
- Kill the Leyendell knight by the artist’s shack in eastern Liurnia of the Lakes to get the dragon cult prayerbook. Give it to Muriel, paster of vows in the Church of Vows to the north and purchase the incantations lightning spear and honed bolt.
- Learn the beastial vitality incantation by giving Gurranq, the Beastial Clergyman, 3 deathroots. Get them by defeating the boss of the Deathtouched Catacombs in Limgrave, killing the Tibia Mariner in the Summonwater Village in Limgrave, and killing the one near the Carian Study Hall in Liurnia of the Lakes.
- Get the gargoyle’s black blade by killing Black Blade Kindred next to Beastial Sanctum. You need at least 14 vigor to not be 1-shot by its roar attack. Level up Latenna the Albirnauric to at least level five and place her on the tree branch east of the Black Blade Kindred. Run in and out of the Beastial Sanctum to maintain the Kindred’s aggro. Pelt it with black flame when possible. You need 16 endurance to wield the gargoyle’s blackblade, and 18 strength to 1-hand it.
One More Thing: Don’t level this weapon past +5 unless you have a spare somber smithing stone of the same level you can use to upgrade the blasphemous blade later. Somber smithing stones 6 and above are rare in early-game zones.
- Kill the Erdtree Avatar in northeast Liurnia of the Lakes to get the lightning and holy shrouding crack tears. Equip the holy shrouding cracked tear in place of the crimsonburst crystal tear.
Faith Build Mid-Late Game Points of Interest
- Kill the Rotten Avatar in northwest Caelid to get the flame shrouding cracked tear and the greenburst crystal tear. Equip the greenburst crystal tear in place of the opaline bubbletear.
- Head east of the smoldering wall site of grace in Caelid to the abandoned cave, defeating the boss will earn you the golden scarab talisman that increases rune gain by 20%.
- If you haven’t already explored the Sifra river well in Limgrave, at the end of the Siofra river is a lift that takes you up to a canyon in Caelid. If you fight your way past two golem archers you can challenge the Great Jar’s champions. If you’re victorious the Great Jar will award you the great jar’s arsenal talisman.
- Defeat two shardbearers (Godrick, Radahn, Rennala) to receive a third talisman pouch from Enia in Roundtable Hold. Equip the Great Jar’s arsenal talisman. Defeating Caelid’s Radahn will open a path underground in Limgrave.
- Kill the Rotten Avatar in Dragonbarrow to get the opaline hardtear. It can replace the greenburst crystal tear.
- Get Fortissax’s lightning spear by defeating Lichdragon Fortissax in the Deeproot Deapths and trading his remembrance to Enia in Roundtable Hold.
- Loot the golden vow incantation in the Corpse-Stench Shack on Mt. Gelmir.
- On Mt. Gelmir is the Sainted hero’s grave where the dragoncrest shield talisman +1 can be looted.
- Use the serpent hunter greatspear found by the entrance to the boss room to slay Rykard, lord of blasphemy, and trade his remembrance to Enia in Roundtable Hold for the blasphemous blade. Level this weapon to at least +9 asap to melt through the rest of the game.
- Past the wall defending the Capital Outskirts lies the Azura Hero’s Grave where the tree sentinel armor can be obtained.
- The final talisman pouch drops from Godfrey’s Shade in Leyndell.
- The erdtree’s favor +1 drops from the boss of the Subterranean Shunning Grounds.
- Learn “Giantsflame take thee” by finding the giant’s prayerbook at the top of the Guardian’s Garrison in the Mountaintops of the Giants, and giving it to Muriel, pastor of vows, in Liurnia who will sell you the incantation.
- The Veteren’s armor set is purchasable from Enia in Roundtable Hold after defeating the boss of Castle Sol in the Mountaintop of the Giants.
- Learn ancient dragon lightning strike by finding the ancient dragon prayerbook near the crumbling beast grave depths site of grace in Crumbling Farram Azula and giving it to Muriel, pastor of vows, in Liurnia who will sell you the incantation.
- The dragoncrest greatshield talisman can be found near the roots of the Haligtree.
- The erdtree’s favor +2 can be found in the Ashen Capital after entering the area backwards from the Forbidden Lands.
- Loot the Erdtree heal incantation from Marika’s bedchamber in the Ashen Capital at the very end of the game.
Faith Build Stats
This is how I recommend leveling up your stats as you progress through the game. It is not a rigid doctrine and has room for adaptation. This template is for a rune level 150 build.
- Start with the prophet class and golden seed burial gift.
- Level endurance to 14
- Level arcane to 12
- Level vigor to 14
- Level endurance to 16
- Level faith to 27
- Level strength to 18
- Level vigor to 20
- Level faith to 30
- Level vigor to 30
- Level endurance to 26
- Level strength to 22
- Level dexterity to 15
- Level mind to 20
- Level vigor to 40
- Level faith to 50
- Level mind to 38
- Level vigor to 50
- Level dexterity to 24
Faith Build Weapons
You’ll find the game hard to beat without these. I personally prefer melee over spellcasting, but both are powerful and viable. In the endgame I recommend wielding the blasphemous blade in your right hand, where you have easy access to its powerful weapon art, and hold godslayer’s seal in your left hand allowing you to freely cast incantations.
- The lordsworn’s greatsword is a decent very-early-game weapon and a vast upgrade to the short spear prophets start with. Slap on a sacred infusion to boost the weapon’s base damage considerably.
- The gargoyle’s blackblade is a powerful sword that you’re not meant to unlock until much later in the game. This sword hits very hard as long as you meet the minimum stat requirements due to its incredible base damage. Its weapon art is similar to the infamous blasphemous blade. If you grab this weapon early, you’ll feel right at home when you swap to the blasphemous blade later, and you’d be able to dual wield them eventually if you want.
- The golden halberd is an alternative early-game weapon if you don’t feel like killing the Black Blade Kindred. It can be found very early, as it drops from the Tree Sentinel patrolling in front of the first steps site of grace. The golden halberd comes with the golden vow self-buff ash of war, and has very high AR for a halberd. Because of its high strength requirement, you won’t be able to wield it in one hand, which would otherwise free up your left hand to easily cast incantations. Halberds are a very well-rounded weapon class that don’t have many weaknesses.
- The winged scythe is another alternative early-game weapon. It has a long range and deals partial damage through shields. The weapon art temporarily prevents people from drinking their flask of crimson tears. It can be found beneath the ruins just west of the Tombsward Catacombs in the Weeping Peninsula, take the stairs leading underground to find the winged scythe in a chest.
- The blasphemous blade is easily one of the most powerful weapons in the game, and this build is centered around empowering it. Most faith scaling weapons deal holy damage, but many enemies and bosses are resistant to holy damage. The blasphemous blade is fairly unique in that it deals fire damage which scales with faith. The blasphemous blade’s weapon art is obscenely strong. It has long range and heals you for 10% of your maximum health for each enemy it hits. And that’s not all, each enemy you kill while holding the blasphemous blade heals you for 2% of your max health. You can transpose Rykard’s remembrance into the blasphemous blade by talking to Enia in Roundtable Hold.
- The sacred relic sword can only be obtained by beating the final boss of Elden Ring and transposing its remembrance. The sacred relic sword’s ash of war has the largest aoe in the game and is ideal for farming runes at Mohgwyn Palace.
Faith Build Spells
This is a list of useful spells you can find early in the game, but I recommend replacing them with the late-game spells I list once you acquire those. Incantations scale with faith and offer greater variety than sorceries. More advanced incantations require high levels of faith to use. Spells must be cast from a catalyst such as a sacred seal. You can have up to 10 spells equipped if you’ve found all 8 memory stones.
- Prophets start with the catch flame incantation. This is arguably the strongest melee spell in the game for PVP, though it’s not that useful in the early game when you lack the gear and stats to scale its damage. For PVE content it’s usually better to just swing a sword, unless the enemy’s really weak to fire like Erdtree Avatars.
- Flame of frenzy can be found in the Callu Baptismal church in the Weeping Peninsula and can be a useful tool to have before you obtain stronger incantations.
- Rotten breath can be purchased at the church of dragon communion in Caelid and is one of the most powerful spells in the game. On top of dealing high damage, it will inflict scarlet rot on most enemies after two or three casts. Scarlet rot is basically a more powerful version of poison. Beware that aggressive enemies can interrupt you while you cast rotten breath.
- Black flame is a well rounded spell with decent range and damage. It can be found in a cellar in Stormveil castle that requires a stoneword key to access. Like other godskin incantations, in addition to dealing fire damage it removes 2-5% of an enemy’s maximum health. 2% for strong enemies, and 5% for weaker ones. This effect is less potent in the late game when you can scale the base damage of incantations very high.
- Beastial vitality is the most fp-efficient healing spell in the game. Give Gurranq, the beast clergyman, 3 deathroots to receive this incantation. It heals hp slowly over a course of two minutes. It’s great to use when exploring to stretch out your flask of crimson tears, and can be cast before boss fights to help mitigate damage. In the late game you will have enough fp to cast more potent healing incantations.
These last nine incantations are the ones I prefer to run in the endgame. I find they complement my melee-focused build very well.
- Flame grant me strength boosts physical and fire damage by 20% for 30 seconds. It requires 15 faith to cast but you can reach 15 faith if you have 10 and equip a faith-boosting talisman. The spell can be found in Fort Gael in Caelid. The only downside is that the buff only lasts 30 seconds. This spell synergises extremely well with the blasphemous blade as it increases both the blasphemous blade’s physical and fire damage.
- Lightning spear and honed bolt can both be purchased from Muriel, pastor of vows, in Liurnia after giving him the dragon cult prayerbook that drops from a Leyendell knight who patrols just outside the Church of Vows. Lightning spear is a well-rounded long range spell, while honed bolt is very spamable and difficult for enemies to dodge. Honed bolt is very effective in PVP.
- Frenzied burst is dropped by a teardrop scarab south of the Church of Inhibition in Liurnia of the Lakes. It is the longest range incantation in the game and ideal for sniping enemies from afar.
- The Golden vow incantation is a more powerful version of the ash of war of the same name. It buffs you and your teammates damage by 15% and damage absorption by 10% for 80 seconds. It’s not a body buff like flame grant me strength so you can stack them and deal incredible damage. You can find this spell in the Corpse-Stench Shack on Mt. Gelmir.
- Fortissax’s lightning spear can be obtained by defeating Lichdragon Fortissax and trading his remembrance to Enia in Roundtable Hold. You must gain access to the deeproot depths and complete Fia’s questline in order to challenge Fortissax. This is a melee spell with a large aoe that deals high damage and provides the caster with a significant amount of hyperarmor. It is a great tool against aggressive opponents.
- Giantsflame take thee is the highest form of the basic fireball pyromancy and requires two spell slots to equip. It can be charged to further increase its range and damage and has the potential to 1-shot other players. To learn it you must find the giant’s prayerbook at the top of the Guardian’s Garrison in the Mountaintops of the Giants. Give the tome to Muriel, pastor of vows, in Liurnia and you can purchase this spell from him.
- Ancient dragon lightning strike has the highest potential damage output of any spell in the game, and excels against very large enemies. The spell shoots out a multitude of lightning bolts that radiate outward. Only a few bolts will hit a small enemy, but if you are next to or underneath a giant enemy they can get hit by dozens of bolts, each dealing damage separately. To learn this incantation find the ancient dragon prayerbook near the crumbling beast grave depths site of grace in Crumbling Farram Azula. Give the tome to Muriel, pastor of vows, in Liurnia and you can purchase this spell from him.
- Erdtree heal is the most powerful healing spell in the game and is capable of healing yourself and nearby allies up to full health with a single cast. It can be found in Marika’s bedchamber in the Ashen Capital at the very end of the game.
Armor
These last few sections contain information that applies to all builds.
Heavier armor offers better protection, so it’s best to wear the heaviest armor you can without going over 70% maximum equip load, which will slow your character down considerably if you do. For this build I recommend wearing the veteran’s helm paired with the rest of the tree sentinel set.
- The knight set is sold by the Twin Maiden Husks in Roundtable Hold and costs 10,500 runes if you exclude the helmet. It is a substantial upgrade over the hero’s set.
- The Imp Head (Wolf) helm can be found in the Minor Erdtree Catacombs in northwest Caelid. It offers high defenses and has a passive effect that increases your endurance by 2 levels which helps compensate for its heavy weight.
- Once you reach Stormveil Castle you can farm the banished knight near the castle rampart site of grace for the full armor set. This may take a half hour for all 4 pieces to drop. This is a significant upgrade to the knight set. If you don’t have enough endurance to wear the full set you can mix and match the two. This set is very heavy in exchange for its high protection and requires around 30 endurance to wear. Farming it isn’t necessary as you don’t really need heavy armor to acquire the next armor set on this list.
- Once you clear castle Redmane and gain access to the Radahn festival by progressing Ranni’s questline you can challenge Starscourge Radahn. His armor set will then be sold by Enia at Roundtable Hold and is a slight upgrade to the banished knight set.
- The crucible tree armor set can be looted from a chest in the Deeproot Depths, it has high poise for its weight, but is less protective than other heavy armor sets.
- In the Azura Hero’s Grave northeast of the Royal Capital is the Tree Sentinel armor set. This set has incredible stats for its weight and is superior to everything lighter than the ultra-heavy sets. After patch 1.07 its chest and legs have even higher poise than the infamous veteran’s set.
- Progressing Patches’ questline in Volcano Manor to loot the Bull Goat armor set. This is the most protective armor set in the game, but also the heaviest, good for mixing with lighter armor pieces. Be warned that the chest armor is one of the “fatty” armor pieces that cause your character’s arms to be held further out from your body thus increasing the size of your hitbox. You probably won’t get hit more often because of this, but the chest specifically is so heavy, and its bulky shape obstructs your view, that I don’t recommend wearing it.
- Killing Commander O’Neil at Castle Sol in the Mountaintop of the Giants will allow you to purchase the veteran’s armor set from Enia at roundtable hold. This armor set offers similar or lesser stats than the tree sentinel’s set while having a better looking helmet that I prefer to wear.
Talismans
Throughout your playthrough you will unlock 4 talisman slots. These items grant significant power boosts and weigh very little. In the endgame I recommend wearing the erdtree’s favor +2, the dragoncrest greatshield talisman, the claw talisman, and the lord of blood’s exultation.
If you’re still leveling your character, I.E. you’re below rune level 125/150, I recommend wearing the golden scarab talisman. If you don’t wear the golden scarab to boost rune acquisition you should still reach your desired rune level by the time you complete the game though.
- The dragoncrest shield talisman reduces all physical damage taken by 10%. It is found north of Caelid below the Bestial Sanctum in Dragonbarrow. This talisman is a priority for melee builds that get hit often. The +1 version can be looted in the Sainted Hero’s Grave on Mt. Gelmir, the +2 version is in Crumbling Farram Azula, and the dragoncrest greatshield talisman is near the base of Miquella’s Haligtree.
- The erdtree’s favor talisman can be found by the Fringefolk Hero’s Grave near the starting area. It boosts your max health by 3%, stamina by 6.75%, and equip load by 5% making it one of the best talismans in the game, similar to the ring of favor and protection in past souls games. The +1 version drops from the boss of the subterranean shunning grounds, and the +2 version is in the Ashen Capital.
- The claw talisman is found in Stormveil Castle and boosts the damage of jumping attacks by 15%, enhancing the bleed build’s most powerful attack.
- The arsenal charm boosts your maximum equip load by 15% and is given to you by Nepheli Loux in Roundtable Hold after killing Godrick the Grafted. The upgraded version, the great jar’s arsenal, can be found after taking the lift at the end of the Siofra river up above ground to Caelid.
- The golden scarab increases rune acquisition by 20% and is found in the Abandoned Cave in Caelid. I recommend wearing this for most of your first playthrough so you don’t need to farm runes. You can easily reach level 150+ and buy out every merchant by simply full-clearing the game with this talisman equipped. A pro-strat is to use a different talisman during a boss fight and quickly swap back to this one after killing the boss as there is a short delay between killing the boss and being awarded runes for it.
- The Lord of Blood’s exaltation can be found in the Leyendell Catacombs and increases your AR by 20% for 20 seconds after blood-loss occurs nearby, even to yourself like when using seppuku. This can be used by the bleed build when you don’t need the golden scarab.
- You receive the shard of Alexander by completing Iron-fist Alexander’s questline in Crumbling Farram Azula. The shard of Alexander increases the damage of ashes of war by 15%, which will make the moonveil katana and blasphemous blade even more overpowered.
- The rotten winged sword insignia is obtained by completing Millicent’s questline and boosts the damage on continuous attacks by up to 13%. It’s a good alternative to the lord of blood’s exultation when fighting enemies immune to bleed.
Flask of Wonderous Physick
This flask has a single charge and is refillable at sites of grace similar to health and mana flasks. It can be outfitted with any two powerful effects, many of which last 3 entire minutes. In the endgame I recommend every build use the opaline hardtear. For your second tear I recommend the bleed build use the thorny cracked tear, the intelligence build use the magic shrouding cracked tear, and the faith build use the flame shrouding cracked tear. This way you can use your physick to buff both your defense and offense before tough fights.
- In the early game you can use the opaline bubbletear which gives you a shield that absorbs the first hit you take, and the crimsonburst crystal tear which restores 7 health per second for three minutes. They are both dropped by the erdtree avatar in the Weeping Peninsula.
- The magic shrouding cracked tear boosts magic damage by 20% for 3 minutes and is dropped by the erdtree avatar in northeast Liurnia of the lakes. This provides an enormous buff to intelligence builds that deal mostly magic-type damage.
- The lightning and holy shrouding cracked tears are also dropped by the erdtree avatar in northeast Liurnia of the Lakes and increase the damage you deal with their respective elements by 20% for 3 minutes. These can be useful to faith builds who use those elements.
- The greenburst crystal tear is dropped by the rotten avatar in Caelid and boosts your stamina regeneration by 33.3% for 3 minutes. This is nice to have in the interim before you’ve collected all of the late-game tears.
- The flame shrouding cracked tear is also dropped by the rotten avatar in Caelid and increases your fire damage by 20% for 3 minutes. This is a must-have for faith builds that use the blasphemous blade and “giantsflame take thee” incantation.
- The opaline hardtear is dropped by the putrid avatar in Dragonbarrow and boosts all damage absorption by 15% for 3 minutes. This is one of the few ways to scale your defense in this game.
- The thorny cracked tear is dropped by the putrid avatar in the Consecrated Snowfield and boosts the damage of consecutive attacks by up to 20% for 3 minutes. This is very useful for builds that attack quickly like the dual-wielding bleed build.
Spirit Ashes and Comsumables
Spirits are summonable in many boss fights and can often trivialize them. They can be upgraded with glovewart similar to upgrading weapons with smithing stones. I only recommend summoning spirits if you don’t intend to fight a boss on even terms and would rather skip it. Even the lone wolf ashes you receive at the start of the game will make most bosses in Limgrave a joke, which is why I only recommend them if your goal is speedrunning.
- Everybody knows the mimic tear is overpowered. Found in Nokron the Eternal city, it creates a clone of you with all of your armor, talismans, and weapons, and spells. It will even use your equipped ashes of war. It makes for a great meat-shield during boss battles. It doesn’t deal incredible damage but it applies just as much bleed buildup as you do, making it a must-have for status-buildup builds.
- For the faith build in particular: Latenna the Albinauric is essential to defeating the Black Blade Kindred early due to her long range and can be used to cheese many other bosses as well. I recommend upgrading her to +5, save the rest of your glovewort to upgrade the mimic tear, which is a much stronger summon when fully upgraded. Talk to Albus the Albirnauric in the village of the Albinaurics in southwest Liurnia of the Lakes to get part of the Haligtree medallion, then show it to Latenna in the lakeside crystal cave to the east to receive Latenna’s ashes.
I’m not a big fan of using consumables but the medicinal effects of seafood are undeniable.
- Boiled crab is sold by Blackguard Big Boggart for 600 runes each after he moves to the Capital Outskirts. It increases your physical damage absorption by 20% for one minute but it does not stack with the “flame grant me strength” incantation as both are classified as body buffs.
I hope you found this guide helpful.

Note , players depending too much on bleed and pew pew magic will have a rude wake up call in the end game , with that said i get what the author for this guide was trying to go for but for the long run players need to understand the game’s quirks and mechanics otherwise it will punish you every chance it gets
The general gist of this guide was to give newcomers the “easy” way out instead of going deeper into the game’s mechanics , bleed is a very easy crutch and so are spirit summons but as i stated before depending too much on them will give the player a rude awakening towards end game
Bleed is fine even in end game encounters. Sure there are some bosses and enemies who have resistance but you make it sound like bleed builds become useless after like Leyndell which is not true at all.
It’s true. Even Elden Beast on the bleed build is pretty chill, it has high enough AR.
after having done co op for over 500 hours now and seeing players “buff” themselves with seppuku only to get molly womped by radagon again and again yeah…. and then there is malenia who ofc is very susceptible to bleed but players thinking yeah i am just gonna ROB her and who dive head forward to her fight without learning her moveset and quirks get a very rude wake up call , point is that yes bleed obviously does not become useless far from it but relying on it as a crutch will get you frustrated in the long run
Oh yeah i don’t play co-op (having to disable EAC so i can use flawless widescreen) so idk what other player are doing.
I guess my experience is different because i played a lot of monster hunter games (on DS and onwards) and i never expected to just mow down a boss on the first try 😀 And ER was my first “souls” game.