
Contents
DB BR 442
Overview

Austria may have Talent, but Germany has Talent too! Built to many different configurations for use across Germany, the upgraded Talent 2s actually bear little resemblance to their older counterparts; low floors and curved bodies aside, the rounded front ends were replaced with a more subtle, yet equally iconic design, lending the fleet their nickname of “hamster cheeks”.
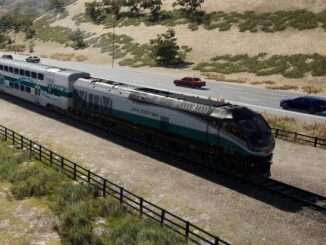
For the railway network of Dresden, the DB BR 442 Talent 2 is used on a variety of services, although mainly on regional stints out towards Riesa and Großenhain. The 3-car 442.1 variant is operated here, although other variants can be found throughout Germany, 4-car sets for example can be found in Köln, and on dedicated S-Bahn networks, such as around Leipzig, there are also 3-car sets with alternative door layouts for faster boarding and alighting of passengers.
- Manufacturer: Bombardier
- Build Location: Hennigsdorf, Germany
- Build Date: 2008-2015
- Number Built: 60 sets (442.1)
- Power Type: 15kV AC OHLE
- Power Output: 2040 horsepower
- Coaches: 3-car (442.1)
- Capacity: 168 Passengers (442.1)
- Length: 56.2 Metres (184.3 ft) (442.1)
- Weight: 108 Metric Tons (442.1)
- Top Speed: 160 km/h (100 mph)
DB BR 442 Cab – 1/3
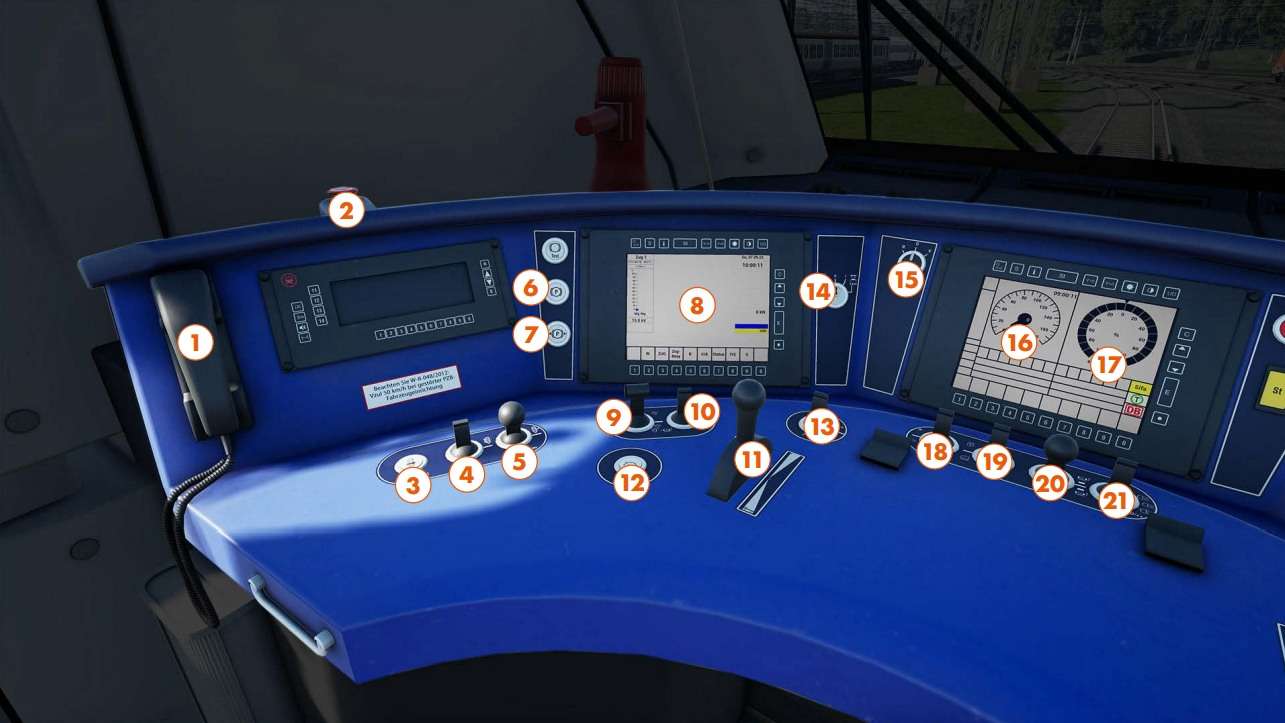
- 1 – Contact Signaller Phone
- 2 – Emergency Brake Plunger
- 3 – PZB Override Button
- 4 – PZB Release Switch
- 5 – PZB Acknowledge Switch
- 6 – Handbrake Apply Button
- 7 – Handbrake Release Button
- 8 – Left Multi-Function Display (MFD)
- 9 – Pantograph Switch
- 10 – Main Circuit Breaker Switch
- 11 – Combined Power Handle
- 12 – Tempomat Button
- 13 – Tempomat Switch
- 14 – Master Key Switch
- 15 – Master (Reverser) Switch
- 16 – Central MFD (Speedometer)
- 17 – Central MFD (Tractive Effort)
- 18 – Train Lights Switch
- 19 – Cabin Lights Switch
- 20 – Sander Switch
- 21 – Headlights/Tail Lights Switch
DB BR 442 Cab – 2/3
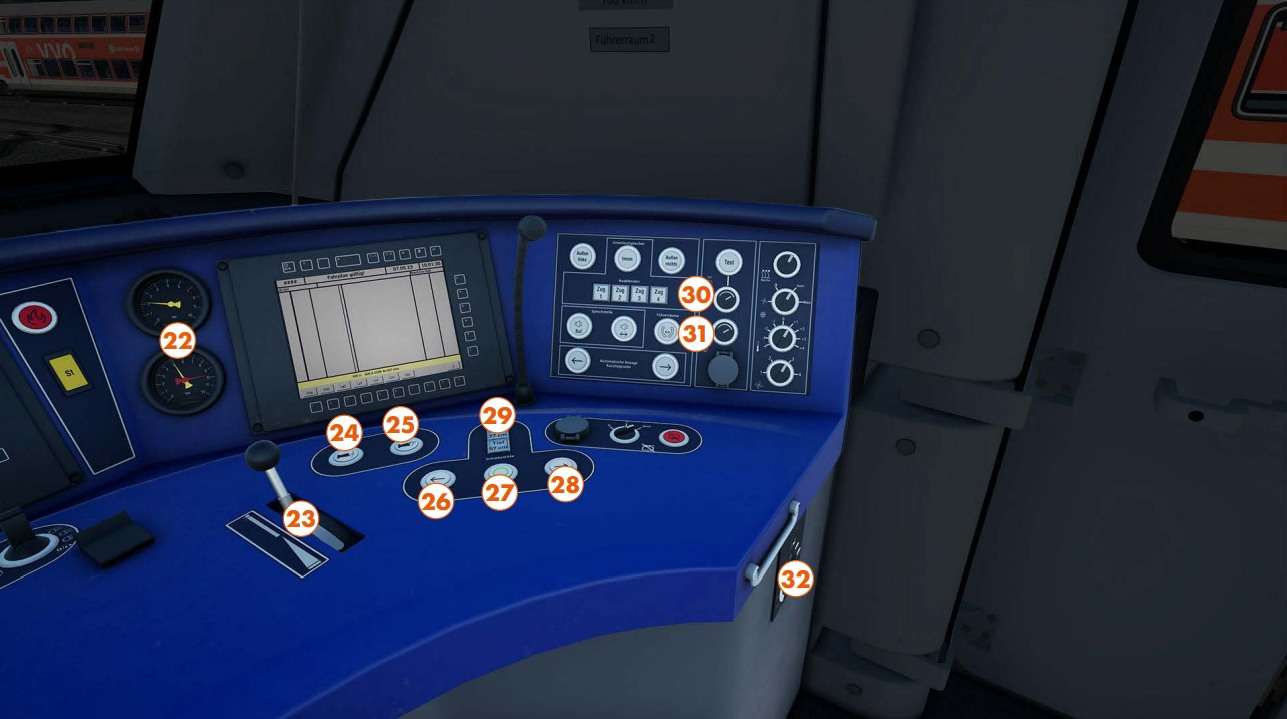
- 22 – Brake Pressure Gauges
- 23 – Indirect Brake Handle
- 24 – Horn High Button
- 25 – Horn Low Button
- 26 – Open Passenger Doors Left
- 27 – Close Passenger Doors
- 28 – Open Passenger Doors Right
- 29 – Door Ramp Button
- 30 – Instrument Lights Dimmer Switch
- 31 – Reading Light Dimmer Switch
- 32 – Wipers Switch
DB BR 442 Cab – 3/3
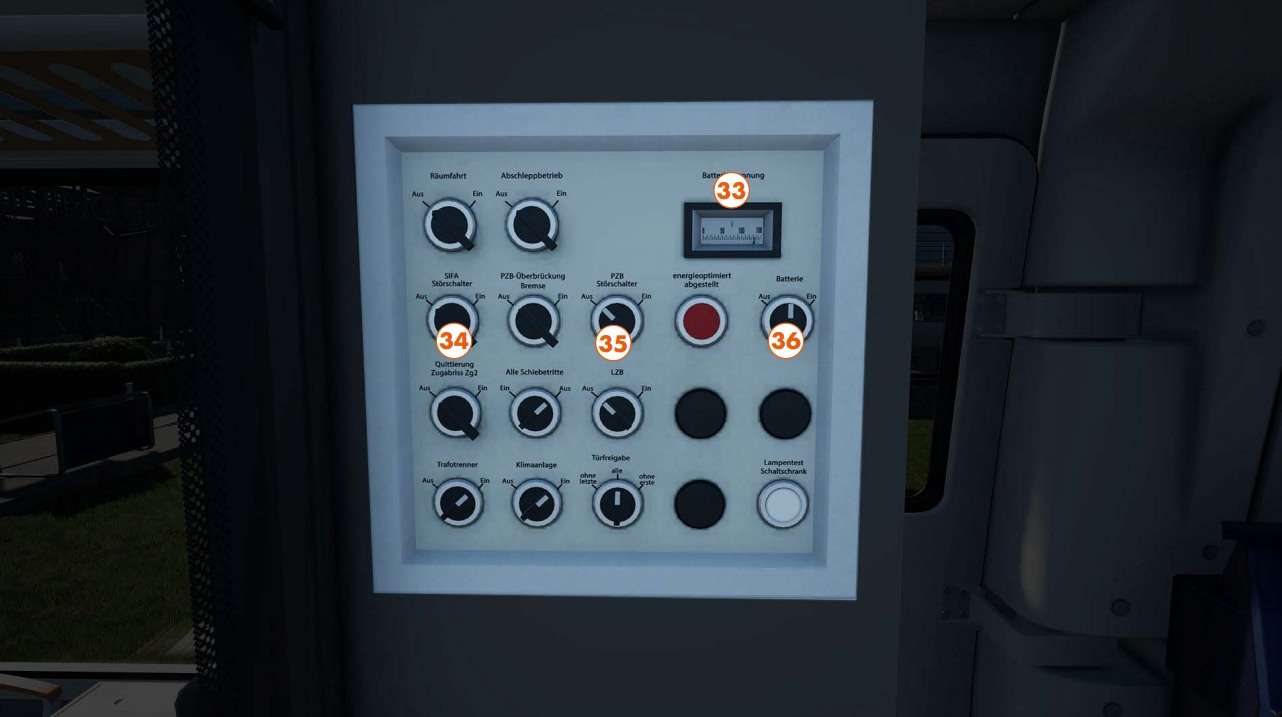
- 33 – Battery Voltage Meter
- 34 – SIFA Isolation Switch
- 35 – PZB Isolation Switch
- 36 – Battery Switch
Procedures & Unique Features
Tempomat Control
- Like its Austrian predecessor, the BR 442 has its own unique style of Speed Set which is unlike AFB, this is known as the Tempomat (Cruise Control).
- To enable Tempomat while stationary:
- With the Combined Power Handle in 0 position, press the Tempomat Button so it is On.
- Select your desired speed by moving the Tempomat switch into increase, allowing for 1-5 km/h then increasing in 5 km/h increments upto X km/h.
- You can change your speed at anytime using the Tempomat increase or decrease ranges.
- While Tempomat is enabled, the Combined Power Handle has no effect, the train will accelerate and brake with it left in the 0 position – if you move the Handle into power or braking then back to 0, this will automatically disable Tempomat.
- To enable Tempomat while on the move:
- Move the Combined Power Handle to the 0 position.
- Press the Tempomat Button so it is On.
- The train will hold the speed you are currently coasting at, and you can use the Tempomat Switch to increase or decrease your speed.
Coupling and Uncoupling
- To couple in the BR 442, slowly approach another unit and make contact, there is no need to press a button to confirm or make an electrical connection.
- To uncouple a unit which is connected to the cab end you are sitting in, you must be stationary, with the Reverser and Power Handles in neutral positions, and rotate the Master Key all the way to the left for the “Uncouple Local” mode, hold it there for 5 seconds to electronically uncouple the train.
- If a unit is coupled to the rear end of your unit however, then instead of turning the key left, turn tke key right into the “Uncouple Remote” mode, this will electronically uncouple a unit from behind.
- Once the uncoupling has been made, slowly pull away from the other unit to release the physical couplings.
- It can be a common mistake to turn the Master Key when setting up a train without thinking about the additional “Remote” setting, if you turn it too far, you may accidentally leave the rear unit behind, so take care when going through initial train setup at the start of a service.

Be the first to comment