
Intro
By Zyruvias.
Hestia makes Hades a rhythm game (lots of things make Hades a rhythm game, but I digress). It is a high action-per-minute weapon that needs consistent input to output its DPS potential. This “rhythm” in my experience is something like:
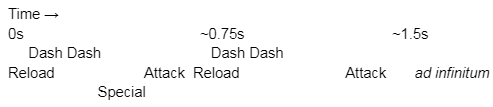
Effectively creating a 2 : 1 : 0.5 ratio of dashes to powered attacks to special. I refer to this series of actions as a “cycle.” The cooldowns don’t line up perfectly, but in my experience, trying to perfectly utilize cooldowns makes you much more likely to miss a reload, reload multiple times in a row, forget to special, etc. In a similar vein, I don’t like build elements that disrupt this standard cycle (e.g. Greater Reflex from Hermes, Triple Bomb, Swift Flourish [although special speed is probably my preference of these three {and there are exceptions that I make, but I will get to that later.}]), but if you’re someone who can dynamically incorporate these types of rhythm shifts into your playstyle to significant benefit, feel free to make use of these things! Also don’t forget to weave in your cast against armored enemies, bosses, etc.
- One important aspect of the cycle is using something (special, dash) to cancel your reload animation. I started this as a new paragraph thinking I would have more useful things to say about it. I do not. Awkward. But I guess to summarize:
1) Make sure all of your charged attacks are dash strikes. It’s a good habit to get into, considering you frequently get dash strike % boons from Chaos, and - 2) Cancel your reload animation as often as you can. You can do this by dashing immediately after reloading, using your special, casting.
- 3) Be consistent. Mechanical rhythm should be the first thing you practice, then small adjustments, real-time dynamic play, etc.
- 4) Rebind your Reload button to something other than the default, preferably a shoulder or trigger button. The default is terrible. I use L2 (LT? Idk man controller lingo is weird).
Any% (IGT)
I’m assuming you have a decent understanding of how to speedrun any% already. For general tips, see other Any% guides.
Mirror
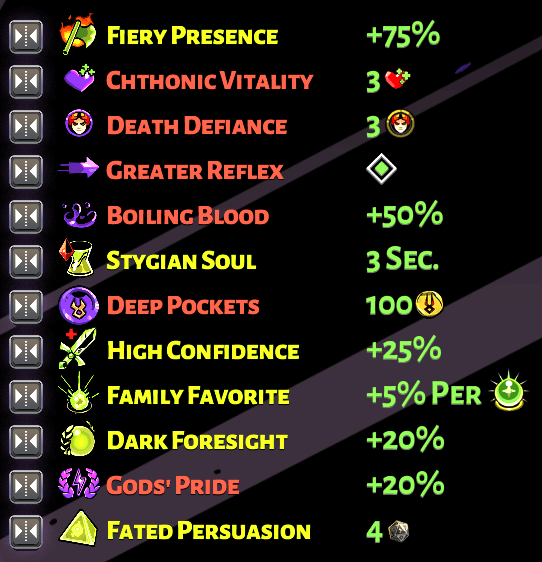
Standard mirror for any%, Fiery Presence for sure for the extra ~112 damage on first hit. That will let your attack chunk pretty much every enemy in tartarus before you get an attack boon. Pride over Legacy since you’re more reliant on good rarity from Hermes, Chaos, and your cores. I do like getting Sweet Nectar, Heart Rend, and/or Deadly Reversal on Hestia, but these don’t make-or-break your builds, they’re just gravy on top. Stygian vs. Infernal Soul is going to be left as an exercise for the reader. I’ve used both with good success.
Pact
FO2, EM2. Nothing special here. Hestia can viably handle BP1 if you’ve fallen victim to Benefits Package Propaganda. I’ve fallen victim to it for a short period of time. I was in a dark place. I don’t want to talk about it.
Hammers
To summarize, you generally want to get Rocket Bomb and Cluster Bomb. If you’re playing with the Speedrunning Modpack (which I highly recommend), select Rocket Bomb as your first hammer. However, I’m adding my thoughts to each hammer so you know how to decide when you don’t get this combination on your best paces (it happens. It’s sad, but this is what Hades the Video Game is all about).
Flurry Fire
Useless. You should be reloading after each shot except against numskulls. Neither of the benefits do anything useful for you assuming you’re playing a non-cursed Hestia playstyle.
Ricochet Fire
A really good attack-oriented hammer. Up-to-doubles your attack DPS assuming consistent ricochet hits, but it’s not 100% reliable. Not a priority, but nice to see if you don’t get Cluster Rockets.
Spread Fire
You may occasionally find it nice to burst a few up-close enemies, but the 6 ammo clip is annoying, and you should be unloading charged attacks as often as possible anyway. Charged shots are not modified with this hammer option.
Explosive Fire
You may occasionally hit more than 1 enemy at once with this.If you focus on grouping with your dash more, this has more benefits, but there are much better choices.
Delta Chamber
Useless, this should never be taken in Any%.
Piercing Fire
Piercing shields is nice, and the armor damage is not useless, but I would not pick this hammer up often. It technically can be more effective than Ricochet, but lining up enemies is kinda hard. Incredible for the Heroes fight if you’re stuck with it.
Triple Bomb
This can feel really awkward in the main Hestia Rhythm, so I’d only advise taking it if the other choices are useless. This hammer feels less awkward if your special button is on a different side of the controller than your attack. I have mine on R1 when attack is on the face buttons and it is very comfy to just spam the special button when it’s off cooldown.
Rocket Bomb
Probably my favorite first hammer. Higher base damage, faster release-to-damage times, easier to aim, synergizes with Cluster Bomb insanely well.
Targeting System
Decent buff to damage if you have it, but not worth prioritizing. I would likely grab this only if the other options are useless attack hammers. 30% damage buff only significantly benefits your dash and call, as you should have a lot of % scaling on your attack and special already.
Hazard Bomb
Not a bad hammer choice for any%, but not my first choice. The time-to-drop is even longer than with the normal special, but the damage is very, very good. It is hard to use in the Hades boss fight effectively since he is so mobile, but it’s very good at room clear. Circle around where you drop the special so enemies stay inside the blast radius.
Cluster Bomb
This is pretty good on its own, but the biggest benefit of it is synergy with Rocket Bomb. If given the choice between cluster and rocket, I take rocket first, but starting with cluster bomb technically does make it slightly more likely that you see Rocket Bomb in the second hammer.
Seeking Fire
15 damage on the charged shot. That’s really it.
Hermes
Hestia really does not perform well with anything other than the beloved Rush Delivery combination (Hyper Sprint + Rush Delivery). Extra dashes are clunky. They do not buff your attack or special damage, and can mess up your timing for the rest of your cycle.
Proper Cycle Management
To play Hestia well, you have to plan out how and where you are going to execute each part of your cycle. It’s important to conceptualize the Attack, Special, and Dash as three distinct sources of damage that can be distributed as you see fit. Having a good intuition of your damage and enemy health breakpoints here is critical. For example, if you get a room with Bonerakers and Bloodless in Asphodel, you should be thinking about aiming for Bloodless with your rockets and dashes if you need the supplementary damage to finish the kill, and focus your attacks on Bonerakers since they are a bit beefier (for an example of this, check my 5:30 Hestia IGT video). Clearing rooms as quickly as possible relies on wasting as little damage potential as possible. Getting this mindset down definitely takes practice, but it’s worth it once you can utilize it at full speed.
Weaving in dash-only kills between attack and special cycles also cuts down the total amount of time you need to clear a room, but the difficulty of this varies based on enemy type. I’m not even that great at this yet outside of tartarus, but it’s another aspect of play you can focus on to really improve your chamber clearing efficiency.
Trust your special. A very easy mistake to make is focusing 100% of your cycle’s damage into one enemy at a time when you don’t need a full cycle to hit breakpoints. If you launch a special, let it do its thing before going after the enemy you targeted with it. This is mostly an issue in Tartarus when your special is still capable of one-shotting enemies, and possibly Asphodel with rocket and good special scaling. Every part of the attack cycle that overlaps unnecessarily is just wasted time.
When you’re practicing Hestia, try to be intentional about reloading between shots, and making sure to unload your charged shot before reloading again. A single attack bullet or reloading twice in a row basically nullifies half of your DPS for a given cycle, which, again, is just a time waste.
Build Path
The general build for Hestia is as follows:
- Start Poseidon for Tidal Dash; it’s the best DPS dash in the game.
- Early on in the run, acquire good core boons for your attack, special and cast throughout the rest of the run
- Get extra scaling from Hermes and Chaos boons
- Focus on good supporting boons after your main build comes together
I’ll go into more depth about the pros and cons of different gods for different cores and supporting boons in the following sections, but that is the general gist of it. Hestia is relatively flexible compared to aspects that rely on specific gods or duo boons.
Core Boons
Poseidon
Start with Tidal Dash to optimize your kill speed against enemies in Tartarus. Tempest Flourish is okay if it’s epic and you’re in desperate need of a special boon, but not my first pick. Attack knocks things back a bit too much but if you’re in a pinch it’s not nothing.
Aphrodite
Be on the lookout for Aphrodite in early Tartarus; she gives the best scaling attack and special boons. However, I’d hesitate to take common rarity boons from her. Additionally, she has so many other support boons that the odds of you getting something really good from her is to be quite frank, sad. I’d prioritize attack over special if rarity is matching, but if I’m offered common attack and epic special, I’d rather take the special and wait on getting a better attack later.
Artemis
Another goddess to look out for early, or force into Asphodel if you have Aphrodite. I prefer her on the special, and that’s about it. I usually only take Artemis’s attack when I have good supporting sources of Attack damage like an early epic Lunge from chaos. If your additional sources plus the attack add up to around 100%, consider her attack.
Athena
Athena is okay on the attack or special if you get offered an epic boon. I would hesitate to take other rarities. The cast is one of the best casts you can get, but considering cast is not a significant source of your damage end-game, it’s not worth prioritizing.
Demeter
Same as Athena: I’d only take epic attack and special boons from her. Be somewhat mindful of blocking duos if she’s not your first core slot fill.
Dionysus
Don’t take core boons from Dionysus unless you can immediately sell them off. Some weirdos like taking Trippy Shot, but keep in mind this also removes your ability to benefit from Boiling Blood. Ice Wine is much more preferable than Trippy Shot in my opinion, but not really an active build interest. Ask your doctor if your heart is healthy enough for Ice Wine.
Zeus
Zeus cast is amazing for clearing early Tartarus. Zeus’s call is incredible damage later in the run.
Ares
If you’re a sick freak that likes unbuffed Hunting Blades, then sure, take Ares’ cast. It personally makes my blood boil. would not take any other cores from Ares, since they are not Percent Scaling boons for your attack and special. You won’t find any Blade Dash propaganda in this document. As far as I’m aware Ares doesn’t even offer a dash. In some rare instances, I have taken an epic doom attack. This was after getting Rush Delivery, and I had no other good god to fill the slot with. Flat damage scales insanely well with Rush Delivery but it’s not ideal.
Supporting Boons
After you have your major core boons in place, you should be thinking of what else is meaningful to pick up during the run. There are a decent number of support boons to supplement your core build.
Aphrodite
Nothing really useful outside of attack/special + opening duos. Sweet Surrender is just about the only good supporting boon Aphrodite can give you outside of other Duo bons.
Athena
If you happen to get an Athena Core boon, Blinding Flash is decent scaling if you are also good at backstab positioning, but not a priority by any means. Most useful in the Hades fight.
Ares
Battle Rage is insanely good on Hestia. Level 1 Epic Battle Rage is an extra 300 damage on your charged shot, which is usually enough to continually kill enemies in one shot per attack. I personally do not force Ares for Battle Rage, but if it’s in your pool, it’s a good pick.
Artemis
In addition to her cores, Pressure Points and Hunter’s Mark are the best supporting boons. Support Fire is not as good on Hestia since actual attack/special/cast frequency is lower than other weapons like Aspect of Eris, but it’s better than boons like Hide Breaker and Hunter’s Instinct. Clean Kill is like okay if it’s epic and you have the attack, special, and PP/HM from artemis already. But at that point why are you taking a 5th+ artemis Boon?
Poseidon
Hydraulic Might is my favorite supporting boon. Extra attack and special damage is ridiculously good, even if it doesn’t last the full duration of a chamber. Razor Shoals is good for supplementing dash damage and killing certain enemies more easily. Breaking Wave is always good Styx Insurance in case you don’t get Cluster Rockets.
Zeus
Lightning Reflex and Heaven’s Vengeance are incredible. Full Stop. Since you spend very little time actually attacking enemies relative to the cycle length, nearly all of your dashes are going to be eligible to proc Lightning Reflexes and deal extra damage. Even if you mess up and get hit, Heaven’s Vengeance has your back. Static Discharge for jolted on top of these two is just mild-to-moderate madness. Double Strike with multiple Zeus boons is well… multiplicative. Need I say more?
Dionysus
Strong Drink and Premium Vintage are about the only boons I want from Dionysus for low heat speedruns. You can technically get Bad Influence if you take Dionysus call, but the thought of needing Bad Influence to scale on Hestia makes me nauseous.
Demeter
Ravenous Will is great. Rare crop is nice if it’s picked up early. It can mess with damage breakpoints early on if you have unpommed cores, so be mindful of what negative side effects you may experience on an OTC Rare Crop.
Keepsakes
God Keepsakes
Forces a God(dess) to appear. You know this. Comes with what it says on the tin, plus 10% Epic/Duo/Legendary chance.
Shattered Shackle
I am very partial to the shackle as a way to boost DPS if you don’t have an attack boon going into asphodel. I would only force Aphrodite into Asphodel if I had Battle Rage + high Chaos Dash% or Attack% boons, otherwise just rely on whatever attack shows up. Ideally, you’re only taking Shackle into Asphodel and pick up an attack boon before Elysium so you can switch to some other keepsake for further benefit.
Charon’s Hourglass
I love this little guy for Elysium. Getting extra duration for Ichors, Attack/Special/First Hit/Backstab/Armor damage is really useful. Items gained in Elysium should last through the Hades fight with enough free rooms and a 2 tunnel sack.
Hades’ Call
Very good keepsake if you have your cores filled and Rush Delivery, usually only taken in Styx, and possibly Elysium if you’re not an hourglass stan like myself. It’s very good for burst damage with Cluster Rockets and controlling Hades’ moveset.
Distant Memory
I hope to Hades this thing is still level 1. If you leveled it up for an achievement or some other garbage, it might be best to start a new savefile.
Acorn
Good for keeping High Confidence active for a longer duration of the Hades fight. I would only take this for Styx if you have a call already, or if you’re out of DDs and aren’t confident that you’ll survive the fight. DPS can’t really benefit you from beyond the grave. Although you’re already in the underworld? Mortal analogies don’t always work for this game. In all seriousness though, I may consider forcing Zeus for a call if you don’t have one, and you feel comfortable with your health + DDs + overall safety.
Any% (RTA)
For this small section, I’m assuming you have a bit of RTA experience or knowledge. I’m hoping to make this a succinct summary of the decisions I’m making during runs instead of excruciating detail and annoyingly verbose prose (and dumb humor. I like my sense of humor but I’d imagine reading this guide is probably painful for at least one or two fellow humans out there).
Hestia does extremely well in the RTA category. Even though it scales really well with poms, you can still get really good scaling just from Hermes and Chaos (and for this reason, Olympian Favor may be of non-insignificant benefit, but I have not tested it very much). General build path is the same as IGT above, but with greater reservation when being offered attack and special boons. I use shackle way more for RTA than IGT. Hourglass is never worth the time, as you should not be checking wells unless you’re insanely close to an exit and a chaos gate would not interfere with upcoming free rooms. Mid-biome wells are fine/personal preference.
Tartarus / Early Building
The only major changes to gameplay for me: focus on poms for your tidal dash until it’s level 3 or 4 (rarity depending). I tend to avoid gods on the attack unless it’s specifically aphrodite or artemis on a midboss door. AT MOST I would only put one pom into your attack and special if and only if you have Aphrodite. Scaling from other gods is literally just not worth the time considering you should be getting good damage from Chaos and RD.
Asphodel
Try to reflect on your setup and remaining gold immediately after you kill Furies. Take Shackle if you’re missing attack scaling, check the well only if you have 55 gold or more. Don’t bother buying anything from shops unless it’s a gyro, centaur heart, or pom slice. The only exception I’d consider is Zeus for the call after already having RD from Hermes. Gameplay here is generally the same as IGT. If you’re forced into taking a pom past this point, I’d just instantly select the top option to get on your way faster unless you’re below the pom thresholds I mentioned above. You shouldn’t be taking useless pommable boons in the first place, so any top-shelf pom options will benefit you.
Elysium
The only consideration here is just avoiding menus like the plague (pre-COVID meaning of the phrase). Your build should be “RTA-tier complete” except for Hammer / Hermes and more Chaos skips. Focus on health over gold for safety moving into Heroes, Styx, and the Father Fight. I’ve had runs that end with more than 1,000 gold, but the build is in such a solid state that spending any of it is just literally not worth the time.
Styx
Same thinking as before. Take a miniboss room without a menu if possible, then follow up with the other non-menu option to get the sack. The only exception I’d make is getting your second Hermes or Hammer. NEVER buy anything in the shop. It takes between 5 to 7 seconds at best, and there is basically no way that you will shave that much time off the Hades fight. The only time I would ever consider buying anything is a 3rd Hermes when I have Epic Rush Delivery for Greater Haste or Swift Flourish, but that’s a huge gamble both on getting either to show up, and whether or not either of them actually make any meaningful impact on your DPS is still up for debate. I tend to say no here.
Hades
Just don’t die, lmao. Seriously, a good Hades fight on Hestia should take between ~30 seconds and 40 seconds IGT, and a death just extends that by ~10% or more. It’s better to be more careful with dashing and special / attack timing than suffer a 3-4 second penalty out of carelessness.
Greece
Fishy sparkles are pretty but only go for them if you can guarantee a perfect catch. Getting a slow catch and a trout is really embarrassing to see in Hestia runs. Hestia deserves the best’o’ya in every way, even fishing in her presence.
High Heat Speedruns
This section is about 32, 40, and 50 Heat Speedrunning categories on Speedrun.com. If you only care about Highest Heat, see the next “High Heat” section below.
Mirror
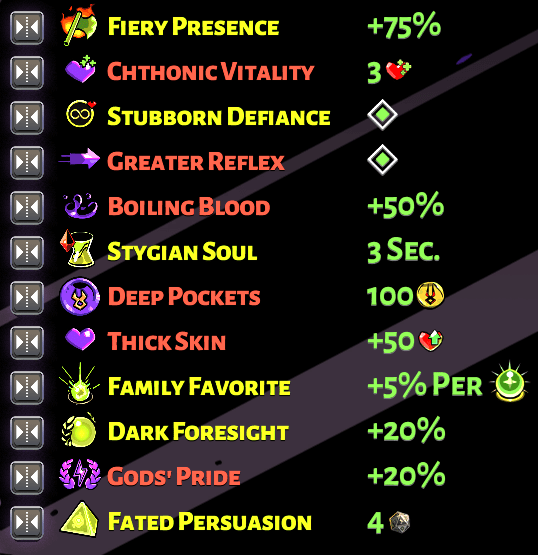
All Heat Speed categories will use a pretty similar setup to the Any% Mirror, notable exceptions being Thick Skin for extra health, and Stubborn Defiance since you cannot heal otherwise.
Pact
32 Heat
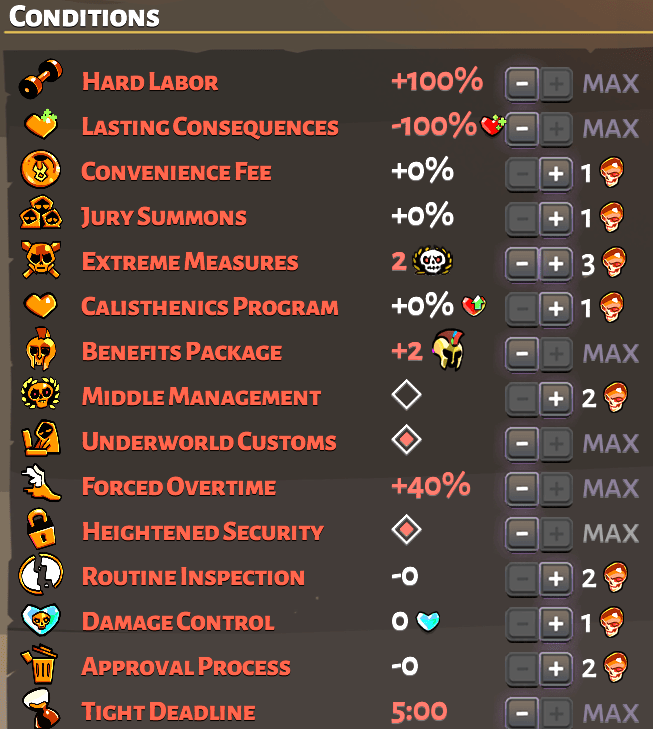
Pretty standard pact for 32 Heat Speedrunning. Hestia can handle EM3 at this level, but since the other pact options are faster, we leave that for higher heat categories.
40 Heat
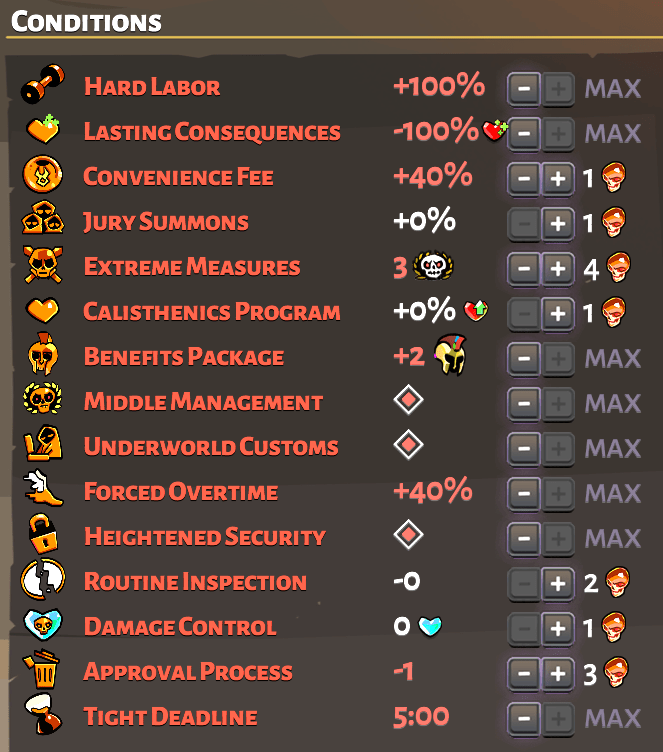
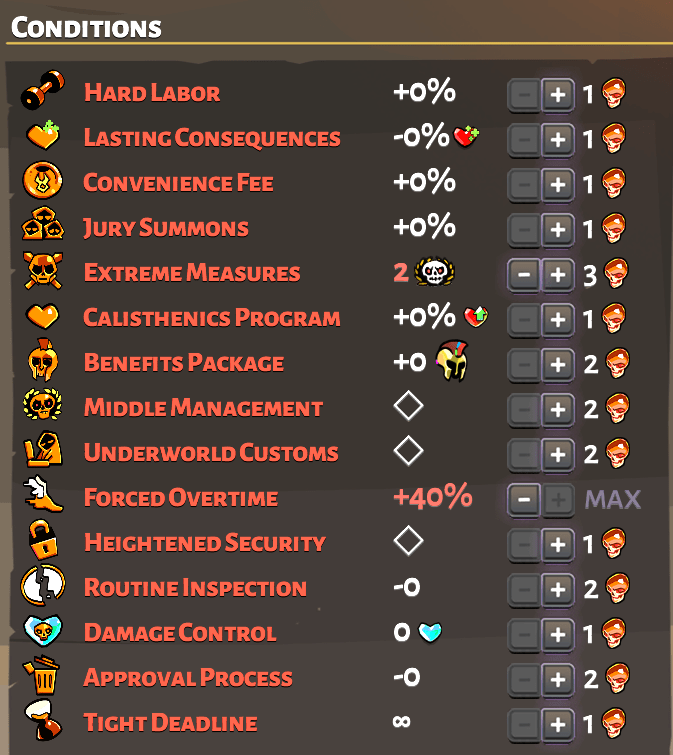
This is pretty much the same as the 32 Heat Pact with the addition of Approval Process 1, Extreme Measures 3, Convenience Fee 1, Middle Management.
Middle Management and EM3 add on approximately 20 to 30 seconds to your expected times for the category, while AP1 makes it much more annoying to get good builds. Focus on buying an extra Spindle for a meg in Styx. You don’t need it without MM, but tnot having an extra Megera summon for 2 beefy Styx bosses is just agony unless your build is absurdly strong.
50 Heat
This category has a couple of potentially-viable options…
Option 1
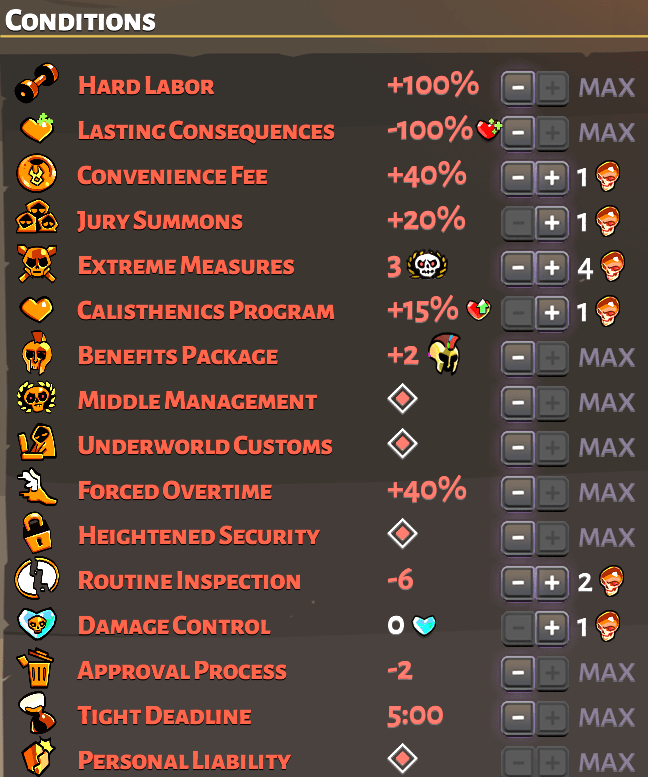
Notice Routine Inspections 2 and AP2. You still keep EM3, but your build quality will DRASTICALLY decrease.
Option 2
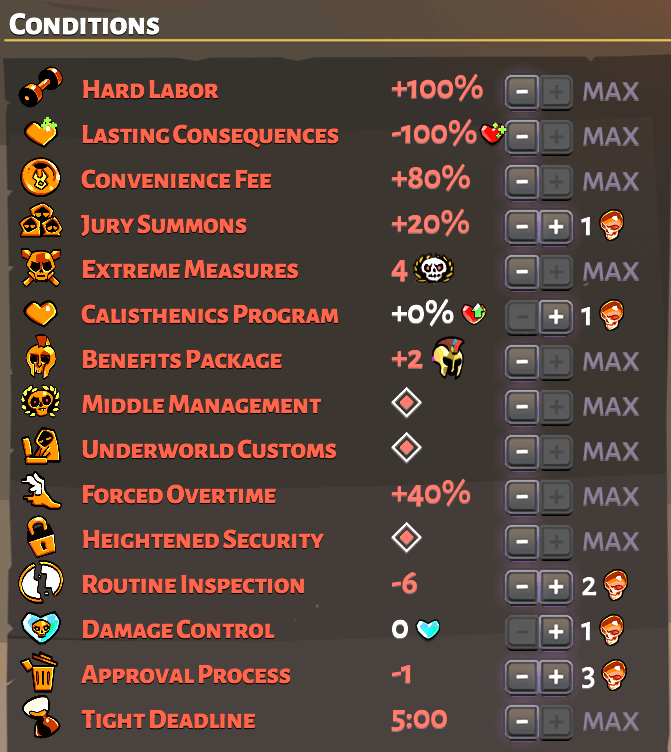
The highroll pact, all oriented around Approval Process 1 for slightly more sanity. EM4, but disabled Hell Mode so you can use CP0 to minimize Boss fight times. If you pick this pact, you more-or-less must reset if you don’t get Cluster Rockets and Rush Delivery. EM4 adds a TON of time to your runs, but if you effectively reset for Any% builds and rooms then this is going to be your best option overall assuming you have an infinite amount of time to play this category, don’t burn out, get lucky, etc.
Category Insights
After you’ve practiced enough Hestia, 32 Heat and 40 Heat will just start to feel like Any Heat with a mild inconvenience to it. People don’t call these “Spicy Any Heat” for nothing. 50 Heat is the only category that really starts to feel painful for Hestia.
High Heat
For this section, I am assuming you are attempting to use Hestia for at least ~40+ Heat for clear potential, not speed. Specific Speedrunning Category Pacts will be added later. Hestia can be played similarly between 0 heat and ~40 heat with respect to build and aggression levels, so consider this section to just be for improving your best heat clears with it.
Mirror
Mirror setup is pretty standard for high heat.
Fiery Presence / Shadow Presence
Both work well throughout the run. Fiery scales well in general with the attack and special if you have Hazard Bomb. Shadow Presence is highly recommended for EM4, since you will need all the DPS and time save you can get (also, Chaos boons for backstab are much, MUCH better than Fiery Presence enhancement). Learning to position for backstabs against enemies consistently will give you overall better DPS gains throughout the run, but this takes a bit of practice.
Dark Regeneration
Just kidding, this one doesn’t matter.
Stubborn Defiance
High heat standard when you have 0% healing.
Greater Reflex
You need mobility on this weapon, as you’re not relying on a shield to block damage. You might be able to pull off Ruthless Reflex with EM3, but if you take it further to EM4 you will likely have to reset for extra dashes from Hermes. Considering most of your damage comes from percent scaling already, the 50% bonus damage is not as great as it is on other aspects.
Boiling Blood
Extra 50% damage on your attack / special goes a long way in boss fights. Abyssal is not super useful, just don’t get hit in the first place lmao.
Stygian Soul
This one could probably go either way. Infernal may do better at consistently applying Boiling Blood to normal enemies throughout your run. Stygian does give you a marginally better Hermes boon pool, however.
Deep Pockets
100 starting gold. Better to get more boons / pomegranates early than hoard for end-game.
Thick Skin
High confidence kicks in for the first like 2 chambers, not really worth it. Possibly for 32/40 heat speedruns, but again, that’s a 2 million IQ play that I’m too room-temperature to consider.
Family Favorite
With a standard Aphrodite start, you could probably make Privileged Status work, but it’s not consistent with higher Approval Process levels. Family Favorite is just more reliable and consistent DPS improvements which is important on Hestia.
Dark Foresight
Who even legitimately uses OnlyFans for this slot lmao
Gods’ Pride
There are a good number of Duo Boons that work well on Hestia, but are not reliable at all at higher Approval Process levels. It’s better to just have higher epic rate on boons, especially for Hermes’s boons and Chaos’s buffs. It helps with Aprhodite Attack Resets as well if you haven’t turned on Routine Inspection.
Fated Persuasion
Rerolling boons allows for higher run consistency than rerolling door rewards. Plus it saves you time for Tight Deadline since all deliberation takes place while a menu is open.
Pact
Hard Labor
Use Level 5, standard High Heat setting.
Lasting Consequences
Use Level 4, standard High Heat setting.
Convenience Fee
I advise just using level 2 immediately for all heat-pushing pacts. Hestia does not need a ton of gold to scale well into the end of the run.
Jury Summons
Hestia can handle extra enemies very well with Hazard Bomb and/or Ricochet Shot. Cluster Bomb is a nice alternative if you’re having trouble positioning yourself around Hazard Bomb explosions. Try having this on at least level 2 to get used to enemy quantity.
Extreme Measures
Level 1 and 2 are really easy for Hesita. Level 3 is a bit of a slower fight, but with a kiting-based playstyle you should be able to stay relatively safe during all of it. Unfortunately you rarely find good opportunities to damage both Heroes at once, so the fight is a little slower compared to other aspects. Hestia does pretty well overall with Level 4 on this Pact due the mobile and distant playstyle you’ll be employing. See other guides for tips on how to generally handle EM4, I don’t think Hestia needs any special knowledge to handle it. I personally add EM4 after everything except DC/RI is maxed, but feel free to throw it on earlier in the grind if you just want to practice the fight as you’re climbing.
Calisthenics Program
This should be one of the last Pact options you add, as it just extends the length of the run with little added difficulty or benefit. CP1 is the minimum if you’re using Hell Mode (recommended), so wait to use CP2 until you’ve maxed out most everything else. This doesn’t make normal rooms too much harder, since hestia hits hard throughout most of the run. Health breakpoints are rarely an issue outside of boss fights.
Benefits Package
Throw on Level 2 immediately. The only combinations that Hestia can’t really deal with are Savior Cloner enemies.
Middle Management
Standard High Heat Pact Option, Hestia doesn’t really struggle with this option.
Underworld Customs
This option can be a bit painful in conjunction with CF2, but Hestia doesn’t really need much to scale well. Boon awareness during early parts of the run is really important with this setting, however.
Forced Overtime
Not Hestia Specific: Level 2, standard High Heat Pact Option. In general, you’re better off turning on FO2 and keeping it at the same level regardless of your heat level, so you get better acclimated to enemy movespeeds and attack speeds. Helps you learn how to play at high heat more consistently across all aspects. Hestia specifically only needs a very small window of time to emit an attack or special, so you’re rarely left in a vulnerable state outside of your general movement / positioning when clearing rooms.
Heightened Security
Not Hestia Specific: Urns suck, but it’s better to have this on early and learn to deal with traps while you’re progressing instead of being bombarded with a really painful-to-add pact once you’ve felt like you’ve reached your limits. Plus, dying to traps to reset your Health/Stubborn Defiance is much faster.
Routine Inspection
One of the more painful pact options… Hestia can make use of RI1 really early on in the Heat Climb, but RI2 should likely be the last Pact option before EM4. RI3 should be only used when the only other option is Damage Control. RI4 just isn’t happening for non-shields outside of niche challenge runs that don’t utilize the full pact.
Damage Control
Hestia just cannot deal adequately with Damage Control. The standard playstyle is low hit frequency for high damage, so Damage Control is just going to slow you down by an absurd amount. In my opinion, you should only use this pact if you’re pushing for 60 heat or 62 heat clears.
Approval Process
Hestia is not a needy weapon. It can do surprisingly well with AP2, once you have a good-scaling attack and special. With use of the Speedrunning Modpack 1.1.1, AP2 is a non-issue for Hestia outside of assembling your preferred auxiliary build features.
Tight Deadline
Use Level 3. Hestia performs well enough throughout the entire run, even at Jury Summons 3. You may run into issues with time if you have EM4 enabled, but so does almost every other aspect. Just get the rooms LOL
Personal Liability
When you play Hestia, you accept legal responsibility to forfeit precisely the amount of health you are prescribed to lose every single time you get hit. Failing to abide by this agreement will cost you 1 Heat. Jokes aside, use Hell Mode for an easy extra Heat. Hestia’s High Heat playstyle is very mobile and distant from enemies, so you should rarely run into situations where the health shield would save you.
Keepsakes
God Keepsakes
I primarily use Aphrodite in Tartarus to work on getting a beefy attack boon early on, then force Athena into Asphodel for a bit of extra utility and safety. Artemis is another decent option for high special damage and dash strike damage, but not as reliable or safe. I will go into actual build paths in more detail, but I generally do not force more than 2 gods per run in High Heat for Hestia, as there is much more to be gained from other keepsakes past Asphodel.
Shattered Shackle
Starting with this keepsake is a decent option for moderate levels of heat, but being AP2’d into bad core boons completely invalidates the benefits. I’d likely only suggest this for speedruns if you lack damage.
Charon’s Hourglass
Extends the duration of Well items by 8 chambers once fully leveled. I personally love taking this through Elysium. There are a TON of items that will be of significant benefit to Hestia, so extending their duration through the end of the run (if you get a 2-sack) is incredibly useful. Notable items are +Attack, +Special, +Backstab, +Movespeed, +First Hit, Touch of Styx, Nail of Talos, Braid if you have a meaningful cast.. This is a less-safe option, so I would only take it once you are perfectly comfortable getting through Elysium consistently. Also recommended during EM4 pact runs to churn out extra damage for the final fight (requires 2 sack Styx for most things to last, unfortunately).
Skull Earring
+40% Damage when you’re under 35% health is pretty significant if you can’t go above 30% health. Considering most of your core build is already based on percent scaling, this is not as proportionally useful compared to other effect-based aspects. May be worth taking into elysium if you’re running a bit low on time leaving Asphodel, but I rarely use it for Hestia. One good set of jerkies from the well with an hourglass will outscale this keepsake. And considering using Touch of Styx Dark from Patroclus is high-heat standard for survivability, you can potentially lose out on this benefit in chamber 29.
Tooth
A general High Heat truth – this keepsake is mostly used before styx if you’re concerned about surviving through the normal chambers. It is a pretty good option against EM4 as well. Be wary of the bug that removes excess death defiances if you add or remove this keepsake… you can lose your extra Athena DDs
Acorn
Great for extra protection against bosses once you’ve developed a bit of confidence going through normal biome chambers. Good for Heroes and Hades up to EM3. Can be easily lost with bad summons against Hades, especially with EM4.
Spearpoint
Another good defensive option, especially for EM4 or if you can’t take Tooth due to an extra stubborn defiance source. Great for EM4 due to butterfly balls throwing out tons of low-damage hits, so you’ll get the benefit of blocking damage quite frequently. May also block repeat hits from Hades’ combos. I personally don’t make any alterations to playstyle with this keepsake, but if you’re focused enough you can be hyper aggressive during the 1.5 seconds after activation for consistent burst damage after getting hit.
Daedalus Hammers
Hestia has a handful of hammer upgrades that work well, but I’ll go ahead and add discussion for all of them. In general, I would recommend focusing on either Ricochet shot or Hazard Bomb, but it’s a good idea to have a full understanding of the hammers you could get stuck with throughout the rest of the run. Hestia has neutral-to-great synergy with all hammer upgrades, so there’s no reason to avoid the second hammer like other aspects.
Flurry Fire
Useless. You should be reloading after each shot except against numskulls. Neither of the benefits do anything useful for you.
Ricochet Fire
A really good attack-oriented hammer. Up-to-doubles your attack DPS assuming consistent ricochet hits, but it’s not 100% reliable.
Spread Fire
Surprisingly, not the worst hammer upgrade? Your first charged shot does not suffer from the lowered attack radius or base damage change, but every other attack does, like normal. Definitely should not be your first pick, but if you are a little short on damage with respect to enemy health breakpoints and need to quickly clear something in your face, you can spray a clip to finish off a foe or two with reasonable reliability.
Explosive Fire
This is okay. If enemies cluster frequently, you may get 2 or 3 enemies hit per attack. Not a priority hammer, but isn’t useless either. Most beneficial in elysium while you are running away from melee enemies, in my experience.
Delta Chamber
This is an interesting Hammer, as you retain I-Frames on Dash Strikes. Getting it as a result of your second AP2 hammer might be technically marginally safer than nothing at all? Not sure if this protection effect applies to the charged first shot, may need feedback here.
Piercing Fire
The 50% damage to armor is pretty nice, and piercing enemies (and shields!!!) is a nice side effect. I’m not sure I would pick this as your go-to hammer since lining up multiple enemies for attacks is difficult, but it’s a pretty good hammer if you’re stuck with it.
Triple Bomb
Does decent work when addressing tons of extra enemies from Jury Summons, but three times the number of attacks to emit is a little clunky and unsafe compared to cluster bomb or hazard bomb.
Rocket Bomb
I am not a huge fan of this one for High Heat, since the blast radius is a bit smaller. Easier to use, but much lower DPS compared to Hazard Bomb. It does synergize extremely well with Cluster Bomb, but your odds of getting cluster bomb after rocket bomb is really low with higher levels of Approval Process. I’d rather not have a 90% chance to kill a run on top of all the other reset conditions I have in place.
Targeting System
Decent buff to damage if you have it, but not worth prioritizing.
Hazard Bomb
One of my favorite hammers for High Heat Hestia. 240 base damage on your special is really good, plus you can use it to reset your Stubborn Defiance if you find yourself with ~5-30 health remaining at the end of trapless chambers (or just a complete health refresh in a room where time is paused). Highly recommend learning to play with this hammer, especially if you’re running a pact with JS2 or JS3.
Cluster Bomb
Slightly safer alternative to Hazard Bomb. More varied radius, and has a really nice effect when combined with Rocket Bomb if you happen to be that lucky during the run. For modded High Heat, I would not personally prioritize the Cluster Rocket combination, as it is increasingly unlikely in High Heat, and you do not need to add more reset factors to your runs.
Seeking Fire
+10% Damage and you’re less likely to miss enemies (not sure if this applies to the charged shot, actually…). There are obviously better options but it’s not 100% useless if you do get stuck with it.
Build Paths
The primary build for Hestia is relying on high-scaling percent-based boons. Personally, I prefer Aphrodite for the attack since it outputs more consistent DPS than Artemis. On the special, any percent scaling God works well here. Artemis, Athena, Demeter, Poseidon all provide decent scaling boons for this slot. I typically end up with Athena or Aphrodite special since I force those two Gods before Elysium, but you may pick up random Gods throughout the run as well.
Core Boons
Attack
Aphrodite scales the best with Poms. Artemis is okay DPS early, but inconsistent and doesn’t scale well unless you try to go for Chaos buffs.
Special
Artemis may be the best special buff, but she’s likely not going to end up in your pool naturally. Aphrodite is a great second if you get multiple boons from her. Athena is pretty decent as well.
Cast
For Boiling Blood, I’d advise only keeping casts that lodge into enemies. Artemis, Poseidon, Athena. Zeus is okay, but it’s more difficult to control which enemy it lodges into. I’d sell off others you get, especially if they don’t lodge.
Dash
Some flexibility here. I prefer Divine Dash for utility and safety, but Hunter’s Dash is a really good damage spike if you happen to get it. I personally like keeping a distant playstyle, so more offensive dashes like tidal dash and blade dash do not do much for me, but preferences on this vary.
Aid
I tend to prefer defensive / utility Calls, but your preferences may vary from mine. Hestia has a low hit rate from its intended playstyle, so use your calls conservatively as they build up. I absolutely hate Artemis Call on Hestia, as it’s only useful when fully charged, which you’ll probably only get during the final Hades Fight.
- Athena > Aphrodite > Ares/Poseidon > Zeus/Dionysus/Demeter > Artemis
I’ll now discuss supporting Gods, and what you should prioritize from each.
Ares
Battle Rage is the best result from Ares, especially if you have Hazard Bomb.
Urge to Kill is better than nothing.
Aphrodite
Aphrodite has a few nice supporting boons for survivability such as Life Affirmation, Different League, Sweet Surrender, Broken Resolve.
Poseidon
Your best supporting boon will be Hydraulic Might. If you have a core, Razor Shoals and Breaking Wave are good.
Athena
Probably my favorite supporting god for Hestia. Blinding Flash is nice scaling backstab damage, Holy Shield and Bronze skin are okay if you don’t have more defensive boons from Aphrodite.
You can also get extra Stubborn Defiance revives from Athena after you have a core from Athena. Make sure you pop your initial revive every time you get successive Athena boons just in case these pop up.
Zeus
Nothing from Zeus is particularly useful with standard high heat pacts, but there are a handful that are better than nothing at all: Billowing Strength, and if you’re lucky enough, a Lightning Reflexes + Jolted setup, but getting this when Zeus should not be your priority is extremely unlikely. Keep in mind that every boon option from Zeus is Pommable, so if you take him early you are risking hindering your attack scaling.
Artemis
Pressure Points and Hunter’s Mark are another good set of supporting boons, if you happen to get them.
Demeter
I would probably only want Ravenous Will. Killing Freeze is okay if you happen to be stuck with a core. Rare Crop is always nice, but you’ll get epic or heroic attack boons often enough due to the niche high-heat synergy of UC and Eurydice.
Dionysus
Premium Vintage and Strong Drink are decent, especially if you get them in Tartarus. I will prioritize Dionysus more in Tartarus than other biomes since both of these need time or luck to scale. If you happen to get a dionysus Core, Numbing Sensation is decent as well.
Be the first to comment