
Each path may be subjective to your own team composition. When choosing a path, stick to blessings that are part of the path.
The Path of The Preservation
Resonance Formation Priority:
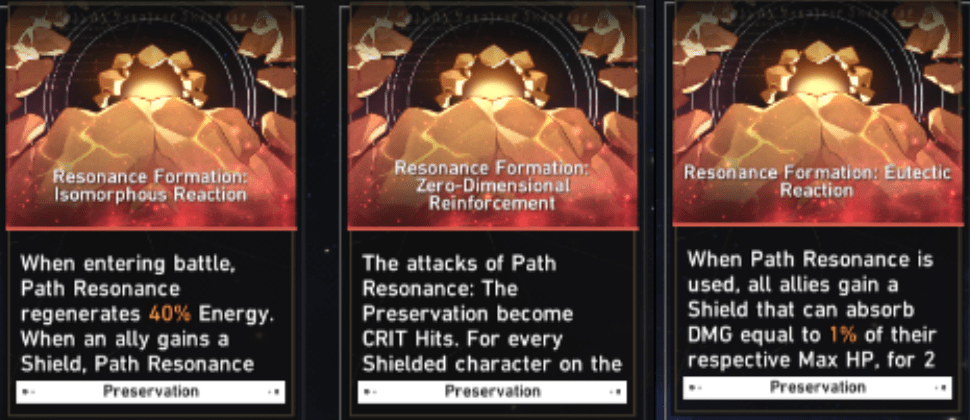
- Isomorphous Reaction >= Zero-Dimensional Reinforcement > Eutectic Reaction
Explanation:
Isomorphous Reaction regenerates 40% Resonance energy on battle entry, and 3% whenever shields are applied. This greatly increases early run survivability and resonance uptime within boss phases.
Zero-Dimensional Reinforcement makes Resonance a CRIT Hit, increasing its damage by 50%. Each shielded character adds 15% more, for up to 110% stronger resonance damage. This can be as valuable as Isomorphous Reaction if the team burns through fights faster than you gain new Resonance usages.
Eutectic Reaction gains a 1% hp shield for 2 turns, and applies Amber which nullifies damage exceeding your shields. Do not take Eutectic Reaction unless extreme overkill damage is expected.
Notable Blessings:
Note: Preservation blessings tend to be universally useful within its own path. You usually cannot go wrong just picking any Preservation blessing.
3* Divine Construct Blessings
- Resonance Transfer – Deals Quake damage when a character attacks. A required blessing to deal Quake damage and proc’d Quake related blessings. Useable alone, but best with Metastatic Shield.
- Macrosegregation – Every 2 turns, generates a 1% hp shield that is strengthened when shields are applied. Enhance this. Enhanced effect makes this a 10% hp shield, that is strengthened by 130% when shields are applied. Major damage mitigation.
- Metastatic Shield – Deals Quake damage when a character is attacked. A required blessing to deal Quake damage and proc’d Quake related blessings. Useable alone, but best with Resonance Transfer.
2* Interstellar Construct Blessings
- Sanctuary – 80% chance to generate a 12% hp shield on a character’s turn end. Good enhance value. Becomes 100% chance and 15% hp shield.
- Quadrangular Pyramid – Increases max damage absorbed by shields by 30%. Stronger shields are good.
1* Construct Blessings
- Firmness – Shielded characters take 16% less damage. Good enhance value. When enhanced, shielded characters take 24% less damage.
Gameplay Methodology:
Bring a shield character. Quickly build up Preservation blessings by rerolling blessings if needed and obtain Isomorphous Reaction or Zero-Dimensional Reinforcement. If no Preservation blessings are available, speed and action blessings are universally useful. What can make or break a run is the acquirement of shield and Quake related blessings.
Shield blessings are needed for survivability and resonance damage, while Quake can bring additional dps. You cannot deal Quake damage unless you have 3* Resonance Transfer and / or 3* Metastatic Shield. By late run, you may wish to choose event occurrences over battles due to a higher chance at 2* / 3* blessings which are key to the build.
The Path of The Remembrance
Resonance Formation Priority:
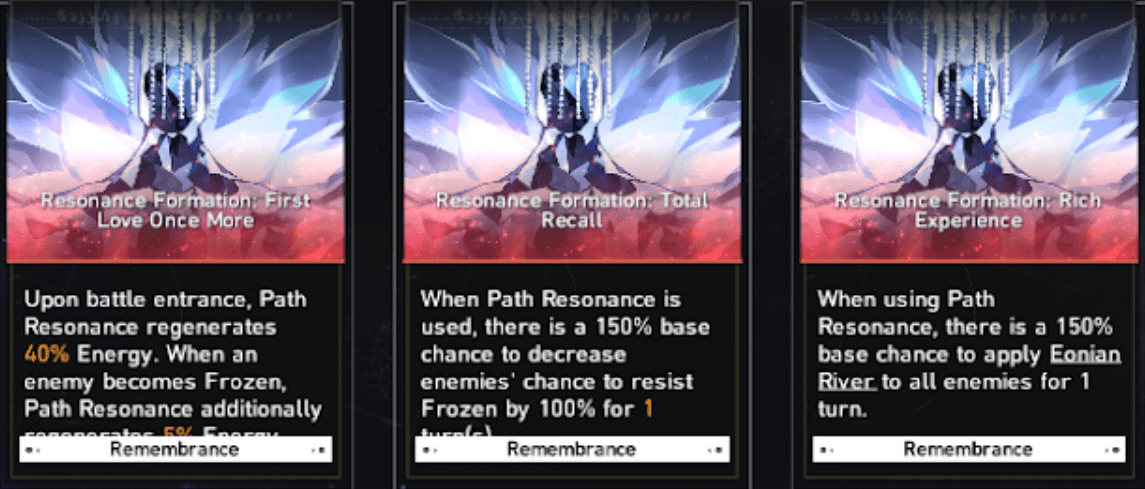
- First Love Once More > Rich Experience > Total Recall
Explanation:
Rich Experience makes the Resonance have a 150% chance to afflict Eonian River to all Enemies for one turn. Eonian River doubles debuff duration.
Total Recall makes the Resonance have a 150% chance to decrease enemies chance to resist Frozen by 100% for 1 turn.
First Love Once More makes the Resonance regenerate 40% energy on battle entry, and when enemies are Frozen, Path Resonance recovers 5% energy.
Notable Blessings:
Note: Literally all Remembrance blessings are kind of useless when not on the Path, so be wary.
Dissociation is a debuff that deals 30% of the enemy’s max HP, and can only be applied on Frozen enemies. When upgraded, this blessing makes Dissociation deal 20% more damage. The damage is dealt when the enemy unfreezes.
3* Perfect Experience Blessings
- Perfect Experience: Fuli – When attacking Frozen enemies, 100% chance to inflict Dissociation on them.
- Perfect Experience: Reticence – The enemy has a 120% chance to become Frozen for 1 turn every 6 hits. When upgraded, the enemy has a 150% chance to become Frozen for 1 turn every 5 hits.
- Perfect Experience: Innocence – After breaking an enemy’s Weakness, the target will have Dissociation applied. The enemy will count as “Frozen.” When upgraded, this Weakness Break Frozen effect will ignore enemy Frozen resistance.
2* Ultimate Experience Blessings
- Ultimate Experience: Melancholia – Attacking an enemy with Dissociation will remove Dissociation, and deal 150% of Dissociation removal damage. When upgraded, 200%. (Please see Ultimate Experience: Dizziness.)
- Ultimate Experience: Insensitivity – When Dissociation is triggered, 50% chance of freezing the enemy for 1 turn. When upgraded, 75% for 1 turn.
- Ultimate Experience: Dizziness – Increases the DMG taken by enemies with Dissociation by 36%. When upgraded, 54%. This debuff lasts 1 turn after Dissociation passes. (Please note that this does not make Dissociation do 66% of HP, but rather 36% more of whatever 30% was.)
1* Experience Blessings
- Experience: Unspeakable Shame – Reduce enemies’ chance to resist Freeze by 6/8% per 6/9 blessings. Total reduction chance of 36/72%. Priority enhance.
- Experience: Primordial Hardship – Frozen enemies take 16% more damage. When upgraded, 24% more damage.
Gameplay Methodology:
A common misconception is that any ice character will work. This is not the case. Unless specified in an ability, ice characters will not apply Freeze outside Weakness Breaking.
This makes March almost unilaterally unchallenged due to an Ultimate that can Aoe Freeze.
The path of Remembrance focuses on the debuff Dissociation, which deals 30% of the targets Max HP when unfreezing. There are 2 ways to apply this debuff:
- 3* Fuli
- 3* Innocence
Fuli applies Dissociation when hitting Frozen enemies. Innocence applies Dissociation when breaking enemies.
Fuli is by far more valuable to us.
The main challenge then becomes, securing 3* Fuli, and having enough Effect Hit Rate or Freeze reduction chance to freeze the enemy. For enemies that can resist freeze or crowd control, we need modifiers of 800% for 100% Freeze.
This means you need either 800% Effect hit rate, or 200% Effect Hit Rate + (Enhanced) 1*Unspeakable Shame or other modifiers that assist such as enemy freeze/ effect resist reduction. Going below these points will result in non-100% Freeze chances, and your success will vary on how effective it is.
Once we have a good method of freezing the enemy, it is best to acquire 2* Melancholia.
- The most important part of Melancholia is that hitting an enemy with Dissociation will apply the damage and remove Dissociation.
- This means that instead of waiting for the enemy to unfreeze to deal Dissociation damage, we can refreeze them to hit them with Dissociation again.
Checklist:
- 3* Fuli
- 2* Melancholia
- [800% Effect Hit Rate] or [200% Effect Hit Rate + (Enhanced) 1 Unspeakable Shame]
*Not meeting this requirement only means that you cannot 100% freeze bosses resistant to freeze/crowd control
**Freeze immune enemies will not freeze no matter what you do. Don’t fight them.
- Other various Remembrance blessings
The Path of The Elation
Resonance Formation Priority:
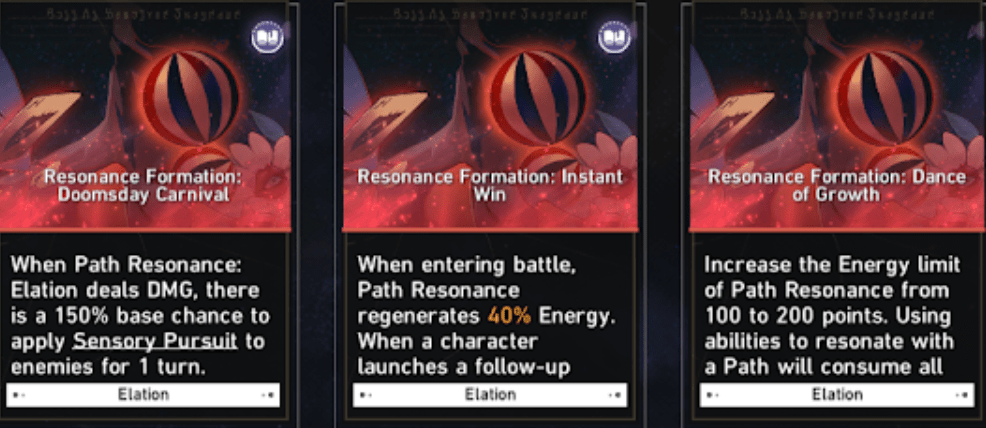
- Instant Win > Doomsday Carnival > Dance of Growth
Explanation:
Instant Win regenerates 40% Energy. When a character launches a follow-up attack, Path Resonance additionally regenerates 5% Energy. This greatly increases resonance uptime.
Doomsday Carnival activates when Path of Resonance: Elation deals DMG, there is a 150% base chance to apply Sensory Pursuit to enemies for 1 turn. This Sensory Pursuit increases the received follow-up attack DMG by 8% for each stack.
Dance of Growth increases the Energy limit of Path Resonance from 100 to 200 points. Using abilities to resonate with a Path will consume all Energy. For every 20% Energy consumed that exceeds the original limit, attacks will deal DMG for 1 extra time. Do not take this if your follow-up attack DMG is insufficient..
Notable Blessings:
Note: Preservation, The Hunt, Nihility is a good side bless to pick up especially the ones that boost DMG, Break, and Shield
3* Elation Blessings
- Auto-Harmonica: Whitest Night – After a follow-up attack deal Aftertaste DMG equal to 55% of their ATK for 1 to 3 time(s) (Aftertaste is a follow-up dmg of a random element dealt by specific Elation Blessings).
- Slaughterhouse No. 4: Rest in Peace – After launching a follow-up attack, deals Aftertaste DMG equal to 80% of their ATK to the enemy. If the enemies’ weakness is broken due to the follow-up attack, it deals DMG for 1 extra time.
- Champion’s Dinner: Cat’s Cradle – Consider Ultimate as a follow-up attack and increase the dmg of follow-up attacks by 15% (Ultimates also gains the additional 15% dmg since it is considered as a follow-up attack).
2* Elation Blessings
- The Painted Albatross – For each enemy hit by the character’s follow-up attack, the character deals additional DMG equal to 24% of their ATK to all enemies hit (Character deals more DMG the more enemies in the field are hit by the follow-up ATK).
- Twenty-First Military Rule – Recover 1 Skill Point at a 65% (100%) chance when performing follow-up attacks.
- Just Keep on Crying! – For every 1 Type of Aftertaste DMG the enemy received, increases the DMG taken by them by 8% until the end of their next action.
- Portrait of A Man On Fire – When causing Aftertaste DMG to an enemy, characters deal additional Aftertaste DMG of different Types for 1 time(s), at DMG values equal to 60% of the original DMG.
1* Elation Blessings
- Suspiria – Increases the DMG of follow-up attacks by 26% (39%).
- Pale Fire – Increases the CRIT Rate of follow-up attacks by 26% (39%).
- Exemplary Conduct – Increases the DMG of follow-up attacks by 9% (12%) for each Elation Blessing. This effect can stack up to a max of 6 (9) time(s). Enhance this.
Gameplay Methodology:
Extremely recommended to be running a follow-up attack character, if not required. Path of Elation is a path that requires some calculation to build it right. You want to stack blessings that boost follow-up attack DMG as much as you can by utilizing Aftertaste DMG and Sensory Pursuit stacks. Obtain Instant Win to allow resonance attack spams, Dance of Growth to increase resonance uptime and follow-up attack DMG, then Doomsday Carnival to boost the follow-up attack DMG with Sensory Pursuit.
It is vital to obtain Auto-Harmonica: Whitest Night and/or Slaughterhouse No. 4: Rest in Peace to trigger Aftertaste DMG.
Fulfill the trigger conditions to initiate follow-up attacks and chain more follow-up attack to conclude the run. If no Elation blessings are available, any blessing from different path that compliments on fulfilling the follow-up attack trigger condition is very helpful.
The Path of The Hunt
Resonance Formation Priority:
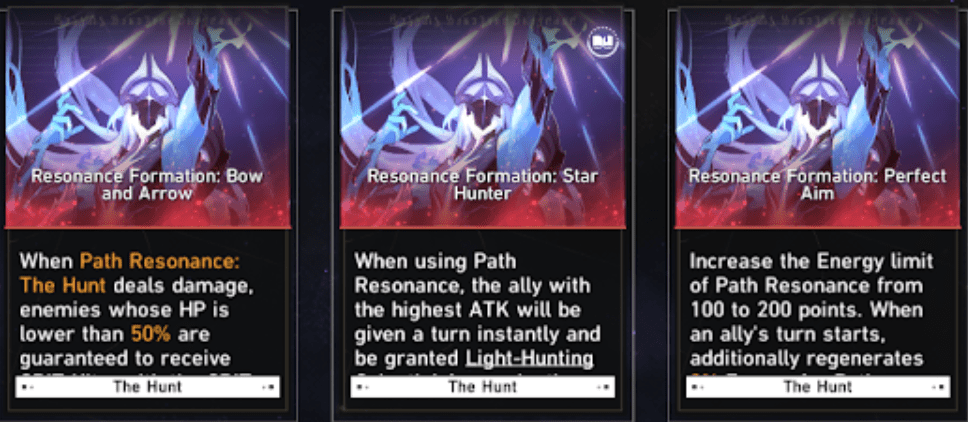
- Bow and Arrow > Perfect Aim > Star Hunter
Explanation:
Bow and Arrow grants guaranteed critical hits with 50% Crit DMG as long as enemies are lower than 50%. Defeating any enemy with this gives back 50% energy which allows continuous use of Resonance ability as long as you kill enemies using the ability.
Perfect Aim increases energy limits from 100 to 200 allowing 2 uses of Resonance abilities. In addition Perfect Aim regenerates 3% energy every time an ally’s turn begins. This Resonance synergizes very well with Bow and Arrow. Allowing the continuous use of Resonance Abilities as long as an enemy is killed.
Star Hunter allows a character with the highest ATK on your team to take their turn instantly and grants the buff Light-Hunting Celestial Arrow. This buff grants the character Crit DMG equal to 50% of your Crit Rate. This resonance ability is only useful with a hyper-carry in the team.
Notable Blessings:
Note: Hunt Blessings tend to be universally good for any path as they tend towards giving more turns and damage.
3* Hunt Blessings
- Celestial Annihilation – When a character breaks an enemy’s weakness, the character takes another turn and increases their damage dealt by 50%.
- Imperishable Victory – After a character defeats an enemy, they take another turn and gains 4 stacks of Critical Boost, (Critical boost increases Crit Rate by 6% and Crit DMG by 12%) this buff transfers to allies when the next turn starts but is reset when an ally is attacked. Not very useful in boss stages without summons or lots of AOE.
- Imperial Reign – When a character’s turn begins, they gain 1 stack of Critical Boost (Critical boost increases Crit Rate by 6% and Crit DMG by 12%). Very good enhance value.
2* Hunt Blessings
- Archery Duel – When a character’s turn begins, every stack of critical boost heals the character for 5% of their max hp. If you have Imperial Reign this blessing is amazing for sustaining long battles. Not recommended to upgrade until Imperial Reign has been enhanced.
- Battle Against the Old Foe – If a character has higher than 100% Crit Rate and currently has Critical Boost. For every 1% Crit Rate over 100% increases Crit DMG by 3%. Crit DMG can be increased up to 150% through this way. Not recommended to enhance unless you have more than 100% crit rate.
1* Hunt Blessings
- Vermeil Bow and White Arrow – For every blessing of the Hunt, increases SPD by 3%. This can stack up to 6 times. Highly recommended enhancing as this blessing will generally get you lots of extra turns.
- Catastrophic Constellation – At the end of a character’s turn, their next turn is advanced by 8%. This synergizes very well with other hunt blessings especially Vermeil Bow and White Arrow in gaining you extra turns. Enhance if possible.
- Vaulting Ambition – At the beginning of a character’s turn, regenerates 4 energy.
- Skirting Life and Death / Shrewd Arrangement – These blessings increase Crit Rate by 11% and Crit DMG by 20% respectively. Upgrading these blessings give a decent amount of extra damage. Do not upgrade unless you have got extra cosmic fragments.
Gameplay Methodology:
Hunt allows continuous damage output and a lot of attack turns. Quickly gather as many Hunt Blessings as you can and obtain Bow and Arrow then Perfect Aim. Use these Resonances to deal high damage and kill enemies in order to continuously regenerate the Resonance Ability.
If no Hunt blessings are available, anything that will give extra survivability and sustain for elite / boss fights can help in your runs. Curios like Doctor’s Robe may help in your runs for extra Resonance damage since this Path is highly dps dependent.
The Path of The Destruction
Resonance Formation Priority:
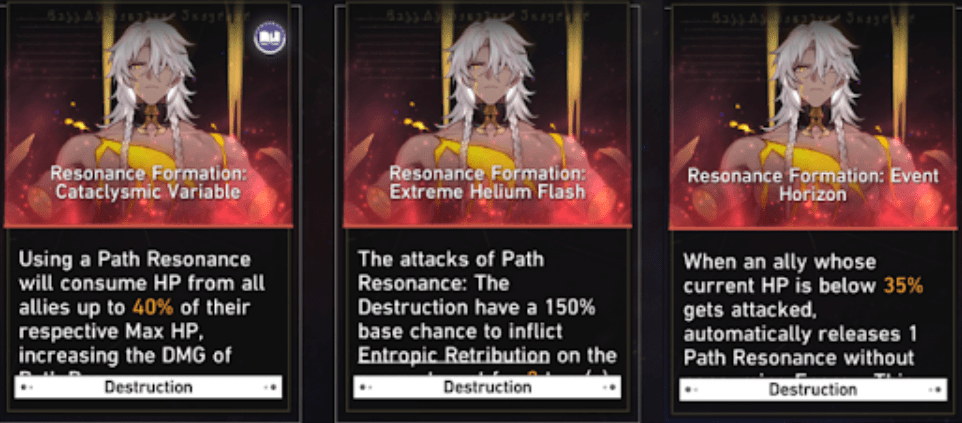
- Cataclysmic Variable > Extreme Helium Flash > Event Horizon
Explanation:
Cataclysmic Variable causes the Destruction Resonance to claim 40% of your entire team’s HP in exchange for a shield of equal value and a 20% damage increase. This shield lasts for two turns and stacks effects with Preservation blessings.
Extreme Helium Flash allows the Destruction Resonance to have a 150% base chance of inflicting the debuff Entropic Retribution on enemies for two turns. Entropic Retribution is a debuff that decreases enemy defense by 20%, and then every turn the enemy takes Fire Damage equivalent to 125% of the total HP difference between your character’s Max and Current HP.
Event Horizon allows the Destruction Resonance to be automatically triggered again when an ally is attacked under 35% HP. This can activate up to twice per battle.
Notable Blessings:
Note: Destruction Blessings can generally be considered the most generic of all blessings, and fit into a multitude of different Paths as well as its own.
3* Destruction Blessings
- Non-Inverse Antimatter Equation – When a character is below 50% HP, they gain 16 stacks of Fighting Spirit. Fighting Spirit is a buff often granted by the Destruction Path, and grants 3% to ATK and DEF per stack, up to 35 stacks. When upgraded, you gain 20 stacks below 50% HP, and 2 more stacks for every 10% HP you’re missing below 50% HP. Medium enhance value.
- Regression Inequality of Annihilation – All damage taken by characters is distributed equally. On AoE attacks, damage will be summed up then split across all allies. When upgraded, grant 15% damage reduction. Decent enhance for sustain.
- Universal Heat Death Characteristic – When allies are hit or use their own HP (I.e. Activation of the Destruction Resonance), they will gain 4 stacks of Fighting Spirit. They lose 4 stacks on end of turn. When upgraded, everything is the same except allies to the left/right of the hit character gain one stack of Fighting Spirit. Priority Enhance.
2* Destruction Blessings
- Indicative Depth of Field – For each stack of Fighting Spirit, gain 0.8% damage reduction. When upgraded, this increase max Fighting Spirit stacks from 35 to 45. Priority Enhance.
- Hazardous Lucent Residue – Upon Ultimate, characters gain a shield equivalent to 25% of the difference between their Max and Current HP. On upgrade, 25% +7% of their Max HP. Valuable to for low hp build.
- Destructive Flare – When character HP is below 50%, deal 40% more damage. Upgraded, under 50% deal 50% more damage + when lower than 35%, gain another 20% damage dealt. Valuable for low hp build.
- Disciplinary Flicker – When HP is lower than 35% when being attacked or losing HP, restores their HP by 12%. When enhanced, can restore up to 20% HP depending on low health. Valuable for low hp build.
- Catastrophic Resonance – When attacking with the Fighting Spirit buff, consume 10% of current HP and deal extra damage equivalent to 60% of HP lost. When upgraded, for each stack of Fighting Spirit, deal additional damage equivalent to 1% of HP lost. Use this blessing with Disciplinary Flicker and/or Universal Heat Death
1* Destruction Blessings
- Primordial Black Hole – Characters gain 5% ATK for every Blessing of Destruction acquired up to 6 blessings. When upgraded, 7% to ATK for every blessing up to 9.
- Instability Strip – Gain 4 energy when hit or lose HP. When upgraded, 6 energy when hit or lose HP. Very good synergy with Catastrophic Resonance.
- Orbital Redshift – Max HP is raised by 16%. When upgraded, 24%.
Gameplay Methodology:
The path of Destruction focuses on the buff Fighting Spirit, which grants 3% atk/def per stack, which efficiently raises dmg and defenses at a low blessing cost. There are 2 ways to get this buff:
- 3* Non-Inverse Antimatter Equation
- 3* Universal Heat Death
Depending on which you get, how you play Destruction will change. If you obtain Non-Inverse Antimatter Equation, you must maintain your HP below 50%. Difficult compatability with healers that have uncontrollable healing. This is due to how the blessing only grants you 16/20 Fighting Spirit stacks when below 50%. Due to the Fighting Spirit buff, you will be tougher than 100% hp with no blessings. Take additional blessings that you can benefit from as listed in Notable Blessings above. Can be used in conjunction with Universal Heat Death to attain maximum stacks of 35.
If you obtain Universal Heat Death, gaining and maintaining stacks can become more difficult, as you gain 4 stacks when getting hit or losing hp, but lose 4 stacks when taking your turn. Only useable if you can consistently hit or hurt the party, and commonly not very useable in short SIM UNI runs. Refer to Higher Difficulty Blessing Setup for more info.
Higher Difficulty Blessing Setup:
This build can also be used outside of Destruction main path to drastically increase any run’s survival.
When incoming damage starts to increase to more unmanageable levels, a more specific setup Fighting Spirit setup can be used. More feasible in the Expansion game modes because of the greater accessibility to blessings
- 3* Universal Heat Death
- 2* Catastrophic Resonance
- 2* (Enhanced) Indicative Depth of Field
Using Universal Heat Death, we will gain Fighting Spirit stacks when getting hit and losing HP. Normally, these stacks would fade when a character’s turn ends, but Catastrophic Resonance allows us to maintain and cap out our stacks by hurting us whenever we take a turn. Enhancing Indicative Depth of Field will then increase the maximum amount of stacks to 45, while also providing damage mitigation.
We can achieve 45 Fighting Spirit Stacks, which gives us +135% ATK, +135% DEF, and 36% DMG mitigation while being at MAX HP.
Other blessings we watch out for are:
- 1* Construct: Firmness
When shielded, take 16/24% less DMG. This will require you to either be using Cataclysmic Variable on Destruction main path, or source shields from a character / blessings.
- 3* Regression Inequality of Annihilation
DMG is equally distributed among all allies. When enhanced, reduces DMG by 15%. VERY SPECIFICALLY do not take this if you use Fu Xuan, or replace her when using it, as this overrides her ability.
The Path of The Nihility
Resonance Formation Priority:
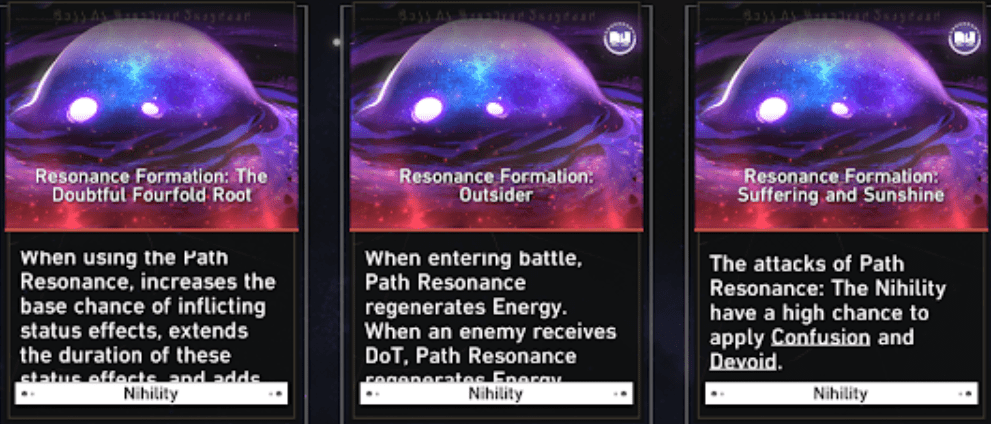
- Outsider > The Doubtful Fourfold Root > Suffering and Sunshine
Explanation:
The Doubtful Fourfold Root increases base chance of applying statuses by 100% for 1 turn, and increases all stackable statuses by 1. This lets us rapidly increase the amount of DoTs for proc’ing other blessings.
Suffering and Sunshine inflicts 2 stacks of Confusion and Devoid for 2 turns. Confusion causes all DoTs to deal 30% DMG of the original DoT when Weakness Broken. Confusion stacks are consumed when proc’d with a max limit of 5 stacks. Devoid reduces Toughness regeneration by 10% per stack, up to a max limit of 5 stacks. An extremely good resonance formation for damage, but only after we get DoT stacks running.
Outsider regenerates 40% resonance energy on battle start. When an enemy is inflicted with a DoT, regenerate 2% resonance energy. A very good formation that increases resonance uptime and also refund resonance energy for itself.
Notable Blessings:
Nihility is a extreme blessing-based path. If you do not have the core 3* blessing to generate Suspicion, and a mix-up of 1-2* blessings to rapidly generate Suspicion, large DoT DMG cannot be generated.
Nihility blessings tend to be niche or useless outside of the Path. There are a few exceptions such as Weakness Break, or increasing DoT DMG of characters, but it is unlikely to be a priority pick compared to being on your proper path.
3* Nihility Blessings
- The Man in The Cover – Every time an enemy is afflicted with a DoT, apply 3 Suspicion. A required blessing to stack Suspicion and proc’d Suspicion related blessings. Useable alone, but best with characters that apply constant DoT.
- Funeral of Sensory Pursuivant – Every time an enemy takes DMG from DoT, apply 1 Suspicion. A required blessing to stack Suspicion and proc’d Suspicion related blessings. Useable alone, but best with blessings that enable extra DoTs.
- Why Hasn’t Everything Disappeared Yet? – At the beginning of an enemy turn, trigger extra DoT for 90%(130%) DMG. Good enhance value for damage.
2* Nihility Blessings
- Night beyond Pyre – Increases Weakness Break efficiency by 30%(45%). An exceptional blessing of Nihility, that lets you break enemies extremely fast. A possible universal pickup blessing for all Paths.
- Café Self-Deceit – Inflicts 1 stack of Suspicion if target has Suspicion stacks when Suspicion is applied. Enhance this. Doubles the Suspicion stacks on target when triggered. An extremely potent and fast method of reaching 99 Suspicion stacks.
- All Things are Possible – Attacking any enemy under a DoT status will trigger 100% DMG of a random DoT. A good combo with Funeral of Sensory Pursuivant.
1* Nihility Blessings
- Before Sunrise – When an enemy receives a DoT, 2.0(3.0) Energy is regenerated for a random ally. Increases overall ultimate uptime, providing sustain and damage, notably charging up resonance faster.
- Ignosticism – Increase DoT DMG by 6% per stack for each Nihility blessing, up to a limit of 6. Good enhance value for damage. Increase DoT DMG by 8% per stack for each Nihility blessing, up to a limit of 9. This increases DoT DMG from 36% to 72%.
- Sensory Labyrinth – Extend the duration of Wind, Physical, Lightning, and Fire DoT by 1 turn. Okay enhance value. Extend the duration of Wind, Physical, Lightning, and Fire DoT by 2 turns. Take this if an extended battle is expected.
- Questioning of Purpose – Increases Break Effect by 50%. This assumes you use characters that break and apply DoTs. Good enhance value. Increases Break Effect by 75%.
Gameplay Methodology:
Recommended to bring a DoT character, but not required. A high-risk high reward path, the Path of Nihility shines best in late game battles, where fast and high stacking Suspicion causes enemies to die to DoTs nearly instantly. There is a 2 part methodology to Nihility. The first is acquire blessings which lets you generate Suspicion stacks quickly.
The second is to acquire weakness-related or DoT DMG blessings, to ramp up DoT DMG. Acquire resonance formation Outsider then The Doubtful Fourfold Root. If you haven’t gotten 3* The Man in The Cover or 3* Funeral of Sensory Pursuivant, acquire them. Once a Suspicion blessing has been obtained, 2* Suspicion blessings will become available. Obtain these if possible for fast Suspiscion stacking.
The Path of The Abundance
Resonance Formation Priority: Anatta, Anicca, Terminal Nirvana
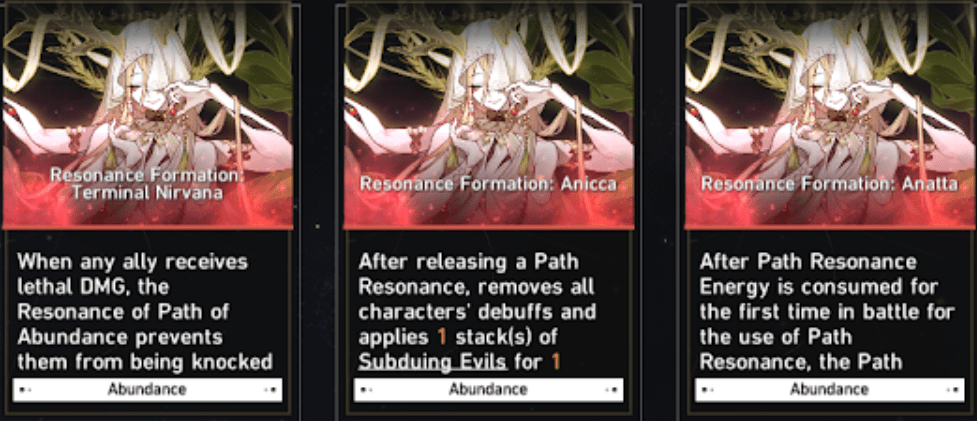
- Anatta >=Anicca > Terminal Nirvana
Explanation:
Anatta is easily the most valuable out of the initial Path Resonances available to Abundance. Essentially, every single turn after the initial use of the Abundance Resonance will re-trigger the Resonance Ability, albeit at a 30% weaker way. In addition, this “2nd cast” also retains all previous abilities of the other Resonances. When stacked with “Anicca,” it results in essentially a complete nullification of debuffs. The most important tip would be to ALWAYS ACTIVATE the Resonance Ability at the start of the battle, so the automatic triggering of Anatta’s second trigger will be activated from the start.
Anicca would have to be your second priority when running The Abundance, with basically one purpose. On activation of the Resonance Ability, it clears all debuffs from your characters and inflicts a stack of “Subduing Evils” for one turn. This buff can stack up to 5 times, and nullifies a debuff and heals 10% HP when the timer on the buff runs out.
The final ability would be Terminal Nirvana, which is good in emergencies but really not necessary on most competent teams. Essentially, if any character on your team falls, all Resonance Energy will be consumed and the Resonance Ability will be automatically activated, reviving the fallen character and healing them by however much the Resonance Ability does. This can activate once per battle, but is generally never activated.
Notable Blessings:
Note: Abundance blessings tend to be universally useful within its own path. You cannot go wrong just picking any Abundance blessing, but Destruction blessings like 1* Orbital Redshift and 3* Regression Inequality of Annihilation make you even more virtually invincible.
3* Abundance Blessings
- Prosperity, Longevity – This is generally considered a must, especially with Anatta. Every single turn, based on the amount of hp healed, the Dewdrop effect will charge. The charge value of this effect will be equivalent to 100% of the healing received in that turn, and the maximum value of Dewdrop is 500% of the character’s HP. Dewdrop charges even when hp is already capped. While this does not sound impressive, this is on average a 12000 – 16000 total damage per turn increase. When upgraded, Dewdrop will deal 40% more damage, raising this average increase to 16000 – 24000 damage per turn increase. Please note to use this with Anatta.
- Mudra of Blessing – Read the prior description first. Mudra of Blessing charges Dewdrop by 60% of the character’s hp, raising dps by 60% of the active character’s current hp. When upgraded, Mudra charges Dewdrop by 70% of the character’s maximum hp, and this Dewdrop damage also stacks with the 40% increase from the upgraded “Prosperity, Longevity.” Recommended to use with Anatta when not upgraded.
- Being of Abundance, Of One Mind – The most mediocre of the 3* Abundance blessings. Whenever one of your characters receive healing, all other characters receive 30% of the hp restored. When upgraded, characters gain 15% of the hp restored to their base atk, stacking up to 80% of each ally’s atk, this buff lasts until the end of the next turn.
2* Abundance Blessings
- Aversion to Suffering – 36% of the character’s current hp will be added to your attack damage. When upgraded it is 42% of your maximum hp.
- Mortals of the Buddha Field – Increases charging efficiency of Dewdrop by 80%, 120% when upgraded. This effect only functions when characters are at maximum health. This blessing can only be obtained when the Player has one of the 3* blessings “Prosperity, Longevity” or “Mudra of Blessing.”
1* Abundance Blessings
- Rain of Truth – For each blessing of Abundance (up to 6), raise maximum hp by 5%. When upgraded, Raise by 7% and up to 9 blessings of Abundance.
Gameplay Methodology:
Not really any healer required, works with any team. The Abundance is rather easy to use and requires no player input or focus for every single ability to be actively used in an optimized manner as long as Resonance Formation: Anatta is active.
Any combinations of blessings are going to work and once 6 blessings are obtained choose Anatta or Anicca in World 5. These two Resonances will keep you alive virtually infinitely as long as the Elite / Boss enemy does not stack enough damage from Berserk or standard damage stacking. All damage will be supplemented as long as the player acquires “Prosperity, Longevity” or “Mudra of Blessing” and if neither is obtained make sure to go for as many “Transaction” occurrences as possible and try to trade a 3* blessing for one of them.
Once either is obtained, go for blessings like Rain of Truth, Orbital Redshift, or Sweet Dew, all 1* blessings that boost HP or incoming Healing. If Mortals Of the Buddha Field, Prosperity, Longevity, Mudra of Blessing, and the Anatta Resonance Path are obtained, most fights should become a breeze. The general ideal of the Abundance is to stack HP and depend on Dewdrop for damage rotations.
The Path of The Propagation
Resonance Formation Priority:
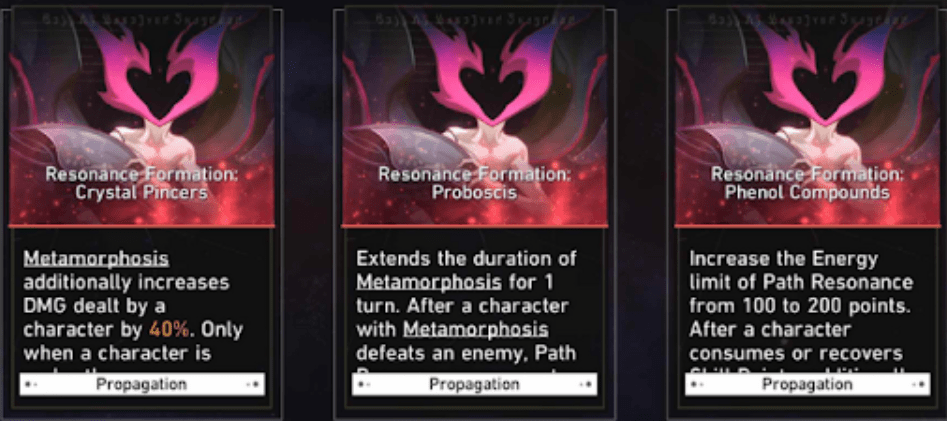
- Phenol Compounds >= Probocis > Crystal Pincers
Explanation:
Phenol Compounds is a good source of resonance energy that recovers on every change of skill points. Probocis can match Phenol Compounds if there are sufficient summons to kill to refuel a loop. When Crystal Pincers is obtained, Spore can only be popped by characters with the Metamorphosis buff from resonance.
Metamorphosis gives 10% all-Type Res ignore per skill point consumed or recovered, up to 2 times, for 1 turn.
Spores are a debuff that causes damage when a target is damaged at 3 or more stacks. After bursting, Spores will spread to a random adjacent target and cannot spread again.
Notable Blessings:
Note: Best used with characters with a kit that revolves around basic atk, or multi-skill-point usages
3* Propagation Blessings
- Spore Discharge – All enemies gain 1 Spore per skill point consumed. When enhanced, the character that uses the last skill point will gain a 20% spd buff for 2 turns. Poor enhance.
- Fungal Pustule – Apply Spore to 2 random enemies per skill point recovered. When enhanced, max Spore count increases to 9.
- Scythe Limbs – After a character’s ultimate usage, their crit dmg will be increased by 40%(45%) per skill point consumption action, up to 2 stacks. When skill points are consumed, it will be considered as 1 additional skill point consumed.
- *In order to reach 2 stacks of crit dmg, a skill must be used twice before attacking. Additional consumption is not the same as consumption action.
2* Propagation Blessings
- Putrefaction Ulcer – Allows Spores to burst and spread up to 2 times. When enhanced, upgraded to 3 times.
- Excitatory Gland – Recovers 1 additional skill point if skill points are at 0 when enemies are attacked with a basic attack. When enhanced, there is a 50% chance to recover another skill point.
1* Propagation Blessings
- Osseus Blade – For each blessing of Propagation (up to 6), raise basic attack damage by 9%. When upgraded, raise basic attack damage by 12% and up to 9 blessings. Enhance this. –
- Spinal Spur – Increase basic atk crit rate by 24%(36%).
Gameplay Methodology:
Propagation is most noticeable for its large increases in basic atk damage. However, for general gameplay loop, the path itself loops around the usage of resonance and changes in skill points.
With 3* blessings, Spores will be created per skill points consumed/recovered, and will burst when attacked at 3 stacks or more, causing damage to a target, and spreading to adjacent targets. By using resonance to loop energy back and repeatedly causing large skill point changes, you can cause massive damage with Spores, on top of large basic attack damage.
This general gameplay may be skipped in many cases by using the large basic attack dmg blessings alongside synergistic blessings to simply refund turns and destroy enemies with small enough health pools
The Path of Erudition
Resonance Formation Priority:
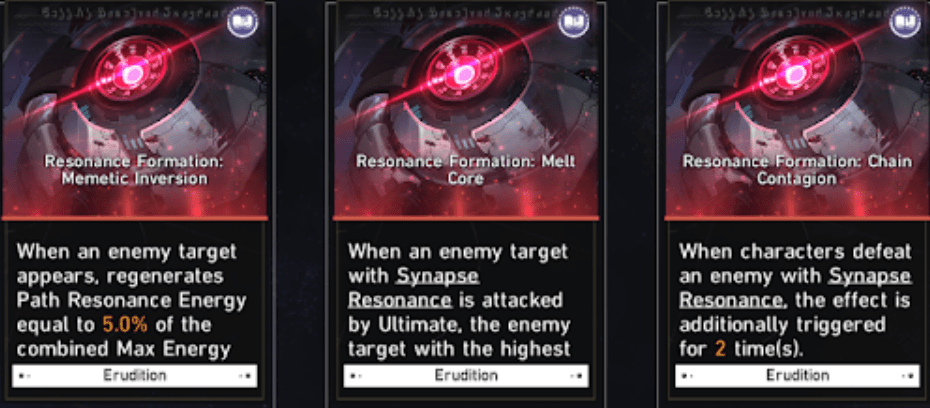
- Summons: Memetic Inversion > Chain Contagion > Melt Core
- No summons: Melt Core > Chain Contagion = Memetic Inversion
Explanation:
Extremely dependent on summons. Advised to use something else if no summons.
Synapse Resonance is inflicted through the base Erudition Resonance on all enemies. Whenever a Synapsed enemy is hit, it will deal 70% of the character’s ATK as Ultimate DMG to the enemy and highest Max HP Enemy. This can be triggered 15 times.
- Melt Core – When attacking a Synapsed enemy, the highest Max HP Enemy takes 50% ATK DMG from the character
- Chain Contagion – Boss dependent. Upon defeating an enemy, activate Synapse Resonance twice more, dealing damage to highest Max HP Enemy.
- Memetic Inversion – Boss dependent. Energy is only regenerated when new enemy targets appear. Only good for enemies that consistently summon, such as Swarm
Notable Blessings:
Brain in a Vat acts as a secondary ultimate energy bar. When an Ultimate is used while Brain in a Vat is at 100% charge, the Ultimate can be used again until the next turn. The charge will be consumed on use.
3* Erudition Blessings
- SMR-2 Amygdala – Dealing fatal DMG charges Brain in a Vat by 50%
- BCI-34 Gray Matter – Charges Brain in a Vat by 65% on entering battle. Breaking Weakness charges Brain in a Vat by 35%
- VEP-18 Occipital Lobe – Increase All-Type RES PEN for Ultimate DMG by 20%. Increase All-Type RES PEN for next Ultimate DMG by 3% for each enemy hit during an Ultimate
2* Erudition Blessings
- Attachment: Vestibular System – Increase ultimate CRIT DMG by 80% for Brain in a Vat Ultimates. When enhanced increase ultimate CRIT DMG by 90% for Brain in a Vat Ultimates and the next attack.
- Imitation: Transmitter Synthesis – Charge Brain in a Vat by 0.8/1.2% for each point of excess character energy. More useful the more energy you find from external sources
- Analysis: Subliminal Sensation – Regenerate 60/100% of max energy at battle start. Increase ultimate DMG by 50% for first ultimate. When enhanced, ultimate DMG buff won’t fade after first ultimate
- *Load: Striated Cortex – When attacking a single enemy with an [AoE], deal DMG equal to 40/60% of the attack. *Strictly for characters with [AoE]
1* Erudition Blessings
- Throne of Engaged Gears – For each blessing of Erudition(up to 6/9), increase ultimate DMG by 7/10%. Ultimate DMG increase of 42/90% when capped blessings.
- Ring of Bent Wires – Increase ultimate CRIT Rate by 18/27%.
- Sceptor of Energy Torque – Increase ultimate CRIT DMG by 30/45%.
- Torch of Anti-Lag Ignition – After using an ultimate, the next attack will deal 50/75% more DMG.
Gameplay Methodology:
Erudition revolves around 3 major things.
- [AoE] attacks(no, [Blast] is not [AoE], check the ability tag on skills)
- Ultimates
- Multiple enemies/enemies summoning more enemies
Due to how conditional this is depending on team composition, pick blessings based on what you are capable of using. A general build will aim for BCI-34 Gray Matter instead of SMR-2 Amygdala to better fight low enemy density bosses / tougher enemies, assuming you break enemies.
Switch priority as needed. The blessings in Notable Blessings focus on Ultimate critical hits, but obtain other Erudition blessings on a case by case basis on whether your team can use them.
FAQ
What is the SPD / speed stat?
Speed determines action order (the bar on the top left of your screen and how many turns you can take during a battle). The fastest characters based on speed during a battle will go first, followed by second fastest etc. With enough speed, your fastest characters may take two or even three turns before your slowest character can take their turn. Action order can be affected by multiple buffs or debuffs.
The most common action delaying debuffs being Frozen or Imprisonment. Freeze causes the character that is frozen to skip a turn putting them further back in the action order. While Imprisonment delays and slows down the character affected causing them to take less turns for as long as Imprisonment is active. Using these buffs and debuffs allow you to manipulate action order to give your characters more turns while keeping your enemy from being able to move.
How long do buffs / debuffs stay active?
Buffs and Debuffs are affected whenever a character takes an action and ticks down at the end of a character’s turn. These buffs / debuffs are not affected by the Forgotten Hall’s Cycle counter for example as they do not count as a character taking a turn. While character Ultimates and follow-up attacks do take the benefits of your buffs, they do not tick down the buff duration as it does not count as an actual turn.
*Things like Bronya’s Skill or Sushang’s Ult for a 100% Action Forward is counted as an extra turn meaning your buffs may cycle off faster than you may want them to.
What is the difference between break effect and break efficiency?
Break effect and break efficiency are two very different things although they both are related to the Toughness Bar (see Break Effects above). Break effect determines how much damage each break does and is capped by how often your enemy can regenerate their Toughness Bar. Break Efficiency on the other hand determines how fast you can break a certain enemy’s Toughness.
What are Trailblazer Blessings and which one should I take?
Trailblazer Blessings are your beginning three picks inside Simulated World. You are given an option of Curio, Blessings, or Cosmic Fragments. Cosmic Fragments are the most consistent to take for a playthrough as they are useful for a variety of Occurrences, Transactions, or Respite Stages. A case can be made for Curio though as some starting Curios like the Galactic Lottery have the chance of snowballing your playthrough.
Blessings should only be chosen when you want to get to your specific Path Resonance as fast as possible.
Should I choose Combat, Occurrences, Encounter or Transaction Stages?
During your playthrough of Simulated Universe you might have encountered Combat, Occurrences, Encounter and Transaction Stages and wondered which ones are more optimal to go through. Combat allows for more consistent Blessings gain without any downsides that can come from the other Stages. Occurrences are more of a gamble as they have a mixture of negative and positive events. Encounters are more high risk and high reward allowing you to fight Elite Enemies in exchange for guaranteed three star Blessings. Transaction Stages allow you to exchange your Health, Cosmic Fragments, Curios, or Blessings in exchange for (usually better) Blessings. If you are not sure about which to choose for your playthrough Transaction > Combat > Occurrences > Encounters, for the least RNG in your pathing.
How do I use Downloader in Simulated Universe and what does it do?
The Downloader in Simulated Universe is found inside Respite Rooms after an Elite Enemy. These Downloaders will let you bring a character besides the base four that you began your Simulated Universe playthrough with in order to swap out certain members of your party in order to take advantage of enemy weaknesses or in the case of a character dying. These characters can be accessed by clicking the Team Setup button on the top right of your screen.
How do I unlock the Reviver and how do I use it?
In Simulated Universe the Reviver is unlocked as the 7th ability in the Ability Tree tab. This Reviver is found inside Respite Rooms after an Elite Enemy. The Reviver lets you spend Cosmic Fragments in order to revive characters that have died during your battles in your playthrough. This is the only way besides things like Bailu’s talent to bring characters back from the dead in Simulated Universe.
How many Blessings of a path do I need in order to unlock my Path’s Resonance.
Path Resonances in Simulated Universe first unlock after obtaining 3 Blessings of an Aeon Path you choose when you began your playthrough of a world. Further Resonances can be unlocked after acquiring Abilities inside the Simulated Universe Ability Tree (Ability unlocks 6,16,and 25). These upgrades to the skill tree allows you to choose an additional Aeon Path Resonance when you get 6,10, and 14 Blessings (not including path resonance upgrades that show in the total) of your chosen Aeon Path.
How do I unlock different Aeon Paths?
Aeon Paths are unlocked by simply playing through worlds and defeating the first couple stages, with Nihility unlocking at World 4 and Abundance unlocking at World 5.


Be the first to comment