
Tips to jumpstart your Dungeon Diagramming!
Dungeons & Diagrams Tips
Introduction
Dungeons & Diagrams is a Nikoli-style puzzle. There are 64 puzzles included in the game. I certainly haven’t gotten through them all yet, but I’ve been enjoying them, and I figured I’d share some of my insights…This is especially for people who haven’t encountered this type of puzzle before, or who have only tried Sudoku!
General Tips
Know the rules. You can click the option, or hit F1, to review them at any time.
Watch for patterns. The interesting part of solving this kind of puzzle is watching for patterns and situations implied by the rules. I’ll go through some of these in the next section.
Record every bit of information you can. If a space has to be a wall, click it to mark it a wall! If a space has to be open, right-click to mark it open! Every bit of information has the potential to allow another deduction.
Search the puzzle over and over…and over. The heart of solving this type of puzzle is searching for places you can apply logic and deduce new bits of information. You’ll be searching over and over and over. Don’t get discouraged, but if you have to, try a different puzzle or come back another day; looking at it fresh often helps. In particular, whenever you make a mark, see if that affects any situations or allows you to make new deductions.
Specific Situations
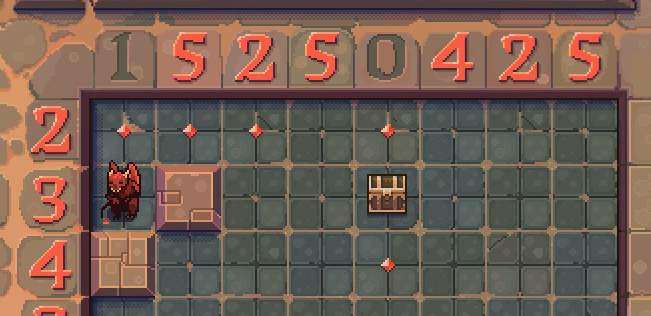
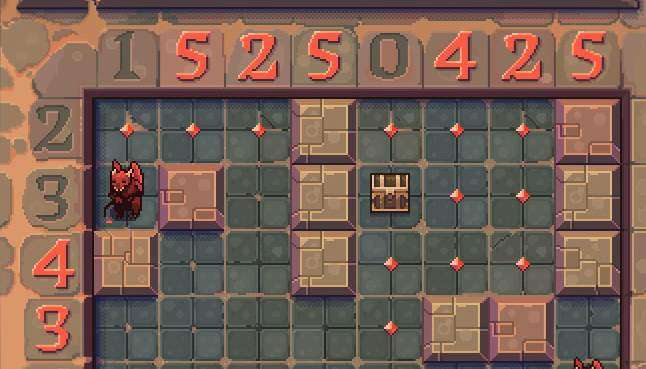
Count the blank spaces. When you start, every space is either a monster, treasure, or blank. To solve the puzzle, you want to mark those spaces as either walls or open. (Technically, you only have to mark walls, but like I said before, mark down every bit of information you can!)
You’re trying to turn blank spaces into marked spaces. The numbers on the rows and columns show how many walls there are; use this information to mark spaces. Remember that the puzzle grid is 8×8, so there are 8 spaces in every row and 8 spaces in every column. If a row says 0, mark it all open. If it says 8, mark it all walls. If it says 6 and has 2 monsters, that adds to 8, so mark it all wall. If it says 3 and has 1 marked wall, the other 7 spaces have 2 walls; if those 7 spaces already contain 1 monster, 1 treasure and 3 marked open, then there are 2 blank spaces; mark those 2 blank as walls. Always compare the number of blank spaces to the number of walls left to mark. When you mark all the walls in a row or column, the number helpfully turns gray; mark the rest of those spaces open!
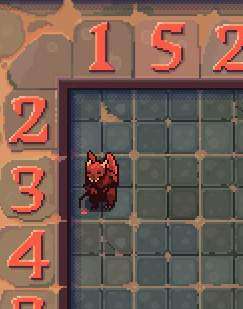
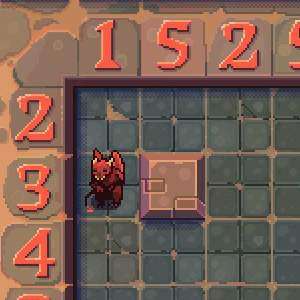
Monsters are surrounded on 3 sides, with 1 side open. Monsters are “always in a dead end”; that means, out of the 4 adjacent spaces, 1 is open while the other 3 are walls or edge-of-puzzle. If a monster has a space next to it marked open, mark the other ones wall. You can often use this property in deductions like “Out of the 2 spaces next to this monster, 1 has to be wall and 1 has to be open”.
Don’t create dead ends. Unless they have monsters, of course. “Every dead end has a monster”, which means that there are no dead ends without monsters. So if an open space has 3 walls around it, that last space has to be open.
Don’t block off parts of the dungeon. Every open space, including halls and treasure room, have to eventually connect to each other. You can’t mark a wall that would block off part of a hallway. You can often think of this as marking a “trail” of open spaces that lead out of blocked-off parts of a dungeon.
Watch for 2×2 open. You can’t have a 2×2 open space (unless it’s in a treasure room). If you see a 2×2 area with 3 spaces marked open, mark the last space as a wall.
Monsters cannot be adjacent to treasure rooms. That is, they cannot be adjacent to the 3×3 open space that contains the treasure. This follows from the rules. First, a monster has to be in a dead end. Second, a treasure room cannot have 2 exits. So if a monster were adjacent to the 3×3 spaces, one of those open spaces would be the 1 open space next to it, so the other 3 spaces around the monster would have to be wall/edge. However, this would block off access to the treasure room from the rest of the dungeon; the only “exit” from the treasure room would lead into the monster’s dead end. Therefore this situation can’t happen.
Find the possible treasure room placements. If there’s a treasure, it’s in a treasure room (3×3 open spaces), and it “can be in any of the 9 spaces”. If you look at it another way, for every treasure, there are 9 possible placements for the treasure room. I like to imagine it as a 3×3 space that “slides” around the treasure. Watch for things that limit the possible treasure room placements. For example, if there’s a wall directly below the treasure, that limits the possible treasure room placements to 3; the treasure could be in the bottom left, bottom center or bottom right. What these placements have in common is that the two spaces directly above the treasure are always open. So mark those spaces open!
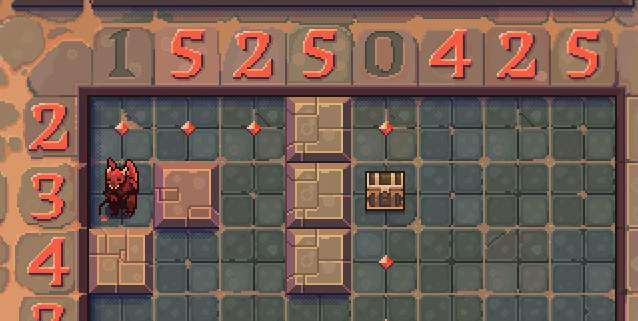
A treasure room cannot have 2 exits. This is straight from the rules. Watch for trails of open spaces around treasures; if it looks like there are going to be 2 (or more!) exits, something’s wrong. Here’s an example.
Since the column with the treasure is marked 0, I marked every space open. However, this almost looks like exits lead both up and down from the treasure room. There has to be something to block off one of those exits; the only way is for the treasure room walls to touch the top edge of the puzzle. It doesn’t let us mark anything yet, but it’s something to keep in mind.
Putting It All Together
As I said in “General Tips”, you’ll be searching the puzzle over and over to find situations to mark spaces. Sometimes you have to say “If this, then that”, and keep going until you find a contradiction, then “rewind” until you find whatever assumption originally led to the contradiction. Here’s an example.
Notice this monster is in a column marked 1. It’s got 3 spaces around it. 1 of those spaces has to be open, the other 2 have to be walls. Let’s imagine the space to the right is open; the ones above and below are wall. However, that leads to a contradiction, because it would be 2 walls in a column of 1. Therefore our original premise was flawed; the space to the monster’s right has to be wall.
Not only that, since we know that out of the spaces above and below the monster, 1 is a wall and 1 is open…that fills the quota of the column marked 1, so the spaces below those 3 can all be marked open.
Now look at this:

Why did I mark the one below the monster as wall? Imagine I marked the one above as wall. The one below would be open, nothing wrong yet. But the space at the top of the 5 column would be a dead end; to prevent this, we’d have to mark that space wall. That would fill the quota of the 2 row, so all the spaces to the right would be marked open. But we already have that line of open spaces leading down from the treasure chest; that would imply 2 or even 3 exits from the treasure room! That can’t happen, so we rewind and mark the space above the monster as open. Then the one below is wall. We also mark a trail of open spaces leading away from the monster, so it will eventually connect with the rest of the hallways.
Now, we already have an exit from our treasure room, leading downward, so we have to block off the treasure room from the trail we just marked.
This nails down our treasure room placement, so we mark walls to close it in.
Now on the right you’ll see there’s a dead end above that monster, so we have to mark it wall. And so on.
This shows how you can build up deductions to make progress in the puzzle. Keep it up and you’ll have those monsters walled off in no time!

Be the first to comment