Here I will try to pass along some crafting tips to hopefully make crafting more enjoyable and easier to understand.
Crafting Character Creation
Ideal Mining Characters:
- Race: Grey Elf or Sun Elf for +2 innate Intelligence
- Class: Powerful Wizard for the extra feats and max base Intelligence
- Feats:
- (1) Skill Focus: Craft (Blacksmithing)
- (2) Skill Focus: Craft (Weaponsmithing)
- (3) Skill Focus: Craft (Armorsmithing)
- (4) Skill Focus: Craft (Magic Equipment)
- (5) Skill Focus: Craft (Wondrous Item)
- Item: something with +Intelligence (they don’t stack so just use the highest one)
Already have a save with full party, but still want some optimized crafters:
- (1) Go to town with an Adventurer’s Guild that provides Substitute Character service
- (2) Buy Substitute Character slots if you have not already (1000, 4000, and 9000 gold pieces for first three slots)
- (3) Move old character into Substitute Character storage
- (4) Recruit either Grey Elf or Sun Elf (doesn’t matter the class; higher level is better)
- (5) Go to town with any Adventurer’s Guild
- (6) Right click the icon of the new recruit and select “Retrain”, which will reset the character to level 1 and allow you to choose the class
- (7) Go to character profile and select level up [+] icon to get all the levels back
Learn Crafting Skills

As explained by the in-game tutorial, the Crafting Skills can be trained at any of the towns with an Artisan’s Guild. The Artisan’s Guild provides training in Woodcutting, Mining, Blacksmithing, Weaponsmithing, Armorsmithing, Magic Equipment Crafting, and Wondrous Item Crafting for a small fee of 200 Gold Pieces.
The towns with Artisan’s Guilds have the icon with the crossed tools over blue flag shown by their city name, which also happens to be the icon to click when visiting the town to access the menu for the training (seen in bottom left corner when inside town). As only three characters can participate in crafting at the same time (1 main and 2 assistants), there is not much benefit training crafters beyond the three characters you picked to be crafters.
The following towns have Artisan’s Guilds:
- Bertbury (Mid-Southeast)
- Ironthorns (Northwest)
- San Ayrr (Central)
- Whitehawk City (Northeast)
Don’t confuse the Artisan’s Guild icon with the Adventurer’s Guild icon (crossed swords over yellow flag shown below), which provides Disable Device Training, Open Lock Training, and/or Substitute Character.

Select Main Crafter and Two Assistants

Once you have trained your characters with the crafting skills, you can choose the main crafter and two assistants by opening the Skill Menu in the bottom right of screen (icon shown above). Next, select the party icon in the top left (usually the default selection):

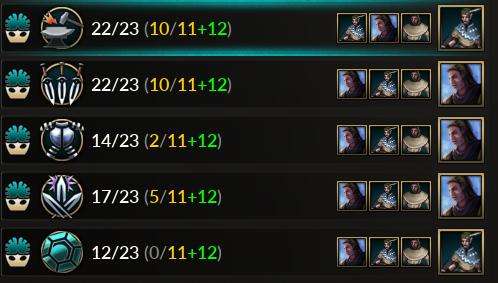
Then, scroll down until you reach the party crafting skills section (early game example shown below). This window shows from left to right: Intelligence icon indicating that this stat gives a bonus modifier with increasing levels of Intelligence, Crafting icons, effective party crafting skill ranks, the three party members assigned in the small boxes, and lastly the character with the highest skill level in the large box (does not represent the main miner). In the example shown, all five crafting skills have the same main crafter, but the large box is showing a different crafter with the same crafting rank as the main crafter for two of the skills.

Finally, to select which characters will be used for crafting, select the Skill Users Icon in the bottom left after selecting the Party Crafting Skill as above. The first character you select will be the main crafter (single fist) and the next two will be the assistants (green hands shaking).

Breakdown of Crafting Skill Window
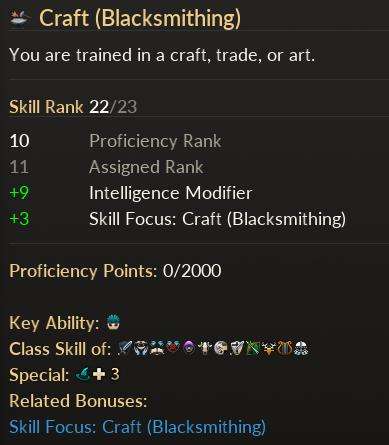
Hovering over the party crafting skill section provides even more information that is especially useful when planning an optimized crafting build. Here is an example using Blacksmithing (the other four crafting skills are essentially the same):
- Crafting Type: Blacksmithing
- Skill Rank: current rank / max rank
- Breakdown of how that skill rank was calculated: Proficiency Rank (ranks already achieved via proficiency points, which are given by crafting), Assigned Rank (term for max skill rank), Intelligence Modifier (boost in rank due to main crafter’s Intelligence level), and lastly additional bonuses applied (Skill Focus feat is the only additional bonus that can currently be applied to crafting skills)
- Proficiency Points: current progress towards achieving next proficiency rank
- Key Ability (again just showing which stat boosts this skill): Intelligence
- Class Skill (shows which character classes can learn this skill): Fighter, Cleric, Wizard, Sorcerer, Rogue, Barbarian, Monk, Paladin, Ranger, Druid, Bard, Dwarven Defender
- Special: Tutor (need to learn skill from Artisan’s Guild), Trained Only (can’t craft without having at least skill rank 1), and 3 maximum combining users (1 main crafter and 2 supports)
- Can get +3 Crafting Rank by selecting the Feat “Skill Focus: Craft (Blacksmithing)”

Increase Max Crafting Skill
There are two main ways to increase max crafting skill: proficiency based (only increase max level) and non-proficiency based (immediately increase effective crafting skill level).
Proficiency Based Crafting Skill Bonus:
- +3 Bonus Initial Skill Point Assignment
- +1 Skill Point Assignment Per Character Level
- i.e. +4 at level 1, +5 at level 2, +6 at level 3, etc
Note: Proficiency gains are permanent in that you will not have to re-earn them. However, if max proficiency drops due to skill reset, then that proficiency will not be used until the max is raised again.
Non-Proficiency Based Crafting Skill Bonuses:
- + Crafting Rank based on Intelligence Level
- +3 Crafting Rank by selecting the corresponding “Skill Focus: Craft” feat
Note: Maximizing the Non-Proficiency Based Crafting Skill Bonuses before training the crafting proficiency is especially important as having 100% success rate for the training activities below will drastically reduce the amount of materials consumed and increase the amount of proficiency earned. Essentially, the best route for crafting training is to setup everything up so you can successfully perform the training activities, which then allow you to level the skills up to a point where you have 100% chance to make anything you want to make for your team to actually use. The higher tier crafting gets very expensive and uses a lot of rare materials. Also, for the most part the experience gained from making the very expensive items is often not that much more than the training activities. By using the following training activities to train these crafting skills, it is possible to max your crafting level to the point where everything has a 100% success rate without having to craft anything expensive using materials that are very easy to collect using mining or woodcutting.
Batch Crafting
For the training activities below, I highly recommend using the batch crafting feature as much as possible. Generally, stocking up enough materials to craft at least one hundred at a time (except for magic equipment and wondrous items as explained later) will save a significant amount of time. Usually it takes a few minutes and will cycle through each of the one hundred crafts one at a time. The batch feature lets you go do something else for a few minutes and come back to the game once the crafting has finished.


Be the first to comment