
Comprehensive Guide to Intermediate-Level Strategies
By 7thApprentice.
Requires an understanding of the game’s basics such as dice probabilities.
Main Events: Meta Overview
Peg-E
- Tokens Needed = (Points Needed / 19.5)
- Multiplier: x1-5
Strategy:
- For the 1-Bumper Version, all buttons provide the same Points per Token since we only have one bumper instead of two. For left and right bumpers, the bumper “removal” x30 strategy still works.
Partners
- Tokens Needed:
- Mega Spin Version = (Points Needed / 232.6) x 20
- 1 Jackpot Version = (Points Needed / 248.6) x 20
- 2 Jackpot Version = (Points Needed / 306) x 20
- Multiplier: x1-3
Strategy:
- LC+RM+HR Version: A 60/40 contribution strategy allows for both partners to maximize the utilization of all three buffs (HR, RM, LC) from a single build if coordinated with at least 1 of the other 3 builds. The goal here is to immediately activate two buffs from one build and one buff from another build for a HR + RM + LC overlap.
- All Other Versions: A simple 50/50 will be sufficient as no coordination is needed here.
Racers
- Tokens Needed = (Points Needed / 17.5) x 20
- Multiplier: x1
Strategy:
- For an adaptive strategy, aim to secure a top 3 spot within the first race. This leaves you with the most options to make adjustments both during the first race and for the next two races based on opponent performance.
Adventure
Difficulty Selection:
- No Buff = 12 Pt Average [♦]
- Ice Cold = 16 Pt Average [♦♦]
- On Fire = 18 Pt Average [♦♦♦]
Strategy:
- Play ‘follow the leader’ to stack x8 Team Boost, and buff up from tasks prior to targeting treasures.
For all events labeled with a x1 Multiplier, the use of a low Multiplier is critical for reaching the expected Jackpot average particularly for players that don’t have a lot of tokens. If an event is marked with a higher range of multipliers, this is because the average cost is easier to reach for some events than others.
Chest Cash Saving Meta
Important: This is ONLY applicable if you have the New Net Worth Gallery.
The new cash saving strategy utilizes the Community Chest as a safe storage for cash since you can stash cash away in the chest indefinitely. This is ONLY possible with the New Net Worth Gallery since it buffs the cash returned so much that flipping 7 Friend Tokens over is equal to the cash value of a Shutdown and an 8th Friend Token is very close to the Bank Heist average value. Considering the average is 1-2 purple packs from the chest per year, utilizing the chest as a piggy bank is a significantly better option.
CC Cash Summary:
- Let the cash continue to safely build in the Community Chest (CC).
- Do NOT open the Community Chest until you need to spend.
- The best time to spend CC cash is during an event overlap alongside Landmark Rush.
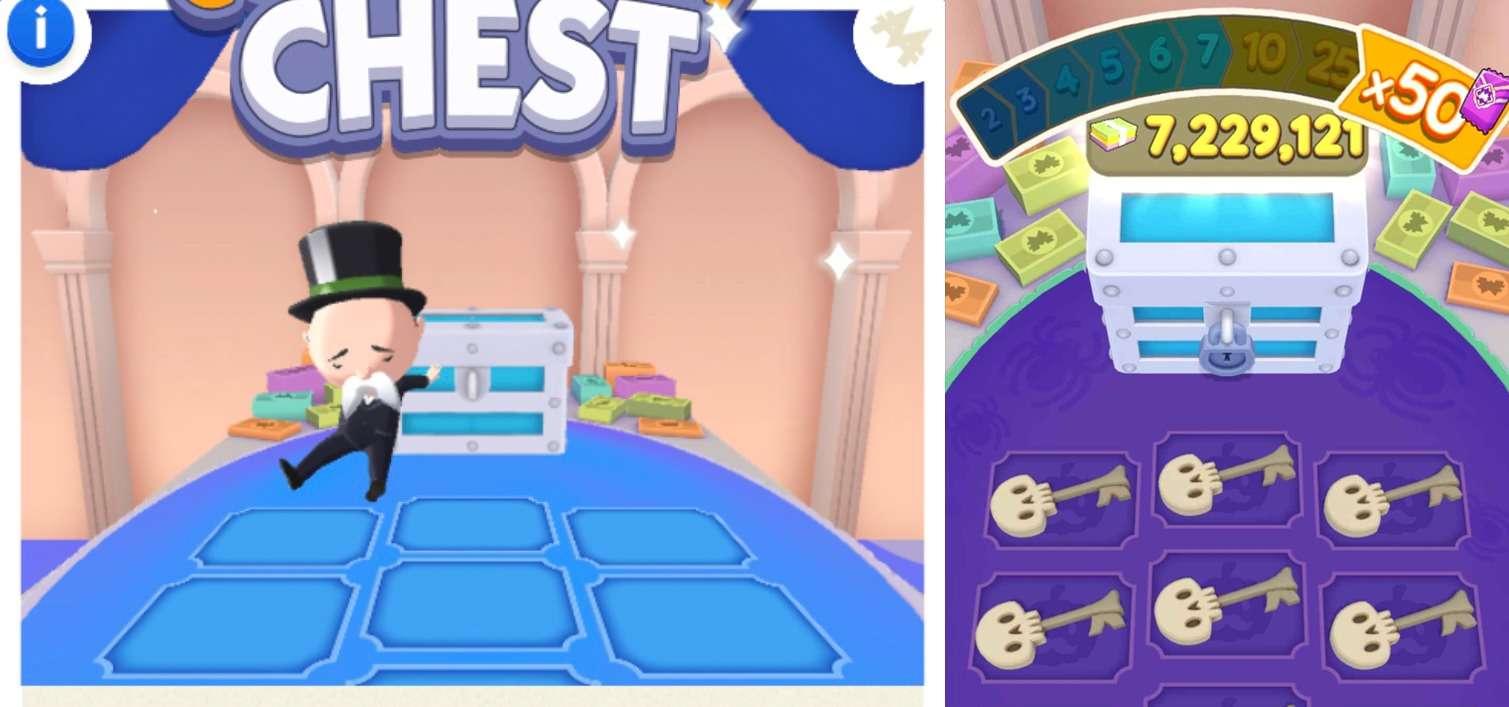
- To check the cash amount saved, land on a CC Tile and look at the animated total on top of the chest (or press the CC if your friends list is empty).
- To estimate the cash you’ll get from a chest opening, multiply the CC’s stored cash by x6.
NON-CC Cash Summary:
- The time to build with non-CC cash is whenever you CAN build -OR- you can gamble that LR, BR, or BB appears within 2 days (spend your non-CC cash within 2 days or less).
- Building immediately with no event is better than waiting more than 2 days to build with LR, BR, or BB (you’re gambling that LR, BR, or BB will appear before 2 days).
- The New Net Worth Gallery gives us a third primary cash source which means we’re getting more cash saved than even before the Bank Heist update was introduced but only for regular builders. The average 5% loss from bot heists every 8 hours is more than made up for by the New Net Worth Gallery CC buff as long as you wait no more than 5 days to spend your cash (5 days of saving is a 50% loss of non-CC cash).
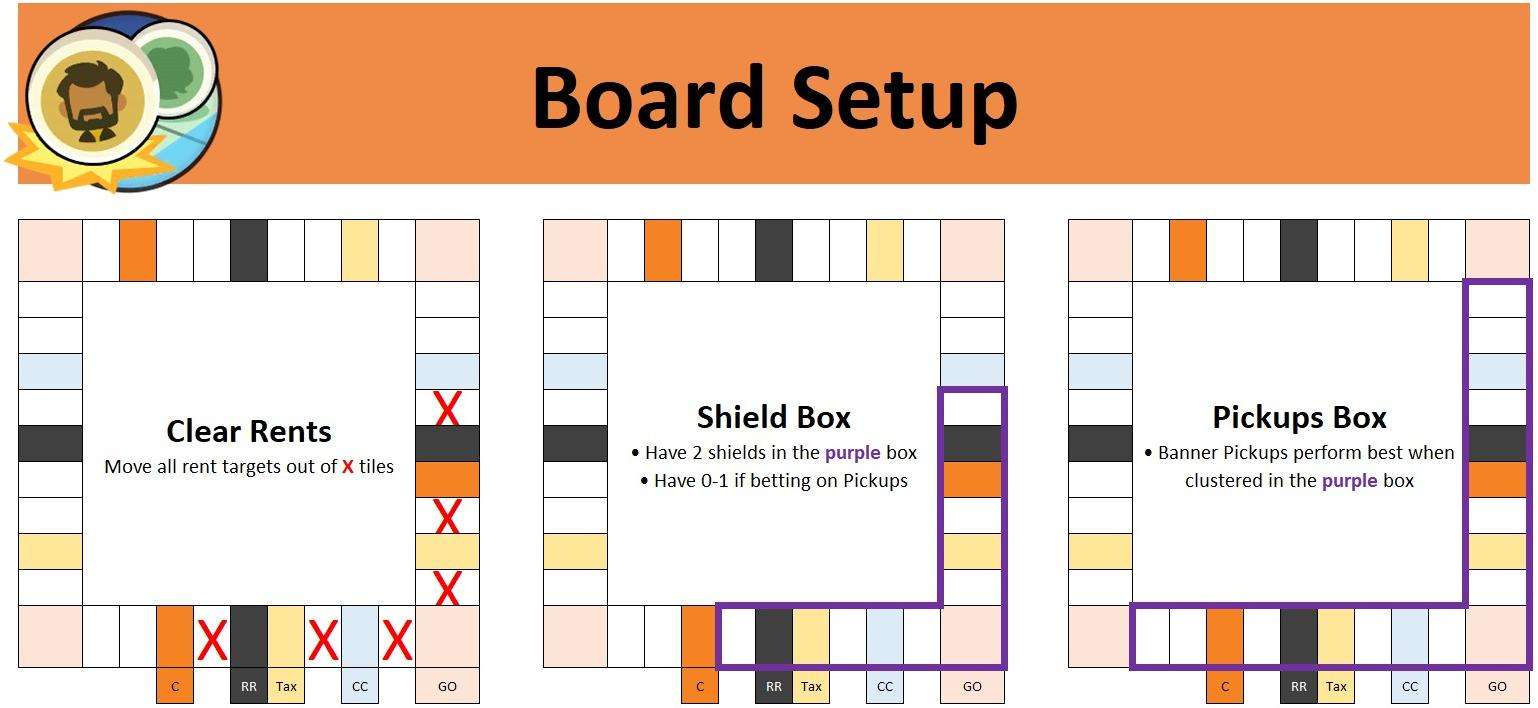
Board Setup Chart
Important: The ‘Clear Rents Chart’ is NOT for players that are unable to toss at least 100-200 dice into x1 auto-rolls.
This is the updated and further simplified version of the ‘Optimizing Shields & Pickups’ post, so review the information below even if you’ve read the old version. In this version, you can prepare both before and after a new banner has started. This is the most universally-applicable strategy update yet as it optimizes for all four banners: Tax, Railroad, Pickups, and partially Corners when using CC Rolling Tile.
Part 1: Moving Rents Out
Our primary focus during board preparations will always be to clear out Rent Targets from the red X tiles on Diagram 1 by auto-rolling. Although not ideal, you can leave one Rent Target within the area. The purpose of clearing out Rent Targets from this area is to increase the probability of 2+ Shields respawning within the Shield Box zone on Diagram 2.
Why is this important? Imagine a scenario where a Rent Target is next to a Tax Tile. This would mean that for the next few minutes of rolling, you are unlikely to see a Shield spawn on the two best Shield tiles in the game (remember that Shields prioritize spawning on a tile that is empty on both surrounding tiles). This plays a key role when you are limited by an event timer such as High Roller, Lucky Chance, and Roll Match.
Part 2: The Shield Box
The purple box on Diagram 2 shows the best area have to Shields hovering around. Ideally you’ll want 2+ Shields within this zone outside of a Pickups banner.
Part 3: The Pickups Box
If you are preparing for the next banner and making a bet on it being a Pickups banner, then you’ll want to clear out Rent Targets from the red X tiles on Diagram 1 and have 0-1 Shields within the Shield Box on Diagram 2.
The purple box on Diagram 3 shows the best area on the board to have Pickups cluster.
Click to enlarge…
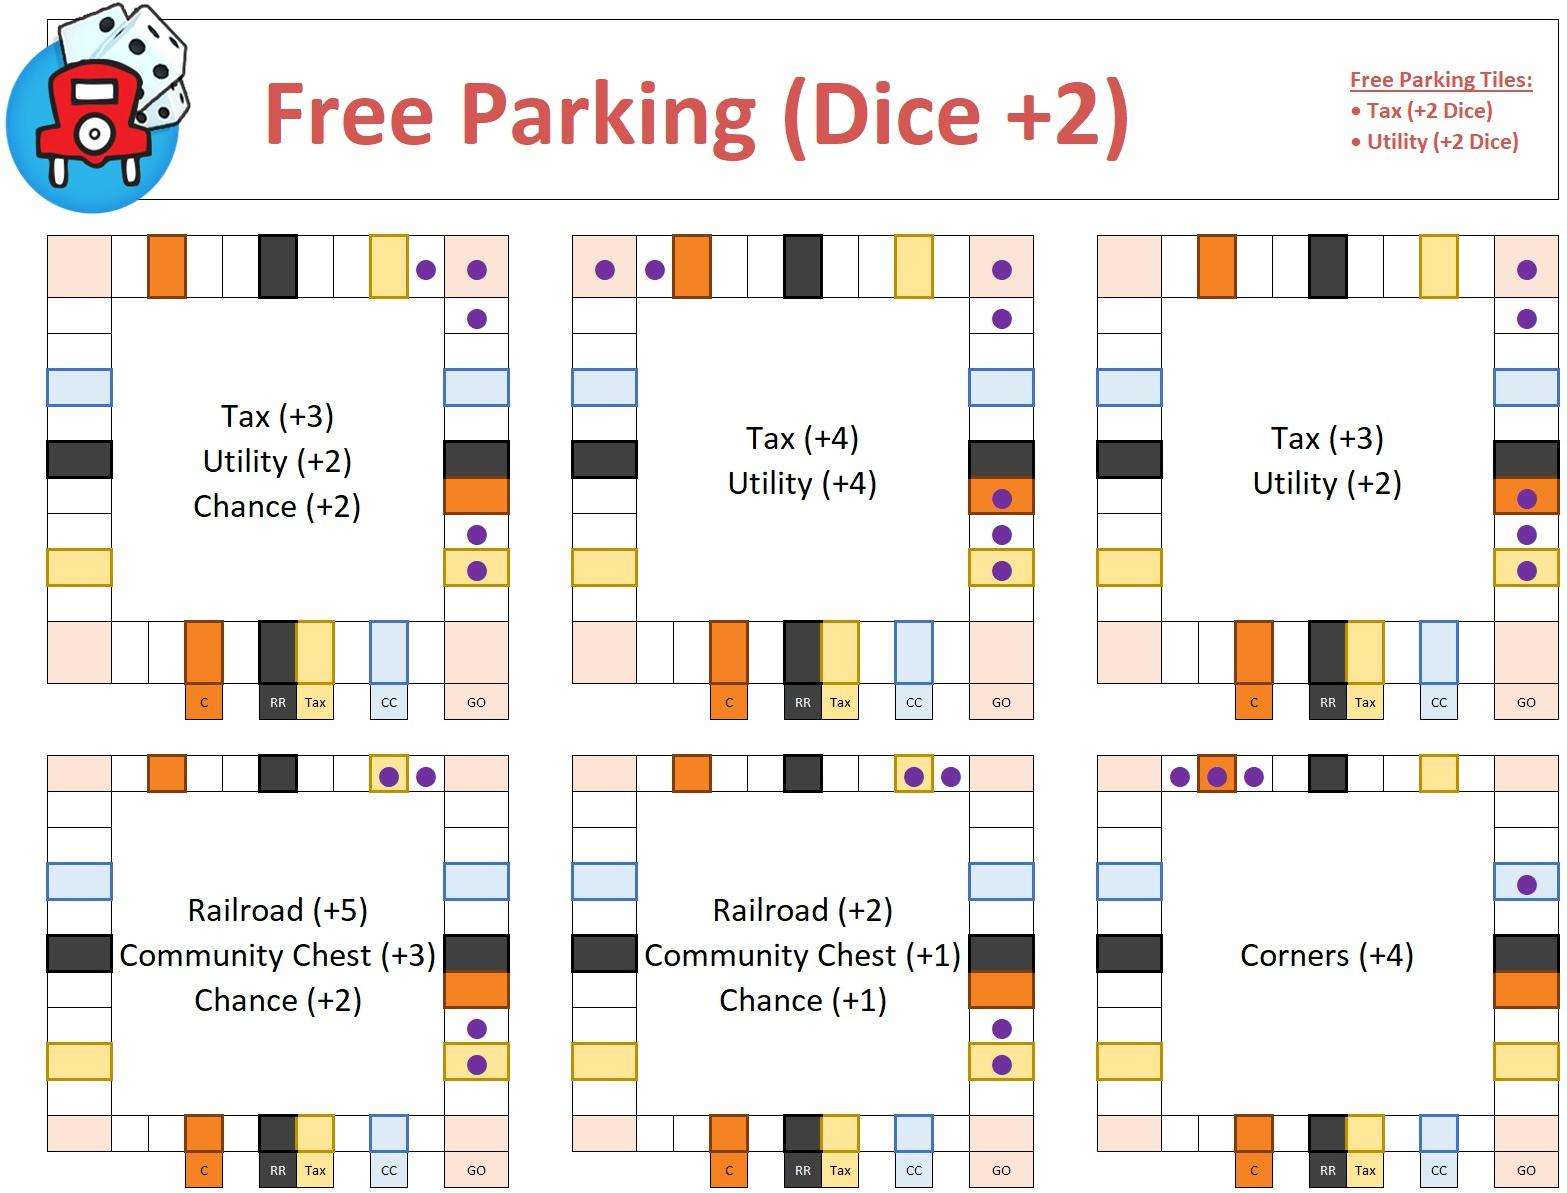
Rolling Chart: Free Parking Dice
Important: This chart only considers the Free Parking (Dice +2) event active and no Shields. Adjust your rolling tiles as-needed based on Lucky Chance and Shields.
This chart marks the optimal rolling tiles during Free Parking (Dice +2) for each banner type except Pickups. The marked tiles are where you’ll be increasing your multiplier for optimal dice spent vs dice returned.
Refer to the table below for risk management.
Multipliers by Dice Count:
- 5k+ (x100 / x50)
- 7k+ (x200 / x100)
- 17k+ (x500 / x200)
- 30k+ (x1000 / x500)
- 50k+ (x1000)**
It is advised to STOP rolling when any one of the events (Banner or Tournament) reaches the final milestone.
Click to enlarge…
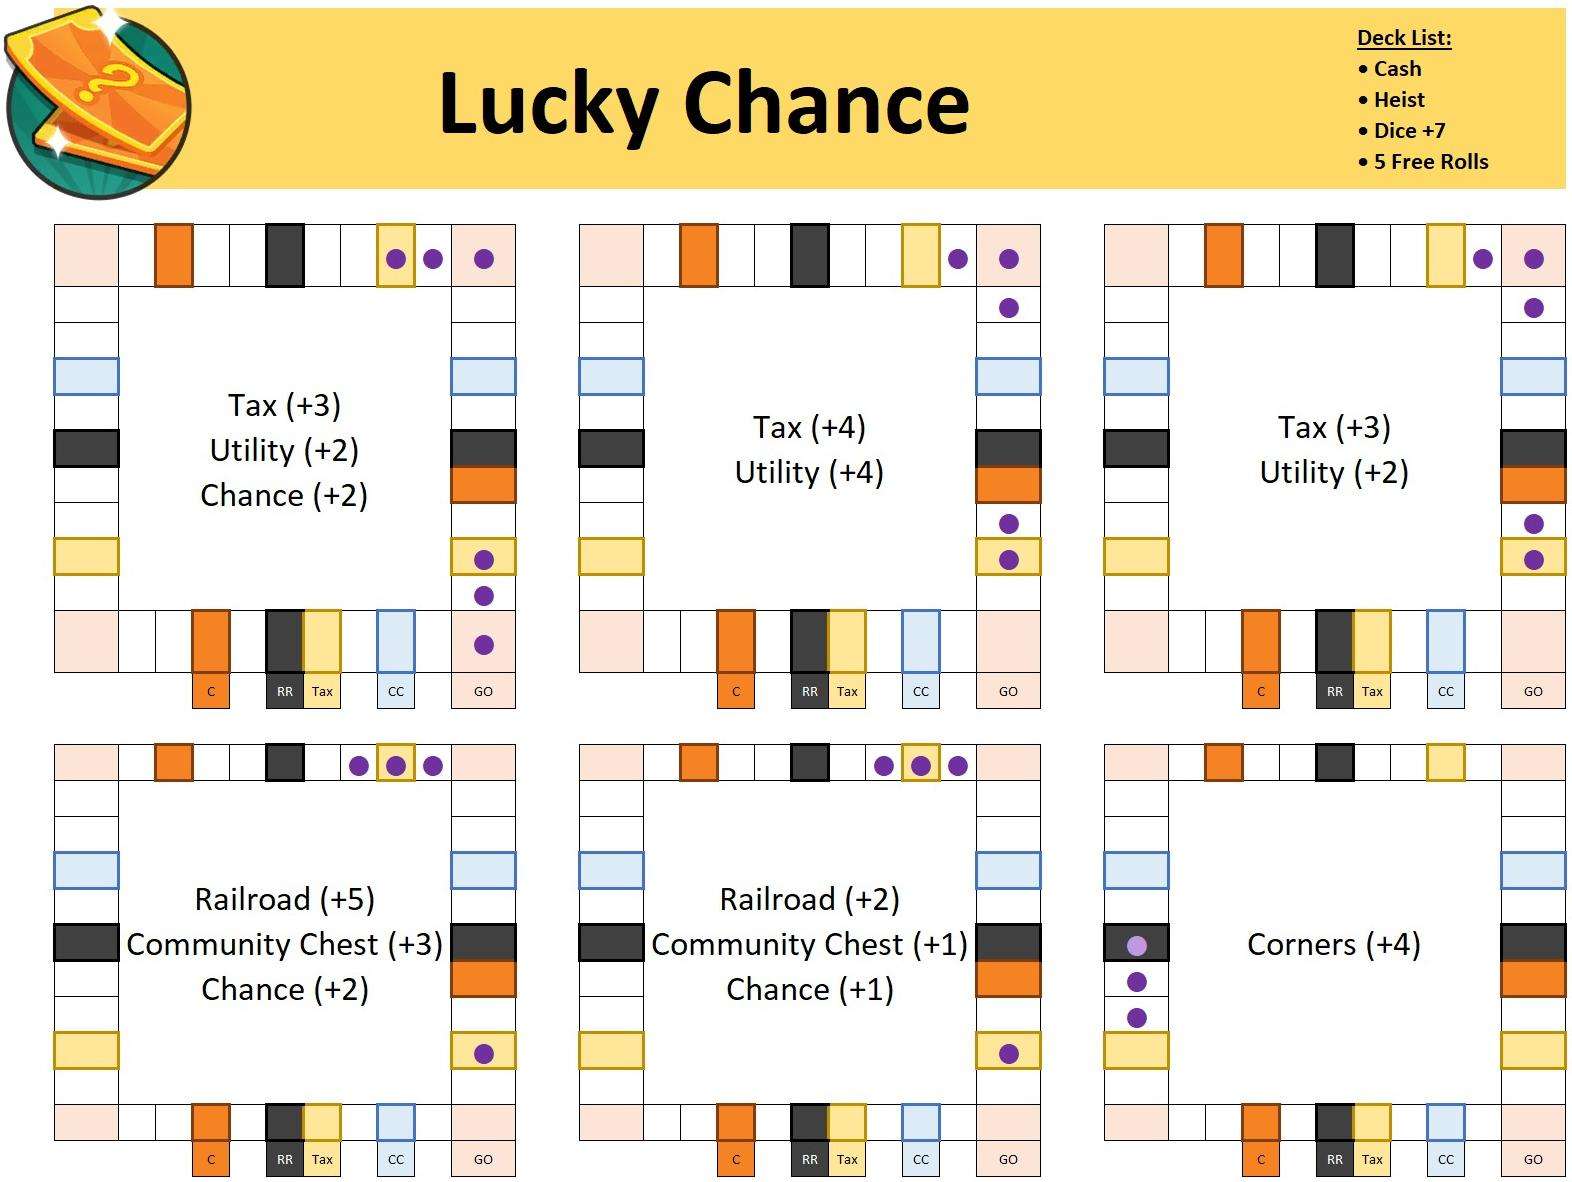
Rolling Chart: Lucky Chance
Important: This chart only considers Lucky Chance active and no Shields. Adjust your rolling tiles as-needed based on Free Parking Dice and Shields.
Update Notes: Reduced number of tax banner rolling tiles from Top 7 to Top 6 to mitigate risk.
This chart marks the optimal rolling tiles during Lucky Chance for each banner type except Pickups. The marked tiles are where you’ll be increasing your multiplier for optimal dice spent vs dice returned.
Refer to the table below for risk management.
Multipliers by Dice Count:
- 5k+ (x100 / x50)
- 7k+ (x200 / x100)
- 17k+ (x500 / x200)
- 30k+ (x1000 / x500)
- 50k+ (x1000)**
It is advised to STOP rolling when any one of the events (Banner or Tournament) reaches the final milestone.
Click to enlarge…
Updated this one to reduce risk exposure (reduced tax banner from top 7 rolling tiles to the top 6 tiles).
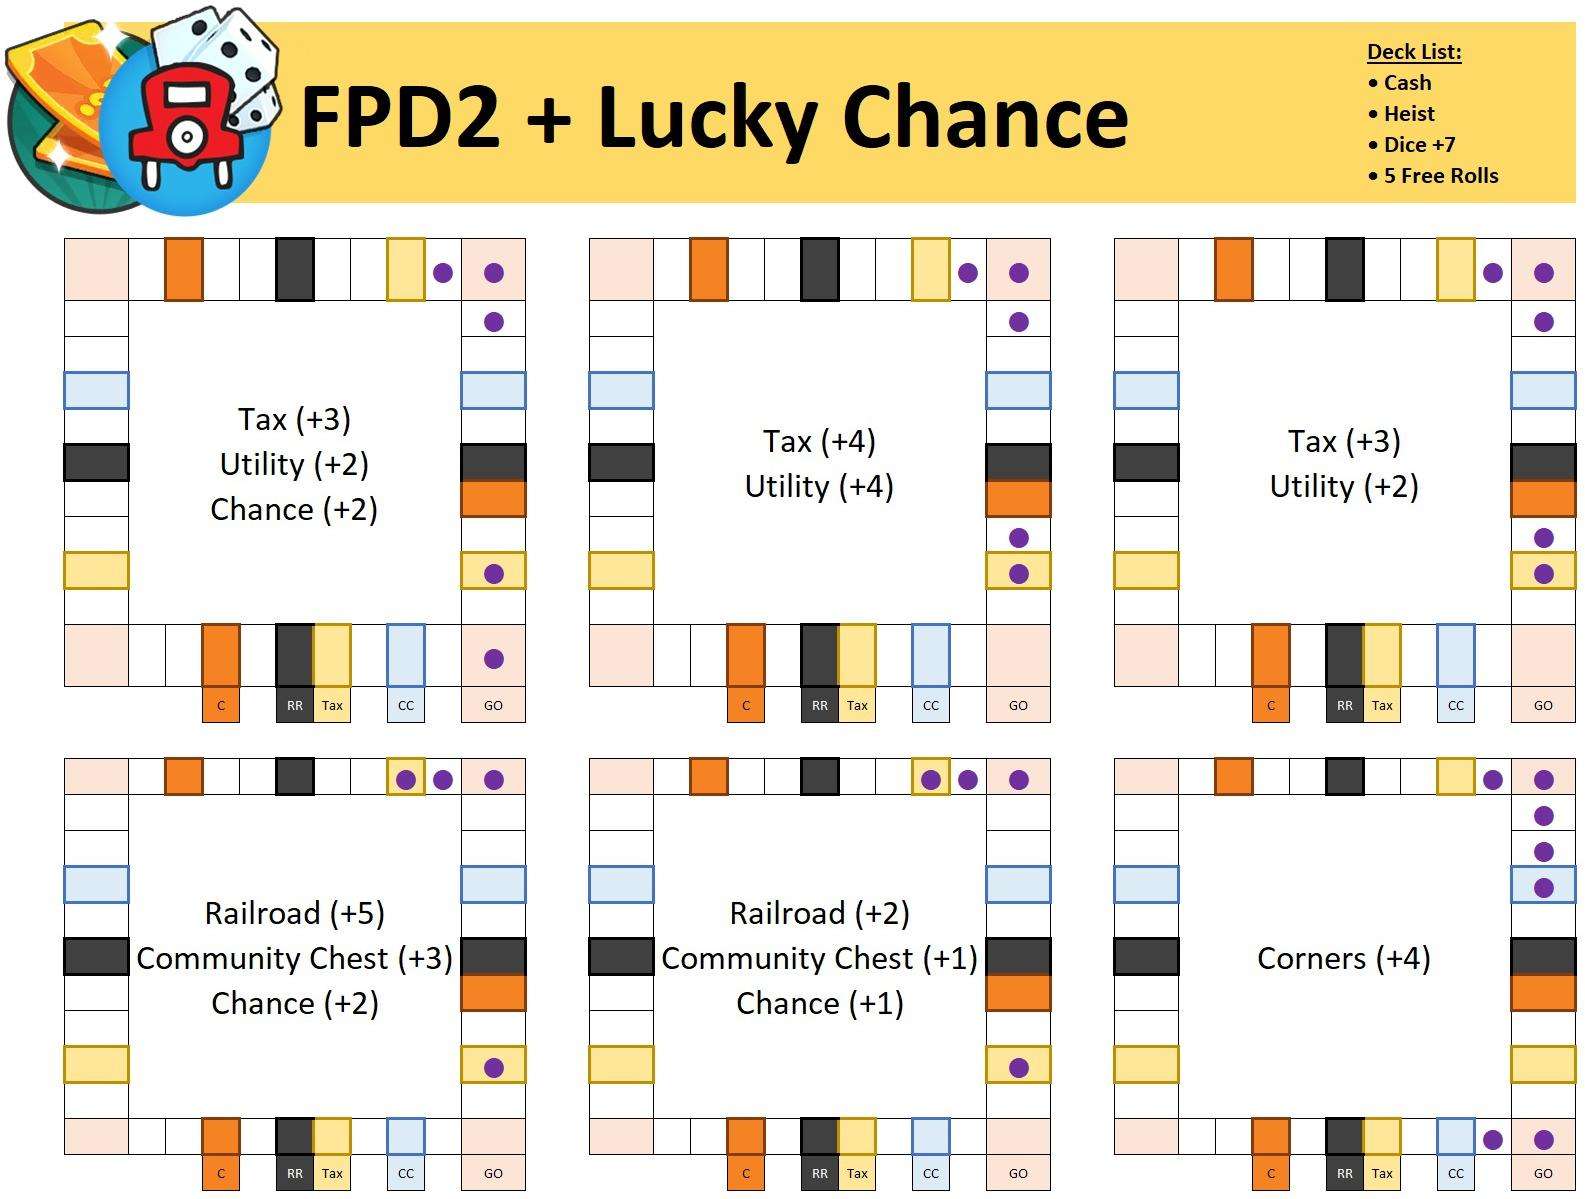
Rolling Chart: FPD2 + Lucky Chance (Overlap)
Important: This chart only considers Free Parking (Dice +2) with Lucky Chance events overlap and no Shields. Adjust your rolling tiles as-needed based on Shields.
This chart marks the optimal rolling tiles during Free Parking (Dice +2) and Lucky Chance overlap for each banner type except Pickups. The marked tiles are where you’ll be increasing your multiplier for optimal dice spent vs dice returned.
Refer to the table below for risk management.
Multipliers by Dice Count:
- 5k+ (x100 / x50)
- 7k+ (x200 / x100)
- 17k+ (x500 / x200)
- 30k+ (x1000 / x500)
- 50k+ (x1000)**
It is advised to STOP rolling when any one of the events (Banner or Tournament) reaches the final milestone.
Click to enlarge…
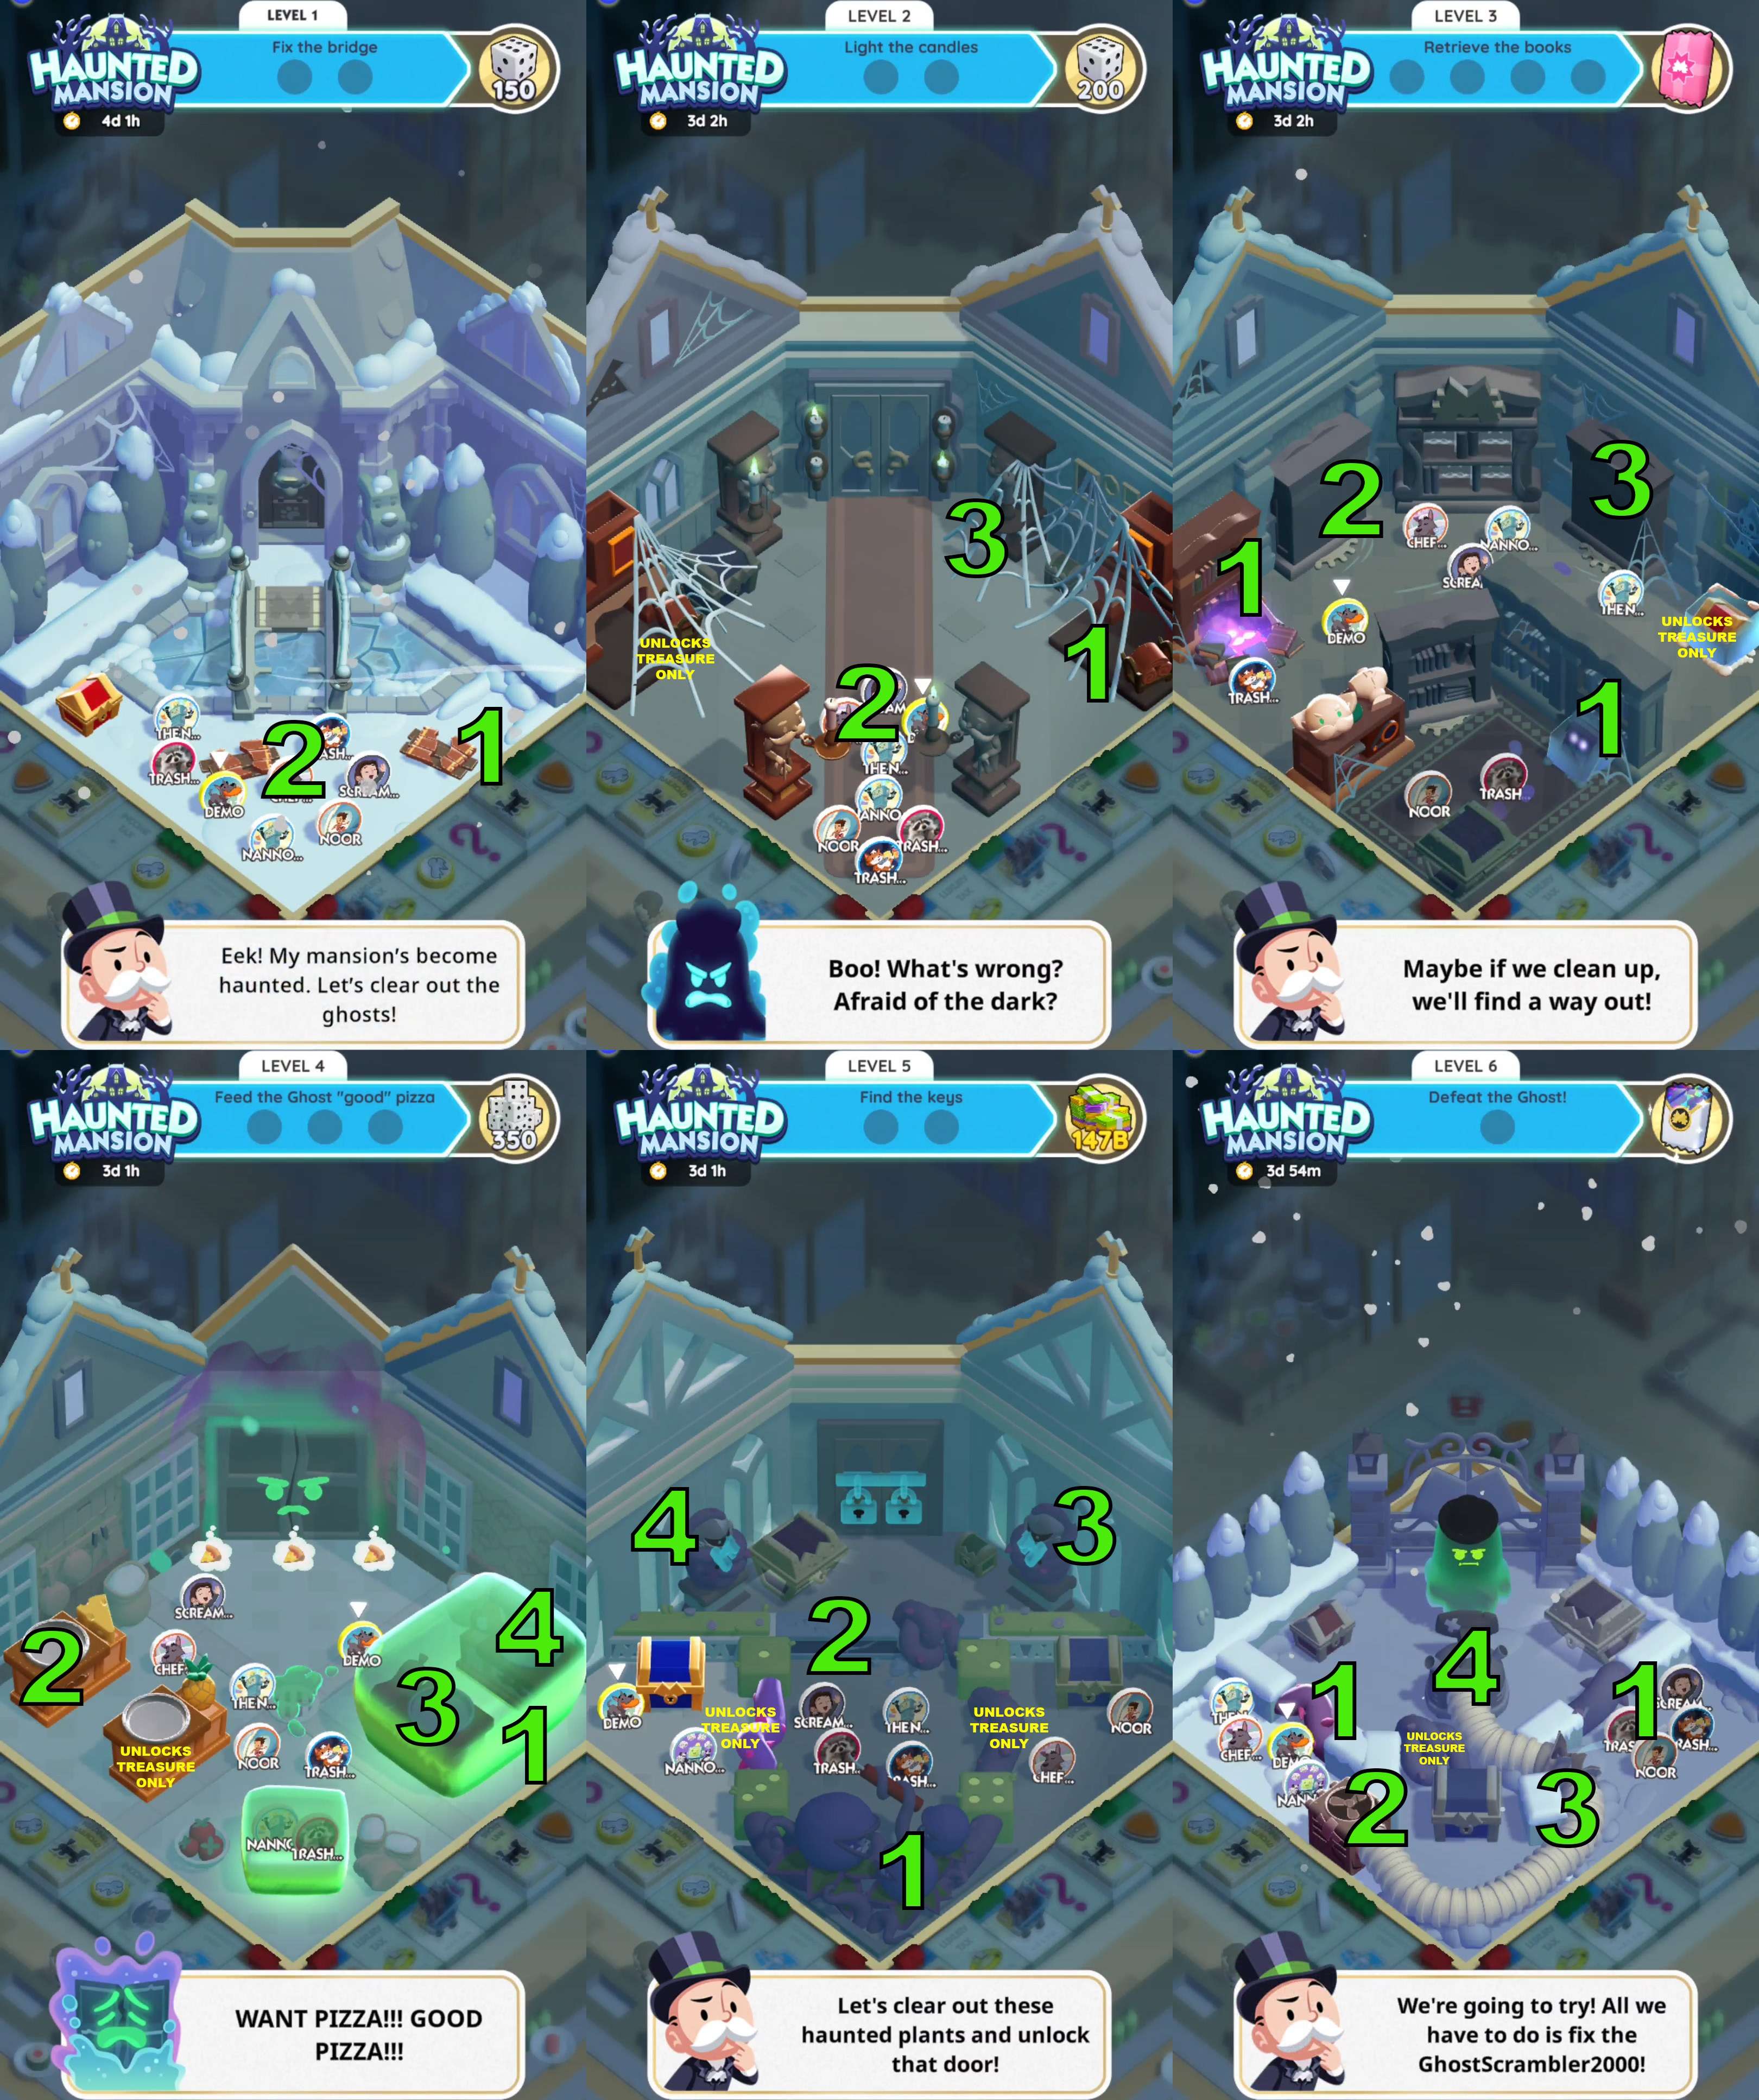
Adventure Club Maps
Treasures are assumed to be ignored.
Haunted Mansion
Task Numbers: This system works best if everyone is online at the same time, but mapping out the task order to work on for each map helps keep the team more organized. The task items for each map are numbered from lowest difficulty to highest difficulty. This allows you to obtain buffs (on fire / ice cold) from the lowest difficulty task to hit a higher difficulty task as-needed (example: obtain On Fire buff from a task 1 [16♦♦] to clear a [17♦♦] or [♦♦♦] difficulty from task 2). To optimize compass usage, clear these numbered tasks from lowest to highest.
Difficulty Selection:
- No Buff = 12 Pt Average [♦]
- Ice Cold = 16 Pt Average [♦♦]
- On Fire = 18 Pt Average [♦♦♦]
Trapped Members:
- Level 3: Do not free trapped members. Members locked behind shelves should clear task 1 themselves.
- Level 4-5: Do not free the trapped members (mini-goo on map 4, left/right vines on map 5).
- Level 6: Clear both vines first. This allows x8 Team Boost stacking on tasks 2 and 3.
Click to enlarge…


Be the first to comment