
How to Solve – Case 2 – Stars
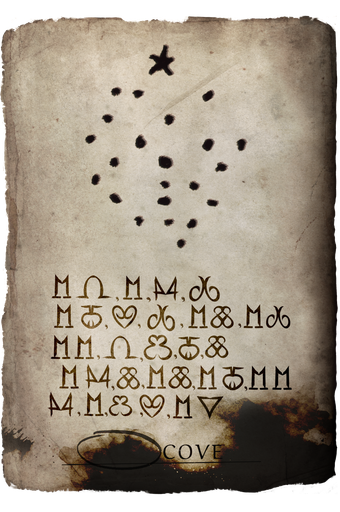
Voss shares a new journal page found alongside the third statuette. It contains a star map, a series of symbols written in Sophia’s personal cipher, and a partially damaged line of text. Players must decode what Sophia encoded in it. The mission unfolds in three phases.
Puzzle 1: The Symbol Cipher
The journal page features a set of symbols arranged in five rows. They are not a known alphabet.
Hints:
- Hint 1: Look closely at the symbols. Do they remind you of anything familiar?
- Hint 2: Try holding one up to a mirror.
- Hint 3: Each symbol corresponds to a standard Arabic numeral. Once you have them all, you’ll have five number sequences.
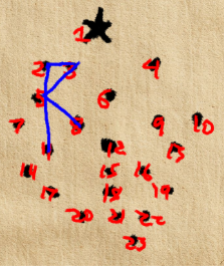
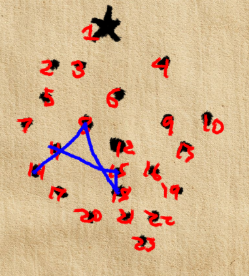
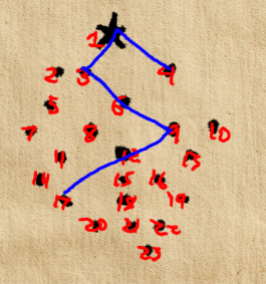
Solution: Each symbol is a mirrored version of a numeral (0–9). Decode all symbols to get five number sequences: 12-1-4-6 / 15-9-6-18-16 / 11-2-3-5-8 / 21-20-14-8-23 / 4-1-3-9-17
Puzzle 2: The Star Map
The map shows one large star and 22 smaller points.
Hints:
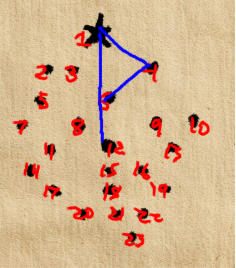
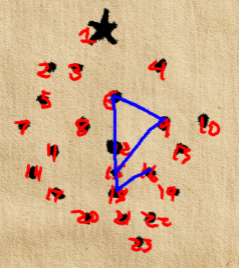
- Hint 1: Start from the large star, number 1
- Hint 2: Then count the remaining points top to bottom, left to right.
- Hint 3: Once every star has a number, use the sequences from Puzzle 1 to connect them in order.
Solution: Number the stars starting from the large North Star (1), then count top to bottom, left to right through to 23. Each number sequence from Puzzle 1 tells you which stars to connect, in order. Each sequence traces the shape of a letter when joined.
Answer – PERAS
Voss identifies Peras Cove as a small cove on a Greek island in the Aegean. An online search surfaces a personal blog run by a local diver named Burt Maxwell. Phase 2 unlocks.
Puzzle 3: The Burt’s Blog
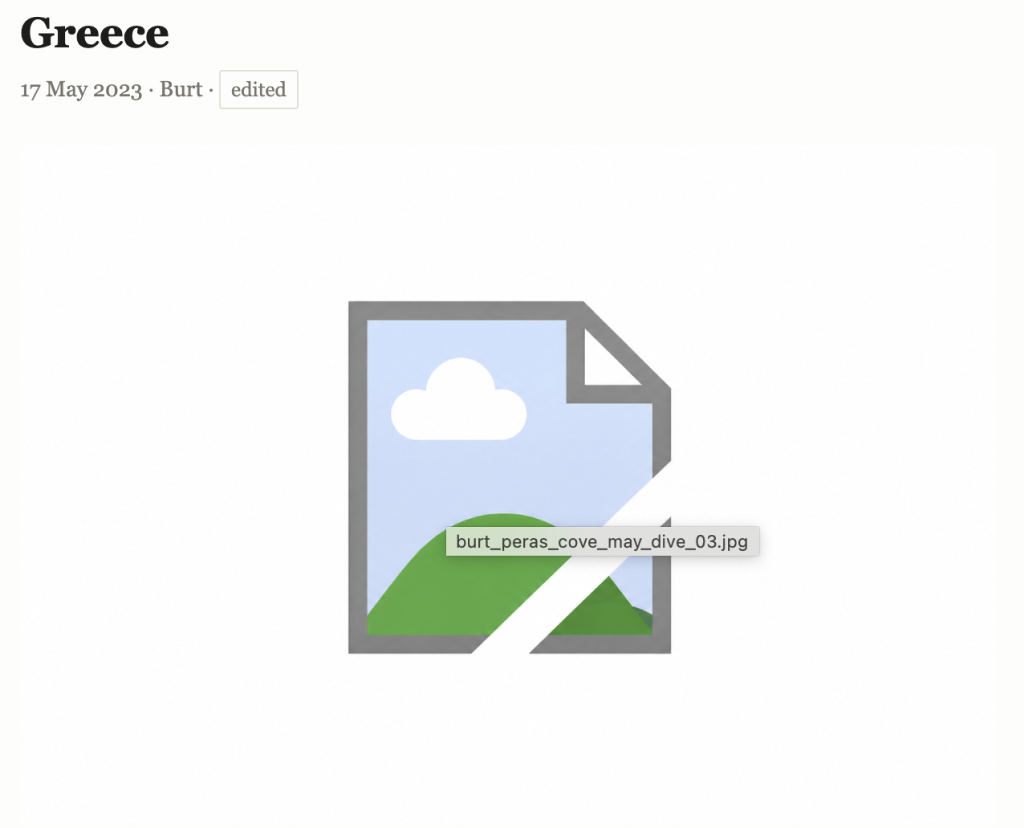
Camille shares a link to Burt Maxwell’s diving blog. One post describes an underwater discovery, but something on the page isn’t loading.
Hints:
- Hint 1: There’s a lot to look at on this page. Sometimes it’s the things that aren’t working that stand out.
- Hint 2: That post about the discovery is interesting but there’s nothing that visibly connects it to Peras Cove. Do you see something?
- Hint 3: Broken images still have names. Try hovering over it.
Solution One post contains a broken image placeholder. Hovering over it reveals the original filename in the browser.
Answer – burt_peras_cove_may_dive_03.jpg
Puzzle 4: The Edited Post
Looking more carefully at the post, players notice it carries an “Edited” label. Clicking it prompts a password field. The original version is locked.
Hints:
- Hint 1: If the password is his, maybe it’s related to something he loves. Have you looked closely at everything he posted?
- Hint 2: Look at the photos in his posts, not just the text.
Solution: In one post, Burt is photographed at his desk. A sticky note visible on his monitor shows his login credentials.
Password – seadog42
Puzzle 5: Contacting Burt
The original post gives a fuller account of Burt’s discovery. At the end, he writes that anyone interested in acquiring the artifact can leave a message.
Hints:
- Hint 1: Read the original post carefully all the way to the end.
Solution: Burt asks interested parties to type “buyer” in the comments. Do so. He replies automatically: the artifact has already been sold to a conservation group, along with two old journal pages found alongside it.
Answer – HEROIC PLAQUE
Voss confirms they acquired the artifact and one journal page. Camille notices Burt mentioned two pages. Phase 3 unlocks.
Puzzle 6: The Corrupted File
Voss shares a file they describe as the second journal page, too damaged to recover. The file is labeled as a .jpg but will not open as an image.
Hints:
- Hint 1: That file says it’s an image but it won’t open like one. There’s something off about it.
- Hint 2: Why would you put an image inside a zip file? Isn’t that weird?
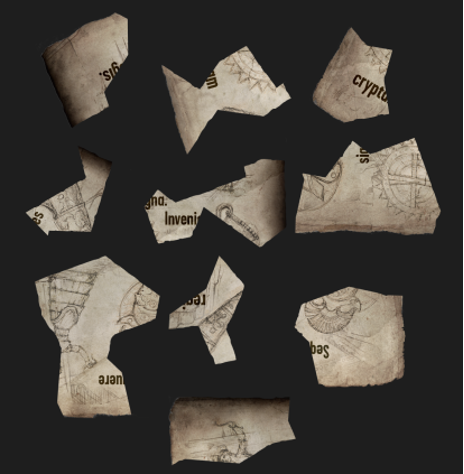
Solution: The file is not actually a .jpg. Opening it in a text editor or hex editor reveals a PK header – the signature of a ZIP archive, not an image. Rename the file extension from .jpg to .zip and open the archive. Inside: 10 scanned fragments of the torn journal page.
Puzzle 7: Reconstructing the Page
The 10 fragments must be arranged to reconstruct the complete journal page.
Hints:
- Hint 1: Try piecing the fragments together like a jigsaw – match the tears and the visible text.
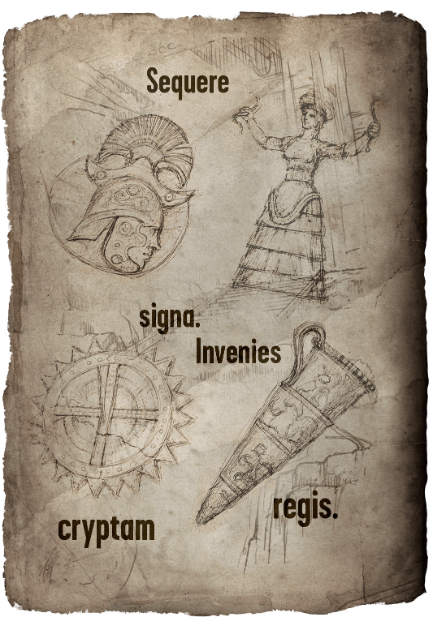
Solution: Arrange all 10 fragments to reconstruct the full page. The completed page shows sketches of four artifacts and a single line of Latin text.
Answer – Sequere signa. Invenies cryptam regis.
Translation: “Follow the signs. You will find the vault of the king.”
Be the first to comment