
The first time you launch Terminator: Dark Fate – Defiance, you will be asked to ‘Select a Language’. The language can also be changed later in the Settings menu. Once the language has been selected you will go to the MAIN MENU screen.
Main Menu
The MAIN MENU contains a list of options including:
- CAMPAIGN: Where you can start a new campaign game or continue an already played one.
- SKIRMISH: Where you can play a single player skirmish game, on different maps, for a given duration.
- MULTIPLAYER: Where you can play with or against other human players.
- SETTINGS: Where you can change various settings within the game.
- ENCYCLOPEDIA: Where you can access various information on the different factions and their units and gain insight on Tutorial screens, giving information about various aspects of the game.
- EXIT TO WINDOWS: Exit the game and return to your desktop.
Campaign
The game’s single player campaign lets you explore a number of story-driven missions where you must fight against the onslaught of Legion’s forces in a post Judgment Day world. Each mission has its own set of objectives that will see you move through with a persistent army.
The following options are available:
- CONTINUE: this will continue the last Single Player campaign game that you were playing, from the last save or autosave.
- NEW GAME: this will start a new single player campaign. This will initially take you to the CHOOSE DIFFICULTY screen, allowing you to choose from:
- Story Mode: Damage taken by your units: 20%
- Medium: Damage taken by your units: 40%
- Hard: Damage taken by your units: 50% – Number of enemies: increased
- Realistic: Damage taken by your units: 100% – Number of enemies: increased
- Skip introductory missions: Selecting this box allows you to skip the first 3 introductory missions if you’ve already mastered the demo or finished the game.
You can change difficulty level at any time during the game by going into the Game Options in SETTINGS.
Once the difficulty level has been Accepted, the campaign story will begin.
- LOAD GAME: Select a saved game or Autosaved game to continue from that point.
Saved games can also be deleted by selecting a save game and clicking on the ‘dustbin’ icon.
- BACK: Returns to the MAIN MENU
Skirmish
Skirmish allows you to play a single player skirmish game, on different maps, for a given duration.
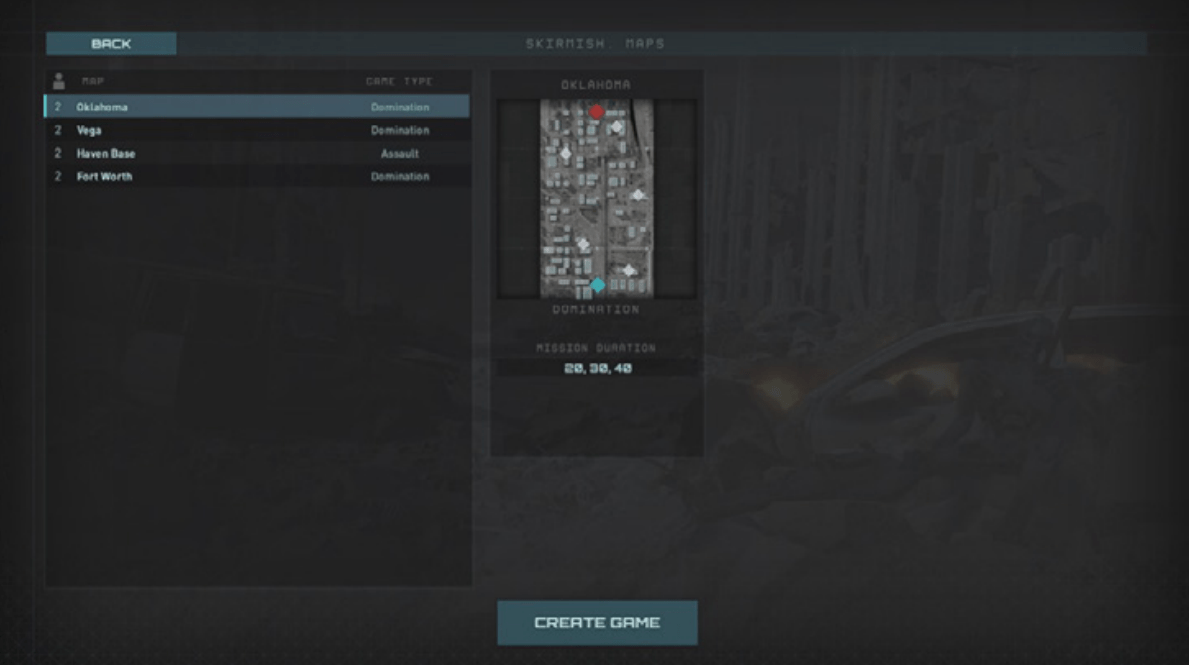
In the Skirmish screen, select a MAP from the list. Each Map will have a GAME TYPE shown. These initially include Domination and Assault.
Once a Map has been selected, select CREATE GAME to go to the Skirmish, Game Creation screen.
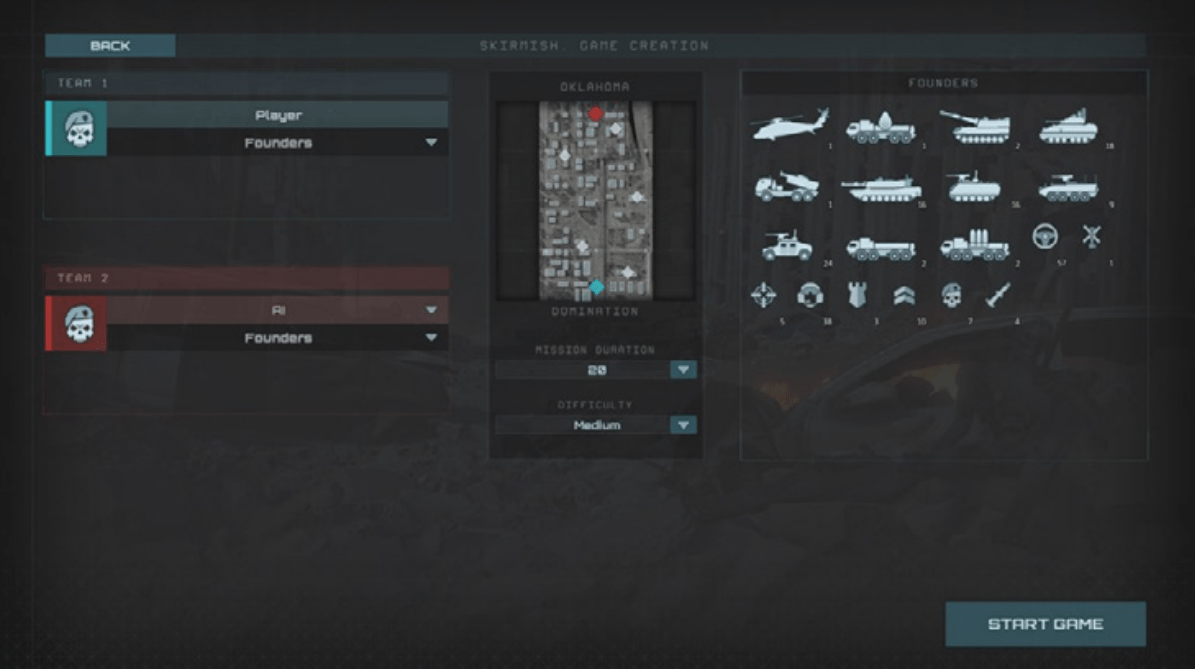
On the SKIRMISH, GAME CREATION screen, choose which faction you wish to play. Initially from Founders, The Movement or Legion.
You can also swap the Team to have AI or Player on either one. This dictates starting points and available factions.
- Mission Duration – select the length of game.
- Difficulty – select the difficulty of the Skirmish game.
The right panel under the name of the faction shows which units will be available in the coming Skirmish game.
- START GAME: selecting Start Game begins the skirmish game.
Skirmish Gameplay
Skirmish games see you fighting against an AI controlled army. You can choose to play either The Founders, The Movement or Legion, and can choose the faction of your opponent.
Your army arrives as reinforcements at given times during the game. In most cases, the opponent will also receive similar reinforcements at similar times.
Reserves
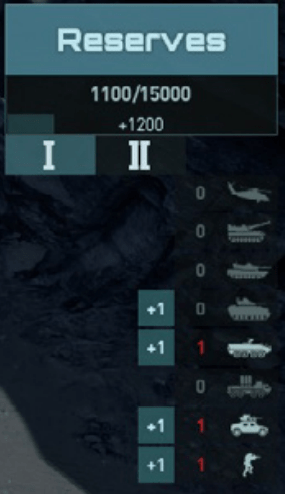
During a skirmish, Reserve points build up over time. When a given number of Reserve points have been gained, it is possible to select ‘Reserves’ that will go to the ARMY REINFORCEMENT SCREEN to gain more units.
Army Reinforcement Screen
On the reinforcement screen, you can choose which units to bring into battle at a given point. Each unit costs an amount of Command Points.
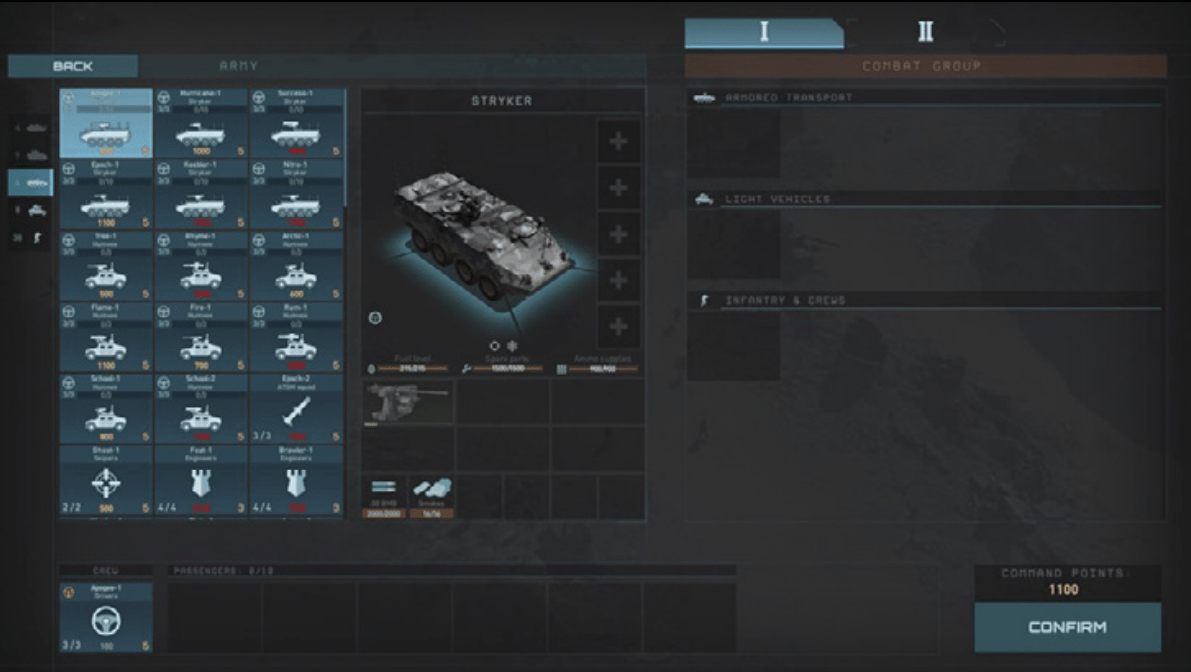
Command Points available to spend are shown on the bottom right, above the CONFIRM button.
Double click or drag units from the left-hand ARMY panel to the right hand COMBAT GROUP slots. When you are happy with your COMBAT GROUP, and it hasn’t gone over the amount of COMMAND POINTS available, press CONFIRM to enter the game.
During a Skirmish game, Command Points are accrued. This is shown on the right hand of the screen under Reserves button. Once a new set of Reserves are available, an audio alert will sound, and the Reserves button will highlight. Clicking RESERVES will return to the Army Reinforcement Screen where further Reinforcements can be added.
During single player Skirmish, the battle is paused whilst on the Army Reinforcement Screen.
Once the TIME LEFT: reaches 00:00, the skirmish match is complete and the results are shown.
Multiplayer
Multiplayer is where you can play with or against other human players.
Join Multiplayer Game
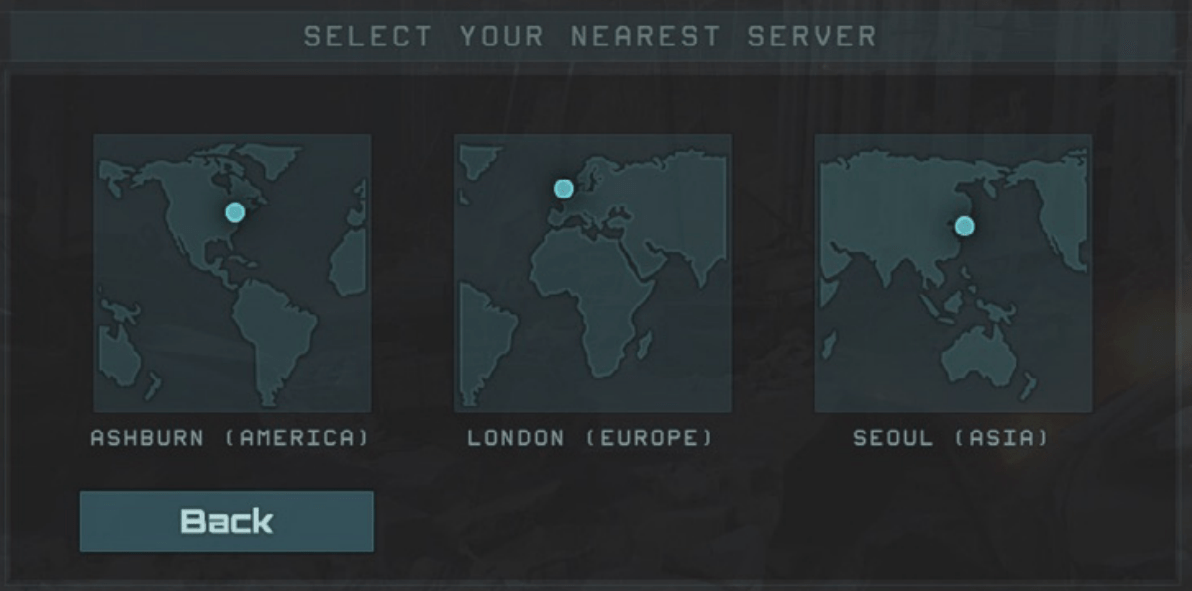
When first entering Multiplayer, you will be asked to login with either you STEAM or SLITHERINE account. You will need to enter the appropriate username and password for which ever you log in with.
Once logged in, choose from a list of location-based servers. Choose the server closest to your location, as this will provide you with the best gaming experience. Choosing a non-local server will most likely mean a subpar connection speed to the game. After selecting a server, you will be able to see games running on that server in the Game Browser.
The Game Browser screen has a list of available games that have been created by other players on this server. These are listed on the left-hand side. Selecting a game on the left will give information in the central panel about the game.
Select JOIN GAME to join the selected game.
Create Multiplayer Game
On the Game Browser screen, select CREATE GAME to create a new Game on the server.
On the Create Game screen, select a map. Maps will show how many players are available. For example, will have 1vs1, 2vs2, etc in the Map name. Select the Mission duration. It is possible to select a password that would then be required to enter this game from the Server Browser screen. Select CREATE GAME to enter the LOBBY screen.
On the LOBBY screen, players can choose which Team Slot they are on, and which faction they wish to play with.
There is also a CHAT option to chat with other players within the lobby. Once a player is ready, they can press the START GAME button. Once all players have pressed the START GAME button, the multiplayer game will begin.
Players will then enter the ARMY REINFORCEMENT SCREEN, as per the Skirmish screen. Multiplayer games do not pause whilst on the ARMY REINFORCEMENT SCREEN.
Settings
Settings allow you to change various options within the game.
- Game: Change difficulty, language, mouse and camera settings.
- Video: Change screen size, visual quality and allow unit silhouettes.
- Audio: Change volume settings for music, ambient sound, effects and speech.
- Controls: Choose between control presets, WASD and Classic, and assign new keys to existing hotkeys and camera keys.
Encyclopedia
The Encyclopaedia menu allows you to access various information on the different factions and their units and gain insight on Tutorial screens, giving information about various aspects of the game.
- ENCYCLOPEDIA: Examine information on units, squads and vehicles from the different factions met within the game, both human and Machine. As new units are encountered, they will unlock in the Encyclopedia.
- TUTORIAL: Detailed information on various aspects of the game. A useful place to learn how to get the most out of the game.
- CREDITS: The credits of the various teams who made the game.
- BACK: Return to the Main Menu.
The Campaign
Once you have started or continued a campaign, you will be thrust into the dangerous world of Terminator: Dark Fate – Defiance.
Changing the campaign difficulty will affect the amount of damage that your units receive with “Medium” set as the baseline. If you’re finding the game too easy or too challenging, the difficulty can be adjusted at any point during the game, even during a battle.
The campaign is a series of story driven missions where you take on the role of Lieutenant Alex Church, a Founder officer, in the fight against the overwhelming army of Legion.
You have a persistent army under your command that can be upgraded, healed, resupplied, and customized as you progress from mission to mission. Your army can be managed by selecting a location when on the world map. Certain locations on the world map also are settlements, allowing for units, equipment, and vehicles to be bought and sold. Settlements also allow you to train units with various new abilities.
Strategic Overview
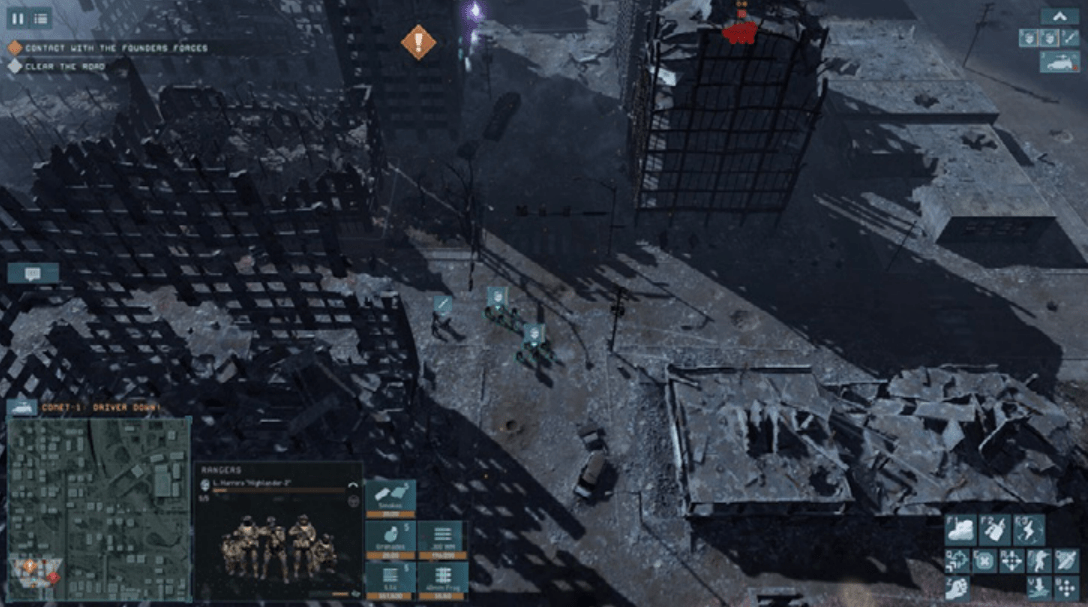
When you first start a mission, you will see the Battlefield in the center of the screen surrounded by a HUD which helps you understand the overall state of the mission.
The Battlefield
The battlefield is the landscape that your units are on. It is possible to view the battlefield from many angles and places. Basic camera controls:
- WASD / Cursor Keys / Cursor to edge of screen – Move camera view.
- Mouse Wheel rotate – Zoom camera in/out.
- Mouse Wheel hold and drag left/right – Rotate camera around center of screen.
- SPACE – Active Pause. Pause the game and give orders. You can’t pause multiplayer games.
Controlling Units – The Basics
Selecting Units
Select a single unit by left clicking on it or its overhead emblem. Select multiple units by left clicking and dragging a box around them. Also select units using the UNIT SELECT icons in the top right corner (as detailed below in BATTLEFIELD HEAD-UP DISPLAY, UNIT SELECTION).
Individual units can be added to the active group by holding SHIFT and left clicking on the unit. Units can also be removed from the active group by CTRL clicking a unit icon in the UNIT SELECT.
Groups can be added to on the UNIT SELECT icons by using SHIFT and clicking on a unit icon to add to the selected group or can have multiple units added by selecting a unit and then SHIFT clicking another unit on the unit icon row. This will select all units in between the first selected unit and the SHIFT clicked unit.
Groups of units that you have selected may be assigned to a control group using [ctrl] + any [number] so that you can quickly reselect them by pressing that number. Units can be deselected by left clicking on another location on the map. Units that have been set to control groups will be bracketed with a number indicating what group they are part of.
Moving Units
Selected units can be ordered to move by right-clicking anywhere on the map or on the mini-map. To attack a specific enemy, right click on it.
To move a unit to face a specific direction, select a unit or units, then right click and drag in a given direction at the location that you wish the unit to move too. An arrow following the dragged direction will show the direction that the unit will face after moving.
Ordering Unit Actions
When a unit is selected, hovering over various elements will change the cursor to indicate the action when right clicking. These are context sensitive, but can involve attacking enemy units, entering buildings or driving vehicles. More detailed actions are available using the UNIT ACTION icons detailed below.
Battlefield Head-Up Display (HUD)
There are various HUD elements that are positioned on the edge of the screen around the battlefield. These include:
In Game Menu
In the top left corner, whilst in a mission, selecting the MENU button will bring up the Game Menu. This includes:
- RESUME GAME: This will return to the mission you had been playing.
- SAVE GAME: This will allow you to enter a name for a new save game, from where you entered the menu from. Type in a relevant name, and press Save. Press Cancel if you wish to not save a game.
- LOAD GAME: Allows you to load a saved position from an earlier point.
- SETTINGS: Opens the Settings screen. You may update settings (as per from the Main Menu) at this point, including changing difficulty level.
- ENCYLOPEDIA: Opens the Encyclopedia screen, as per the one from the Main Menu.
- TUTORIAL: Opens the Tutorial screens. Choose a subject from the scrollable list on the left to learn about game content and control.
- RESTART MISSION: Will restart the current mission from the beginning.
- MAIN MENU: Exits the current mission and returns to the Main Menu. You will be asked if you want to Accept or Cancel the request.
Pause
In the top left corner, pause the game whilst still being able to move the camera and issue orders. Can also be paused by using SPACE.
Unit Selection
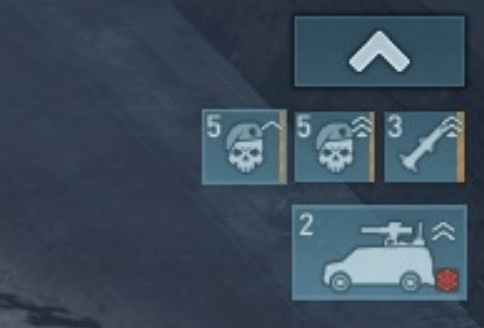
The top right corner of the screen shows the Unit Selection icons. Each unit in your current army is shown here. As units join during a mission, they will appear in this selection.
LMB on a unit icon will select that unit. Double clicking LMB on a unit icon will center the camera on that unit. It is possible to use SHIFT and CTRL to multi-select of deselect units from any given selection.
Unit icons show the unit type, the rank, shown as pips, as well as the number of members in that unit (or driving a vehicle). Vehicles also show additional passengers below the vehicle icon.
Vehicle unit icons also show damage to the vehicle. It is always good to check out unit icons showing damage, to quickly repair them.
Mini Map
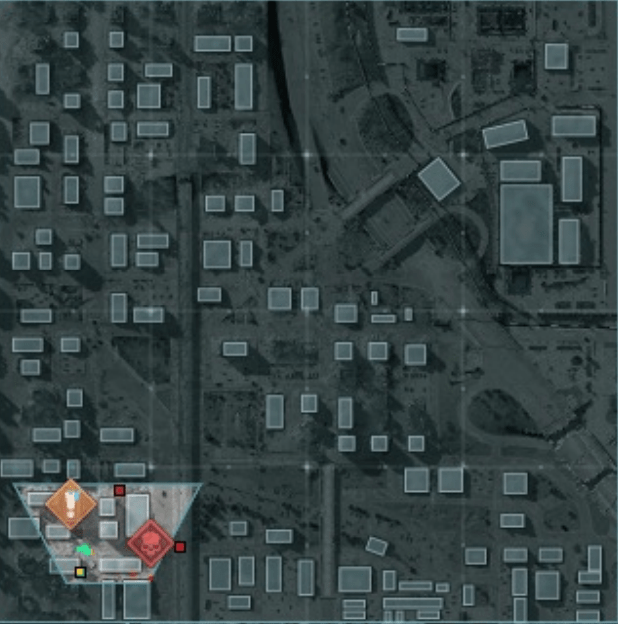
The Mini Map (bottom left) shows a rough top down view of the mission map. Your current view is shown as the view cone, that will move and rotate according to your angle of vision on the map. Your units are shown as GREEN squares, Ally troops are shown as YELLOW squares, enemy units that can be seen are shown as RED squares, and neutral units are BLUE. Objectives are shown as ! icons. Certain other mission elements may also be shown on the map.
Clicking the LMB on the map will move the camera view to that point. You can also use the mini-map to move selected units by clicking RMB on the map when a unit is selected.
Objectives
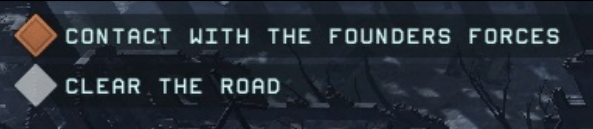
The list of objectives are shown in the top left corner of the screen. You can see objective icons on the battlefield and the mini-map. Clicking on the objective in the list will center the camera on the objective icon on the map.
Objectives are divided into Main [Orange] and Secondary [Grey]. Main objectives are mandatory. Secondary are optional, and can be hints or provide additional opportunities.
Hover you mouse cursor over objectives or objective icons on the map to see additional information.
Unit Shout Outs

When a unit shouts to give information, such as out of ammo, or losing members, this is shown on the left above the mini-map. This will show the Call Sign of the unit, and a description of what the shout out is. Selecting the shout out with the LMB will center the camera on that unit. Hovering over the shout out will highlight the unit on the mini-map.
Unit Preview Window
To the right of the mini-map is the Unit description. This shows an image of the unit. If damaged, various parts of a vehicle will be shown to be green or red, indicating damage. Infantry units will show the number of members lost, as dark silhouettes of missing squad members. Unit description includes the type of unit, the unit call sign, the camouflage level, and driver abilities of infantry
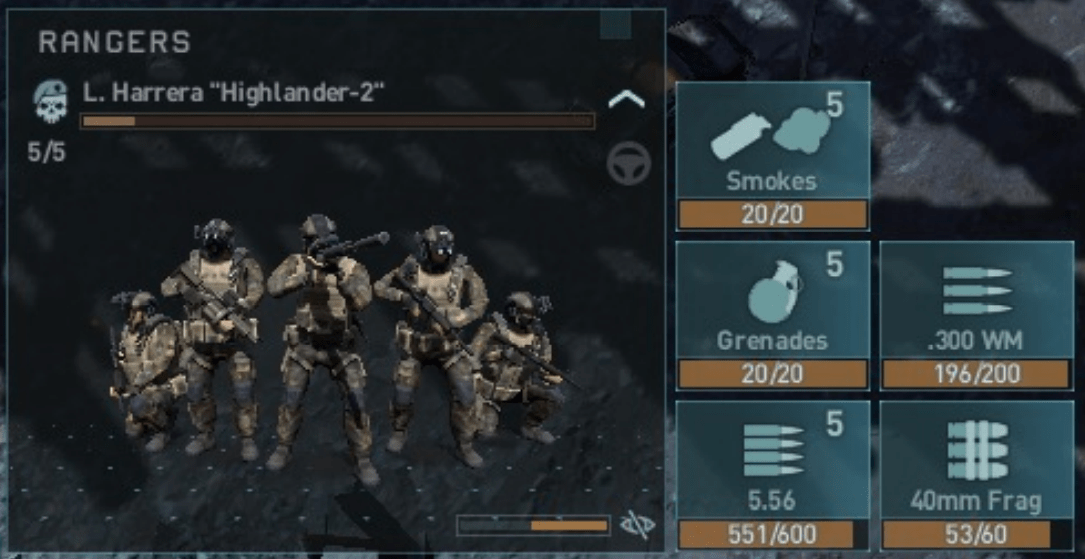
Vehicles also show fuel, repair units and ammo supplies. To the right of the Unit Description are the ammo description. Units can have multiple ammo types.
Units independently select weapons and ammunition. You can forbid a certain ammunition type by clicking on its ammo icon. Unit weapons can run out of ammo. Hovering over an ammo icon will show the minimum and maximum range of that ammo type as dotted circles on the map and shown on the mini-map.
Unit Actions
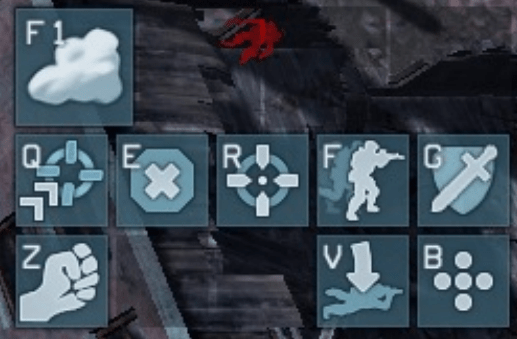
The unit actions are on the bottom right of the screen. When a unit is selected, all its actions are shown as icons. This includes:
- Move until Engagement (Q) – The combat unit will start moving to the specified destination. If it detects an enemy, it’ll stop and behave according to its current setting.
- Stop (E) – The combat unit will stop and cancel all current orders.
- Attack with all Weapons (R) – The unit will use all of its currently enabled weapons on the target, regardless of their effectiveness against it.
- Firing Mode (F) – By default, a moving unit will make short stops to fire weapons that require being stationary, if any. You can disable this behavior, making the unit always move.
- Change Behavior (G) – Changes between default, ambush and offensive mode.
- Capture that Building (Z) – The squad will begin assault on the selected building, trying to capture it and kill the enemies inside in close-quarters combat.
- Repair (C) – The crew will exit the vehicle and repair its modules. Armor cannot be repaired during a mission.
- Take Cover (V) – The squad will lie down. This allows to reduce the chance of getting direct and splash damage. Or will stand the unit up.
- Reverse Move (R) – Order vehicle to reverse by left clicking point to reverse too.
- Close the Hatch (V) – The gunner will close the hatch. This will reduce the risk to him but limit the vehicle’s attacking capabilities.
- Exit Vehicle (B) – The crew and troops (if any) will immediately exit the vehicle. Change Formation (B) – Opens the formation menu.
- Smokes (F1) – the unit will set a smoke screen. The accuracy and rate of fire of all units firing through smoke is reduced.
- Charge! (F1) – Revs have the ability to charge into battle. Select then select a location within the charge circle to charge too.
- Set Mines (F2) – Opens the mine menu. Mines include anti-personnel or anti-tank mines. Select the mine type, then click and drag and click on the ground to lay a minefield.
- Remote-controlled explosives (F2) – Self explanatory…
- Call Airstrikes (F3) – Technicians and Rangers with this ability. Select the action, then select the type of airstrike required. Then select the location, then direction, then click again to issue the order.
- EMP Grenade (F3) – Temporarily suspend a Legion unit. Press EMP ability icon then LMB-click on ground so Legion units are inside the red EMP effect circle.
- Supply Mode (F4) – The vehicle will switch to supply mode. In this mode, it’ll restore fuel or ammunition to nearby units. Select again to switch back to mobile mode.
- Hack Terminator (F4) – Select this order and click a robot disabled with an EMP.
- Booby-trap Terminator (F4) – Place a mine on a EMP’d Legion vehicle. Trigger it when desired for a large, destructive explosion.
- Attach/Detach Trailer (X) – When a vehicle that can tow trailers is selected, select Attach/Detach then select a trailer to attach/detach it.
- Change the frontline (X) – Change place direction of all troops in a selected building. LMB direction to face.
- Deploy Troops (Z) – Deploy all troops in a selected building at once to a selected point, another building or transport.
- Land helicopter! (X) – Select a clear location for your flying vehicle to land.
Buildings
On the Battlefield, buildings can be entered and used to protect your squads, becoming perfect locations to hold areas. Having a unit or units selected, hover over a building and the cursor will change to ‘Enter Building’ It is also possible to force squads to storm an occupied building using the ‘Capture that Building’ action button.
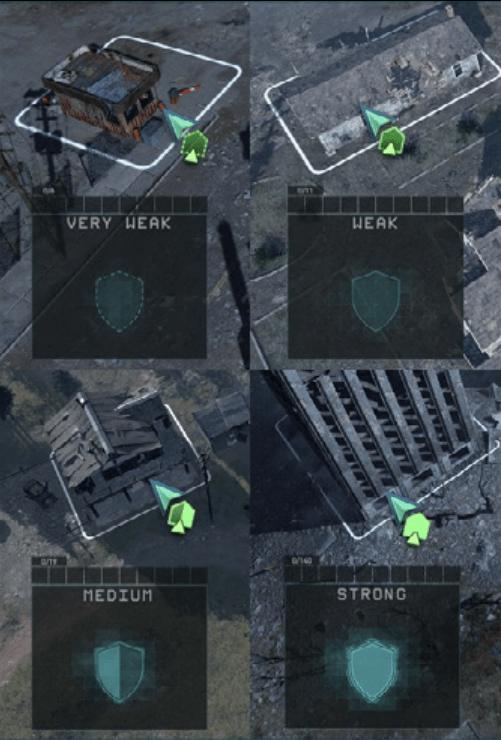
Buildings are divided into four types that have different durability, defense bonuses against splash damage and miss chance from direct hits. Building types appear in the preview window of the selected building. The cursor also shows the type when you order infantry to occupy a building. More damaged buildings provide less defense because of less obstacles to hide behind.
Building maximum capacity can be decreased by damage. See what squads are inside by their icons on the panel. Use the panel to select the squad you need and give them separate orders.
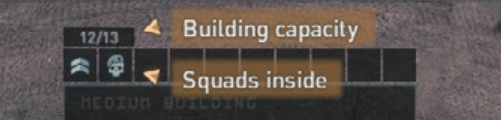
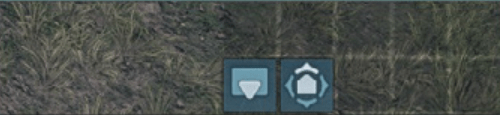
Use Deploy button (left) to disembark all troops at once to the ground, another building or transport. Use the Change the Frontline button (right) to change the place and direction your troops are facing and firing from the building.
Transport and Vehicles
Vehicles can be damaged on missions The damage is shown on the Unit Preview window. Damage to different modules on the vehicle will effect it’s use. For example, a damaged weapon may cause firing to reduce, or to stop completely if Immobilized.
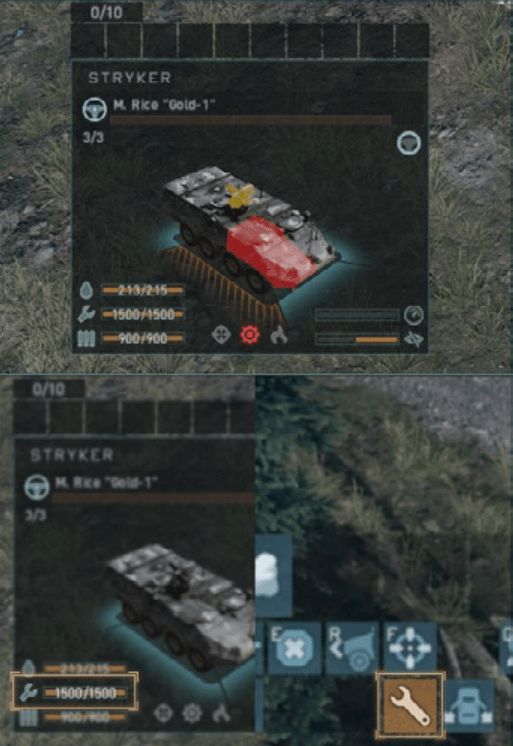
One Tip: Repair Damaged Vehicles! Vehicles that are damaged will eventually be destroyed, so do Repair them using the Repair Action. The repair action requires spare parts that are displayed on the unit preview panel. Troops can be loaded and transported in certain vehicles with capacity. This will sometimes resupply their ammo too. The resupply is displayed on your unit preview screen.
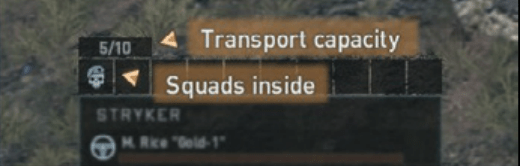
Transport capacity displays the number of squad members that can fit inside. See squads inside by their icons on the panel. Use the panel to select the squad you need and give them a separate order to disembark the transport by RMB click on a destination.
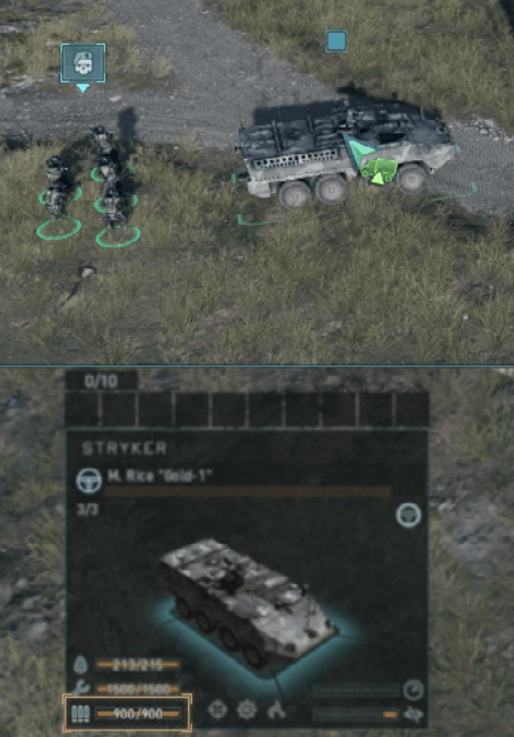
Like buildings, you can use the “Deploy Troops!” action to order your troops to disembark from a vehicle. After you click on the Disembark button, press the LMB on the destination to deploy your troops there. The vehicle will approach the destination if it is out of a deploy radius, shown as a white dotted radius.

Be the first to comment