
This guide will cover the basics of the game, including training your Onbu. Remember not to feed your Onbu after midnight or get him wet!
Guide to Train Your Onbu
Introduction
Welcome! This guide will prepare you for your journey on the back of your brand new Onbu. There are many like it, but this one is your-bu.
We will cover the basics of gameplay, how to tell the trust of your Onbu, and how to survive the spore clouds. Because you can only delay the inevitable: there will be a point both paths have unavoidable spore.
With this guide, you should be more than prepared to handle even the largest of spore clouds.
How Do I do X?
This section is just going to quickly cover all the different buttons in the game. If you’ve already played a bit, you can probably skip this section.
Speed

Speed can be brought up to 4x by tapping the fast forward button twice. You can lower it to 1x by clicking the middle icon. The game can be paused by pressing the play button on the left.
You can also:
- Space to Pause
- Press 1 for 1x speed
- Press 2 for 2x speed
- Press 3 for 4x speed
Resources

Resources will be in the top left when in the zoomed in view. You can hover over a resource to see information on it.
Onbu and Map
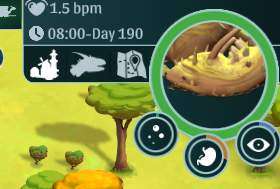
Clicking on the 3 icons beside Onbu in the top right will instantly move you to the relevant screen. You can also use the scroll wheel.
Onbu’s health, toxicity, hunger, and sleep will be listed here. You can hover over them to see their percentage.
And if he’s happy, you’ll see him swaying with his derpy lil smile.
Construction, Destruction, Priority, and Science

You can bring up and minimise this menu by clicking the middle bar (the one with the hammer).
This menu is one of the most important. If you’re unsure what something does, hover over it.
- Want to cut some trees? Leftmost option, the curved dagger (aka, a sickle). Don’t want to cut berry bushes? Select only trees. Don’t want to cut growing trees? Select ‘only harvest fully grown’.
- Want to set something to a higher priority? Star icon. Click and drag to set the priority of many things, or just tap something for solo things.
- The hammer and wrench is the window that’s open by default, and it’s where your buildings are. Each tab in this menu leads to a different set of things you can build.
- Deconstruct things. Simply click on it, and then click on what you want destroyed, or click and drag. You can then switch to the priority tool to increase it’s priority.
- The science menu. You can click to start a research here, or shift+click to que different researches so you don’t have to keep selecting new ones for a while.
Your Onbu and You
Your Onbu comes in one shape with two colours. The first thing to determine is what sort of generation you gained. Work out ahead of time where you want to place things and leave room. In general, here are a few tips:
- Your storage/kitchens should be in the center of the map.
- Despite needing tents, the people never actually use them. They can be put anywhere that’s most convenient.
- Leave space on one side of wood trunks and quarries to allow for a sawmill and such in late game.
- Don’t touch Onbu’s spikes. Just trust me. He never forgets.
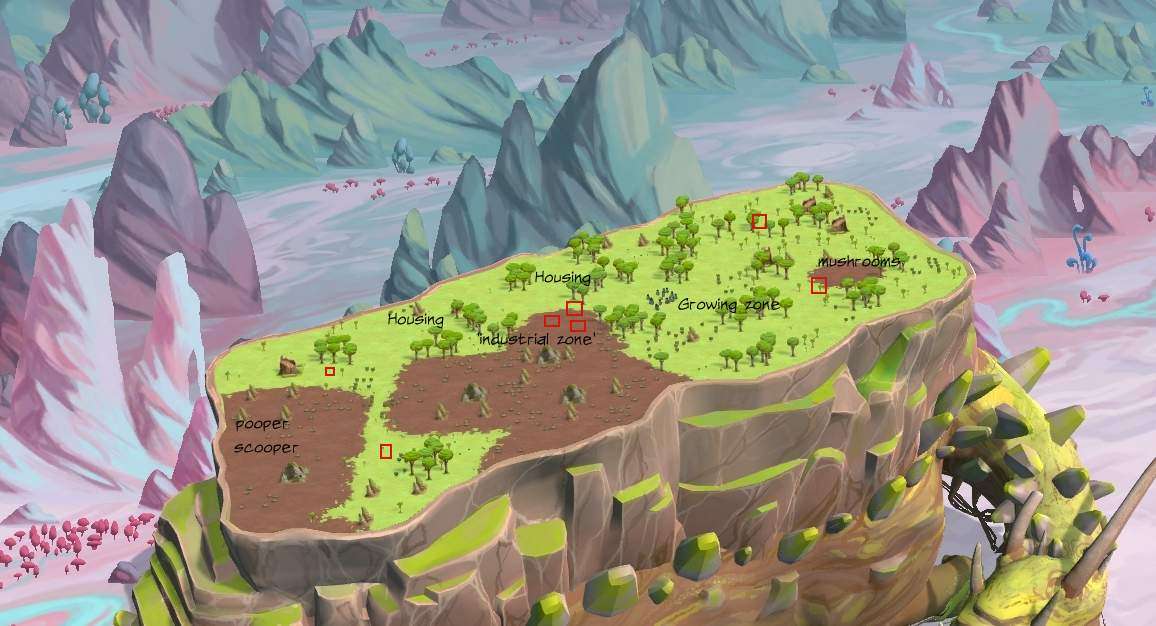
Following this, I’ve grabbed a rough outline of how I normally lay out my structures. If I’m fortunate enough to get a central dirtzone, I’ll use that for any industrial buildings, like kitchens, forges, planks, etc etc. This leaves me a large portion of land for which to use for growing food.
Also set aside an area for mushrooms as well. They don’t need a large zone, but should be somewhere close to the front of Onbu. Similarly: the compost heap works best right next to the pooper scooper.

You might notice some red boxes. I’ll briefly explain what those are here. While I’ll be getting into it in a later section, those are Decontaminators. Yes, 7 of them. We will discuss that in more details later in the guide, just know that you need to plan for them as well.
All of this is prep you can do in the first second of the game, and I’d recommend pausing to start while you plan out your Onbu.
Start
- On Novice and Adept: you start in in jungle or mountains.
- On Expert: you can be anywhere. Including a desert.
What Is Trust?
The best way to explain Trust, is with a story.
I was playing on Adept difficulty when we came to a fork in the road. The issue was, both forks led to a biome I didn’t want to go into, had a large toxic forest, and a dead Onbu. Meaning it was a large bad news bears, and completely unavoidable.
I’d taken good care of my Onbu, never took his blood or spikes. He was always wagging his jolly little tail. So I knew he’d obey me.
I prepared the torch squad, halted all but the most necessary of productions, filled up my flamers, and prepared for battle. When we were close enough, I ordered Onbu to run. It was hard. I’d not had as many people as I would have liked (unlucky spawn, barely a single town or ruin, my population was only 25), but I filled up the squads as best I could.
It took us a long time to finally beat back the last of the spores, two full days. By this point food was low, onbu was starving and tired, I forced him to run through, he began to lose health but we made it. So I let him sleep. At this point his health was down by 40%. What’s more, due to my low pop I was struggling to stockpile the herbs needed to heal the town, and grow the shrooms to feed him.
We came to another fork in the road, one had spores and one didn’t. Onbu, on 60% health, highly toxic, very hungry, disobeyed my command. We went down the spore path. I managed to survive, and my Adept colony is now very much thriving, but that’s a tale for another day.
You might be wondering what the above has to do with Trust. And that is: Onbu has a very very long memory, but only if you cause the damage. Shortly after this, Onbu was back to obeying commands. In fact, he was already swaying and cheerfully wagging his tail, despite his bad condition.
Let’s compare this to another run, where I mined 1 of his spikes. Just one. Treated him fine otherwise. He disobeyed for weeks longer compared to my adept run. Despite not being hungry, or toxic, or hurt.
With all that said, let me put it in plain English for you now.
- Trust is a measure of the damage you’ve done to Onbu+ the damage the environment is doing.
- You hurting Onbu is weighed significantly more than environmental factors (Forcing him to run, high toxicity, high hunger).
- The above is true to such a point, it can take 7-14+ days for Onbu to fully forgive you. (1-2 hours of playtime)
- Health is basically Trust.
- While the above is true, there’s also a second hidden ‘Trust’ level. This is where Onbu remembers how well you’ve taken care of it. If he’s been fed, slept, and not toxic for a long time: he’s more likely to ignore his health.
- If the Onbu is a-swayin’ you’re Onbu is at high trust.
- If the Onbu waggs his tail: it’s at max.
So in conclusion:
Don’t hurt your Onbu. It’s not worth it.
Being able to control where you go is much more valuable than extra food, or stone or wood.
Food, Farmland, and Berries
- TLDR: 1 kitchen to 2 farms/berry farms. This applies to mushrooms as well. 2 mushroom farms to 1 onbu chef.
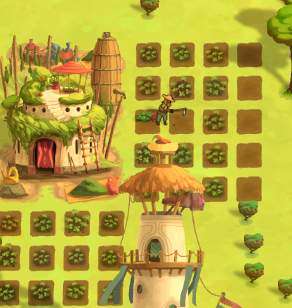
A single farmer can, if not hungry, plant 4 plots before the first is due to harvest.
This number is from beetroot, but I also tested it with corn, the longest growing plant. I found a farmer could plant 8 corn before 1 was ready to be harvested
Depending on the type of crop, the amount of plots you need is actually a ton smaller than you think. A fully staffed herbalist can only manage around 24 herbs. Notice how the last lane in the patch of 4 is empty.
As such With farmland, 1 fully staffed farm can produce 32 beetroot per harvest.
This number, of course, ignores environmental factors. But let’s take that number, and divide it by 3. That gives us 10. Now we times that by 5, meaning 50. Why 5? Because 3 beetroot makes 5 meals.
As such: 1 full staffed farm+kitchen produces approximately 50 food per harvest.
A person eats roughly twice, or three times a day. And you will harvest multiple times a day. What this means is, essentially, 1 farm can feed roughly 10 people.
Berries on the other hand, are very much the better food source. However that is only if they have 60%+ efficiency. At higher difficulties you may only get one or two ‘good spots’ if at all. As such: 1 berry farm can feed roughly 15-20 people at 100%.
- 1 kitchen can handle 2 berry farms, with some leftover. It’s about 1.5 kitchens.
- 1 kitchen can handle 2 farms, fully stocked.
Scavenger Huts
Are amazing, and wonderful. But you probably want some rough numbers.
In general: 2 is all you need. But once you get the scout tower upgrade, you can increase that to 3 or 4.
Events
Events that happen when going after a resource are a little harder to predict. From what I can determine: if a choice leads to a bad outcome, it will always lead to a bad outcome during that run.
e.g: For example the quicksand event. On my novice run I always ran for a rope, and got a ton of water. But on Adept that always led to death, but pulling them out proved to be the better option.
Another example: the mysterious forest, on novice I chopped around the big tree. On Adept that caused deaths. But leaving on adept always gave me planks.
I haven’t done extensive research on this, but in general if you get a bad result one time, you’re probably always going to get that result.
Natural Disasters
There’s a few types, and they can all be handled differently.
Tornadoes and sandstorms
Are fast. You need to run to get past them. The best way to time it is:
- Wait for the right moment by laying down, and then sprint through. This runs the risk of Onbu getting bored though. Which is why I recommend:
- Walk toward it, and wait for the tornado to hit the aoe marker. (It will turn red) When it is halfway across: start sprinting. If you timed it right you should get through without issue. This may take a few tries to get the timing right. Make sure your Onbu is well rested before you do this though.
Spore Clouds
These are slow moving, and can oftentimes be walked past without issue. If they’re within 5 dots of the road, you’ll need to wait for them to pass. Waiting is a challenge, as Onbu gets bored, so make sure to prepare Decontaminators or work stations if he starts going and it hasn’t passed yet.
If it moves within 5 dots while you’re passing by: run. In general it will travel 1 or 2 dots while you’re passing. Use the white outline when you click it as a reference.
Hot and cold spots
Not a big issue. Click ‘plant’ to turn off planting on farms, and harvest everything if they’re going to decompose.
Hot sand
Sleep on the nice toxic free sands, and then run through.
The Spore is Coming
The spore will come, you can delay it but it is inevitable. As such, it’s important to factor in Decontaminators.
The key to handling spores is the sledgehammer approach. Namely: deal with it quick, deal with it fast, or you won’t be able to deal at all.
Even if it means halting your farms. Even if you have to pull away scouts. Get as many butts as you can into those seats.
If you haven’t unlocked decontaminators: have two worker huts built. Even if they’re ‘locked’ and disabled. That way: if you run into an early spore cloud you have a way to fight it back.
Let’s go over the three p’s of dealing with spores.
Preparation
- Make sure your doctor has 3 people working at it, and you have medicine. Disable the onbu doc to steal it from that building if you’re super low (They will take it from the disabled building).
- Get your defences ready. If not decontaminators, the two worker posts should be filled and ready for action.
- If you have the horn: prepare to run.
Prosecution
- Get those spores that spawn gone ASAP. If you’re using worker huts, scour the land five times over and make sure they’re max priority.
Peace
- Disable every decontaminator, reduce the doctors to 1 once everyone who got sick is healed, and continue on.
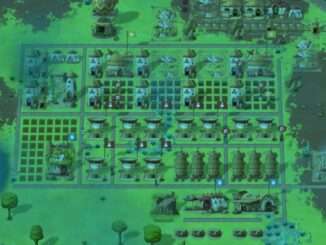
How many Decontaminators? Where to put them?
The fact of the matter is people are slow. Having a decontaminator in every corner will greatly speed up the removal of the threat. However, they will often leave to eat partway through.
While 1 decontaminator can reach everywhere, the person has to walk back to their job building after every torch. That’s why the above image has the red boxes where they are.
If you place 7 in the arrangement above: then there will always be some close by. Doing this, a large portion of the spores will be dealt with quickly.
If you don’t have the pop or materials for this large yet: build the ones in the center first.
And that’s really all there is to it.
Research Order
Do note these these are just suggestions. Sometimes you’ll want the doctor before the horn, for example. Adjust as needed depending on your game, and style.
I will divide the list into three tiers, low, mid, and high. These tiers focus on getting you what you need to survive.
High Tier: Basics
Kitchen:
- Increases your food by 40% when cooked.
Scavenger Hut:
- Makes gathering resources a ton easier. And all around more efficient.
Hornblower:
- You need it to stop Onbu from walking into spores.
Dung Collector:
- While you don’t need it right now. It’s best to get the chocolate cakes baking ahead of time.
Onbu Kitchen:
- Required to turn Mushrooms into food. It’s good to get that production early, even if you build nothing else yet.
Village Doctor:
- You don’t want to need it, and not have it.
Mid Tier: Important
Sawmill:
- Need it to make things and bops.
Quarry:
- Need it to make things and bops.
Onbu Doctor+Pet:
- These are only useful together.
Sleep:
- Useful when you need to prepare for a sprint.
Cactus+Corn:
- Corn is amazing. It’s great for hot climates.
Onbu Feeding Trebuchet:
- There is never going to be enough food for Onbu unless you feed him.
Compost Heap:
- Remember to set it to make biogas.
Decontaminator:
- Without it, you’re a sitting duck.
Hut:
- 6 people for the space of 4.
Iron Furnace:
- Need it to make things.
Glassblower:
- Need it to make things.
Scout Tower:
- See threats before they appear. And scout more.
Low Tier: Optional
- Everything else.
Biomes
Desert
Deserts are amazing. They never have any toxicity. Meaning they’re your safety zones. Grow corn, harvest oasis.
If you’ve been playing right you’ll have water stockpiled before you head in. They are your one ‘safe zone’ from spores in late game.
Jungle
Spore central, only go through here if you have no choice. If you’ve only got 1 doctor active, increase it to 3. Use this biome to stock up on water. I’d say 5 or so water gatherers are good if you can get to that point. I wouldn’t build them all at once. 1-2 is good for the start. You can increase it later if you have to enter this biome.
Mountains
It’s an ok biome. Good to restock on water. Grow beets here in case of cold snaps. Might have spores but it’s not too bad.
Conclusion
With this, you should be more than ready for even the hardest difficulty. Best of luck out there nomads.
Be the first to comment