
Guide to Training Center Route
Overview
The Training Center is the all-inclusive hub for learning the fundamentals about Train Sim World 3 and its included locomotives. You will learn everything from how to move and interact with the environment, how to interpret the HUD, and get to grips with the basics of making a locomotive move.
The route is based on the Wildenrath Test Track near Düsseldorf, Germany, but with our own buildings, facilities, and scenery to make it the perfect environment for learning about all your trains. Included with the Training Center is a Class 66 to learn the basics of Train Sim World 3 on, and all loco training is now done on the Training Center. You can also freely explore the route, practice driving trains endlessly around the loops, and making your own scenarios in Scenario Designer.
More advanced training, such as signalling systems, are still done on the main routes themselves, but you can still access these through the Training Center screen.
Training Center Tips & Tricks
- All the junctions are manually controlled, and the route has no signalling, so you can go wherever you want!
- In Scenario Planner, use Off the Rails mode to bring anything from your collection onto the route, create weird and wonderful mixes in this free roam environment.
- The outer loop encompassing the Training Center is ready for 300 km/h operation, which train can you do the fastest lap in?
- You can explore almost everywhere on-foot in the Training Center, from the building interior to ladders onto the top of depots, or maybe just a nice bench with a view.
- There are several Map Route Tasks dotted around the route to place, can you find them all?
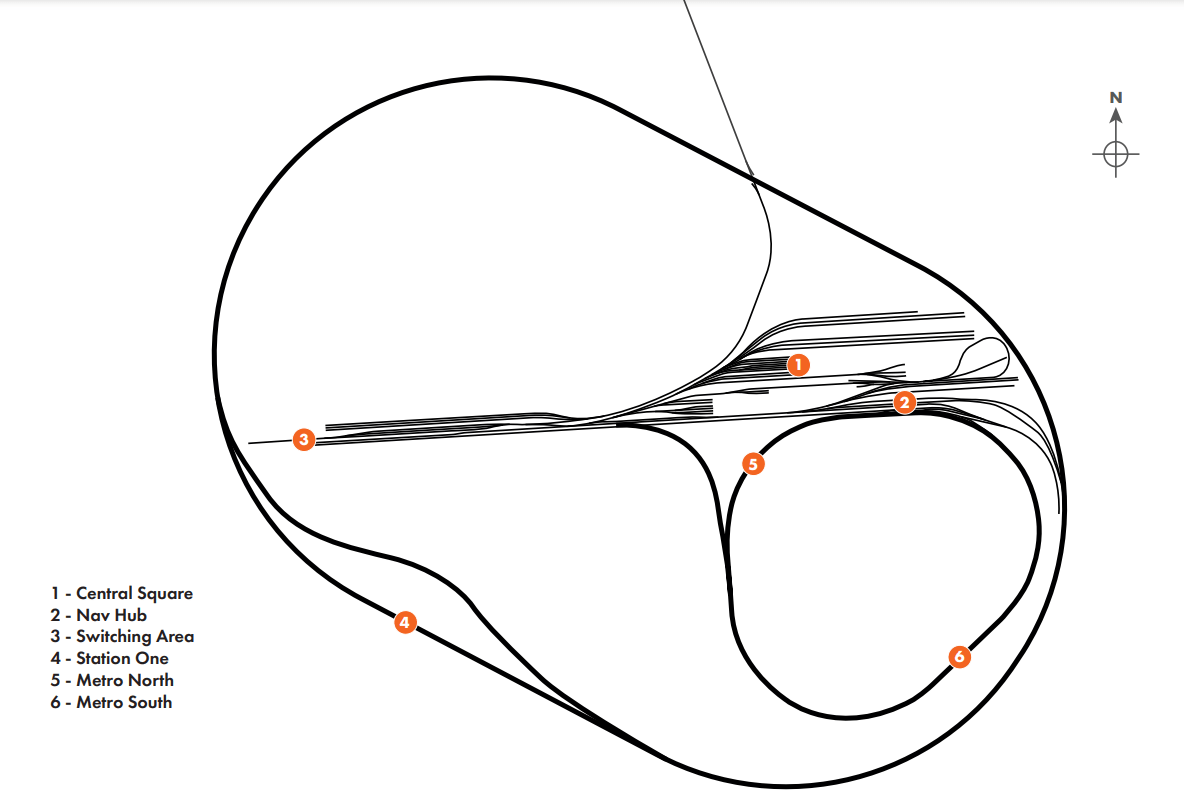
Route Map
Click to enlarge…
Training Center BR Class 66
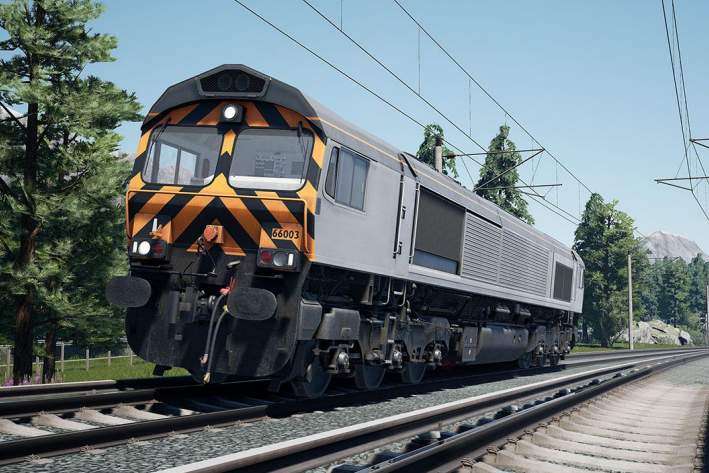
Perhaps one of the most widespread and successful locomotives in the UK, the Class 66 was introduced following the successful albeit limited number of Class 59s. Built across the pond in Ontario, Canada, this massive fleet of locomotives bears many operational similarities to their North American cousins. Capable of hauling a large variety of freight and able to fit almost anywhere, there aren’t many places you won’t see a 66 out and about. Between 1998 and 2015, a total of 480 locomotives were delivered directly to the UK, with many more also built for Continental Europe.
Quick Start
This Quick Start sequence represents the basics you will need to follow to get this train moving – follow along with the Training Module of this train in the Training Center or when you start a Scenario or Service.
- Insert the Master Key, leaving it in the Neutral position.
- Move the Reverser into Forward.
- Clear the AWS self-test sequence (if enabled) by pressing on the AWS Reset Button.
- Release the Brakes by holding the Automatic Brake Handle in the Release Position until you see 4.5 Bar on the Brake Pipe Control gauge.
- Set the Head and Tail Lights as appropriate.
- Apply Power using the Throttle Handle and Release the rest of the Brakes once generating traction.
Cold & Dark Start
This Cold & Dark Start sequence represents when the train is fully powered down. You may use this as a reference to get familiar with how trains are started and practice the full start-up sequence by spawning on-foot in the Training Center.
- Enter the locomotive by interacting with the External Door and climbing on-board.
- Enter the cab by interacting with the Cab Door.
- If you wish to drive with Safety Systems enabled, open the Right Fuse Cabinet on the back wall (No. 1 cab only) and set the AWS/TPWS isolation fuse to On, and set the Driver’s Safety Device Isolation switch to Normal.
- Sit down in the driver’s seat.
- Insert the Master Key, leaving it in the Neutral position.
- Set the Control & Fuel Pump, Generator field and Engine Run switches to On.
- Press and Hold Down the Engine Start switch for 10 seconds.
- Once the engine is running, set the Isolation Switch to Run.
- Cut in the brakes using the TMS Screen above the Windscreen; use the arrow keys to select Brake Cut-Out, F3 to select that page, then F2 to Cut In the brakes, use F4 to exit.
- Check the Brake Gauge and ensure the Main Reservoir reaches 9 Bar.
- Set the Head and Tail Lights as appropriate.
- Release the Parking Brake.
- Move the Reverser into Forward.
- Clear the AWS self-test sequence (if enabled) by pressing on the AWS Reset Button.
- Release the Brakes by holding the Automatic Brake Handle in the Release Position until you see 4.5 Bar on the Brake Pipe Control gauge.
- Apply Power using the Throttle Handle and Release the rest of the Brakes once generating traction.
Be the first to comment