
Guide to Southeastern Highspeed Route
Overview
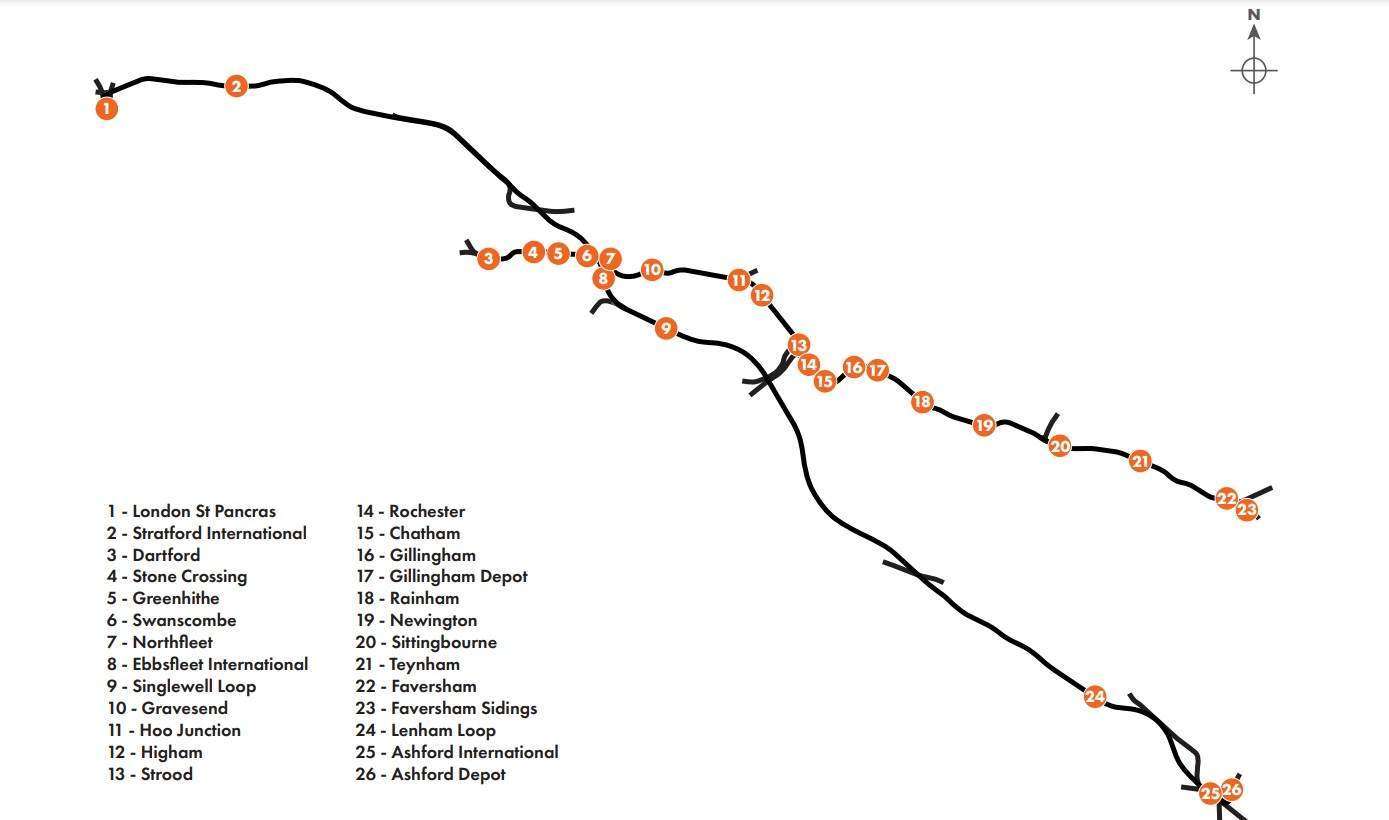
A fan-favourite, now better than ever! Southeastern Highspeed covers Britain’s fastest line between St Pancras International and Ashford International, while also including the classic main line from Dartford, Ebbsfleet and Gravesend to Faversham via Medway. Built upon the original route in Train Sim World 2, this extended version includes 40 miles of additional track, upgraded areas of scenery, and an all-new timetable based on pre-pandemic service patterns. Take on the task of running a unique blend of high-speed, commuter and freight services on this network-like route.
Southeastern Highspeed Tips & Tricks
- The full Class 395 workings have been represented, meaning there is coupling and uncoupling throughout the day, if you need to do this, look for the Coupler Preparation Buttons to open the nose, take care by moving at low speeds, and holding either the Couple or Uncouple Button as appropriate for 10 seconds to ensure it works properly.
- Look out for Approach Control! Mainly found at junctions, this feature will hold a signal at Danger until it is sure you’re going slow enough to safely pass, you may find this to be the case at places like Gravesend or Hoo Junction.
- Look out for improvements on the existing sections, all new OHLE equipment, replaced buildings and more detail, plus smoother junctions on HS1.
- There are many route tasks to complete, place route maps, fix broken fences, restock newspaper stands and adding platform edge safety signs.
- If you stand in the road at Gillingham Level Crossing, the cars beep their horns at you!
Route Map
Click to enlarge…
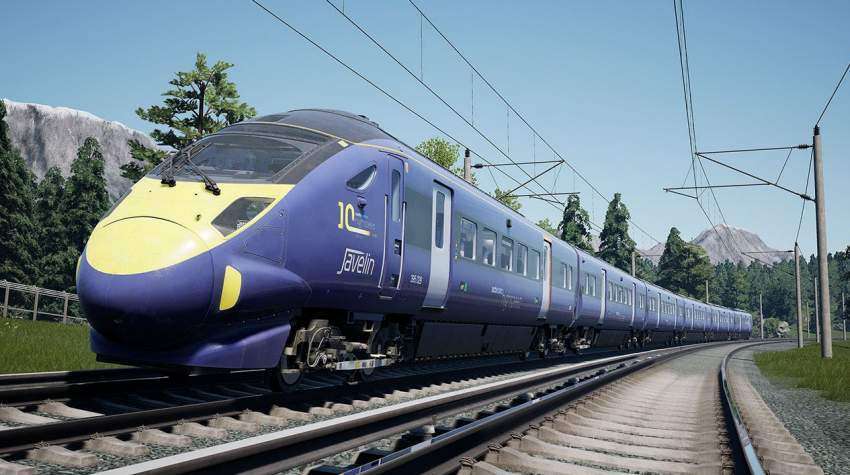
Southeastern BR Class 395
Entering service in 2009, the BR Class 395 was built specifically for use on Southeastern’s network, allowing them to run services along High Speed 1 between London and Kent, which opened in 2007. The Class 395 is equipped with both Overhead Line Equipment and Third Rail shoes, along with the different signalling systems for each area; AWS/TPWS for Classic Lines, TVM430 and KVB for High Speed 1. Entering service in 2009, these units now feature a 10th anniversary sticker, and 395 012 features a fabulous “Trainbow” design!
Quick Start
This Quick Start sequence represents the basics you will need to follow to get this train moving – follow along with the Training Module of this train in the Training Center or when you start a Scenario or Service.
- Open the desk by inserting the Master Key.
- Move the Reverser into Neutral.
- Clear the AWS Self-Test sequence (if enabled) by pressing on the AWS Reset Button.
- Ensure that the Line Volt Indicator is illuminated along with either the DC or CTRL Button as appropriate (DC Button should be illuminated between Dartford and Faversham, and Ebbsfleet Platform 6, CTRL Button should be illuminated between Ashford and London) – if set incorrectly follow steps 10-14 in the Cold & Dark Start.
- Set the Head and Tail Lights as appropriate.
- If in the platform, begin passenger boarding by pressing the Left or Right door Open Buttons.
- Once passenger loading has completed, press the Close Doors button and await Interlock.
- If it is set, reset the Driver’s Reminder Appliance Button.
- Move the Reverser into the intended direction of travel.
- Pull the Power Handle into Notch 2, increase notches to gain more speed.
Cold & Dark Start
This Cold & Dark Start sequence represents when the train is fully powered down. You may use this as a reference to get familiar with how trains are started and practice the full start-up sequence by spawning on-foot in the Training Center.
- Enter the cab by interacting with the Cab Door and climbing on-board.
- Sit down in the driver’s seat.
- Open the desk by inserting the Master Key.
- If the train is not powered on at all, press and hold the Aux On Button for 10 seconds.
- If you wish to drive with Safety Systems enabled, switch on the AWS, DSD and TVM on the back wall as you desire.
- Move the Reverser into Neutral.
- Clear the AWS Self-Test sequence (if enabled) by pressing on the AWS Reset Button.
- For operating on Third Rail territory, press down the DC Button until it illuminates.
- Once it has illuminated, press down the Pan Up Shoes Down Button until the Line Volt Indicator is illuminated and the MCB Indicator is extinguished.
- For operating on Overhead Line territory, press down the CTRL Button until it illuminates.
- Once it has illuminated, press down the Pan Up Shoes Down Button until the Line Volt Indicator is illuminated.
- Once the Line Volt Indicator has illuminated, press down the Pan Up Shoes Down Button again until the MCB Indicator is extinguished.
- Once power is being drawn by the train, observe the Brake Gauge to ensure the Brake Cylinders reach 5 Bar, and the Main Reservoir reaches 8.8 Bar.
- Set the Head and Tail Lights as appropriate.
- If in the platform, begin passenger boarding by pressing the Left or Right door Open Buttons.
- Once passenger loading has completed, press the Close Doors button and await Interlock.
- If it is set, reset the Driver’s Reminder Appliance Button.
- Move the Reverser into the intended direction of travel.
- Pull the Power Handle into Notch 2, increase notches to gain more speed.
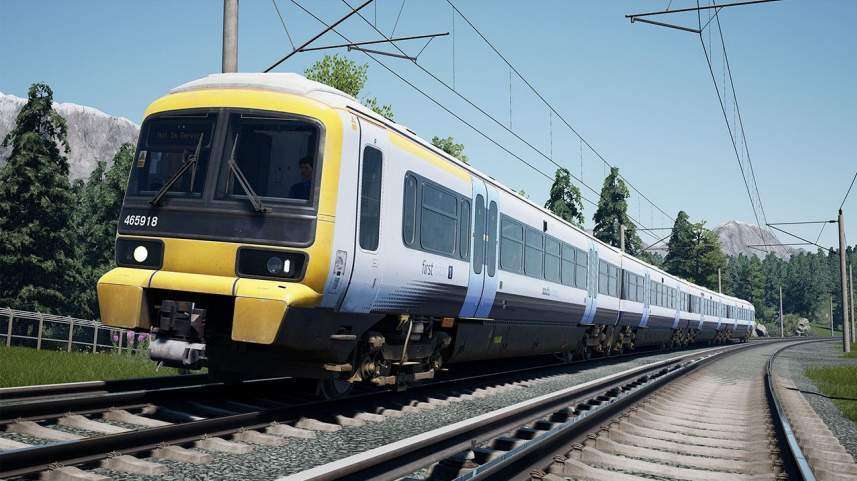
Southeastern BR Class 465/9
Designed in the 1990s to revolutionise travel throughout Kent and South East London, the Class 465 “Networker” was a successful piece of an overall plan which didn’t quite come to fruition. Built in several variants, the Networker has been in constant use since its introduction, but the 465/9 entered the scene when a subset of 465/2s were fitted with First Class, enabling them to go on longer-distance services. Despite their niche nature, the 465s continue to play a vital role in the movement of commuters, now wearing the latest variation of Southeastern’s white livery.
Quick Start
This Quick Start sequence represents the basics you will need to follow to get this train moving – follow along with the Training Module of this train in the Training Center or when you start a Scenario or Service.
- Open the desk by inserting the Master Key.
- Move the Reverser into Neutral.
- Clear the AWS self-test sequence (if enabled) by pressing on the AWS Reset Button.
- Set the Head and Tail Lights as appropriate.
- If in the platform, begin passenger boarding by pressing the Left or Right Side Open Doors Buttons.
- Once passenger loading has completed, press the Close Doors button and await interlock.
- If it is set, reset the Driver’s Reminder Appliance.
- Move the Reverser into the intended direction of travel.
- Pull the Power/Brake Handle into Notch 2, increase notches to gain more speed.
- To use Speed Set, the Regen Brakes must be On and the Power/Brake Handle must be in Notch 4.
Cold & Dark Start
This Cold & Dark Start sequence represents when the train is fully powered down. You may use this as a reference to get familiar with how trains are started and practice the full start-up sequence by spawning on-foot in the Training Center.
- Enter the cab by interacting with the Cab Door and climbing on-board.
- Sit down in the driver’s seat.
- Open the desk by inserting the Master Key
- If the train is not powered on at all, press and hold the Aux Heat & Light On button for 10 seconds
- If you wish to drive with Safety Systems enabled, set the AWS, DSD and Vigilance Isolation Switches on the side wall to Normal as you desire.
- Move the Reverser into Neutral.
- Clear the AWS self-test sequence (if enabled) by pressing on the AWS Button.
- Set the Head and Tail Lights as appropriate.
- If in the platform, begin passenger boarding by pressing the Left or Right Side Open Doors Buttons.
- Once passenger loading has completed, press the Close Doors button and await interlock.
- If the train needed powering on, check that the Main Reservoir and Brake Cylinders have fully charged to 7 Bar and 2.5 Bar.
- If it is set, reset the Driver’s Reminder Appliance.
- Move the Reverser into the intended direction of travel.
- Pull the Power/Brake Handle into Notch 2, increase notches to gain more speed.
- To use Speed Set, the Regen Brakes must be On and the Power/Brake Handle must be in Notch 4.
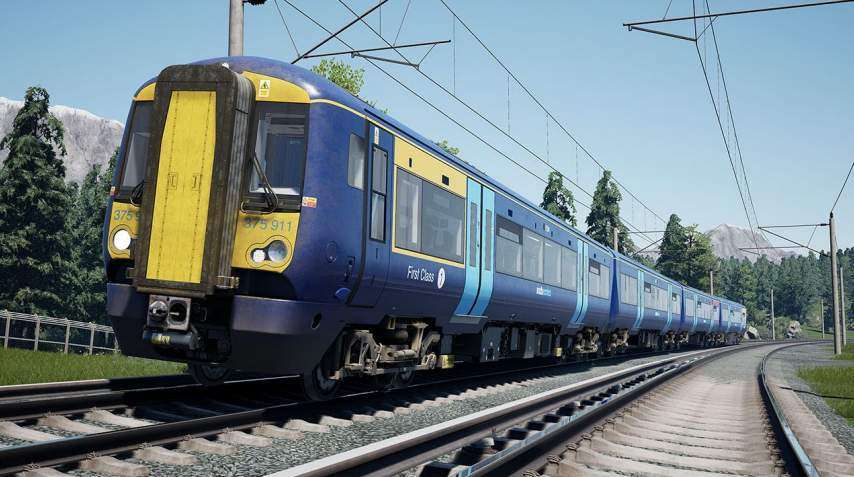
Southeastern BR Class 375/9
Needing little introduction, the Class 375 is part of the widespread Electrostar (Electric) and Turbostar (Diesel) families of Multiple Units used routinely throughout the UK. The Class 375 Electrostar was introduced in Kent in the early 2000s, replacing ageing slam-door units from decades prior. There are multiple subclasses of the fleet, including the 375/9, which is the high-density variant offering additional seating capacity for the busiest services out of London. Delivered in a white livery, the 375/9s now sport a sleek dark blue livery for their current operator, Southeastern.
Quick Start
This Quick Start sequence represents the basics you will need to follow to get this train moving – follow along with the Training Module of this train in the Training Center or when you start a Scenario or Service.
- Open the desk by inserting the Master Key.
- Move the reverser to Neutral.
- Clear the AWS self-test sequence (if enabled) by pressing on the AWS Reset Button.
- Set the Head and Tail Lights as appropriate.
- Set the Headlights to the appropriate setting with the Headlights Switch.
- If in the platform, begin passenger boarding by pressing the left or right door release buttons.
- Once passenger loading has completed, press the Close Doors button and await Interlock.
- If it is set, reset the Driver’s Reminder Appliance.
- Move the Reverser into the intended direction of travel.
- Pull the Power/Brake Handle into Notch 2, increase notches to gain more speed.
Cold & Dark Start
This Cold & Dark Start sequence represents when the train is fully powered down. You may use this as a reference to get familiar with how trains are started and practice the full start-up sequence by spawning on-foot in the Training Center.
- Enter the cab by interacting with the Cab Door and climbing on-board.
- It may be necessary to reconfigure the internal Cab Doors before proceeding. Ensure that the solid door into the passenger cabin is closed, you may need to open the transparent gangway doors in order to do this – check the sliding door to the secondman’s side is open, and that the central door is closing off the front gangway.
- If you wish to drive with Safety Systems enabled, switch on the AWS, DSD and Vigilance on the secondman’s side as you desire.
- Sit down in the driver’s seat.
- Open the desk by inserting the Master Key.
- If the train is not powered on at all, press and hold the Aux On Button for 5 seconds.
- Move the reverser to Neutral.
- Clear the AWS self-test sequence (if enabled) by pressing on the AWS Reset Button.
- Press and hold the DC System Select Button for 5 seconds, it should illuminate.
- Press and hold the Shoes Down/MCB Close Button for 5 seconds.
- Set the Head and Tail Lights as appropriate.
- If in the platform, begin passenger boarding by pressing the left or right door release buttons.
- Once passenger loading has completed, press the Close Doors button and await Interlock.
- Ensure the Brake Gauge is reading 7 Bar on the Main Reservoir and 3.5 Bar on the Brake Cylinders.
- If it is set, reset the Driver’s Reminder Appliance.
- Move the Reverser into the intended direction of travel.
- Pull the Power/Brake Handle into Notch 2, increase notches to gain more speed.
EWS BR Class 66
Perhaps one of the most widespread and successful locomotives in the UK, the Class 66 was introduced following the successful albeit limited number of Class 59s. Built across the pond in Ontario, Canada, this massive fleet of locomotives bears many operational similarities to their North American cousins. Capable of hauling a large variety of freight and able to fit almost anywhere, there aren’t many places you won’t see a 66 out and about. Between 1998 and 2015, a total of 480 locomotives were delivered directly to the UK, with many more also built for Continental Europe.
Quick Start
This Quick Start sequence represents the basics you will need to follow to get this train moving – follow along with the Training Module of this train in the Training Center or when you start a Scenario or Service.
- Insert the Master Key, leaving it in the Neutral position.
- Move the Reverser into Forward.
- Clear the AWS self-test sequence (if enabled) by pressing on the AWS Reset Button.
- Release the Brakes by holding the Automatic Brake Handle in the Release Position until you see 4.5 Bar on the Brake Pipe Control gauge.
- Set the Head and Tail Lights as appropriate.
- Apply Power using the Throttle Handle and Release the rest of the Brakes once generating traction.
Cold & Dark Start
This Cold & Dark Start sequence represents when the train is fully powered down. You may use this as a reference to get familiar with how trains are started and practice the full start-up sequence by spawning on-foot in the Training Center.
- Enter the locomotive by interacting with the External Door and climbing on-board.
- Enter the cab by interacting with the Cab Door.
- If you wish to drive with Safety Systems enabled, open the Right Fuse Cabinet on the back wall (No. 1 cab only) and set the AWS/TPWS isolation fuse to On, and set the Driver’s Safety Device Isolation switch to Normal.
- Sit down in the driver’s seat.
- Insert the Master Key, leaving it in the Neutral position.
- Set the Control & Fuel Pump, Generator field and Engine Run switches to On.
- Press and Hold Down the Engine Start switch for 10 seconds.
- Once the engine is running, set the Isolation Switch to Run.
- Cut in the brakes using the TMS Screen above the Windscreen; use the arrow keys to select Brake Cut-Out, F3 to select that page, then F2 to Cut In the brakes, use F4 to exit.
- Check the Brake Gauge and ensure the Main Reservoir reaches 9 Bar.
- Set the Head and Tail Lights as appropriate.
- Release the Parking Brake.
- Move the Reverser into Forward.
- Clear the AWS self-test sequence (if enabled) by pressing on the AWS Reset Button.
- Release the Brakes by holding the Automatic Brake Handle in the Release position until you see 4.5 Bar on the Brake Pipe Control gauge.
- Apply Power using the Throttle Handle and Release the rest of the Brakes once generating traction.
Be the first to comment