
This is big spoilers. Go away if you care.
Final Area Map
Foreword
The final area is a puzzle area, where you need to manipulate existing network components to route packets. It’s a mess, and you can’t rewire it to make it less messy, so I made a network map so I didn’t have to chase all the crisscrossed wires all the time.
If this part is randomly generated and my map is wrong: Oops!
The Map
Click to enlarge…
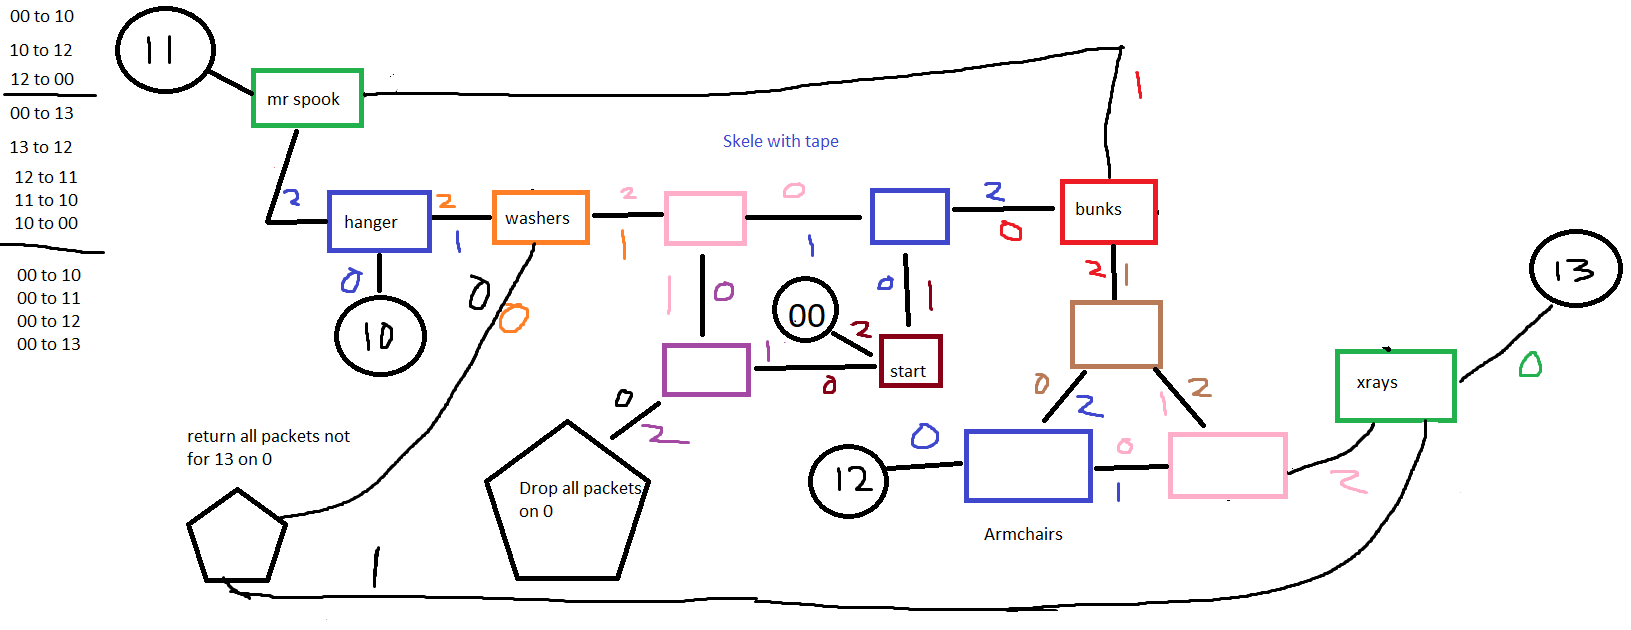
To help keep locations straight, I labeled some of the hubs with nearby features. Hopefully they are self explanatory. Skele with tape is to help orient yourself in the mainframe room, it’s our north star!
- Rectangles are hubs. You’ll need to change which way packets flow often, so I didn’t bother listing their configuration.
- Circles are endpoints. I only include the last 2 octets (quartets?) of their IPs.
- Pentagons are filters. Their ports are in black.
All lines between shapes have numbers on them. The numbers are different colors, that marks which port the shape of the same color that wire is. IE, for the “start” hub, the 2 port from the brown hub connects to the mainframe, and the 1 port from the brown hub is the 0 port for the blue hub.
There are 2 hubs with incomplete wiring: mr spook, and xray. They are behind the “don’t open” doors, don’t worry if you can’t find them at first. Mr spook you actually get to place yourself, so you can wire the ports on that one any way you like. Xray has 2 ports you get to wire, it doesn’t really matter which way you wire those but one will need to go to the pink 2 port and one will need to go back to the 13 filter in the bottom left.
This isn’t a walkthrough, I’m just saving you from drawing your own map. Honestly, it’s not a pretty map, clean it up if you like.
Bonus Tips
You can get the door code for mr spook’s room from the hot tub kids in the club. There is a piece of paper in the back of the Villa sewers you get a code from, then you just tell them. For some reason the Villa code is the same as the HQ code… Or just break the glass, mr spook can open the door if he wants to anyways so you can’t trap him in the endpoint part.
The notes on the left hand side is the packet route for each stage of the puzzle. There are 3 stages. Once you complete a stage, you don’t have to keep routing packets in that order, so you can change hub flow for the new stage (this really tripped me up for a few minutes). For the last stage, all packets are one way, and should go pretty quick. Just don’t get jumped by mr spooky.
The black hole filter in the mainframe room has a little room behind it to place network equipment, and since the filter is on port 0, you can hook stuff up to port 1 and it’ll end up in the mainframe room. Not sure if it’s intended, but it is a GREAT place for an antenna.
Save before doing the final step so you can get both achievements.
When you’re done at HQ, you’ll have one final mission. Don’t overthink it, use your jetpack, and when you’re done “acknowledging” you’ll be at the credits. Congrats!
My advice would be to mark down where and what each of the computer addresses are and then use the ability to pause and go step-by-step to see where each packet wants to go next. Unless it’s random it should do a round trip and take you back to roughly where you started. I also recommend using wireless transmitters to skip putting cables through the mazes as they have a habit of filling themselves back in again when you are not around and using your drill will break any routers you put in there.
Thanks for posting this! I didn’t realise some of the blood-painted “DO NOT OPEN” doors were actually openable. I’d assumed that, since I’d tried one and it was locked, they’d all be locked. Pretty annoying the game expects you to voluntarily open a door marked like that! I guess those endpoints would have shown up on the small portable radar/locator thingy, which at least would have been a clue.