
Ultimate Guide to Harvesting! Feasting! Great Food Festival Scenario
By Celery.
GFF is a training-oriented scenario intended for short/mile builds. GFF has the following stat caps:
- 1750/1000/1700/1700/1350
The theme of this scenario is cooking. You’ll be participating in various cooking-related activities like harvesting vegetables, cooking meals, and participating in tasting events to create the ultimate dishes to satisfy all the students at the food festival.
Vegetables and Harvesting
In GFF, there are five different vegetables to harvest (Carrot, Garlic, Potato, Chili, Strawberry). Vegetables are harvested mainly from clicking on a training category, with each category corresponding to an associated vegetable (Speed always gives Carrots, etc.):

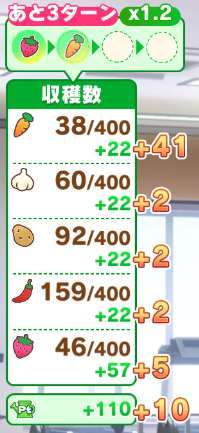
Clicking on a training will prepare the associated vegetable for harvesting. The table in the left side UI will show your currently available vegetable amounts, and in green the prepared amounts for the next harvest. Every harvest initially starts with +20 all vegetables prepared.
Above the side UI you’ll find your harvest stack that fills over four turns with a care stamp for each of the vegetables you click on. Every four turns, you’ll automatically harvest the vegetables you’ve prepared for gathering and the amounts you’ve prepared (in green) will be added to your current total amounts.
Every training category will prepare a bunch of the associated vegetables of that category for harvesting. Friendship (rainbow) training will give an increased harvest by providing a glowing stamp in your stack instead. Obtaining a glowing stamp will provide a small additional yield for all other vegetables too. The harvest stack has an additional vegetable multiplier as well, and this is increased by obtaining more glowing stamps.

During summer camp and URA finals, you’ll be able to harvest each turn and gain higher amounts of vegetables.

You’ll also be able to prepare quantities of a random vegetable from resting/dating/racing. Sometimes these will also have a glowing stamp available to provide an increased harvest. Objectives always give a glowing stamp.
Vegetable Levels
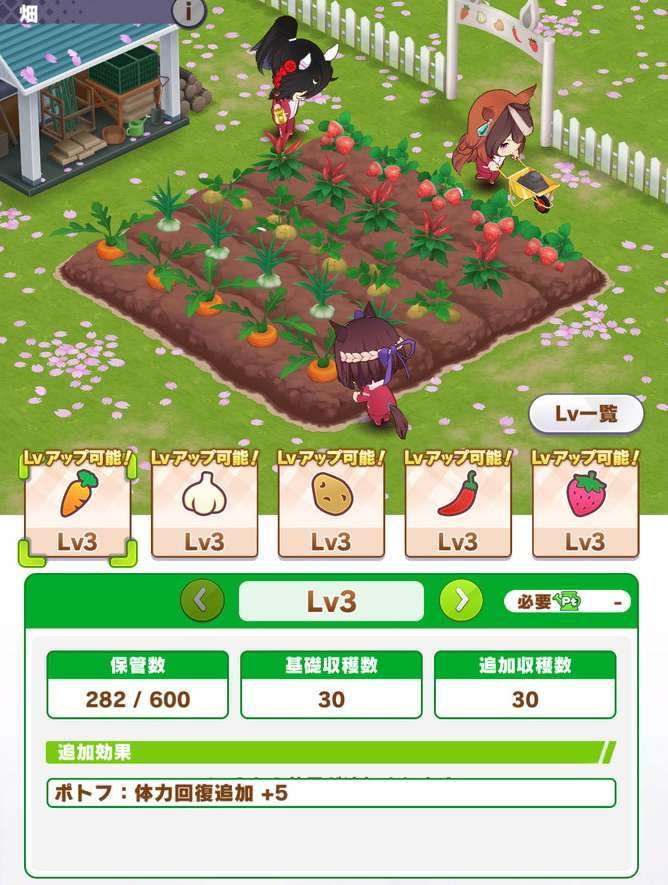
Training will also yield field points (displayed at the bottom of the side UI), which you can use to increase your vegetable levels in the field menu.
Field points are obtained from harvesting every four turns, with a base of 100 field points per harvest, but you also gain a bunch of points when collecting glowing stamps.
Each vegetable has their own level ranging from 2 to 5. The initial max level for vegetables is 2, and it increases at set intervals (see later sections). Upgrade costs are 100, 180, 220, and 250 field points per level.
The first main reason to raise a vegetable’s level is to provide higher yield while harvesting that vegetable. There are two basic ways a vegetable’s level affects the harvested amount:
- The amount harvested for clicking a training increases by level:
| Level | 1 | 2 | 3 | 4 | 5 |
| Harvest | 20 | 30 | 30 | 40 | 40 |
The small amount of bonus vegetables you get for collecting other vegetables’ glowing stamps increases as well, with comparatively similar scaling as above (so +2, +3, +3, +4, +4 at base).
- Also, the initial amount per harvest increases as well:
| Level | 1 | 2 | 3 | 4 | 5 |
| Initial | 20 | 20 | 30 | 40 | 40 |
However! These harvesting boosts from vegetable levels apply retroactively, meaning that as long as you level up the vegetable before the current 4-turn harvest stack is filled, all of the above bonuses from a higher level will be retroactively applied to the amount of that vegetable that will be obtained (the numbers in green will increase). Already obtained vegetables (not in green) are not affected.
The second main reason to level up vegetables is to increase the vegetable’s storage cap. The initial cap is 200, and it increases by 200 per level.
The third main reason is that leveling up vegetables will boost up their associated classic/senior year dishes and the final dish available during URA finals, see the next section on cooking.
During summer camp, the field menu will be unavailable and you’ll need to adjust your vegetable levels beforehand if you want to reap the benefits. On the other hand, during summer camp you harvest each turn and will also gain +50 field points per turn (and a bonus +25 for glowing stamps).

Akikawa Yayoi is the scenario linked friend support for this scenario, and her scenario link mechanic provides a large boost in vegetables.
For each of the five dates you go on with her, you’ll gain +40 of every vegetable category for a total of a whopping +1000 vegetables overall throughout the run.
This makes her not only an incredibly strong (almost mandatory) inclusion in all decks in GFF, but also changes how you play the scenario as you will have to play around the vegetables gained from her dates in addition to the ones you get from harvesting.
Cooking
Once you’ve acquired enough vegetables, it’s time to cook them.
Cooking vegetables will provide you with dishes that will boost up your training with various one-time effects. Cooking does not take up a turn, and cooking a dish will immediately consume it to provide a one-turn boost for the turn you’ve cooked it on. These boosts mainly include training boosts and race bonus boosts. You’ll want to collect enough vegetables and then cook a dish before a good turn to provide an appropriate boost for it.
Every dish has its own effects, and using higher-leveled vegetables to create a dish will provide higher numbers from said effects.
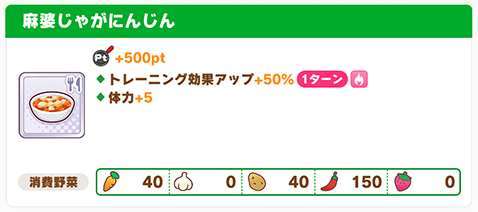
Cooking a dish costs a certain amount of vegetables per dish. You can freely choose which dish you would like to cook beforehand, but you can only cook one dish per turn.
When you cook a dish, it’s possible for it to be a great success. The success chance will increase over time during the scenario, but achieving great success is quite nice as it will provide an additional bonus for the dish.
Cooking a dish will also give cooking points. Your current total cooking points amount will provide additional bonus effects for training, bonuses start when you have at least 500pts:
- Increasing the chance of great success for cooking.
- Passive training bonus increase.
- Passive training skill point gain increase.
- Specialty rate up.
- Fan bonus up.
These bonuses increase as you gain more cooking points, but not continuously. Rather, there are multiple breakpoints at which new bonuses are applied:
| Bonus/Points | 500 | 1500 | 2500 | 5000 | 7000 | 10000 | 12000 |
| Great success | 15% | 18% | 20% | 22% | 24% | 25% | 100% |
| Training bonus | 10% | 16% | 21% | 25% | 28% | 30% | 30% |
| Training SP gain | 15% | 24% | 33% | 42% | 51% | 60% | 60% |
| Specialty rate | 5 | 8 | 11 | 14 | 17 | 20 | 20 |
| Fan bonus | 20% | 28% | 34% | 39% | 43% | 45% | 45% |
There are also set intervals at which having enough cooking points increases your training levels by +1:
- 2000 pts
- 7000 pts
- 12000 pts
Cooking also increases your cooking gauge. Filling up the gauge guarantees great success on your next cooked dish, and this empties the gauge after cooking.
Tasting Party
Every 6 months or so, you’ll be participating in a tasting party. For each party, you’ll need to achieve enough cooking points to achieve a “Great Satisfaction” evaluation:

- First Tasting Party (end of Junior year): 1000 pts required.
- Second Tasting Party (before Classic summer): 2500 pts required.
- Third Tasting Party (end of Classic year): 5000 pts required.
- Fourth Tasting Party (before Senior summer): 7000 pts required.
- Great Food Festival (end of Senior year): 10000 pts required.
At the Great Food Festival, having 12000 cooking points beforehand gives a “Super Satisfaction” evaluation instead. This provides important benefits such as decreasing the cooking cost of the strongest dish for URA finals. 12000 points also guarantee great success on cooking, so it’s doubly important.
You’ll be able to pass these milestones just by cooking regularly often, so it’s not something to worry about too much unless you’re hoarding vegetables (don’t).
Achieving Great Satisfaction in tasting parties will do the following:
- Increase the caps on vegetable levels: The one at the end of junior year increases the cap to 3, and the one at the end of classic year increases the cap to 5.
- Provide new available dishes to cook.
Initially you’ll only be able to cook sandwiches and curry, but stronger dishes are obtained later during the scenario. Next, let’s take a look at all the available dishes.
List of All Dishes
Here is a list of dishes available for cooking in GFF. Shorthands:
- 🥕🧄🥔🌶️🍓 = Icons for each vegetable
- TB = Training Bonus (more stats from training)
- RB = Race Bonus (more stats from racing)
| Dish name | Obtained when | Cost to cook/points obtained | Effect (see notes for scaling) |
| Sandwich | Start | 25🥕50🥔50🍓+250 cooking pts | +25% TB for 1 turn (speed/pow/int) +2 bond to all |
| Vegetable Curry | Start | 25🥕50🧄50🌶️+250 cooking pts | +25% TB for 1 turn (speed/stam/guts) +2 bond to all |
| Great success on the initial two dishes gives: +1 skill hint from your supports (random) +3 more bond to all (random) +10 energy. | |||
The next dishes are obtained from the start of the classic year. Each one corresponds to one stat / vegetable and enhances training for that category.
| Carrot pot-au-feu | Classic year | 150🥕80🥔+500 cooking pts | +50-60% TB for 1 turn (speed) |
| Garlic Ramen | Classic year | 150🧄80🌶️+500 cooking pts | +50-60% TB for 1 turn (stamina) |
| Potato Pizza | Classic year | 80🧄150🥔+500 cooking pts | +50-60% TB for 1 turn (power) |
| Chili Mapo Tofu | Classic year | 40🥕40🥔150🌶️+500 cooking pts | +50-60% TB for 1 turn (guts) |
| Strawberry Ice Cream | Classic year | 80🥕150🍓+500 cooking pts | +50-60% TB for 1 turn (wisdom) |
| Great success on the above five dishes gives: +1 skill hint from your supports (random) +10 energy (random) +4 max energy (random) another support appears in the current training category. Note: You should have a non-full training including npc’s for this to occur I believe. | |||
Note that the effects of dishes are further upgraded as follows:
- +5 energy per dish if its respective vegetable is lvl 3+
- Training bonus increases after the tasting event before classic summer. The increase seems to be +10% if the respective vegetable was lvl 3+ before the tasting event.
Continued on the next page.
In senior year, upgraded versions of the previous dishes are added to the recipes:
| Chunky Carrot pot-au-feu | Senior year | 250🥕80🥔+800 cooking pts | +80-100% TB for 1 turn (speed) +30-35% RB for 1 turn +10 energy |
| Whole Garlic Ramen | Senior year | 250🧄80🌶️+800 cooking pts | +80-100% TB for 1 turn (stamina) +30-35% RB for 1 turn +10 energy |
| Fluffy Potato Pizza | Senior year | 80🧄250🥔+800 cooking pts | +80-100% TB for 1 turn (power) +30-35% RB for 1 turn +10 energy |
| Spicy Chili Mapo Tofu | Senior year | 40🥕40🥔250🌶️+800 cooking pts | +80-100% TB for 1 turn (guts) +30-35% RB for 1 turn +10 energy |
| Double Strawberry Ice Cream | Senior year | 80🥕250🍓+800 cooking pts | +80-100% TB for 1 turn (wisdom) +30-35% RB for 1 turn |
| Great success on the above five dishes gives: +1 skill hint from your supports (random) +10 energy (random) +4 max energy (random) +1 motivation (random) another support appears in the current training category. | |||
Part of the TB scaling for the senior dishes comes from a boost of +10% training bonus if their respective vegetable is level 5.
During URA finals, a new dish becomes available:
| G1 Plate | URA finals | 100 all But if you achieve Super Satisfaction (12000 pts) for the last tasting event: 80 all | +150-200% Training bonus +70-100% Race bonus +25 Energy +1 Motivation +1 Skill hint from your supports +Supports appear in multiple trainings |
The power of the G1 plate gets increased as follows:
- +5% training bonus for every vegetable at level 5
- +5% race bonus for every vegetable at level 5
At URA finals your great success chance when cooking should be 100% already, so there’s no additional bonuses to be obtained there.
Scenario Linked Characters
The following characters are scenario linked for GFF:
- Special Week
- Rice Shower
- Nishino Flower
- Katsuragi Ace
- Hishi Akebono
- Akikawa Yayoi
For support cards having scenario link, it gives the following benefits:
- +2 vegetable gain per training
- +1 skill hint level from their hints at great success dishes
- Ability to make a special dish during senior year when achieving great success (each of the 5 scenario linked uma musume has her own speciality dish).
- Ability to obtain a corresponding gold skill from the senior later half event, see next section.
For trainable characters with scenario link, it gives the following benefits:
- Higher starting vegetables (+5 all) and very slightly higher vegetable gains.
Scenario Specific Skills and Evolution Skills
The scenario is oriented towards building short and mile characters which is reflected in the scenario skills.
Scenario Gold Skills:
Late senior year, you’ll be offered a skill choice from one of the scenario link characters:

If you are training one of these characters or have them as a support in your deck, the skill is upgraded to a gold skill. Otherwise you get the white version.
The skills are:
- Special Week: Big Eater/食いしん坊, gold recovery for leaders, kinda useless in this scenario.
- Rice Shower: Straight Down Resolution/決意の直滑降, leader accel skill for downhills, only good in very specific situations
- Nishino Flower: Like The Wind/ハヤテ一文字, generically good straight skill
- Katsuragi Ace: Gold version of Danger Avoidance/危険回避, the gold version isn’t really an upgrade over the white version though. This skill is good but only for runners using a specific opening leg skill combo.
- Hishi Akebono: New skill/電迅速攻, A short distance midleg speed skill. Very short duration so it’s not super valuable.
- Akikawa Yayoi: New skill/風翔, A mile midleg speed skill. Very short duration so it’s not super valuable.
The scenario also gives the gold skill Exquisite Timing/時中の妙 when achieving great satisfaction at the Great Food Festival at the end of senior year. This is a midleg speed skill that has a very short duration. It can evolve in the scenario to provide a bit higher boost but it still lasts the same short time.
At the end, if you achieved all the scenario objectives you’ll get the scenario gold skill The Races We Run/私たちの走る道程. This is a final leg current speed skill, kind of decent but expensive. It gains a boosted effect for your amount of cooking points at the end, overall the effect is decently strong but not top tier.
Scenario Evolutions:
The following gold skills can evolve to pink skills in GFF:
- Sprint Turbo/スプリントターボ → Gains small bonus speed effect at 200m before goal
- Uma Mania/ウママニア → Small increase in speed boost
- Exquisite Timing/時中の妙 (gold from scenario) → Small increase in speed boost
- Curve Sommelier/曲線のソムリエ → Gains small bonus speed effect at 200m before goal
- Lightning slash/紫電円刃 → Small increase in speed boost
- Lightning speed/電光石火 → Gains small bonus speed effect at 200m before goal
Scenario Gameplay Strategy
Basic Gameplay and Goals
At the start, you’ll want to raise your supports’ bonds as usual to take advantage of the increased yield from rainbow training as early as possible. You start with 50 of all vegetables, so you can cook both available dishes immediately if you have decent enough turns for them. This will already give you bonuses like +10% training bonus from your total cooking points, so you want to get it done as early as possible, usually on the first two turns.
Since the junior year dishes also raise bonds, it is especially important to be cooking a lot until you’ll be clicking mainly on rainbows, as rainbows are especially powerful in this scenario due to giving guaranteed glowing stamps.
Generally, you’ll want to be cooking dishes quite frequently since your total cooking points will offer small benefits to overall stats as well. But choosing the timing of cooking is the key gameplay mechanic of this scenario, so don’t simply cook at every opportunity without thinking. As long as you’re using Akikawa Yayoi’s friend card in the deck though (and you should), you’ll gain so many vegetables you’ll be cooking almost constantly.
A Balanced Harvest
Since every training category has its associated vegetable, you’ll ideally need to click on a variety of different training types to have enough vegetables to cook many different types of dishes. It’s a bit hard to force this while still chasing big support stacks, but just keep an eye out so you have enough vegetables for cooking.
Try to maximize how many glowing stamps you collect from rainbows and resting/dating/racing to maximize your vegetable harvest and grab some additional field points. Ideally, you’ll want your rest/date turns to be glowing stamps as well, but don’t force this too much.
If you want to judge which vegetables are most important to be harvesting, the general order is this (based on how much they are typically needed):
- Carrot (Speed)
- Potato (Power)
- Chili/Strawberry (Guts/Int)
- Garlic (Stamina)
Garlic you won’t really need to harvest by clicking on stamina training, since it’s a short/mile scenario and you don’t want to be clicking there anyways. But you also won’t use it much for dishes so you will probably have excess garlic by the end.
Remember that Akikawa Yayoi now gives +40 of each vegetable from her dates, so don’t overcap too much because of this.
Vegetable Leveling Priority
Remember to level up your vegetables in the field menu somewhat frequently! Vegetable levels are important to manage to increase your harvested amount and provide higher bonuses.
Remember that vegetable levels apply retroactively to harvesting! You can freely wait until the final (4th) turn of a harvest before leveling up vegetables if all you care about is the harvested amount. Of course, later when you also get bonuses to dishes you might want to increase levels earlier.
For example, if you’ve obtained 3 carrot stamps so far and are planning to click on a potato stamp for the fourth turn, leveling carrots up on that turn is going to end up giving you a bunch of more carrots on that harvest even though the stamps were collected on previous turns.
Let’s look at in which order you should be leveling up your vegetables in the field menu throughout the run:
- Junior year (level 2 available, upgrade cost 100)
During junior year your simple goal is to level every vegetable to level 2. This is very easy to achieve, so the question is just about the order. Since the main benefit from being level 2 is the harvested amount increasing when you collect stamps of that vegetable, you should focus on what’s in front of you and level up whatever you’re getting most from the current harvest.
Leveling vegetables up just to increase the cap is also decent if you’re in danger of overcapping hard. A little bit of overcapping is always fine.
Since you gain at least 100 field points per harvest, starting from the second harvest you’ll be able to increase at least one level for each harvest. As explained before, do so on the fourth turn of each such harvest before the harvest is completed. Do so until everything is level 2. You can leave garlic at level 2 for a longer time, since you’ll be obtaining it the least of any vegetable.
- Classic year (level 3 available, upgrade cost 180)
At the start of classic year, you’ll be able to upgrade things to level 3 now. Typically you can upgrade one vegetable right away. In addition to more vegetables harvested, meals using these vegetables now also gain +5 energy. This is a small benefit but it’s still nice, so level up those vegetables to 3 before summer that you’ll be clicking the most.
After summer, level the rest to 3 except garlic is optional.
- Senior year (levels 4 and 5 available, upgrades cost 220, 250)
Senior year unlocks upgrades up to level 5. Now you’ve got the option of taking the cheaper option and upgrading multiple things to level 4 for additional vegetables harvested, or leveling one particular vegetable to level 5 at a time. Level 5 gives additional training bonuses to dishes, so it is quite good for highrolling stats if you know you’ll be clicking on a specific training category a lot.
But if you think you’ll be short on vegetables instead, you might want to level multiple vegetables to level 4 instead.
Sometimes you might end up overcapping on, say, a level 3 strawberry at 600/600. But unless you’re overcapping by a large amount this is not necessarily worth a level up just to increase the cap.
- URA finals
During finals you would like to level each vegetable to level 5 one at a time to gain the maximum bonuses for the G1 plate dish, but you also need to make sure to have enough vegetables to cook these dishes in the first place. See the URA finals section later.
Optimizing Cooking
The main effect from dishes is the training boost, so the best opportunity to use a dish is to boost up a turn where your supports are stacked well. Using food for racing is a bit less important (it’s mainly used for the “G1 Plate” dish in URA finals), but remember that you can also use food during the race menu.
Since you can only cook one dish per turn, don’t end up in a situation where you have too many vegetables to spend your available turns effectively or overcap on them too much. Since cooking food also increases your passive scenario bonuses, you’ll want to be quite active about cooking as much as possible while still cooking on strong turns.
On a good run with a meta deck, your cooking point totals might look like this:
- End of junior year: 2500-3000 / 1000
- Before classic summer: 5000-6000 / 2500
- End of classic year: 8500-9500 / 5000
- Before senior summer: 12000+ ideally / 7000
- End of senior year: 15000+ / 10000
Cooking vs Waiting
On every turn where you have enough vegetables to cook, you have a choice of either cooking the dish or waiting for a better opportunity to use your vegetables. Let’s look at the main points of when you should cook vs wait:
- Cook if: You’ve got a really strong support stack/rainbow.
- Wait if: The main opportunity to wait is before a tasting party or summer camp, since after the tasting party your bonuses and foods will get upgraded, while in summer your trainings are simply stronger. You can also save a guaranteed great success from a maxed cooking gauge for the next tier of food, but don’t focus on this too much as in the end the main point of dishes is to take advantage of the strong turns right in front of you.
- Cook if: URA finals (every turn, including races). See next section.
- Cook if: You’re lacking points for the next tasting party. Remember that for the final tasting party (GFF) you need 12000 points to achieve Super Satisfaction. This is always optimal for stats so you should go for it every time. Having 12000 points also changes your great success rate to 100%, so unlocking it early is a great way to get maximum benefit from your senior year turns.
- Cook if: You’re overcapping hard on certain vegetables and have an opportunity to get some value from them. Overcapping garlic isn’t usually too bad though.
These rules are not absolute, and finding the right balance is important here. Note also that if you’re not at the current cooking points cap, you’re not supposed to wait on cooking for too long because then you’re missing out on the passive bonuses from higher cooking points.
One basic thing about this scenario to keep in mind is that even though you want to be, say, cooking speed food on speed rainbows, the main way to obtain the ingredients to cook speed food is still by clicking speed rainbows. So you should certainly take advantage of your weaker rainbows to store up on vegetables to take advantage of stronger rainbows later.
Make sure to acquire 12000 cooking points before URA finals to empower the G1 Plate dish.
URA Finals
In a perfect world, for the final 6 URA turns you’ll want to be eating the strongest food, G1 Plate, which becomes available at the time. The G1 Plate is especially interesting because it allows your supports to appear in multiple trainings, so it can create new rainbows and big stacks as well if your turn looks bad. It also boosts race stats a lot, so don’t forget you can use it on the final three race turns as well. Prioritize training turns though, the race turns aren’t as important.
Of course this means saving enough vegetables beforehand to be able to make sure you can cook enough G1 Plates at the end. You’ll need a total of 480 vegetables each to make this dish for 6 turns, but keep in mind you’ll be harvesting during URA finals as well. If you need to calculate deeply, here are some numbers to help:
- Level 2 garlic base gain per turn (finals): +15, level 3: +22
- Level 4 other vegetable base gain (finals): +30
This assumes glowing stamps each training, but these are almost guaranteed. You can, of course, always randomly get the vegetable you need from the first two race turns too.
This means you need to come in with the following vegetable amounts to guarantee 6 G1 Plates:
- Level 2 garlic: 330/405/330/330/330
- Level 3 garlic: 330/370/330/330/330
Of course, you will need less for the categories you’ll actually be clicking on so take those into account. Moreover, you will gain extra amounts of two random veggies from the first two URA final races, which can randomly save your run if they land on just the one you’re missing.
You may also notice that in the level 2 garlic setup you need 5 more garlic than the level 2 cap allows. Let’s discuss the ways to address this problem:
- Get garlic from one of the first two URA races randomly OR
- Cook a lower leveled dish for the second URA race OR
- Level up garlic to level 3 on the second URA race
The first solution is ideal but random, the second solution is best if you’re missing enough other vegetables and can’t make 6 G1 Plates anyways, and the last solution works by giving you a slightly higher harvest of garlic for the final two turns. But in the last solution you might not make it to four level 5 vegetables total so your G1 Plate for the final two turns is slightly less powerful. It is possible though on a good run:

Remember that you can also cook other foods during finals too, so if you’re running low on some vegetables you’ll want to cook the senior year food for races instead and save G1 Plates for training. Remember to pick the senior food based on which vegetables you have most of in this case.
Using Downgraded Food
Just like in URA finals where you can cook senior dishes instead of G1 plates if you’re running low on vegetables, there are also some other rare opportunities where you might want to cook a lower tier dish instead of a higher tier one on a turn:
- If you have a very good turn available but lack vegetables to cook the best food, or just want to save vegetables for more powerful turns later.
- If you need just a few points to achieve a breakpoint in passive bonuses from cooking points, but don’t want to cook an expensive dish.
- You can even cook a sandwich in senior year if you want to get a small boost on power training but don’t want to spend any garlic. Same for cooking curry on guts training not to spend potatoes.
But keep in mind that great success is exceedingly more powerful on higher tier dishes than lower tier ones, so don’t waste your guaranteed great success on a sandwich during senior year or something.
Deck Choices and Inheritance
Deckbuilding

Akikawa Yayoi is the scenario linked friend support for this scenario. Besides high bonuses she’ll provide increased bond gauge gain for your other supports, a whopping +40 all vegetables from her dates, and a temporary buff from her dates which gives additional +5 energy every turn for a while. Her dates are also guaranteed glowing stamps She is practically mandatory in this scenario to achieve the highest results.
For the other cards I’m guessing 1 speed builds are viable with a strong speed card, otherwise stick to 2 speed. You’ll also want one pow/guts/int card each, and the final card should round out your build with whatever you are missing.
You’ll want to inherit speed/pow/guts or int based on your umas bonuses and what cards you are bringing. Inheriting a bunch of power is probably the most reasonable choice.
Here are some deck composition examples, but feel free to experiment:
Short/mile:

Mid: You can make mid umas in GFF too, though you won’t be able to evolve any scenario skills. Still, the stats and skill points make up for it. You will need to inherit stamina, use a stamina card, and/or buy recoveries to survive though.

Long: Don’t build long umas in a short/mile scenario. The stamina cap is too low.
No-Akikawa Builds

During the first days of the scenario release when Akikawa Yayoi was undertuned, people experimented with replacements to her in the form of other strong cards. This showed that with luck you can theoretically get fairly high stats even without Akikawa in the deck.
Using Akikawa is optimal for stats after she got buffed, but since stats matter less in short/mile races than skills do, there is some consideration towards running 6 normal cards instead to obtain more important gold skills for some tracks. This is a very top level strategy though, most people should stick to running Akikawa in every deck.
What if my cards are weak?
If you’re a beginner or are using cards worse than MLB SR cards to begin with, stick to builds like 3 speed/1 power/1 int or 2 speed/2 power/1 int depending on your options. You still want to borrow MLB Akikawa Yayoi, or use the R version and borrow something like Vivlos speed SSR.
Example Builds
King Halo + Fuji Kiseki after Akikawa Yayoi buff.


Oguri from twitter (no friend card highroll).

Icons:

I hope the above information was helpful.


Be the first to comment