
Are you failing to complete levels? Do you desperately want the reaper to come and make a snack of your frail vampire hunter body? Well, you’ve come to the right place.
Guide to Succeed
Introduction
Are you having trouble completing levels? Are you struggling to clear huge screens of mobs? Are you needlessly grinding for coins to boost your stats in the hope of edging out a victory?
It’s because you’re choosing the wrong items.
Basic Strategy
To succeed in Vampire Survivors you need to understand a single truth: all defensive and quality of life items are worthless. All of them. Defense does not scale into the endgame. Defense does not clear screens. Defense does not punch a path for you to run into.
There are no enemies in the game that deal guaranteed damage to the player. This means that, with good positioning and the right weapons, you never need to consider mitigating hits or refilling your health.
Defense is worthless. Offense is defense.
To overcome the utter weakness of defensive items and stay safe while we kill vampire minions, we need offensive items in three specific categories: area (AOE) damage, directional damage, and knock back. We have six weapon slots to choose from; selecting at least one from each of these categories and filling the rest as luck dictates will make almost any run successful, barring a positioning failure or a streak of bad luck.
Items by Tier and How to Choose Them
Items come in two categories: weapons and passives. Weapons deal damage, and passives are used to upgrade level eight weapons and to buff your stats.
Below are all the items in Vampire Survivors, broken down by tier and explained. In any given run you aren’t guaranteed to be able to select all the best items, but that doesn’t matter. You can very easily last the full thirty minutes with sub-optimal choices, so long as you choose damage.
S-Tier
King Bible
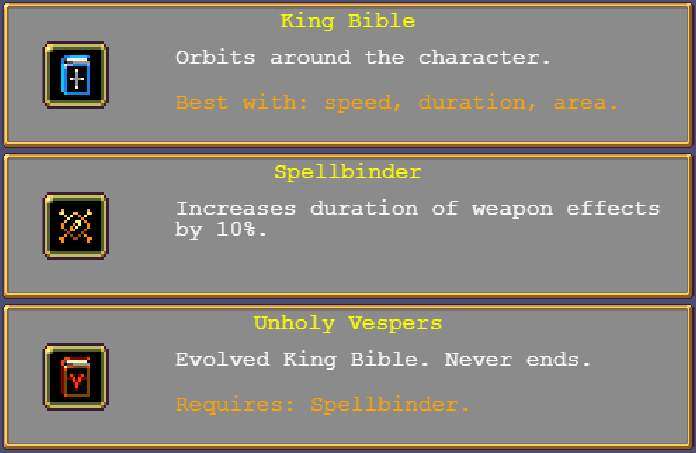
The King Bible, upgraded to the Unholy Vespers by the Spellbinder, is the only S-Tier weapon in Vampire Survivors.
The King Bible periodically circles around the character, striking enemies and passing through them. When upgraded to the Unholy Vespers, this periodic activation becomes a continually active wall of rotating projectiles. These projectiles deal decent damage while also knocking back any enemy hit and spinning quickly enough to prevent enemies from dodging past them and getting to the player. The Unholy Vespers embody the principle of offense as defense perfectly.
Sadly, the Spellbinder – the passive catalyst item needed to upgrade the King Bible – is mostly worthless. The Spellbinder scales skill duration, a stat which is ignored on all of the best weapons. However, the Vespers are so powerful that this wasted stat doesn’t matter.
It’s worth noting that you aren’t required to find a King Bible and upgrade it to complete a run; it’s just virtually guaranteed once you do.
Duplicator
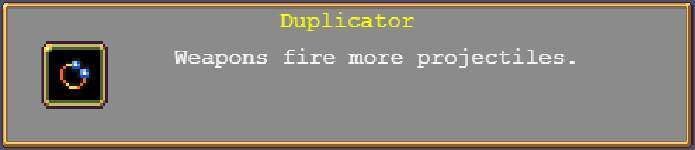
The Duplicator is a passive item that has no direct synergy with a weapon upgrade path. Instead, it synergizes with literally everything in the game perfectly. It requires no explanation; all of the (good) weapons in the game scale with additional projectiles.
More projectiles means more damage, but also more knock back and more crowd-control. The more things you have flying around the screen, the safer you are.
A must-choose item.
A-Tier
Fire Wand

The Fire Wand, upgraded to the Hellfire with the synergizes-with-everything Spinach, is second only to the Unholy Vespers in desirability. Although the wand itself is mediocre early, doing decent damage with projectiles that are absorbed by the enemy they strike, once upgraded it becomes a damage powerhouse.
Hellfire projectiles pierce all targets, doing tremendous damage. They also originate from the character’s position, allowing the Hellfire to frequently punch a hole into a group of mobs, allowing you to run that direction. Although this isn’t it’s primary use, it shouldn’t be discounted.

As you can see, the Hellfire deals incredible damage without being completely random.
There is no situation in which you shouldn’t choose the Fire Wand as a weapon and the Spinach as a passive.
Magic Wand
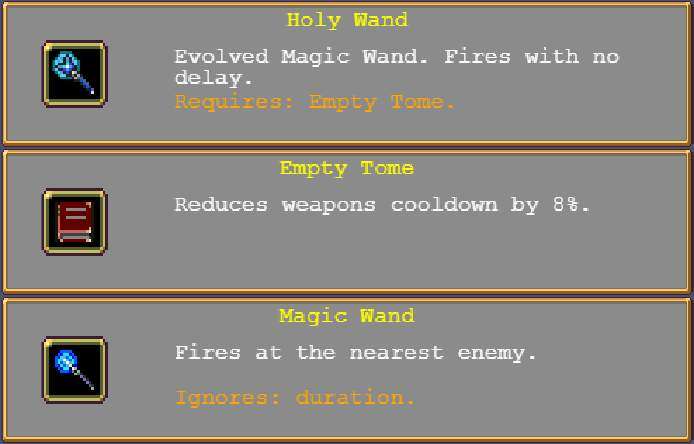
The Magic Wand, upgraded to the Holy Wand by the Empty Tome, is a very different wand from the Fire and Hellfire. It attacks quickly and automatically, doing unimpressive damage, but its utility comes in the form of knock back and of the excellent synergy implicit in the Empty Tome.
The Holy Wand is the best way to stay safe from bosses in the game. Once upgraded it attacks so quickly that you need to kite bosses very little – if at all – to be safe. This also applies to individual small mobs that may penetrate your defenses while you wait for your area damage to come online.
However, where this combo truly shines is in the Empty Tome. The Tome grants 8% reduced cooldown on all your weapons per level, scaling to 40%. This is just as good as – if not better than – the pure damage offered by the Spinach. A maxed Empty Tome means you have almost no down-time on your attacks. Combined with the Holy Wand, this means everything will die before it gets a chance to hit you, and the things that don’t will be bumped backwards continually.
B-Tier
Axe
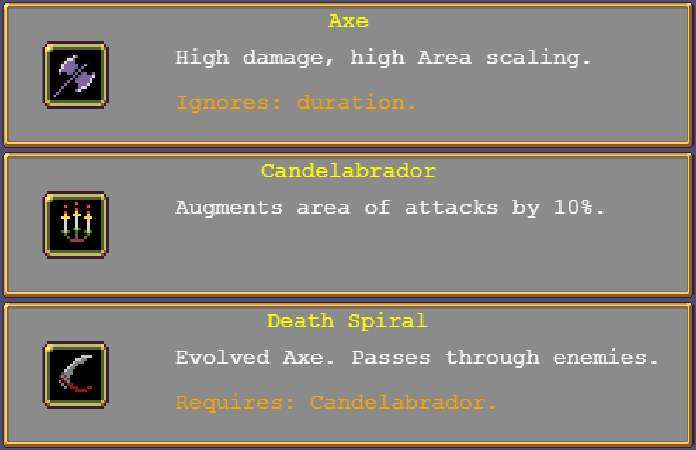
The Axe, upgraded to the Death Spiral by the Candelabrador, is a very straight-forward item: just damage. Before the upgrade it’s a high damage weapon that sails in an arc, hitting a limited area. After upgrading, the Death Spiral explodes outward from the character, damaging everything around you. This AOE damage is excellent for protecting your backside and clearing the screen.
The catalyst item for the Axe upgrade, the Candelabrador, should not be discounted. It scales the size of your weapons and radius of your AOE skills, allowing for any piercing weapon to hit greater numbers of mobs. This synergizes exceptionally well with all S- and A-tier items.
Knife
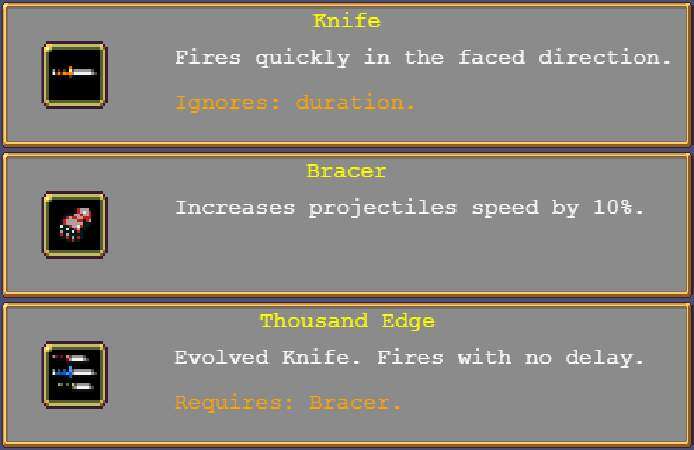
The Knife, upgraded to the Thousand Edge by the Bracer, isn’t an excellent weapon. It is, in fact, a strictly worse version of the Magic Wand. But it does provide a very specific function that is occasionally necessary.
The Knife shoots the direction the character is facing, which sounds all well and good, but in practice is actually awful. You often need to move away from the mobs you’d like to attack, and in this scenario the knife is worse than useless, shooting into the empty space you’re running towards. However, if your build lacks sufficient knock back to keep you safe, the massive speed and sheer number of projectiles of an upgraded Thousand Edge can shove any number of mobs backwards while dealing high single-target damage.
As for the synergy item of the Knife, the Bracer, it’s awful. The speed of your projectiles is irrelevant in all but one case: the Runetracer (see below). Otherwise, it’s a wasted item which could instead be a passive that offers damage.
The Knife and its upgrade exist only to punch a hole or shove a boss, and should only be chosen if you need them for that purpose. The only thing that stops it from being a C-tier item is that the Knife is non-random: you can point it where you want the damage to go.
C-Tier
All the items in C-tier are characterized not so much by being bad as they are by being random. Being able to put damage where you need it is very important to your survival.
The Birds
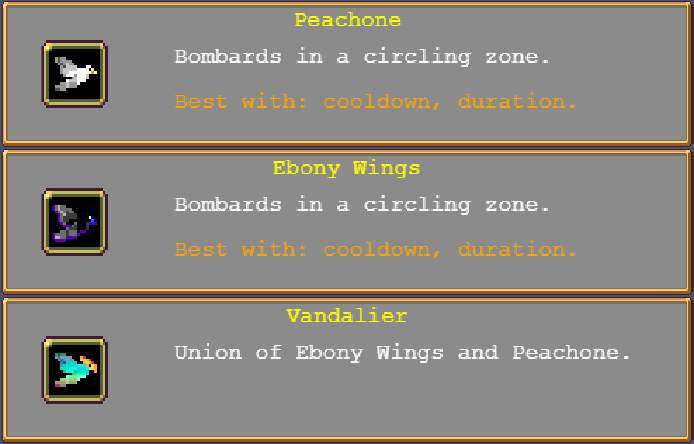
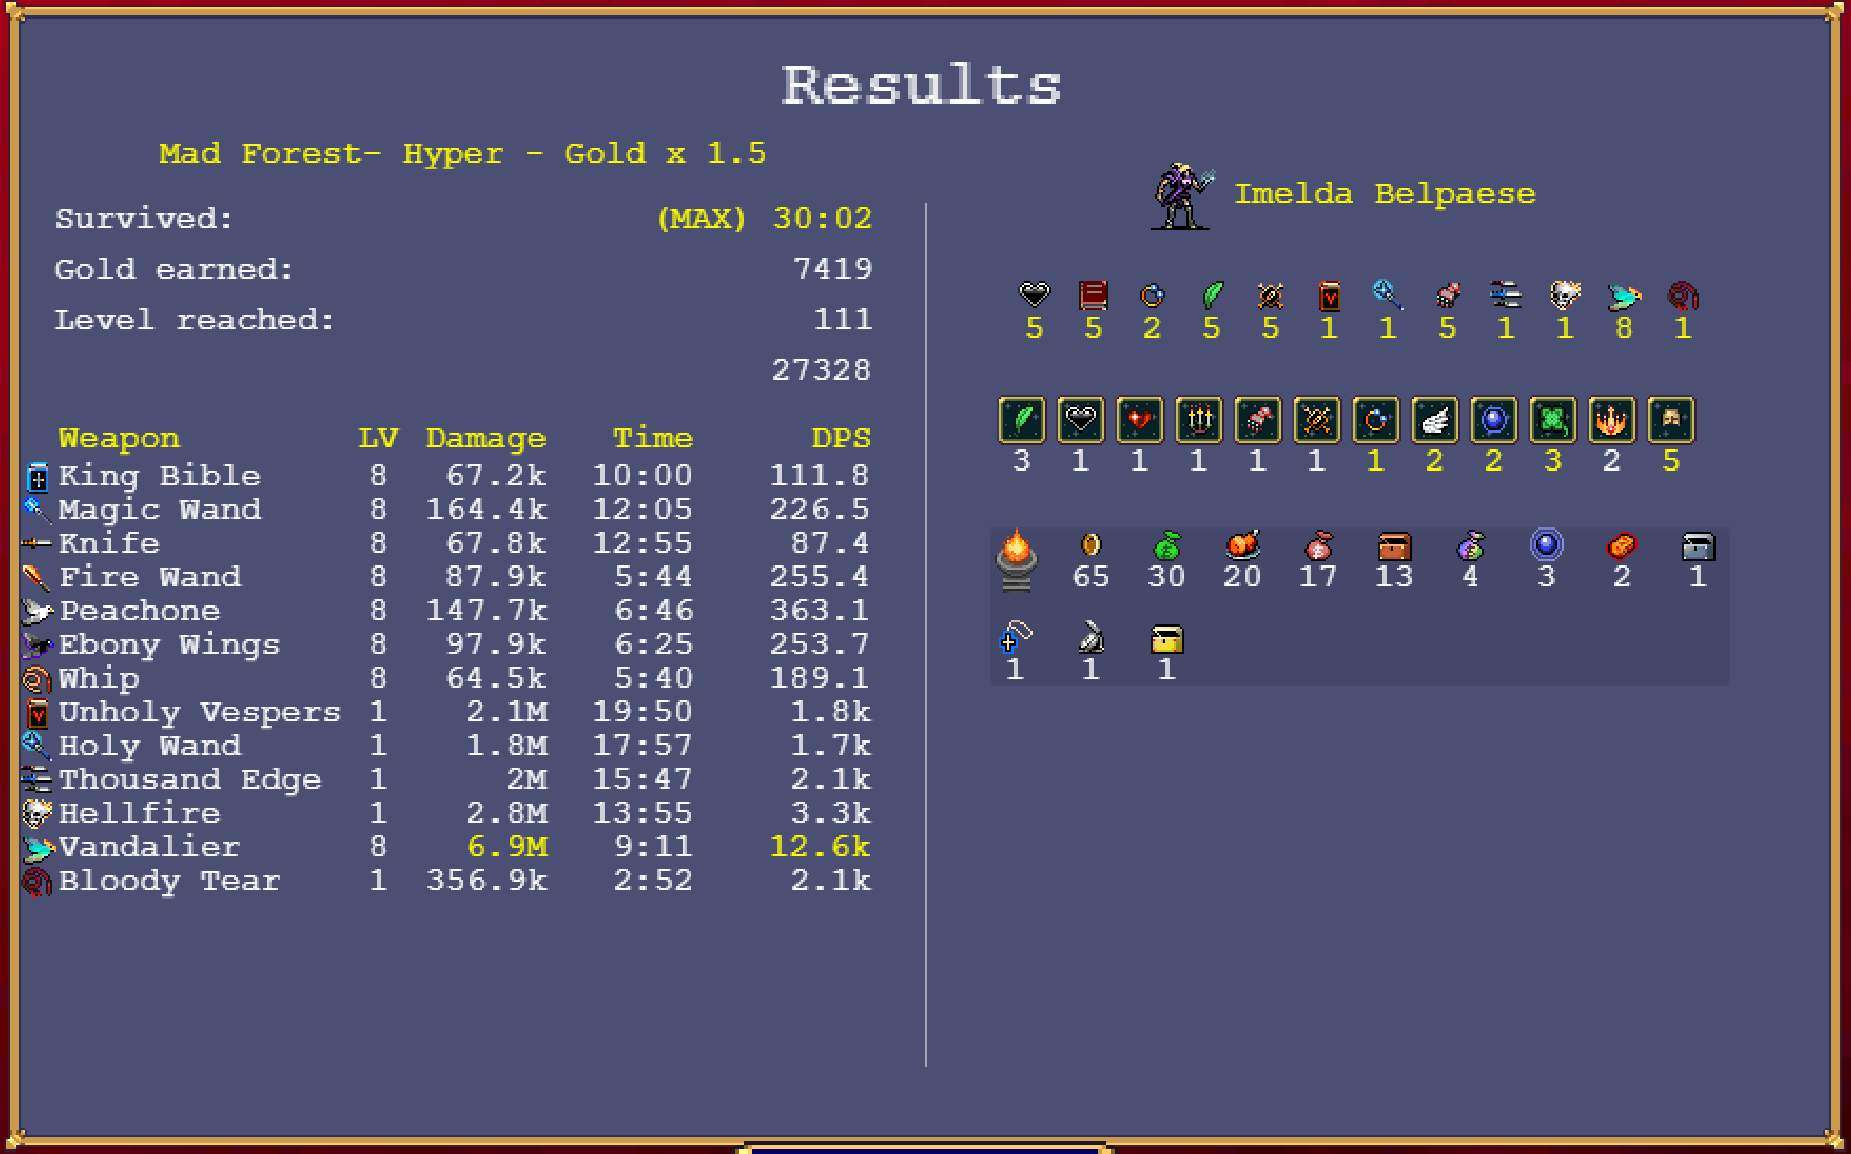
Special mention at the top of the C-tier, Peachone and Ebony Wings together upgrade into Vandalier, becoming a single weapon and refunding you a weapon slot. Both the base birds and their upgrade attack enemies within a circular radius which continually orbits around your character.

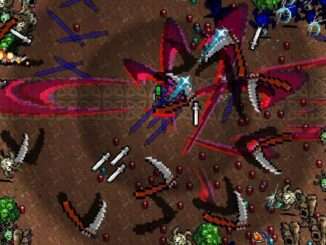
On paper, they do a tremendous amount of damage once upgraded, as you can see from this hyper forest run.
However, in practice, the birds are both random and investment-heavy. The rotating circle within which they damage enemies is basically impossible to position in any way; practically, they just hit what they hit, not what you want. They also require a tremendous amount of experience to fully upgrade, given that you need to upgrade each individual bird eight times, then upgrade the combined bird another eight times.
This experience point requirement isn’t necessarily a bad thing; it just needs to factor into your planning on a run, and you need to have other tools to deal with specific mobs threatening you while the birds mete out damage to the masses.
A possible choice, but there are less risky options.
P.S.: The birds also absolutely fill the screen with projectiles, making it hard to see anything.
Runetracer

The Runetracer is another highly situational weapon that isn’t bad so much as it is random and narrowly synergistic. The Runetracer shoots a very thin projectile that bounces around the screen, piercing enemies and scaling with projectile speed and duration.
With full investment in its scaling, the Runetracer does decent damage, but it does completely randomly, often killing enemies at the very edges of the screen whose experience drops you’re unable to pick up. It can’t punch a hole or protect you; in fact, the Runetracer very often shoves enemies into you while it bounces.
Because of these factors, and because it has no upgrade path, the Runetracer is only ever taken if no other options present themselves.
Cross
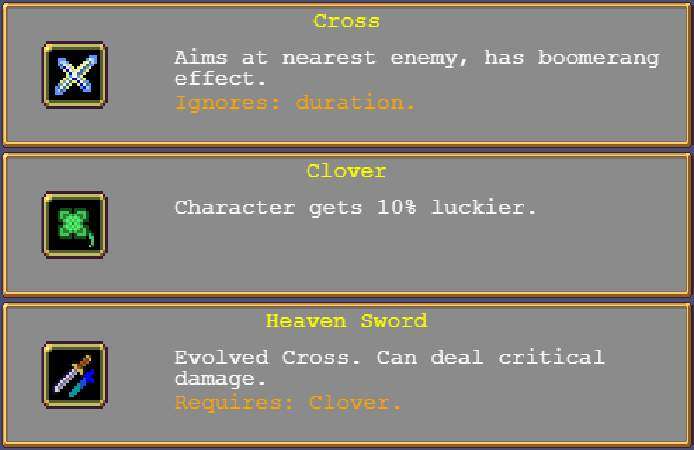
The Cross, upgraded into the Heaven Sword via the Clover, is another overly-random weapon with poor synergy. The Cross flies out from the character a short distance, then boomerangs backwards, dealing most of its damage behind you.
It’s a prime example of yet another weapon that won’t hit where you need it to, and that drops experience gems where you aren’t going. But worse than that, the Cross upgrades with the mostly useless Clover.
The Clover increases the luck stat by 10% per level. Luck scales two things of import: the number of options you have when leveling up, and the Pentagram, the worst possible weapon in the game. In any decent run, you’ll level up at least 70 times; you don’t need more options. And you should never, ever pick the Pentagram in any run. Luck does seem to affect drops from light sources, allowing you to take some real risks, but this isn’t a strong enough benefit to recommend the item.
With no synergy with any decent weapon and random damage, the Cross should only be taken if every other option is worse.
D-Tier
Lightning Ring
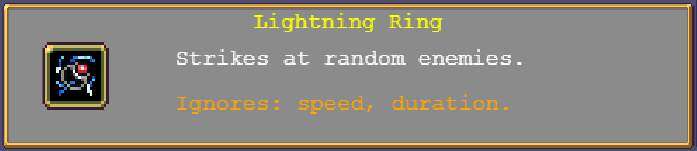
Functionally quite similar to the birds, the Lightning Ring deals random damage in circles on the map. It differs in that the circles are truly random, rather than orbiting around the character. This means you have even less (zero) control over where it strikes.
The Lightning Ring also deals mediocre damage and has no upgrade path. Not a recommended item.
Santa Water

Like the Lightning Ring and the birds, the Santa Water damages enemies in an area in a random location on the map. Unlike those other options, however, the Santa Water requires enemies to stay in its area to be damaged. This is worthless.
You should be moving continually in order to take minimal damage and have optimal positioning. Enemies will follow you as you move. An item that needs enemies to be stationary in its effect will never be effective.
With no upgrade path and the above drawbacks, the Santa Water should not be chosen. It’s not useless (still damage) but it’s not at all good.
Whip

The Whip, upgraded to the Bloody Tear via the Hollow Heart, is the starting item in Vampire Survivors. The first thing weapon you use on the first character.
It’s worthless.
The Whip and its upgrade attack horizontally in front of your character and, with some upgrades, behind. But enemies come from all 360 degrees, so your top and bottom are left incredibly open to damage. With extra projectiles, the Whip attacks more times, rising vertically, but it still doesn’t protect well.
On top of this, the Whip requires the Hollow Heart to upgrade, and the Hollow Heart is also worthless, merely increasing your maximum health. Increased health doesn’t scale the damage of your other weapons or synergize with anything in any way. It just allows you to be a little sloppy. So play better and build damage.
The final nail in the Whip’s coffin is the upgraded version. It deals slightly more damage (but the Whip’s damage is incredibly bad anyway) and leeches life. Again, you don’t need to leech if you kill before you’re hit.
Do not pick unless you’re desperate.
Garlic
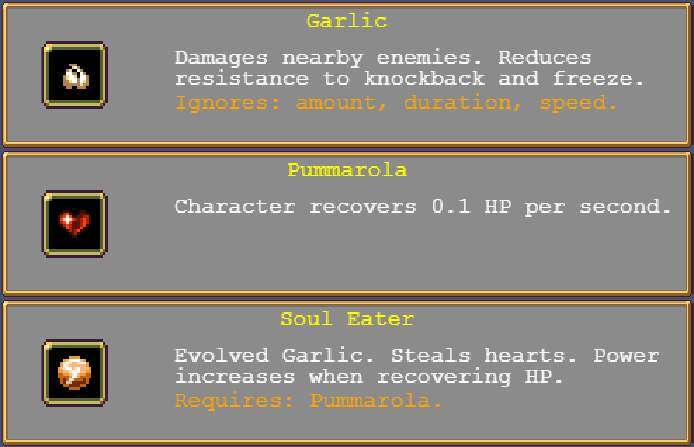
The Garlic, upgraded to the Soul Eater via the Pummarola, is a deceptive item. It deals pulsing area damage around your character and is always active, right from level one. It seems like the perfect item.
But it doesn’t benefit from additional projectiles, so it scales like trash.
The Garlic is only effective in the early-to-mid game. The pulsing damage is a lifesaver in the early rounds, especially when you’re new to Vampire Survivors, but it falls off strongly, and the pulses are slow, lacking the ability to push back enemies once you’re truly being mobbed.
But the death knell for the Garlic, like the Whip, is its upgrade path. The Garlic upgrades with the Pummarola, which increases your passive life regen. Worthless. This stat, again like the Whip, doesn’t synergize with anything or scale any damage. If you’re hurt, move the screen to generate light sources and then kill them for floor chicken.
The Garlic’s upgrade, the Soul Eater, is another life leech item that allows you to be sloppy. Once more, play better and build damage; don’t rely on leech or regen.
A strictly worse version of the King Bible.
F-Tier
The items of F-tier offer no damage, or offer quality of life that can be found elsewhere.
Wings

The Wings increase the speed of your character. In the very first few runs of Vampire Survivors, before you can unlock passive movement speed from the gold shop, they can be taken to help you evade damage.
Once you have purchased one level of passive movement speed, the Wings are worthless.
Attractorb
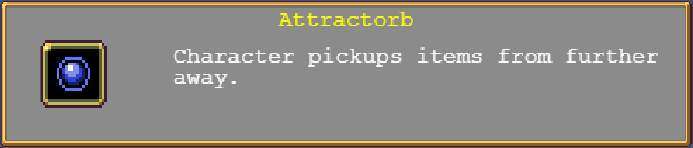
The Attractorb increases the pick-up range of your character. In the very first few runs of Vampire Survivors, before you can unlock passive pick-up range from the gold shop, it can be taken to help you collect experience gems more easily.
Once you have purchased one level of passive pick-up range, the Attractorb is worthless.
Pentagram
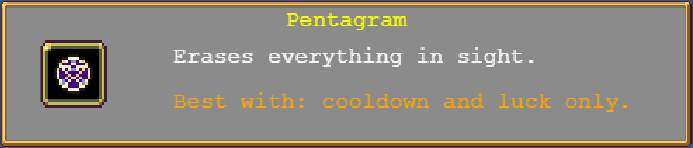
The Pentagram is a uniquely worthless weapon. When activated, it wipes out the entire map. Unfortunately, it cannot be activated at will; it activates on a timer. And when it wipes out all the mobs on the map, it also wipes out all the experience gems the mobs would drop. With levels and with increased luck, it has a chance to leave the experience gems instead of destroying them.
However, Vampire Survivors continually fills the screen with mobs. That’s literally the game. So wiping that screen out gives you nothing more than a few seconds of reprieve before the screen fills once more.
Completely useless, and actively steals experience points from you. Never, ever take the Pentagram.
Clock Lancet
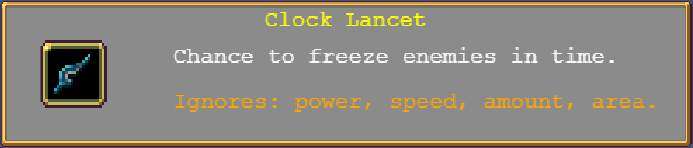
The Clock Lancet freezes mobs in a straight line shot from the player. It does no damage; frozen mobs do not shatter on their own, or explode to damage their nearby allies; they just get slow, then start walking again.
As you can see from the image, it also ignores basically all scaling in the game: no power, speed, amount, or area. It is a single, narrow beam that slows something you would have otherwise killed with any other (better) weapon.
Almost as useless as the Pentagram.
Laurel
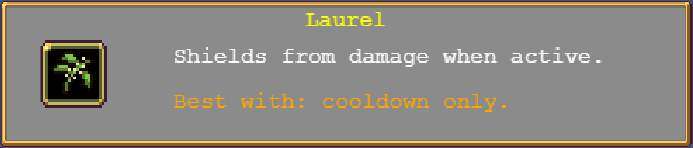
The Laurel is a temporary invulnerability shield that activates when you take damage, allowing you to charge through groups of mobs without being chipped to death.
You know what else allows you to charge through mobs? Any decent weapon. You don’t need to be invulnerable for a tiny amount of time. You need to kill everything you see.
Armor
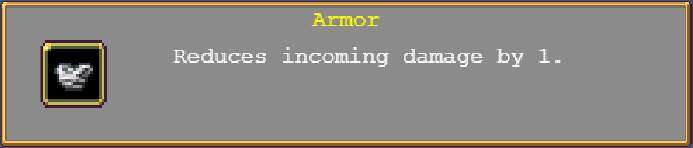
The Armor reduces the damage you take from mob hits.
You already know what I’m going to say. You can’t be hit by a dead mob. Make mobs dead; don’t make yourself a worse killing machine.
Crown
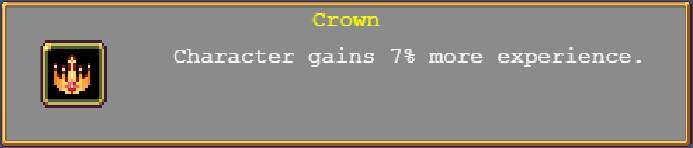
The Crown increases the experience you gain. This seems tempting; fast levels means more weapons, faster. But killing more mobs also increases the amount of experience you gain via more dropped experience gems.
What’s more, once you reach the endgame and are fully decked out, you’ll wish you had one more damage passive, rather than more levels that you don’t need. Remember, you’re going to level up at least 70ish times without any experience boosting at all.
Z-Tier (Special Mention)
Stone Mask
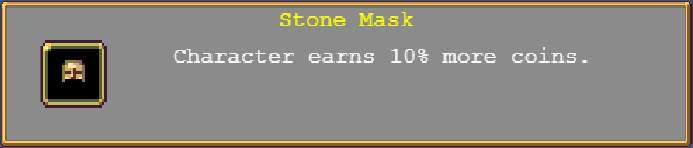
The Stone Mask increases the number of coins you collect during a run. This is fantastic for grinding out the passive boosts in the coin-based upgrade shop, but it’s worthless to waste a passive item slot that could be damage.
Well, the Stone Mask has a secret: to unlock it, you must find it in the Library. But after you’ve unlocked it you can still find it in the library. So, if you’re playing in the library and have selected all six of your passives, you can run left or right until you find the Stone Mask floating and then pick it up for a seventh passive, going over the soft cap for passives.
In this sense, the Stone Mask is actually an excellent passive, but it’s not worth taking outside of getting it for free in the library.
Choosing Power Ups
The Power Up store allows us to build power over time via successful runs with high coin totals. Everything in it is worth buying eventually, but several upgrades stand out.
Remember: you can refund your purchases at any time with no penalty. Never leave coins unspent.
Early Power Ups

- Movement Speed: 1 level
- Magnet: 1 level
- Greed: 5 levels
A single level of each movement speed and pick-up radius allows us to ignore those passive items in any run, and is borderline mandatory. Without those levels, you move quite slowly compared to mobs and have a tiny little pick-up radius.
After that, five levels of greed allows us to prioritize high coin totals and makes everything else in the shop more easily acquired.
Middle Power Ups

- Amount: 1 level
- Luck: 3 levels
- Movement Speed: 1 level
- Magnet: 1 level
- Growth: 5 levels
- Might: 5 levels
Amount is the most powerful upgrade on the board. Everything of any worth scales with additional projectiles. Refund your other upgrades and buy amount as soon as you feel safe doing so.
Three levels of luck means we have a decent chance of having four choices with every level up, allowing for better selection of skills. Finishing the last point in both movement speed and pick-up radius allows for more quality of life, making runs smoother. Five levels of growth for faster level-ups does the same.
Might is damage, damage is safety, safety is long runs with more coins.
Late Power Ups
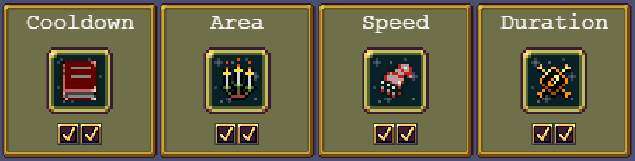
Cooldown, Area, Speed, Duration: your preference.
All of these passives are decent, but the increases they offer are very, very small, so they don’t make much difference. Speed is the worst one, though.
Final Power Ups

- Armor: 3 levels
- Max Health, Recovery: your preference.
As always, defense does not win games. Armor does let you bull your way through mobs in the early game, however, and is better than the other two options in this tier.
Choosing a Character
When selecting your character there are only two variables: starting weapon and passive. The best weapons are those with upgrade paths, and the best passives are damage-related. This makes selection easy, and also eliminates most characters.
Top Tier
Imelda Belpaese

Imelda starts with the A-Tier Magic Wand. Her passive is experience gain, which is mediocre compared but others, but she excels during early playthroughs as you’re unlocking all the items and initial coin shop passives.
Recommended, but outclassed by later characters.
Arca Ladonna

Arca starts with the A-Tier Fire Wand and offers a passive 15% weapon cooldown reduction, an excellent stat. The early game can be difficult with just a slow Fire Wand, but that downside is outweighed by Arca’s kit.
All-round excellent choice.
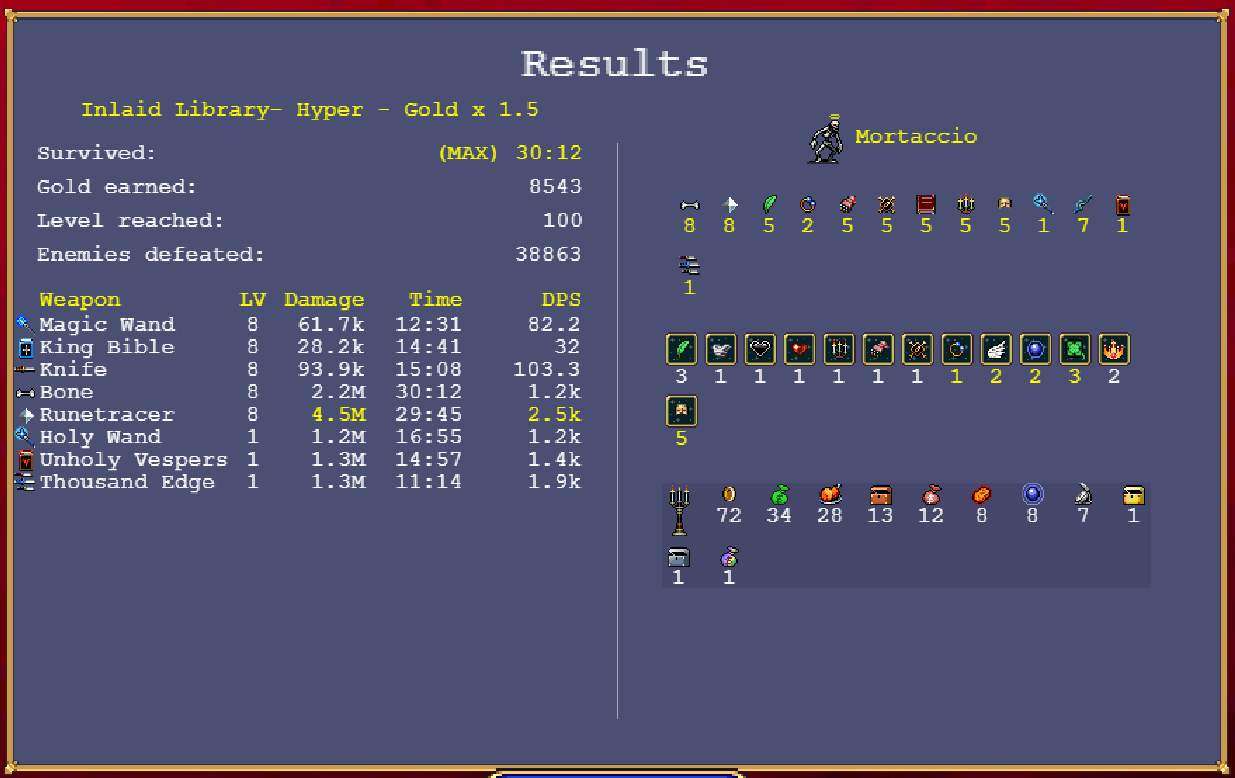
Mortaccio
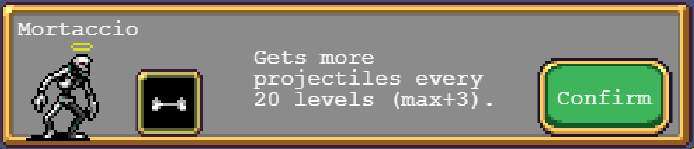
Mortaccio’s passive is +3 additional projectiles, a stat so good I’m surprised he was allowed to have it. It literally outclasses every other passive in the game. Without upgrades from the coin shop he may be difficult early game, since he needs 20 levels for his first +1 projectile.

Mortaccio’s starting weapon is unique to him; no other character can find or use it. The bone lacks an upgrade path, but is decent. It’s a bouncing projectile that acts like the ball from the game Breakout, striking enemies and then bouncing away. It scales very well with speed and duration, making it work with both the build recommended by this guide (Vesper Wall, see below) and less optimal builds (Quickest Bone in the West, see below).
Mortaccio is the best character in the game. Full stop. Always choose him.
Everyone Else
Antonio Belpaese
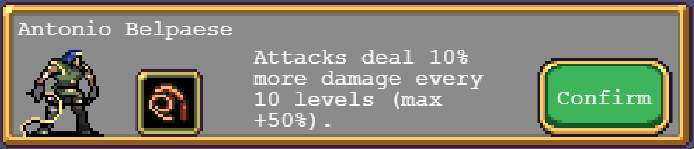
Antonio’s passive is more damage, which is good, but he uses the Whip, which is awful.
As soon as you unlock anyone else, stop using Antonio.
Pasqualina Belpaese
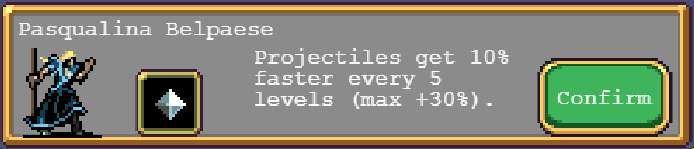
Pasqualina uses the Runetracer, which is only situationally good, and her passive is projectile speed, which only benefits the Runetracer.
Might actually be worse than Antonio.
Gennaro Belpaese

Gennaro uses the Knife, which is a decent weapon. His passive is +1 total projectiles (non-scaling).
He’s a strictly-worse version of Mortaccio.
Porta Ladonna

Porta starts with the Lightning Ring, which doesn’t even have an upgrade path and is very hard to use in the early game. Porta’s passive is increased area, which is decent, but not good enough.
Pick Arca instead.
Poe Ratcho
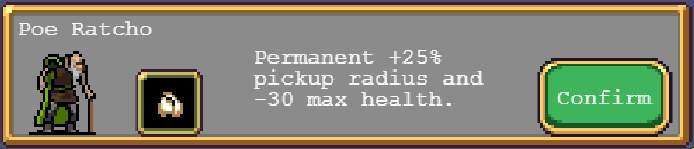
Poe starts the game with the Garlic, making the early game incredibly easy. His passive is increased pick-up radius, making him a treat to start with, but ultimately Garlic is a dead-end item. His negative initial health is meaningless if you’re following this guide and playing for damage.
A fun pick, but not good enough.
The Secret Challenge Character
Exdash Exiviiq
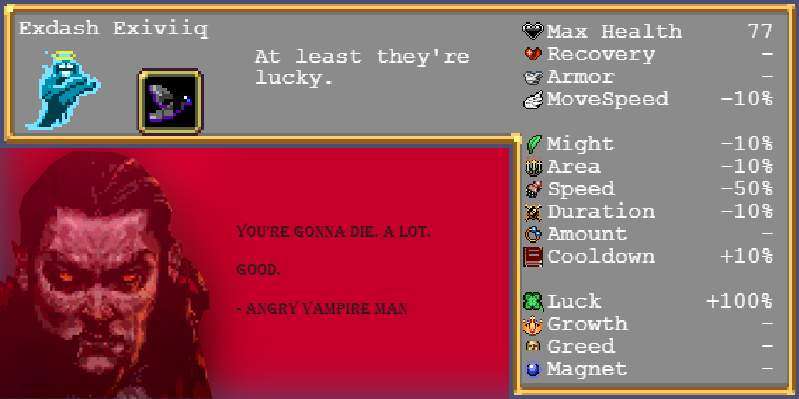
Exdash Exiviiq is a secret, ultra-challenging character. It is unlocked by typing “x-x1viiq” (without quotes) into either the starting screen or the credits screen of the main menu.
Exdash is not a character designed to complete runs. Exdash exists solely to challenge yourself to complete a run with major downsides coming directly from your character. As you can see from the above picture, Exdash has the following stat penalties: less health, less movement speed, less damage, less area of effect, massively slower projectiles, less skill duration, and longer cooldowns. It does, however, have 100% increased luck, allowing for some interesting strategies.
Beyond the stat penalties, Exdash starts with Ebony Wings. This is an absolutely terrible starting item and makes the early game incredibly punishing. To play effectively, you will have to seek out light sources for health and rely on luck to overcome early disadvantages.
All told, Exdash is a welcome challenge that forces you to play differently and mix up your builds. I recommend you have many, many levels in your Power Up shop before attempting him, however.
Choosing a Level
At time of writing there are only two levels in Vampire Survivors, the Mad Forest and the Inlaid Library, and a hyper mode for each level which offers 50% increased gold and, for the Library, 10% increased luck.
Choosing a level is easy: choose the Library.
The Mad Forest
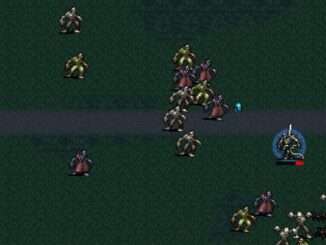
The Mad Forest is the first level of Vampire Survivors and, strangely, the harder level. Mobs come from any direction, making movement more difficult than in the Library. The mobs are also more difficult, particularly the vampire bats, who have a slightly wonky hitbox that allows them to damage you from farther away than expected.
Bosses are also more difficult, with particular mention going to the Preying Mantis boss, who surrounds you with a ring of living flowers and fills that ring with high-health mobs. An unprepared vampire hunter can die very quickly in this ring.
The Inlaid Library
The Inlaid Library is the second level of Vampire Survivors and is significantly easier than the Forest. The Library has walls to the north and south of the screen, meaning mobs can only approach from the east and west. This makes positioning much easier.
The Library also has easy bosses that are little more than moving health bars without mechanics. On top of this, it also has the Stone Mask item available for free, sitting on a random desk. This makes a Library run the absolute go-to for gold grinding.
Choosing a Build
The most important part of Vampire Survivors picking items that synergize with each other. This means that there are two main builds that you can choose from and customize, as well as a third omni-build.
Vesper Wall
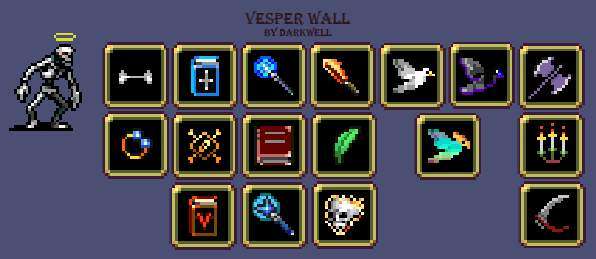
Choose Mortaccio (or Imelda or Arca). Prioritize the King Bible, Magic Wand, and Fire Wand, as well as their passive upgrade items. Take the Duplicator whenever it appears. This is the core of the build, and will work no matter what else you chose.
The King Bible/Unholy Vespers keep you safe from masses of mobs. The Magic/Holy Wand keeps you safe from individual strong enemies and those that slip past the Vespers. The Fire Wand/Hellfire is your main damage dealer and punches safety holes. With a Duplicator and Mortaccio’s passive you’ll output a tremendous number of projectiles for complete safety.
The birds and the axe are added simply because they’re the best possible damage. If you intend to go both birds you need to delay taking the axe until you’ve leveled both to eight and upgraded them to Vandalier. You can take the axe passive, the Candelabrador, while waiting for the birds to upgrade.
This build leaves one passive item slot open, thanks to the birds not needing one. This slot can go to the Bracer, to synergize with Mortaccio’s Bone, or any quality of life item you choose.
Quickest Bone in the West
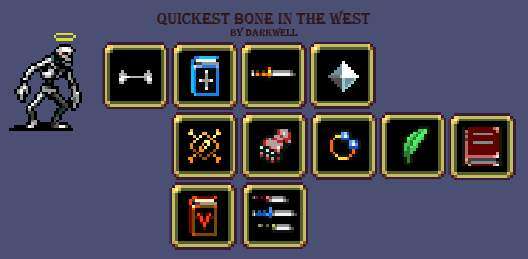
Choose Mortaccio (or possibly Pasqualina, but also definitely not Pasqualina). Prioritize the King Bible, Knife, and Runetracer, as well as the Bracer. Take the Duplicator whenever it appears. This is a far less safe build than the Vesper Wall, but once you have the Bible upgraded you should be alright.
Mortaccio’s Bone and the Runetracer both scale very well with speed and duration. Since we’re already taking the Bracer and Spellbinder for them, we might as well take the King Bible and Knife to get the extra protection of the Unholy Vespers and Thousand Edge.
This build only needs three passive items for upgrading, so we take the Spinach and Empty Tome for pure damage. Because of this, we might as well take the Magic Wand and Fire Wand, but we don’t have to.
Once again a passive slot is also left open for whatever you choose.
The Omni-Build
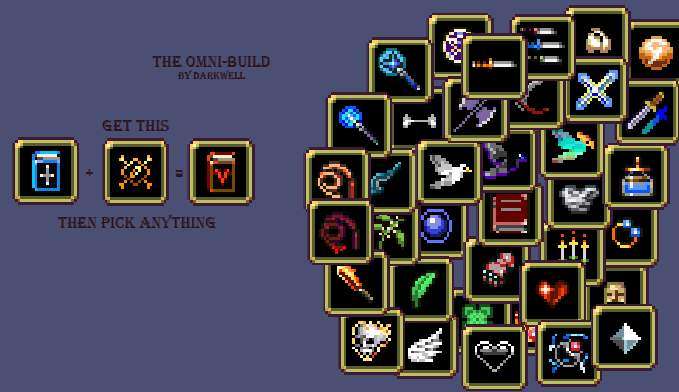
- Step 1: Get the Unholy Vespers
- Step 2: Pick literally anything else
The Unholy Vespers are, in a word, overpowered. Literally any selection of skills on any character will work once you upgrade the King Bible.
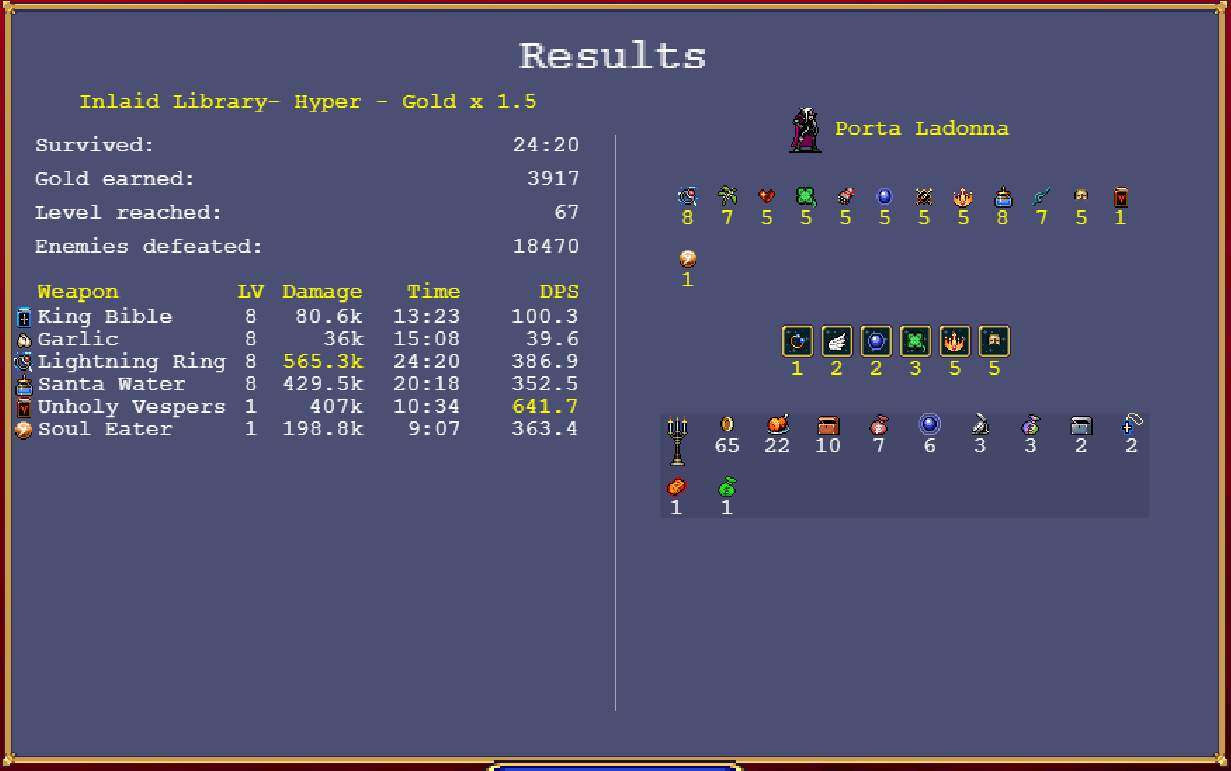
As you can see from this screenshot, I attempted to pick the worst possible items in a hyper library run while upgrading the King Bible. There’s virtually no synergy in my item choices and no damage from my coin shop, and I still lasted 24 minutes. My damage was abysmal, but the insane knock back protection from the Vespers made it irrelevant.
Anything works with the Vespers.
A Typical Run
Regardless of your chosen build, level, or character, your strategy for a Vampire Survivors run is always the same:
- Acquire a knock back weapon
- Acquire an AOE damage weapon
- Acquire a targeted, hole-punching weapon
- Acquire the passive items that upgrade your chosen items
- Acquire any further items that synergize with your previous choices.
Beyond this strategy lies the tactics you use to accomplish your goal. There are no universal tactics – as they come down to player ability and choices – but there are some general tips.
- You don’t need to run in one direction continually to spawn light sources for their drops. As soon as a room is off screen it can spawn a light source when you reenter it.
- Different weapons require different kiting movement. The Whip and Knife favor left and right strafing. The Garlic and Bible require stutter-stepping. Everything else works well with circular movements.
- Moving diagonally will cause mobs to clump as they come towards you. You can then move around them and they’ll often open a channel for you to slip into. Don’t be afraid to take a couple small hits instead of pushing through a large pack of mobs.
- Don’t over-upgrade passive items. You only need one level of a passive to upgrade a level eight weapon to its better version.
- Except the Duplicator. Always upgrade that first.
- Prioritize your AOE damage weapon (preferably the Bible) levels. You can get by without strong single-target damage initially, but if you get mobbed, you’re dead.
- Don’t spread upgradable weapon levels around. One upgraded weapon is worth three or four low-level, non-upgraded weapons.
- Don’t rush when selecting weapons and passives. You don’t need to grab all six of each before you start upgrading.
- If you need to, level or select a new passive to avoid picking something bad. It’s not as big a waste to level a passive as it is to pick the Armor or a Laurel.
and finally
If your first several levels offer up only garbage, just restart the run. There’s no penalty. Don’t punish yourself.
Example Runs
Below are several runs exemplifying the lessons taught in this guide.

Santa water and the evolution is for me S tier man it s the item with the highest dps
I actually quite like Christine. With the Pentagram now being upgradable, to Gorgeous Moon, it’s become one of my favorite weapons, as once it’s upgraded, you can literally sit there and watch the experience gems comes flying to you every 20 seconds or so.
Also, I may have found a way to legitimately kill death. I haven’t managed to dos o yet, because, using the method, the game will keep spawning new deaths to come after you, and I just haven’t had the right combination of weapons to pull it off, but…
As you get near to 30 minutes, int he library, tuck yourself into an alcove so that death gets stuck on a bookshelf and can’t reach you. If you can reach him with powerful piercing weapons, i.e. Phieraggio, hellfire, etc. and deal damage to him, maybe eventually you can actually kill him. Needs more testing, as it appears he has a LOT of health, and more of him start spawning at different angles and eventually one of them will get you…
I’ve been completing everything and doing all the achievements with subpar characters and non-meta weapons
You forgot to add Bone and Cherry Bomb to the tier list on items. Under the pretext/context of “if RNG even gives you the option, should you pick it?” Build wise. Though honestly, I’d argue if going “Random”, objectively “C-Plus”, with a caveat being “either pick the character with this item, or forget about it”.
When combining Arcanas VII – Iron Blue Will and XVI – Slash the Axe deals insane damage. Way more than Phieraggi.
Oh and you can kill Red Death without cheats or editing files. There are few ways to do it. One of the easiest methods is on Library with Runetracer and Clerici character.
You can also update Power Up’s order, since this order will save you ~10k gold more:
Revival + Reroll
Curse
Amount
Growth
Cooldown
Armor + Luck
Greed + Might + Recovery
Amount + Area + Speed + Move Speed + Duration
Max Health
Skip + Banish
Great guide, I learned a lot from it thanks to you, cheers. 🙂
Gatti Amari are pretty great mid to late game, you can score ~8M dmg with them, but it’s good to have healing arcana with garlic or whip. Their “clouds” can fill almost all screen with Candelabra, boss get melted off screen. They eat chicken, but they get stronger with each chunk eaten. ^^
I got the Waltz, Will, and Slash arcanas and used dagger, cross, wand, fire wand, axe, and cart and it wasn’t that effective but it was fun
Hey, Thank you so much, this is maybe the most detailed VS Guide at the moment 🙂
But maybe it needs a bit of an update:
The “Dont touch me” build:
Using Soul Eater, Unholy Vespers and Santa Water creates a circle that, till the last minute, no monster can penetrate. Combined with Spinach, Candelabrador and Empty Tome it is crazy strong. Just stay still and run a circle every minute to collect the xp.
Also if you start in the libary, run up for one “free Upgrade” then to the left, till you find the free “Empty Tome” but don’t collect it, wait till all your passive weapon slots are full and then take it. This allows you to have one more weapon slot (7 instate of 6). After this run a bit more to the left, collect the second Empty Tome and then run all the way back to the right and a bit more to get the free Stone Mask.
This will allow you to even have 8 passive weapons.
The strongest starting character in the library is Poe Ratcho, if you have any points in the “Might” Power Up, you can use the above mentioned strategy to basically collect all mobs on your way to the free “Empty Tome” upgrade.