This guide aims to explain things in more detail than the game does, as many useful mechanics are explained very poorly or not at all by the game.
Table of Contents
Hide
Guide for New Players
Xenoblade 2 has a complex battle system. It’s fun to learn, but the game’s tutorials don’t explain everything. This guide might have spoilers. I’ll try to use images of characters you already know from trailers, box art, and Smash Bros (mostly Pyra and Rex).
Blades
How to get them and how to use them
- Blades are effectively your weapons, and there are three types:
- Common: The most…common. You will draw these the majority of the time. They always have a random name, favorite items, weapon class, and element.
- Rare: Blades with a unique design. They usually possess stronger stats and skills than common blades. There are 41 of them (Of the 41, 6 are locked behind the expansion pass, 1 requires beating the game, and 7 are locked behind New Game+).
- Legendary: Story blades that can only be bonded to the driver they are with when met (Pyra is legendary, and only Rex can use her). There are 13 of them.
- There are 8 blade elements: Fire, Water, Wind, Ice, Earth, Electric, Dark, and Light
- Getting Blades
- One of the most unique (and dividing) aspects of Xenoblade 2 is how one acquires blades. They are acquired by resonating with core crystals, but with the exception of a few core crystals gotten through quests or story events, the blades you get from them are completely random.
- However, there are actually 5 different blade “pools” (Due to error, blade pool 5 was never put into the game, as a result, blade pools 1 and 2 give the same pity blades), with the one the player gets is chosen on save file creation and cant be changed.
- These pools determine the “pity blades” a player will get if they go too long without getting a rare blade.
- Each pool gives each blade a different draw rate, with the exception of a few, and the rarest blade is always the same blade and always a 1/1000 shot, no matter what pool you get
- However, there are actually 5 different blade “pools” (Due to error, blade pool 5 was never put into the game, as a result, blade pools 1 and 2 give the same pity blades), with the one the player gets is chosen on save file creation and cant be changed.
- If you find you can no longer resonate with blades, you have too many common blades. Release some, or complete merc missions to level up your merc rank and get access to more slots (merc missions unlocked later in the game)
- One of the most unique (and dividing) aspects of Xenoblade 2 is how one acquires blades. They are acquired by resonating with core crystals, but with the exception of a few core crystals gotten through quests or story events, the blades you get from them are completely random.
- Core crystals
- There are three types of core crystal, each with their own draw rate multiplier and pity counter increase.
- Pity counter only increases if a common blade is drawn
- Once the pity counter reaches 100, a pity blade will be drawn until the pool of 3 pity blades is used up
- Common:
- 1x chance of drawing a rare blade
- Adds 5 to the pity counter
- Rare:
- 1.5x chance of drawing a rare blade
- Adds 25 to the pity counter
- Legendary
- 3x chance of drawing a rare blade
- Adds 50 to the pity counter
- There are three types of core crystal, each with their own draw rate multiplier and pity counter increase.
- The Blade Probability equation
- The probability of drawing a rare blade uses the following equation.

- A lot to unpack, but the most you need to know is:
- Luck Stat: Maxes out at 999, matters less than you think
- Idea multiplier: Each character has 4 idea stats, with each idea corresponding to 2 elements. The highest idea stat gives you an increased chance of drawing a blade of that element. There exists an item called boosters which can boost your idea stat for one draw, but the corresponding draw will only be of that idea’s element.
- Bravery: Fire and Water
- Truth: Wind and Ice
- Compassion: Earth and Electric
- Justice: Dark and Light
- Each idea has a max level of 10, and each level increases damage dealt by the corresponding element by 5% (for a max of 50% extra damage!)
- Core rarity: Discussed above, each core crystal type has a corresponding multiplier.
Blade Stats and Blade Arts
- Blades have a role and 6 stats. Below is an image of Pyra’s stats (before upgrading her weapon and at lowest trust).

- Auto-attack: On top of being the damage the auto attack does, this stat also affects all the damage the blade does, including Specials.
- Block rate: How often you block attacks, decreasing the damage by half.
- Critical rate: How often the blade lands a critical hit.
- These 3 stats can be modified by changing a blade’s weapon
- Strength: Minor effect on damage, mainly used for merc missions.
- Physical and Ether defense are stat mods for the driver
Stat Mods
- When equipped to a driver, each blade gives a certain percentage buff to a driver’s physical defense and ether defense. For example, Pyra gives Rex an extra 5% physical defense and an extra 10% ether defense.
- A blade’s role usually plays into this. Attack blades like pyra offer low defense buffs, but tank blades can give over 30% boosts to a driver.
- Each blade also comes with a unique stat mod. These work the same as the defense buffs, but for another stat.
- For example: Pyra gives Rex a 10% boost to strength.
Blade arts
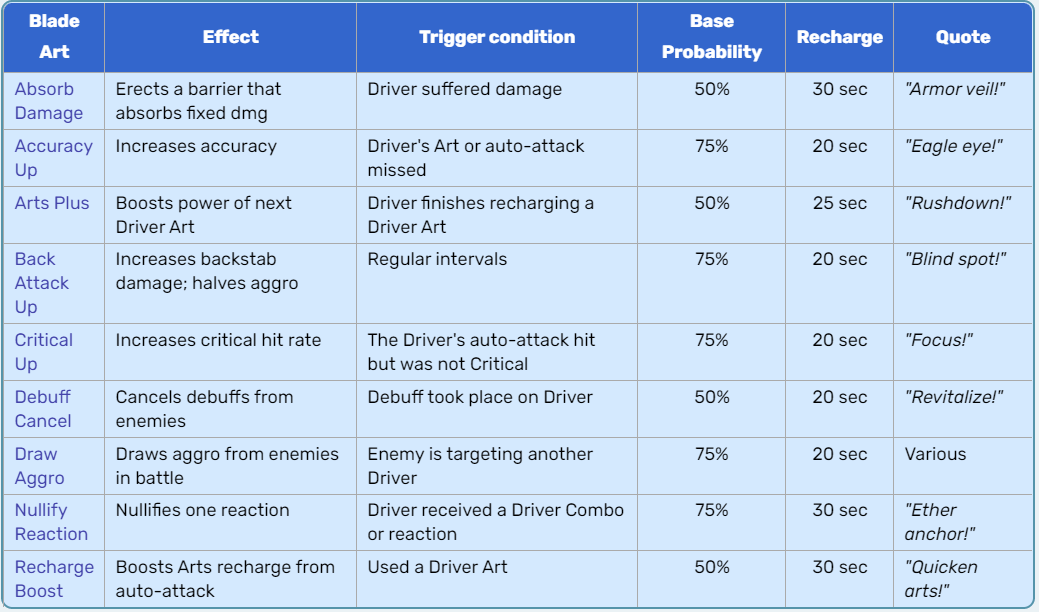
- On top of normal battle skills, blades also have blade arts, which are small buffs they may apply to their driver in battle. Here’s a list of them. The probability of them occurring increases as battle affinity increases. Blades can have a max of 3 blade arts.

Blade roles
- Blades can have 1 of 3 roles, Attack, Healer, or Tank
- Attack blades deal a lot of damage very quickly
- Healer blades provide healing to the party while attacking
- Tank blades draw aggro and provide good defense buffs
The Affinity Chart
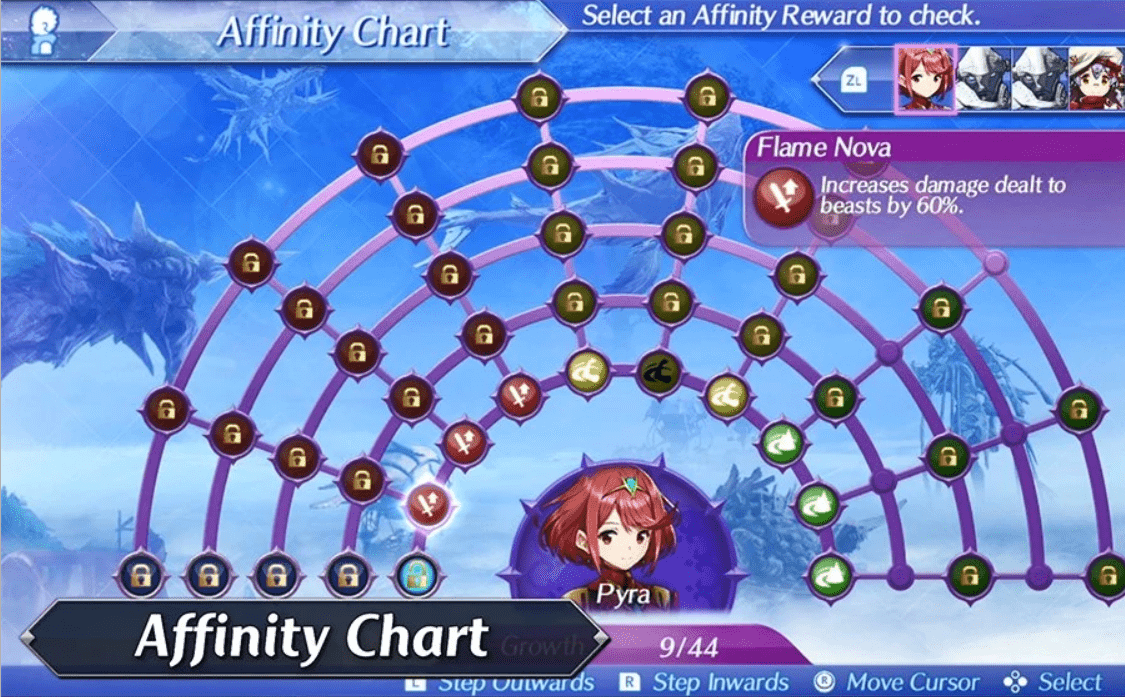
- Possibly the most important aspect of XC2 gameplay, the affinity chart is much different than what it was in XC1, it shows you what skills a blade has and how to level them up
- When you get a notification on the right of the screen that you leveled up a skill, you must go into the blade’s affinity chart to activate the new skill to be able to proceed to the next level.
- Below is an example of an affinity chart. (Poorly cropped to avoid spoilers)
- Red nodes correspond to Specials. Skills learned on these paths will affect the blade’s level 1, 2, and 3 specials
- Yellow nodes correspond to passive abilities. These effects are active even when not using a Special
- Green nodes correspond to field skills. These are what allow you to pass field skill checks

- As you can see, most of pyra’s chart’s nodes have a lock over them. This means that Pyra has not yet reached a high enough trust level to unlock these nodes.
- Trust is a stat that allows a blade to unlock more skills, but it also silently increases a blade’s auto attack stat and how often blade arts go off.
- Trust is increased by battling with the blade, as well as using pouch items.
- Trust starts at E rank and goes up by one letter every time a row of the chart is unlocked. Once every node of a chart is filled in, S rank trust is unlocked.
- However, trust actually goes up to S10! Don’t worry about unlocking this if you just want to play the game casually, it takes a LONG time.
AUX cores
- Aux Cores are just like Gems from XC1. You apply them to blades to boost their stats.
- Blades can have anywhere from 1 to 3 aux core slots.
- One thing that’s different is that instead of crafting them, you refine them using collectibles obtained from collection points, so get as many as you can!
Pouch Items
- The game’s greatest sin, tricking you into thinking pouch items are bad!
- The pouch item you buy in the tutorial is worthless, so many players ignore them entirely. Don’t do this, they impact battle so much!
- Each category of pouch item has an effect associated with it, with desserts, drinks, and instruments being among the best, but books can also be good.
- Desserts apply auto art recharge
- Drinks boost party gauge gain
- Instruments are auto special recharge
- Books are increased damage done by specials
- Try to find out the unique boost given by each pouch item type!
- Of course, very good (legendary tier) pouch items can have a mixture of effects from different categories
- There is at least one pouch item from each category that gives art recharge.
- All the tutorial item does is give you 2% extra ether defense, when the SAME AREA has the second best pouch item IN THE ENTIRE GAME for sale at the dessert shop, the Narcipear Jelly (buy some!)
Grinding and why you DON’T have to do it!
- Unlike xenoblade 1, the most exp a quest will give you is around 10,000, and it all goes into bonus exp anyway! How do you level up? Chain attacks!
- Sometime during chapter 3, you will unlock the ability to chain attack. The game will tell you when this is. Once you unlock this, try to overkill as many bosses as possible in a chain attack.
- Overkilling in a chain attack provides a MASSIVE boost to the exp and gold gotten, with a strong enough overkill getting you 5 TIMES (I’ve hit 750% extra before, for reference of how powerful this is) as much exp as you normally would. This exp boost is indicated by the “Bonus” multiplier on the left side of the screen during a chain attack.
- Do this enough, and you will definitely stay overleveled, and will likely never have to rest at an inn and claim your bonus exp.
- On top of this, by the time you need them, the game has a way to grind 99 legendary core crystals in 30 minutes. Don’t listen to the people who say this game is grindy.
Battle System! Very important!
- Xenoblade 2 has a very complex battle system that is poorly explained, and it’s actually what inspired me to make this guide in the first place. There are 3 very important aspects to know about the battle system:
- Driver combos
- Blade combos
- Fusion combos
- Driver combos are akin to Break -> Topple -> Daze in xenoblade 1, except this time there’s 4 steps, and the pattern is Break -> Topple -> Launch -> Smash.
- Blade combos are started by using a level 1 special of any element, and then continuing the pattern with a level 2 and level 3 specials of specific elements.
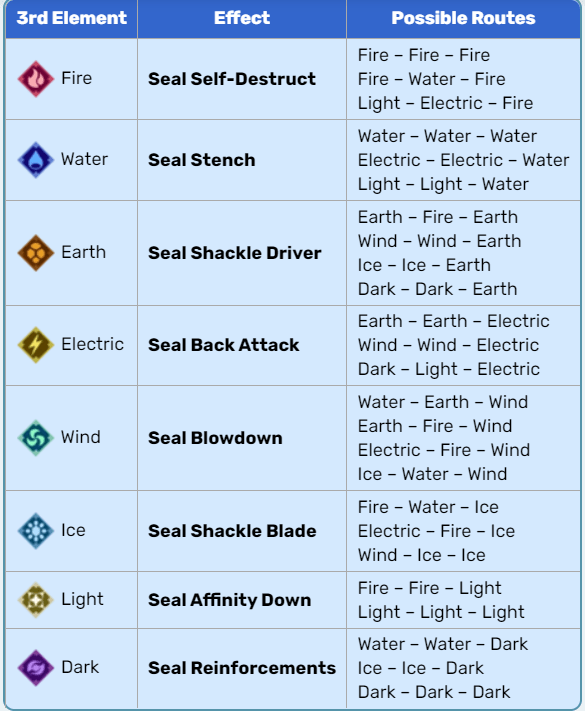
- Orbs:Once the third level of a blade combo is done, an orb will be placed on the enemy that is associated with the element of the final special used. For example: a blade combo that ends with a level 3 fire special will place a fire orb on the enemy. Each orb has a different effect on the enemy, but it also decreases the damage the enemy takes from that element slightly. Only one orb of each element can be on an enemy at once, for a total of 8 orbs (don’t attempt this, it’s not worth it). Here’s a handy chart for all the orbs and their effects, as well as the routes associated with them.
- Extending Chain Attacks: Blade combos allow you to extend chain attacks! By placing an orb on the enemy, that orb can be shattered in a chain attack. By shattering an orb, you get an extra round of the chain attack, and the damage boost is increased. This can repeat for as many orbs as there are on the enemy.
- See second image below
- There’s a few key things to know about shattering orbs:
- If an orb is weak to the attacking blade’s element, that orb will be prioritized and will be damaged twice (an orb must be damaged 3 times to break) Ex: using a Water blade will prioritize a fire orb.
- If an orb is not weak to the attacking blade’s element, and there are multiple orbs on the enemy, a RANDOM orb will be selected and damaged once.
- Full Burst: Shattering enough orbs will initiate a full burst, skyrocketing the damage ratio and causing everyone to do their level 4 specials. This ends the chain attack
- If you start your chain attack late enough in the opponent’s health bar, more than 2-3 orbs are rarely needed for a good overkill bonus.
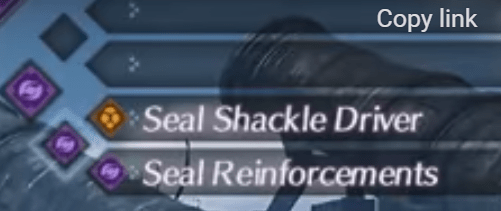
- The image below shows the in game UI of blade combo steps. It appears in the top right of the screen after a special is used to initiate a blade combo. The first special used was a level 1 dark special, and then a level 2 dark special. The player can now choose between a level 3 dark or level 3 earth special to place a dark or earth orb on the enemy.


- Fusion Combos are a combination of a driver combo and a blade combo. The best example is landing a level 1 special on an enemy that’s toppled. This will cause a burst of damage, as well as extend the topple’s duration. The damage burst is greater the more advanced a fusion combo is. For example, landing a level 3 blade combo on a launched enemy will do a ton of damage, much more than a level 1 blade combo on a toppled enemy.
- Another important thing: Stage 3 blade combos and level 4 specials make you invincible throughout the entire animation, but the enemy will still attack. It’s good to save these for when the enemy is going to do a powerful attack (But don’t wait too long, as there’s a blade combo timer that will reset the blade combo back to stage one if you wait too long).
Battle affinity
- In a battle, you’ll see a beam of light connecting the driver and blade. This is affinity, and it resets upon incapacitation. Using arts and specials increase this, and once its gold, it’s at max. Many blades have VERY good skills that apply stat buffs at max affinity only, so try and have it active as much as possible.
Misc. Info
Art cancelling
- You can cancel auto attacks into arts. Doing so at the final hit of the three hit combo will provide the biggest damage boost, but you can do it at any hit. You’ll know you did it right when a ring of light appears around the driver. Each weapon for each driver has different timings.
Recommended accessories
- Drivers have two accessory slots, and there are a few I recommend for any situation.
- Classic, modern, and avant-garde medals: Different tiers of the same effect, these will allow you to restore a percentage of critical damage done as HP. Paired with a blade with a high crit rate and you are almost unkillable
- Headbands: Increase critical damage dealt
- Beta scope: Makes it easier to inflict break on enemies
- Eyepatches: Deal even more damage when cancelling an auto attack into an art.
- Map info bar: This bar allows you to pick and choose what you want shown on the map. From left to right: Landmark, location, collection point, Heart to Heart, Salvage point, Shop, New quest, objective for current quest, and field skill check. To show or hide icons, use L and R to navigate, and press X over the icon you want to hide or show. Right now, only the collection points and shops are hidden.
I hope this was helpful to you!


Be the first to comment