
Please also note that all of this information applies to both your pets, and the enemies in dungeons. Not going to make too many references to that again.
Contents
Basics
By Malfat!
Pet dungeons unlock when a player gets their 6th pet, and this enables them to send a team of one to six pets into a dungeon to gain Dungeon Levels (DLs) and eventually Class Levels (CLs) after evolving. Each pet has an element, four main dungeon stats, two experience bars (percentage next to their Level and Class level), and a rating for each of the four elements, with a positive preference for their own and a negative for the elemental weakness. Neutral pets are balanced for all elements.
And reasonably new, at the bottom you can also see a pet’s rough Offensive and Survivability potentials in a one number. Survivability is based on the worst case scenario, and so the formula uses the lowest element for calculation.
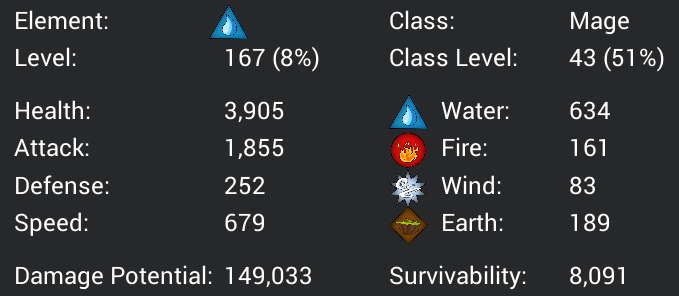
This is our tester pet snip. We will refer to this a bunch.
Also, holy crap numbers! Remember though, it is just like every other game you have played…bigger numbers better. But let’s give a brief rundown on them, just in case.
Stats
The only way to increase a pet’s stats is by gaining Dungeon Levels. However, the total growth they have will give a multiplier to the earned stats. Every 2,000 growth is worth 1% additively. Which means if you have a pet with 100,000 growth, it will have a bonus 50% to stats when compared to a pet with 0 Growth.
Element
The pet’s primary element; this determines both what their attacking element is and what weakness the pet has elementally.
Level
This alone usually means DUNGEON Level (DL), and not regular clone training levels or class levels (CL). DL can only increase through dungeons, while CL is typically dungeon as well. The CL exceptions are Alchemists and Adventurers, who typically gain no experience for their classes in a dungeon. Gaining experience in a dungeon will ,when applicable, apply to both the DL and the CL.
- When the DL goes up, the pet’s element (or all of them if Neutral) gets an increase, as well as each of the four main stats.
- When the CL goes up, the pet’s class-specific bonus increases, more on that below.
Neither of these decrease on rebirthing.
Health
This is the general measure of how much damage your pet can take before it is killed. More is better if pets are dying or are almost dying every round.
Attack
Attack is exactly what it says on the label; it is how hard your pet punches the enemies in the face in general. More is better if you need to kill things faster. Actual attacks also include the pet’s primary element as a modifier. More on that later.
Defense
How good your pet is at ignoring getting punched in the face in general. More defense means less damage from attacks gets through.
Speed
So, Speed is special here. It acts as initiative, where the higher the speed the more likely it is to go first in a turn. But higher speed also grants more actions for your pets to do…usually punching enemies in the face, but there are other options. Speed has a linear gain for additional actions in a turn, with a 100% chance for a second action at 500 speed, and for the third and final action at 1500 speed.
This linear gain means the pet would have 2.5 actions (two confirmed and a 50% chance for a third) if it has 1000 speed. Speed also translates into damage, more on that later.
Elements
These are very important…so much so that they have their own section below.
Elements
So those elements look weird, don’t they? What are they for!? Why are they so everywhere!? Why am I asking questions that I will only answer in the next paragraph!?
Elements are essentially a modifier to all attacks and defenses, in a Rock-Paper-Scissors-Lizard kind of way. So first, let’s have that beautiful line showing who doesn’t invite who to game night, ignoring Neutral for right now.
- Water >> Fire >> Air >> Earth >> Water
Water deals more damage to Fire, which deals more damage to Air, etc. This is just a base weakness for our own pets, and CAN be overcome…however…
All pets and enemies will only attack with their own element. So giving our Water pet above Fire gear (which grants a bonus to Fire element and a malus to Water) will actually lower the elemental portion of the damage…more on that later. This is a tradeoff that should be played with carefully…because too little damage results in the team all dying to a room collapse.
On the plus side, pets always defend with the element they were attacked with. And so if our pet above is attacked by a Water enemy…the damage will be reduced by that same element. However, if the Attacker is Earth…which our tester pet has a large negative in…then our tester pet will take additional damage from the attack. Boooo. More on all that later in Damage!
Pets will gain their own Element when they gain DL, to the tune of 3 Element per 1 DL.
Neutral pets, on the other hand, will gain 0.75 of EACH Element per 1 DL.
Speaking of Neutral pets…these are special. Neutral pets don’t care at ALL about which element their enemy is because they will always attack with the element that will hit the hardest. Typically the highest element is brought up by gear (more on that later), but if, say, the opposing enemy and the Neutral pet BOTH have a very high Fire element, and the enemy has a very low Water element, the Neutral pet might attack with Water because it will deal more damage. Essentially, they are trump cards.
TLDR
Elements are good, they make you hit harder and take less damage, unless they are low, and then they make you hit weaker and take more damage. Keep an eye on them.
Classes
There are eight classes that pets can evolve into in ITRTG. We’ll go over each real briefly, with a note about the dungeon use of them. A specialist is a pet that has a bonus for that particular role, like Dragon and Mage. Non-specialists, or Wildcards, are those pets that do not have a bonus to anything in particular, or have a particularly weak bonus and so are often evolved into a Class which they have no bonus in.
Their stats will also change when evolved, compared to their unevolved counterparts, who have a baseline 100% for all stats.
Blacksmith
These make non-Mages deal 1% more damage per CL…but only counts for the highest CL Blacksmith in the party. They like to hang out with Rogues and Assassins, because they are the other classes good at stabbing things. They also make gear when they aren’t helping in the dungeons.
- HP: 120%, Attack: 110%, Defense: 120%, Speed: 40%
Alchemist
These do nothing special in Dungeons, and so…don’t put them in. Just let them make your items and convert your materials to better ones.
Exceptions are the Supreme Taco and Vampire, as explained in Unique Pet Actions!. Those two pets are the only Alchemists that can gain CL in dungeons in addition to DL.
- HP: 80%, Attack: 100%, Defense: 80%, Speed: 110%
Adventurer
These do nothing in Dungeons. Don’t put them in. Send them to campaigns. They have the same stats as an unevolved pet.
Exceptions to this are Flying Eyeball and the Shadow Clone pet. Those two are the only Adventurers that can gain CL in dungeons in addition to DL…and can be seen below in Unique Pet Actions!
- HP: 100%, Attack: 100%, Defense: 100%, Speed: 100%
Defender
These are your tanks, your meat shields. They not only focus attacks on themselves, but if some other pet IS attacked, they can jump in and soak part of the damage. CL increases the amount of damage the Defender can take for others up until CL 25 (specialists continue to increase this amount even after this) and then from CL 26 onwards, they gain 1% HP per CL. Not recommended for wildcard evolutions. Specialists are able to protect 10% more often (60% of the time) and have an increased maximum protection of 50%, as opposed to the Wildcard only taking 35% at most 50% of the time.
- HP: 120%, Attack: 40%, Defense: 150%, Speed: 40%
Supporter
These are your healers. They can trade one or more attack actions for heal actions, recovering a percentage of the target’s maximum HP (increase by specialist bonus) plus a base amount based on attack. After CL10 they also gain a damage reduction aura of 1% per CL (max 50%), with the strongest aura being the only one that applies to the party. Seen below, Hourglass has a special Supporter aura that will stack with the damage reduction type.
- HP: 80%, Attack: 70%, Defense: 100%, Speed: 130%.
Hourglass has a unique stat spread that is different from the above, with a higher focus on Speed. It has -10% to all stats and +30% speed when compared to the normal support stats.
Rogue
These are very fast, and increase the amount of loot you get from defeating enemies by 3% per CL. More loot is better. This bonus stacks with each other, additively. More rogues don’t get to multiply the loot.
- HP: 80%, Attack: 120%, Defense: 60%, Speed: 160%
Assassin
These are also fast, but they hit harder than Rogues. They gain 5% damage for each CL. Stabby stabby.
- HP: 70%, Attack: 130%, Defense: 70%, Speed: 140%
Mage
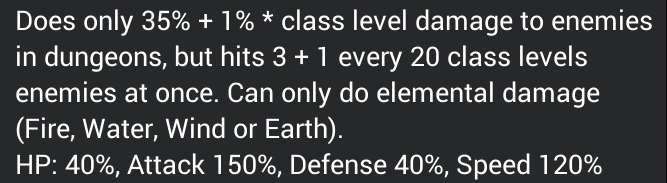
These are your AoE machines, and the most confusing of the class bonuses. They trade their normal attack action for a MultiAttack option. In the beginning, they split their attack into three, which strikes up to three different enemies. Mages like to spread out their attacks, so if the number of magic missiles is equal to the number of enemies present, every enemy gets a missile. If there are more, the targets are chosen at random, and if there is only one enemy left, it will get all of the magic missiles to the face. Each attack also deals less damage, starting at 35% and increasing by a base 1% + specialist bonus each CL. These are ALSO not recommended for wildcard evolutions, because the damage scaling is poor for non-specialists, and because Assassins are typically more needed.
Each CL20, they gain one more attack for their MultiAttack action. Meaning:
- CL 20 is a fourth attack.
- CL 40 is a fifth attack.
- CL 60 is a sixth attack.
- And so on and so forth.
These have the same damage reduction per missile, but when you start adding in more bolts, the damage increases quite nicely.
- HP: 40%, Attack: 150%, Defense: 40%, Speed: 120%
(It’s worth noting that since Mages have the lowest HP and Defense of all pets and the highest base Attack…they are what can be called “Glass Cannons”.)
Wildcard Pets
Before we dive any further, it might be beneficial to understand what “wildcard” pets are. These are pets that have no specialist bonuses (ie. Mouse) or pets whose bonuses are fairly weak or are not very relevant, like Cupid, Bug, Mole and Camel. These 5 pets are the usual non-token wildcards and so can usually be made into whatever class or role that you may need.
A common suggestion is to make 2x Blacksmith, 1x Support, 1x Rogue and 1x Alchemist, because there will be a shortage of those specific classes in the early game.
Recommended Wildcards:
Bug Blacksmith, Cupid Blacksmith, Mouse Support, Mole Rogue, Camel Alchemist
- Bug BS: Fire BS that can go into Volcano D1 and D3. Also early evolution so it becomes your first BS.
- Cupid BS: Only really useful in Mountain D1 for both its events, after that it’s just another blacksmith which will come in handy eventually.
- Camel Alchemist: You may want a wildcard alchemist at the beginning, as having only bee is not enough and you’ll need more of them. Camel is also fire, which allows you to get Carno later on.
- Mole and Mouse as a Rogue and Support: The game doesn’t give many free-to-play options for these roles, so it can be a fine idea to use these wildcards to fill your early missing gaps in dungeon teams.
Note that these are just suggestions and you are free to mix and match as you see fit.
Actions
So what are Actions? They are granted by Speed, and allow the pets to do additional things. Most often to Attack but…there are a few other general actions. Here they are!
Attack
The pet attacks a single hostile target.
MultiAttack
Mages will attack however many Hostile targets they have attacks for, preferring new targets, but they can and will blast a single target.
This has a limitation, however. The MultiAttack selects the targets prior to actually attacking, and so if a single target has been selected twice, but, say, is slain from the first magic missile, then the second magic missile will simply strike the target anyway, but showing no string in the log, and dealing no additional damage.
This can result in a log showing that a Mage with five attacks (CL40-59) only attacked three times, for instance…because the other two parts struck a dead enemy.
Heal
Supporters heal a single injured friendly target.
Per Ryu, the Supporter will first check to see if there is a pet at or below 60%, and if there is, they will heal the lowest among them first. If there are none, the Supporter will see if its heal will be wasted, and will heal any pet that can absorb the full heal. If the heal has any waste in it, the Supporter should Attack instead.
Supporters heal has two parts, an integer amount, and a percentage amount. The integer is based on the attack value of the Supporter; more attack is more heal. The percentage amount is based on their CL, and maxes at 20% if they are a non-specialist. Otherwise it just continues to increase, albeit a little slower than those first levels.
Defender Protect and Absorption
Neither action here actually USES an action, but they are essential towards progression in Dungeons. Defenders have two abilities. The first is just called the Defender Skill (in the logs), but is referred to as Protect here, and it lets them take the entire hit from an enemy for a fellow teammate. The second, Absorption, allows a Defender to take a certain amount of damage for a teammate, instead of the entire blow.
Both of these can trigger when a non-Defender is attacked, and the Absorption can be activated as many times as there are Defenders in the team (and it goes in the order they were put in the team, check the Equip list for the dungeon team), and they won’t die from the damage they Absorb.
The damage they take when they are hit or Protect another pet is mitigated by the Defender’s own, typically impressive, defensive stats.
However when they use Absorption they will take a percentage of the damage the target pet received, so this amount is not further mitigated by the defender’s own stats. Because of this, Absorption will be the majority of the damage a Defender will take in a Dungeon.
Dealing Damage
So many references to damage, and nothing saying how it happens. This may be the most math ridden area, but we’ll try to keep it to a minimum. This is a lie, prepare for arithmetic.
Damage, at its core, is based off of every single stat except for Health. Simple; right? As long as our numbers are a lot bigger than all of their numbers we are good, right? Well…mostly.
Here is the formula:
- Damage = ((AttackerAttack – (TargetDefense/2)) * ElementMod * TargetDefMulti * AdditionalMultipliers) + SpeedDamage
Lots of odd parts, yes? Let’s break it down some. Look at our old tester pet (because I don’t want to redo all of the math below).
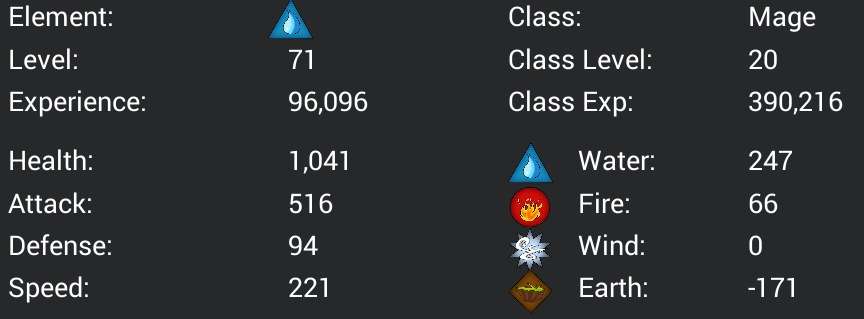
We’ll say our enemy has 250 defense and 100 Water Defense (the rest don’t matter for this since tester is a water element pet) and 179 Speed.
First, the Attack has half of the defender’s Defense subtracted from it. 516 attack, and let’s give our target 250 defense.
- 516 – (250/2) = 516 – 125 = 391
Now our formula looks like:
- Damage = 391 * ElementMod * TargetDefMulti * AdditionalMultipliers + SpeedDamage
Then that result is multiplied based on the Elements involved, the ElementMod as the formula says. Scroll up to our tester pet again. We have 247 Water, which matters because as a Water pet, that is what we attack with. We will presume our defending target has 100 Water defense.
If the elements were negative, you just add them to the positive side and proceed as normal. So if the enemy had -100 Water Element, we treat our tester pet as having 347, and the defender as having 0, and then solve the same way.
- ElementMod = (1 + (AttackersWaterElement / 100)) / (1 + (TargetsWaterElement / 100))
- ElementMod = (1 + (247/100)) / (1 + (100/100))
- ElementMod = (1 + 2.47) / (1 + 1)
- ElementMod = 3.47 / 2
- ElementMod = 1.735
Now our formula looks like:
- Damage = 391 * 1.735 * TargetDefMulti * AdditionalMultipliers + SpeedDamage
TargetDefMulti is an odd one. It reduces incoming damage for the target. We gave our target 250 defense earlier, and the formula used is 1 – (Defense / Defense +200), so simply we have
- TargetDefMulti = 1 – (250 / (250+200))
- TargetDefMulti = 1 – (250 / 450)
- TargetDefMulti = 1 – (5 / 9)
- TargetDefMulti = 4/9 or approximately 0.444
Now our formula looks like:
- Damage = 391 * 1.735 * 0.444 * AdditionalMultipliers + SpeedDamage
Before the Additional Multipliers our attack then deals 391 * 1.735 * 0.444 damage…or simplified, roughly 301.203 damage.
Let’s simplify to 301, though it is slightly inaccurate. If we use the fraction above, we get approximately 301.5 damage. Still going to keep 301 though.
One of these Additional Modifiers is the Class of the pet. Other modifiers include the bonus to melee damage from Blacksmiths without RunePatch, the Mimic Hunting ability (above) and the Witch’s Water Control (also above), but it is by no means limited to these. Our tester pet has none of these, but it is a Mage, so for Mages:
And specifically for our tester pet, the specialist bonus matters, so:

So our only AdditionalModifier here is the class bonus, which is:
- AdditionalModifierClass = (35% + (1% * (CLMage))) * (100% + 12.4%)
- The SpecialistBonus increases the total damage by 12.4% is why here.
- AdditionalModifierClass = (35% + (1% * 20)) * (112.4%)
- AdditionalModifierClass = (35% + 20%) * 112.4%
- AdditionalModifierClass = 55% * 112.4%
- AdditionalModifierClass = 61.82%
Or so it fits with the rest of our math above, 0.6182
Now our formula looks like:
- Damage = 301 * 0.6182 + SpeedDamage
- Damage = 186.20 + SpeedDamage
The damage here IS reduced, but we forgot an important part above; Mages have multiple attacks! So this entire formula will be repeated four times in this case, as our tester pet has four attacks for CL20, and each attack can go to a different target. If they all struck the same target, we could just multiply the above by four, totalling almost 745 damage for this MultiAttack action…wait, we missed SpeedDamage!
- SpeedDamage = (Speed – TargetSpeed) / 2
So for our tester pet we have 221 and our supposed target has 179.
- SpeedDamage = (221 – 179) / 2
- SpeedDamage = 42 / 2
- SpeedDamage = 21
In the case where the target has more Speed than the attacker, this would result in a negative number. But thank Ryu, if the SpeedDamage is zero or less, it is just treated as a zero.
Mages are special AGAIN, and they multiply all SpeedDamage by ⅓ and apply that to each magic missile. Even eight magic missiles would each still get that ⅓ of the original SpeedDamage, which in this case, would be 21 / 3 = 7.
Our final formula is Damage = 186.20 + 7 against this target. Again, our mage friend here will attack a total of four times per action, and so if all attacks were focused against this one target (like it was a boss), then we would finally end at RoundTotalDamage = 4 * 193.20 = approximately 772.8
Math!
TLDR:
Is the bigger numbers you have and the lower numbers they have, the better off you are.
Positioning
Each team that you build to go into dungeons, will be made of up to six pets, set in two rows, like so:
| Front | Front | Front |
| Back | Back | Back |
Pets in the front row gain 20% bonus speed, which DOES affect SpeedDamage, and would be calculated in above in that final step. They will also be attacked 65% of the time, and so pets in the front row should be able to take more than one or two hits.
Pets in the back row have a 20% damage penalty, except for Mages. Mages don’t care where they are, as long as they can cast their magic missiles.
Typical positioning would place Assassins and Defenders in front; Defenders so they get hit, and Assassins so they don’t earn that damage penalty. Mages sit in the back row almost exclusively, since they are reasonably easy to kill, and have no penalty for hiding behind the sturdier pets.
Gear
But how did we get those numbers for our tester pet? By giving it gear of course! Gear, equipment, however you want to call them, provide an astronomical boost to your pet’s strength once the pets themselves have a few DLs. This is because unlike many other games out there, gear in ITRTG multiplies the stats of the worn pet. If multiple pieces of gear increase one stat, these increases are additive to themselves, and then that total multiplies the pet’s stats. So if the pet has two items with each giving 10% HP, the pet will get 20% HP as the multiplied boost to their stats.
Say it again, gear MULTIPLIES the pet’s stats.
One more time, the TLDR here is…Gear multiplies the stats of the pet. They are amazing and grant a significant amount of pet power in Dungeons (and your God’s stats).
Only pets evolved as Blacksmiths can Craft gear, Reforge it to improve the Quality up to SSS and Upgrade it up to +20.
To begin with, all gear is crafted in Tiers, with each Tier being stronger than the one before it. It is easy to tell what tier a piece of gear is, and we will use the Bow weapon for this example. The Tier 1 (T1) bow is called the Feather Bow, and it only costs some Feathers and Bound Feathers. Easy enough materials to obtain. A Storm Bow (T2) however, will require additional materials to craft, which will include a minimum quality and upgrade level of the Feather Bow. T1 gear is then consumed to make T2. In turn, a minimum quality and upgrade level of a Storm Bow is a required material to make a Hurricane Bow, the T3.
There are also three unique weapons that MUST be discussed before moving on to explain Quality and Upgrades…and those are the following:
Knives
These are the Howling / Thundering / Bursting Knives, a wind-type weapon. However, when wielded by anyone that is not a mage (or the Ghost pet who can’t attack, see above), the enemy that was struck loses a percentage of their total defense each time they are struck…up to 1% for the best of Knives. These are the most amazing tool you can have at your disposal, and please utilize them frequently, often, and all the time. Less Defense on those being attacked is excellent, for the same reasons it is horrible for you.
T4 Knives also reduce the ELEMENT of the target being shredded by an equal percent, but only reduce it to 50% of the starting amount.
Please Note: Knives are mostly ineffectual prior to a Thundering Knives S+10, because the shredded amount is so low.
XP Swords
These are the Training / Leeching / Ego Swords, water type weapons. They have negative elements for ALL of the other three elements, not just one, but they have the unique ability to take XP that would be given to other pets in the dungeon, and soaking it all into its wielder, whether they are alive or not at the end. They even partially work outside of dungeons, where they just generate the XP without affecting the Dungeon’s gains, so tossing some around in your Camps is a good way to gain DL for pets not even in the dungeons yet, or at all. These also work for pets doing other tasks, only the XP they gain goes into their CL, not their DL.
You can think of them as XP Banks; they never go into Dungeons, and only gather up experience for you to make a withdrawal from whenever you pay 25GP and drain the dungeon XP from them.
- If an XP Sword is used in a dungeon, it will grant both DL and CL experience.
- If an XP Sword is on a pet in a Campaign, it will only gain DL.
- If an XP Sword is on a pet actively doing anything else (RTI, Fishing, Quests, etc.), they will only gain CL.
- T4 XPSwords also grant HP Regeneration, maxing at 10% additively per T4 XPSword
Important: Once a buff in Dojo has been leveled up (not the building itself, upgrading the building is fine) then ALL BONUS XP from XPSwords is turned off. XPSwords will ONLY work in dungeons from then on, although this can be reversed a steep cost of 10% of all the Dojo Experience put into the building so far.
Gram
Gram is a unique weapon that is earned from the Patreon Dungeon Bosses, spawned by bringing an appropriate number of Runestones to the Newbie Dungeon. It is a T4 Neutral weapon, with a pile of Attack and all elements. It also is the only weapon that can exceed SSS+20(20), as each new Patreon Dungeon Boss that is fought and defeated will increase both the Upgrades and the Enchantments by 2.
It is maxed at SSS+38(38) as of 17MAY2023, as there are currently 10 Patreon Dungeon Bosses in total.
Quality
Items when crafted can vary in quality, depending on your blacksmith capabilities. Those capabilities will be a result of your Blacksmith Class Level, Specialist bonus, Blacksmith Hammer and all other boosts that you may have to crafting (ChP, Gear, Pet specific bonuses, et al.).
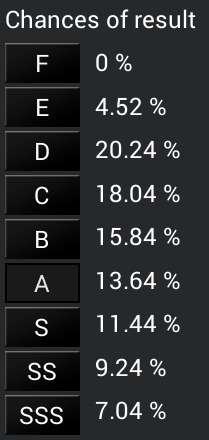
Here is an example of what your blacksmith may look like when attempting to craft something for the first time:
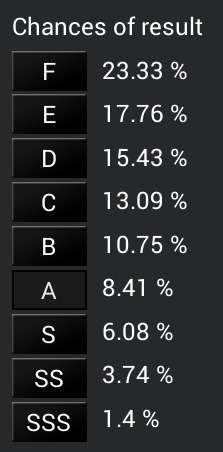
In this particular example on the left, there is a 23% chance of the item being crafted will be an F quality item, which is the lowest possible quality, and a 1.4% chance of it being SSS quality, the best possible quality an item can have.
The stats and elements of that item will vary depending on this quality, being of higher quality meaning higher stats of course.
Here on the right is another example:
- As you get more CL on your Blacksmith and upgrade to a better Hammer etc, eventually your odds at crafting gear will become much better.
- As you can see here, now we have a 0% chance of crafting an F quality item and our odds of crafting an SSS have greatly improved.
Every time a new item is crafted, you “roll” a number to see what quality that item will end up being.
Naturally, as the way to “upgrade” an item from T1 to T2 is to craft a T2 item using the T1 as material (noted above), it’s important to note that the new T2 item that will be crafted is also a new item and will get its own quality “roll” to determine its final quality. But what happens if we craft an item and it is of low quality?
Well, we can always Reforge it to improve its quality to whatever we want it to be. This process can be more expensive than crafting a totally new item, but it is a guaranteed success. So even if you decide to craft a new one, you can always keep your old ones and reforge them at a later time. This will be more relevant the higher we go in tiers, as higher tier items take a lot longer to craft.
Reforging will require the same materials as the actual craft, except without the lower tier item and in different quantities. For a T1 item expect the required materials to be both T1 and T2. T3 items will require T3 materials.
There are a few important breakpoints regarding quality that should be mentioned, and that is tied to what was mentioned before that a higher tier item requires a lower tier one to be crafted.
So, in order to craft a Tier 2 (T2) item we will need to use a Tier 1 (T1) of the same item that is of at least B quality and +5 as one of the required materials for that craft.
Here’s the list:
- T2 – requires 1x T1 B+5
- T3 – requires 1x T2 S+10
- T4 – requires 1x T3 SSS+20
Important Note: As we can see by the quality tables, having good Blacksmithing odds is key to saving time and materials reforging. Because of that it’s recommended that the first item crafted is a Blacksmith Hammer and it should be equipped onto your best Blacksmith. Potentially the second item can also be a Hammer and you can try and upgrade that one all the way to T2 SSS+20. Maximize your potential crafting ability to save those materials when you are early!
Upgrades
Upgrades are very simple. An item, when first crafted, starts at +0 and can go all the way up to +20 for player-made items. (Event items and Gram can both exceed the +20 cap, but they have unique methods of upgrading the item). The higher the upgrade number, the higher the stats and bonus that item has. In that way, it works just the same as Quality where bigger = better.
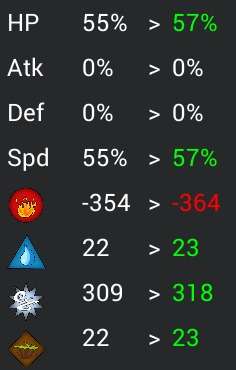
When an item is upgraded, just like when it’s reforged, all its base stats will increase (if they are higher than 0% to begin with), and so will its elements – both the positive ones and the negative ones.
As we can see on the example picture, all of the items’ non-zero stats get an improvement, and so do its positive elements. But its negative elements get worse too. This can be fixed with Enchanting, conveniently the next section.
The cost of upgrading items varies from tier to tier, but usually upgrading from +0 to +10 will require the lower tier of material that was required to craft it (T1 material for T1 and T2 gear) plus a special item called “Whetstones” that drop from dungeons.
Upgrading from +11 to +20 is usually much more expensive and requires the higher tier material (T2 material for T1 and T2 gear), plus “Sacred Stones” which are a higher version of Whetstones. Those can also be rarely dropped in dungeons, or crafted by alchemists.
The biggest difference between Quality and Upgrades is that when you go up in tiers (from T1 to T2 or from T2 to T3 etc) Quality just gets a new roll as explained in the section above, but the new item actually gets 50% of the upgrade levels on the item that was used as a material (rounded down).
What this means is that if you use a +5 T1 item as material to make a T2 item, the resulting T2 will be +2 (50%, rounded down). If you use a +10 T2 item to make a T3, the resulting T3 will be +5 (again, 50% rounded down).
Enchants
While Upgrading and Reforging serve to increase the stats of an item, Enchanting serves to increase or fix the elements instead, depending on the type of gear.
Neutral gear such as Iron or Capes will get ALL their elements increased when enchanting.
Meanwhile, Elemental gear will have their negatives removed at 5% per enchanting level. So, using the previous picture as an example, those gloves if enchanted to the maximum (20 enchants) would have their -354 fire element turned to 0.
The cost of enchanting is usually materials of the tier below current. So T2 items will require T1 materials to enchant, T3 items will require T2 materials, and so on.
Just like Upgrades, when crafting a higher tier item using a lower tier one, 50% of the enchants get applied to the new item (rounded down).
Gems
Gems are obtained through Challenge Dungeons, and can be fused together to increase their level, maxing at 15 (without Overflow Point purchases). There are five types of gems, one for each stat, and one that is for all elements. All gems are ADDITIVE to the gear percentage.
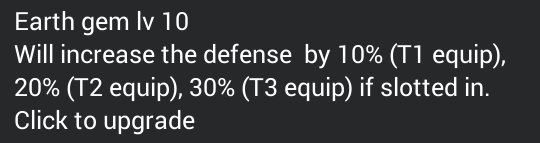
This gem will ADD 30% defense to the Hurricane Bow above, granting the Defense a positive 20%…and the resulting Defense of our fake pet is 360.
Level 1 gems add 1% per tier, and they are combined two of the same level at a time to create the next level up. Each level increase is treated the same…a Level 2 gem would add 2% per tier, a Level 8 would add 8% per tier, etc.
Level 10 gems are a general standard used by many people spoken with, easy to use and the math is simpler. Lower and higher gems can be used based on the user’s preference, but when you remove one, it WILL lose a level unless the Challenge Point upgrade has been purchased.
Ultimately, Gems let you adapt your gear to any situation as needed. And they are not lost upon forging a new item (Making a Hurricane Bow out of a Storm Bow), merely upgraded to the new percentage tier.
Remember that the stat-boosted gems add to the percentage gains for the pets…while the neutral gems are additive to the elements. Oftentimes, the Fire element gem will outpace the Neutral for damage, but keep in mind this may not always be the case. We have to remember that the Neutral gem’s effect will alter both sides of the damage formula. The best bet is to check what would be better suited for your individual pet’s needs.
Traps and Events
But now, before we look at the dungeons themselves, there are special occurrences in dungeons, called Traps and Events. They require you to either have some pets with a certain element or class, or to have an item, which is consumed to counter/complete them.
Events require the maximum rooms run in the Dungeon to be six (6) before they will trigger. This is likely meant to balance the gains from them…be they growth, god power, pet stones, etc.
Traps…as far as I am aware, have no such restriction. But these are all negative in scope if not countered…such as Darkness giving all of your pets a 50% miss chance.
I will not badger you to carry items and complete every one of them…please just scroll to the bottom of the dungeon depths you are descending to and verify you can complete them for the power that they grant to you…and not your enemies.
Loot
Killing enemies in Dungeons grants you loot, in the form of materials. These can be used to help craft and improve gear, evolve your pets, and make items to make your dungeoneering experience a smoother one (looking at you Phoenix Feathers). Look them over with your loyal Alchemists and Blacksmiths, and remember…if you aren’t using them, they are not helping you.
There are a few ways to improve loot from dungeons, such as increasing dungeon difficulty or bringing Rogues. More Rogues = more loot, but they will usually do less damage than Assassins or Mages, so it is a fine balance between these two things.
Also Ants are dropped at rooms * 3 * DropBonus (rogues, LuckyTalismans, SD, etc). This basically only matters for Anteater’s bonus.
Lucky Talisman
This item can be crafted by Alchemists or purchased with Pet Stones. It grants a 50% multiplicative bonus to all loot drops in that dungeon, however a Lucky Talisman will only work for one room. So if you are running a 48-room dungeon and want a Lucky Talisman for each room, you need to bring 48 Lucky Talismans.
Again, it is multiplicative…if you would have originally obtained 10 wood, a Lucky Talisman active in that room means you will get 15 instead.
There are some other buffs to loot drops, including SpaceDim’s v35 Timeline Manipulation, a ChP purchase, even a Pet Stone purchase. These all stack.
Wise Talisman
This item can, again, be crafted by Alchemists or purchased with Pet Stones. It grants an additional 50% experience to any earned, which is multiplicative with any experience boosting events like the Landslide in Mountain D2/D3.
Like its sibling, it is also consumed at one Wise Talisman per room, and so plan accordingly to make sure you have enough Wise Talismans for your entire dungeon run.
A note, that experience gained is specific to the pets. If you would gain 100 XP for an enemy, each pet present would gain the 100 XP. Having more or less pets doesn’t change the amount granted.
Also any and all XP multipliers occur off of that base, and XPSwords (see above) are calculated after the multipliers are put in, to do their own magic.
More Team Slots
In the beginning, after seeing all of that, you will notice you only have a single team to begin with. But fear not, you can obtain a total of six teams currently, through the following means:
- One from trading 2000 level 1 gems of each type, as earned from Challenge Dungeons.
- One can be purchased with 300,000 Pet Stones.
- Two can be unlocked using Challenge Points, earned from completing Challenges. The first costs 1000 ChiPs, and the second 1500 Chips.
- One can be unlocked using 10,000 of each type of Infinity Point from the Infinity Tower.
The Actual Dungeons
Oh goodie we get to talk about the actual dungeons. ALL of that to get here. Dungeons have three Depths, each with eleven Difficulty levels (+0 through +10). Moving up one Depth is roughly analogous to Difficulty +8 or +9 of the previous Depth…roughly.
Please note that the depth of the dungeon is the deepest potential depth. You still have to progress through the 6 rooms of D1 and the 10 rooms of D2 to get to D3 starting at room 17.
In Depth 1, or D1, all enemies are always the aligned element of the dungeon.
In D2, one enemy type is an off-element from the dungeon… shown here:
D2 Off-Element Types
| Scrapyard | Water Temple | Volcano | Mountain | Forest |
| Air | Fire | Water | Earth | Water |
Also new to D2, enemies also gain a 50% chance to ambush your team, meaning that all enemies get an additional action prior to the turn starting. Which they use generally to attack you, or buff themselves, or summon more enemies, etc. A poorly prepared team can get chewed apart in a bad Ambush. This chance to Ambush you increases to 100% in all D3 dungeons.
In D3, there are enemies of the three remaining elements, and not the one found in D2. So using Water Temple, there is a Neutral, an Air, and an Earth enemy type.
You can use this information to farm materials that you aren’t running right now, or to enhance your material gains. For instance, if you need Earth materials, you can run Forest at any depth…or Mountain D2…or any of the D3 dungeons except Mountain.
Also every dungeon except Volcano has a Treasure event in D2…which grants either a small amount of Pet Stones or a Lucky Draw. This makes D2 farming a wonderful place to get all of your gambling needs met…except in Volcano, which just has a Pet Stone and GP box instead.
There is only really one way to truly lose in a dungeon. To have all of your pets die in the same turn. Not to worry, you will only lose all of the materials found. All events and XP earned will be kept, and your pets will rest for one hour before going back in to try and reach the room you told them to go to.
There are two ways in which losing can happen instantly:
- Reaching Turn 51 (meaning there are enemies left alive after Turn 50) in a room, which causes a collapse. Rocks fall, everyone dies.
- Reaching a maximum amount of enemies in a room, which causes them to perform a wild combination attack that annihilates your pets.
I will include a team for each dungeon, that will be sufficient for Depth 2 and potentially Depth 3. This will include a rough gearing suggestion, and items to bring along. There are MANY many more teams that will work, however, I am attempting to offer a real rough starting point.
These will not be teams meant to last you through the end of time.
Newbie Dungeon
This is the first step on the adventure. It has a little bit of everything, and the boss is Neutral. Everything is nice and weak and easy to kill.
Just don’t bring special items like…say…Runestones, A.F. Coins or the Aether Ring in here. Horrors live in dark places, after all.
- D2 Team and Gearing Suggestion: There is no D2 here. Any random 6 pets can get through Newbie Dungeon. It is suggested you pick pets that will be dungeoneers in the future so Armadillo, Frog and Egg are all solid choices. If you opt to follow the recommendations above, you can also use Bug, Cupid and Mouse.
As you get more pets, Squirrel and Rabbit are also very solid choices.
Final Team: Armadillo, Mouse, Egg, Cupid, Squirrel, Rabbit. Frog can go fish in the pond for now and until you unlock more teams.
Scrapyard
This dungeon is Neutral Aligned. All those comments you’ve read about how neutral pets hurt things the best and how negative defensive elements make the attacker even stronger? Well, those are working against you now.
Welcome to the practical application. I refer to it as “Mimic Training” after the powerfully strong…and neutral…enemies that can be found in D3. This dungeon also offers GP, Pet Stones, and eventually Growth.
My advice? Watch your elements, that will kill you faster than anything else really. There are summoners here, enemies that make more enemies. One of the D3 bosses is a summoner as well, so bring some good damage in.
- D1: Armadillo, Mouse, Egg, Cupid, Squirrel, Rabbit.
- D2: Dog, Frog, Cat, Chicken, Squirrel, Rabbit
- D3: Armadillo (or Gnome), Fairy, Chicken, Cat, Mole, Dragon
- D2 Team and Gearing Suggestion: 1 Defender, 1 Supporter, and 1 Rogue. The rest are the player’s choice, though I would suggest 1 Mage for the summoners. Pet elements won’t matter through D2.
Try to keep negative elements to a minimum, because most enemies are Neutral. Bring Torches and Holy Water and Flying Boots. And Phoenix Feathers.
- D3 Team Suggestions: Same as before but this time you will also want 2x Assassins and 2x Wind pets due to events.
Water Temple
This dungeon is Water Aligned. Surprise!
It also has some surprisingly high Defense and low Speed enemies, so Knives and Speed Damage are your friends. This dungeon offers multiple ways to obtain random materials and GP and Pet Stones, along with bonus XP.
A special note for WT D1, is that it will benefit from having 3x water pets and a Blacksmith. For the events, the issue is that Frog is the only really early Water pet, followed by Hermit Crab (check your Milestones) with Undine and Snake being the next earliest…but neither Undine nor Snake are really good picks. They will, however, do in a pinch to ensure the GP and Material events are covered.
D3 has a few different healers as well, so make sure your team can out damage them, or kill them outright.
- D1: Armadillo, Frog, Egg, Hermit Crab, Squirrel, Rabbit.
- D2: Dog (or Whale), Frog, Penguin (or Chameleon), Fairy, Rabbit, Mole (or Ghost)
- D3: Whale, Frog, Fairy (or Hourglass), Chameleon, Rabbit, Ghost
- D2 Team and Gearing Suggestion: 1 Defender, 2 Supporters, and 1 Rogue…the other two pet’s classes will not matter, but do bring three Water pets if possible for the event present in D1 and D3. Try to avoid bringing Fire pets, and prefer to bring Earth pets for the bonus damage output.
Keep your front line made of the Defender and Water pets, to mitigate damage intake.. Use the water accessories to bring the Water element up on any pet that needs it to reduce that multiplier. Try to have T2 Knives to help reduce the enemy’s Defense, and watch out for the D2 boss…it hits surprisingly hard.
Bring Flying Boots and Antidotes. And Phoenix Feathers. Using an item to avoid the poison can free up your supporter to heal important pets…or to deal damage.
- D3 Team Suggestions: Same as before but this time you will want to make sure to bring 3x Water pets. A few considerations could be using Undine as your rogue, if available, which will eliminate the need of having Chameleon on the team. Mole can serve well as a rogue too, but Ghost is very strong and a popular choice for this team.
Keep your damage output high, however, because of the enemy type called Zaratan. They are the woe of many.
Volcano
This dungeon is Fire Aligned! Magma is a thing!
This dungeon offers GP and Pet Stones, and the unique ability to have additional rooms for your pets to fight in, for more XP, along with multiple Double XP bonuses. As far as I am aware, these can occur in the same room even. Excellent!
Lots of enemies with good attack and a single target focus. The boss in D1 and in one of them in D3 are summoners while the other in D3 is a healer.
- D1: Armadillo, Mouse, Egg, Bug, Squirrel, GPet.
- D2: Armadillo or Dog, Frog, Squirrel, Dragon, Bug, Penguin
- D3: Elephant, Salamander, Bug, Squirrel, Slime, Penguin
- D2 Team and Gearing Suggestion: 1 Defender, 1 Supporter, and 1 Rogue…the rest are player’s choice. However, make sure you bring three fire pets. Bug, Squirrel, and GodPower are a good early three to bring…and you do not want to fail that event. Dragon can be swapped in for GPet if it is available.
Clam can be an option instead of Penguin, as Volcano has the highest GP gains of all other D2 dungeons, however it does cost a token.
This is the only place where Fire gear may assist in survival.
Bring Holy Water, Antidotes, and Nevermelting Ice. And Phoenix Feathers. The Nevermelting Ice is to counter a trap that deals 20% to the entire team AND makes all attacks use the pet’s Fire element to attack. Fire against Fire is not as strong as even Wind against Fire…so I like to counter that to ensure my damage output is high enough.
- D3 Team Suggestions: Same as D2 but you may want to bring a Blacksmith now. You can just leave the smith in the team during D2 progression so it has enough DLs when the time comes to start D3.
Salamander can be swapped with any other support if he’s not available, as the three fire pets should already be covered by Bug, Squirrel and Elephant.
If Elephant is not an option because Pet Tokens are low, you can use Salamander or Santa instead as that third fire pet.
Mountain
This dungeon is Wind Aligned. This actually does surprise people, but kind of envision being at the top of the mountain with the thin air and howling winds.
This is touted as being the easiest of the dungeons to push forward in, but this is only due to Dragon being a fast Mage to obtain and evolve. It is also, as the element would suggest, full of pretty fast enemies. Having your own speed be high will decrease the Speed Damage that is taken.
It offers two ways to gain growth, one of which gains GP alongside it, and a unique event that causes enemies to take damage but not your team if successful. Not surprisingly Mountain is easy to push with that one.
D1 boss is a healer, and both of the D3 bosses have a crazy MultiAttack so…your defenders will be quite busy trying to protect everyone. Yes, Defenders plural, check your events and traps!
- D1: Armadillo, Mouse, Egg, Cupid, Squirrel, Rabbit.
- D2: Dog, Valkyrie, Fairy, Cat, Dragon, Squirrel
- D3: Dog, Valkyrie, Fairy, Cat, Dragon, Clam
- D1 Notes: MT D1 benefits from having 2x Wind pets and 1x Blacksmith. If you decide to evo Cupid into a Blacksmith, he can cover both roles. The growth event here is extremely powerful, especially early on.
- D2 Team and Gearing Suggestion: 2 Defenders, 1 Supporter, and 1 Rogue…the rest is up to the player, although a common selection is a Fire Mage, the earliest of which is Dragon. Two of the pets you bring must be Wind pets, because we do not want to ever fail the growth-granting event, even though it is D1 only.
I would suggest using Wind Armor instead of Accessories, to avoid the negative Attack on the rings.
Bring Flying Boots and Ginger. And Phoenix Feathers. Because damage is awesome.
- D3 Team Suggestions: 2 Defenders, 1 Support, 1 Rogue, 1 Mage. You may also want to bring 2x Neutral pets for the event in this dungeon.
An alternative to Fairy here can be the token pet Tanuki, as it will act as both a support and a Neutral pet, freeing both Fairy and Cat to be used elsewhere.
Vesuvius is another token pet that shares some of the growth it gains, so it’s a very popular option to use him here.
Anything is a pretty popular pet to join Mountain D3, because it counts as a Neutral pet, and ANY class, regardless of what it is actually. An Anything mage counts as that second defender for Landslide.
Forest
This dungeon is Earth Aligned. Trees and angry wildlife.
This dungeon has higher HP and Defense than some others, but suffers from a much lower speed. Put the pain on them. This dungeon has two ways to gain growth and an XP doubler.
It also has a Summoner for a boss in D2, and in D3, one of the bosses not only defends the enemies, but heals them AND summons more. Treebeard is not pleased!
- D1: Mostly any team will work fine for D1. You can use the same team as Newbie.
- D2: Armadillo, Mouse, Chicken, Mole +2 spare pets. Dragon and Cat can be an option.
- D3: Armadillo (or Gnome), Mouse, Chicken, Cat, Mole, Sylph
- D2 Team and Gearing Suggestion: 1 Defender, 1 Supporter, and 1 Rogue…the rest is player choice. There are summoners here that 1 Mage could do well against. Up to you.
Many Knives should be brought here, along with some Earth accessories to mitigate the damage.
Bring spare Food (if you have a refrigerator and NEVER chocolate*), Torches and Flying Boots. And Phoenix Feathers.
*See Chocoforest in Advanced Strategy notes.
- D3 Team Suggestions: 1 Defender, 1 Support, 1 Rogue, 2 Assassins. Similar to D2, there will be summoners here, so 1 Mage can be of use here as well…but note that unlike D2, here the BOSSES are the summoners.
The Fire Tree (Blazing Ancient) is often a stumbling block here. If Sylph is not available you can use any other mage here. Undine is also a popular rogue for Forest due to high demand for Wood.
Unique Pet Things
Many pets have a special ability or altered attack method, and are mostly compiled here.
Ghost Scream
The Ghost pet does not attack to deal damage. Instead it trades the Attack option it has to sit in the corner and scream at the enemies as a special action. If it hits, it reduces both attack and defense of the target(s). At CL 20, Ghost can scream at TWO targets per scream. These Screams do not stack on a target, even if one enemy is hit multiple times by the Screams, and the debuff will last until the end of the turn.
Ghost tooltip states it increases the likelihood that pets will attack a scared target; I do not know the odds or how this functions, but…there it is.
Gnome Bulwark
Gnome will shield the team once per room with a good sized bubble of essentially health, though this earthen shield can not be healed by a supporter. This is based off of Gnome’s Earth Element, and once evolved, the Gnome’s CL also matters.
Undine Spears
Undine will, every round, throw water spears at all non-boss hostile targets in the room, dealing a percentage of their maximum health. This is based off of Undine’s Water Element, and is capped at 10%.
Hourglass Slow
Hourglass has two abilities…while unevolved, they slow all enemies in the room. This helps with speed damage. Once evolved into a supporter, they grant a speed boost aura instead of a damage reduction aura, for 1% speed per CL. Their hostile enemy slow also gets better.
Hourglass also has a unique stat spread for DLs…it loses (additively) 10% from HP, Attack, and Defense stats and gains 30% more speed.
So if the usual distribution is 120% for each stat, Hourglass would gain 110% for HP, Attack, and Defense, and then 150% Speed.
*Rabbit (Token Improvement)
Rabbit, when improved via a token, gains bonus speed from Earth gear that is equipped onto it, along with bonus attack from all Earth gear…gems included.
Elephant’s Pachy-Burn
Elephant has an incendiary aura which triggers whenever it is struck in combat, which damages the hostile enemy over time for 3% of the enemy’s maximum Health for normal enemies, 1.5% for bosses. This is capped at a maximum of 5,000 Damage.
This aura deals damage every time the enemy has an action, not every turn. Please note that some enemies are immune to this ability.
Archer Twinshot
Archer has a twin shot ability, granting them a two target attack while they have a bow equipped on a certain chance, which finally reaches 100% at CL64.
This ability has the same potential limitation that MultiAttack has, where it can strike a dead target. It is much more rare.
Chameleon Elements
Once evolved, Chameleon counts as all elements at all times for events, but will still calculate damage and defense based on their current active element, which is changeable at will even if unevolved.
Holy ITRTG Book Index / Anything Goes
Once evolved, the Holy ITRTG Book (or just Book) and Anything (evolved form of Nothing) will count as all classes at all times for events, but still acts as its currently selected Class.
Clam GP Doubling
Clam will double the GP earned from any event it is alive for in the dungeon, evolved or not.
Vesuvius Growth Flow
Vesuvius will create additional growth when gaining it in a Dungeon, and will give that growth to the lowest total growth pet owned regardless of if they are in the Dungeon or not.
This additional growth starts at 50% of that gained by Vesuvius when unevolved (CL 0) and will reach a maximum of 200% at CL 75.
Succubus Drain
The Succubus will heal itself with every single target attack that it deals, for up to 1/3 of their Max Health at CL100.
Lucky Coin Gamble
The Lucky Coin, with every Attack and MultiAttack that lands, deals a random variable amount of damage; either 7, 77, 777, or 7777.
It also has the Rogue’s class ability to find additional loot natively, although it is increased by total damage done and not by CL.
Mimic Hunting
Mimic deals even more additional damage to enemy targets based on the number of Mimic points earned from killing Mimics. Harder difficulty Mimics are worth more points.
Cardboard Box Paradox
Cardboard Box has no special abilities until it evolves. Once evolved, it gains the ability to alter any event rewards with the exception of Treasure (Pet Stones or a Lucky Draw) and the Lava-Filled Corridor (extra rooms). It will, on a 50/50 chance, either steal a part of, or grant a bonus to, the reward from every event that triggered successfully in the dungeon run. This is only checked once, the result applies to every event.
The malus starts at 50% of the event reward and the bonus starts at 110% of the event reward. These can both be increased by gaining Class Levels, to a total of 85% and 145% respectively, the bonus reaching said maximum at CL50.
Approximate neutrality…when the average of malus and bonus is 100%…occurs at CL29 with 70.3% Malus and 130.3% bonus
This will stack with Clam for any GP, but Cardboard Box also applies to Experience, Pet Stones, Growth, etc. Just not Treasure or the extra rooms granted by Lava-Filled Corridor.
*Ape Super Form
Ape will use the first Action it has per room (after Token Improvement) to transform into a true Super Ape. This power-up will last for CL / 5 actions (maxing at 20 actions) and will give a CL% bonus to all stats (maxing at 100% stats). Once the Super Ape Transformation runs out, Ape is unable to transform again until the next room.
During this boost, Ape will also have a TwinAttack, letting it make two attacks in one action. We suggest giving it a set of Knives, and watch the Defense Shred happen.
This does NOT include Elements, just the main 4 stats.
Note: Extra actions not granted as Mage or Supporter.
Supreme Taco Flavorings
We all love tacos, and this one is an Alchemist that is able to gain CL in dungeons. It gets better.
The Supreme taco can wildly change the usefulness of the team it is in depending on its Elements. Whenever the abilities say CL, that bonus will cap at CL50 for the Supreme Taco, not the targeted pet. These abilities are:
- Fire – The Supreme Taco will target the pet with the highest attack.
That pet’s next hit will deal an additional (CL)% damage, and if the target is not a boss, it will also deal an additional (CL / 2)% of the target’s current health pool. This is specified as a hit, so if a Mage is targeted, only the first of the missiles will get the Fire buff, and not the other 2-7.
Again, that second half is ONLY for NON-BOSS targets.
- Water – The Supreme Taco will target the pet with the lowest remaining percentage of HP.
The next attack against that pet will also heal that pet for (CL * 2)% and if the pet dies this turn, it is instantly revived with (CL / 4)% of HP remaining.
The revive can only happen once per turn per pet.
- Earth – The Supreme Taco will target the pet with the lowest defense.
The next attack against that pet will be reduced by (CL / 2)% which is multiplicative with all other defensive bonuses. In addition, it will reflect (CL)% of the unmitigated damage to the enemy if they are not a boss.
Again, that second half is ONLY for NON-BOSS targets.
- Wind – The Supreme taco will target the pet with the highest speed.
For the next turn, the affected pet will have a (CL)% chance to deal (CL)% more damage with each hit when they use the Attack or MultiAttack option. This will apply to all hits within the Attacks and MultiAttacks that the pet performs on that next round.
Whatever Element is highest, that is the ability the Taco uses alongside each Attack action, so up to three times per turn. If two or more Elements are tied, then it is a random roll which one the Supreme Taco uses for that round. I suggest having one clear winner for the Elements.
Also note that the buffs that the Supreme Taco grants do not stack, so if the first target has the buff, it will select the next target and grant the buff to the next pet. This is most important for the Wind ability.
Another note is that the Mage’s MultiAttack counts as an all or nothing. The Fire ability will buff only the first HIT of the MultiAttack, but the Wind ability will grant the chance of bonus damage to each individual attack within it. Yes, this means that a CL100 Mage with 8 attacks will have 8 coin flips for the bonus damage granted by Wind…could be 8 buffs, could be 0. Fire, again, however, will only proc on the first HIT period.
Witch’s Water Control
The Witch is a masterful spellcaster, capable of controlling the very water around them.
This allows them to buff their team’s Water Element by CL% (max50%) and to nerf the enemy’s Water Element by the same percentage for her OWN attacks ONLY. If the enemy or any of her fellow teammates have a negative Water Element, that friend/foe is unaffected by the Water Control.
Salamander’s Healing Flames
Salamander has a healing ability that will heal all pets in the dungeon team before any items are used. This ability will reach its most potent at 1500 Fire Element, which is 15% healed for each pet in the team. This equates to the healing being the (Fire Element / 100) % and is also equivalent to a Healing Potion X every turn, for free.
This healing amount is also reduced based on the following:
- ⅛ (12.5%) of maximum if Salamander is V2
- ¼ (25%) of maximum if Salamander is V3
- ½ (50%) of maximum if Salamander is V4 or not evolved as a Supporter
This means that if Salamander had 1500 Fire Element…but was only V2…it would only heal each pet for 1.875% of their maximum HP each turn.
This heal will not prevent a Supporter Salamander from healing as appropriate for a Supporter for the remainder of the turn. It is theoretically possible for the Healing Flames to heal a pet above the Supporter triggers though, so keep an eye out on your logs for that.
Sylph’s Gale Burst
Sylph has two abilities which synergize and are being combined in one here
The first is that all Wind Element from gear and gems is given a multiplier of 150%. This applies to both positive and negative Wind Elements.
The second is that Sylph can, when evolved as a Mage, gain additional parts to their Multiattack. They can gain seven more magic missiles in this fashion, for a grand total of 15 attacks in one Multiattack from a completely maxed out Sylph.
One new attack within the MultiAttack will be given for each multiple of 450 Wind Element that Sylph has, again maxing at seven additional attacks at 3150 Wind Element.
Fool’s Bewilderment
Fool has a Confuse effect that can be applied once a turn when it strikes an enemy.
This uses the same rules as the Nothing unlock fight, the Fool unlock fight, and the Water Tower (??) enemies, and so is based on the attackers Element vs the defenders Element for success chance.
Carno Chomp
Carno has a token improvement that allows it to deal Pure damage (similar to Coin above) based on its Attack and Speed combined, and then increases more based on CL.
The formula for this is ((Attack + Speed) / 3 ) * ( ½ * ( 1 + ( CL / 50)).
Sphinx Tutoring
Sphinx does absolutely nothing for the dungeons themselves, and in fact is an Adventurer.
However, Sphinx grants up to 7.5% bonus XP for all dungeon experience, simply by existing, and so earned a spot here in the dungeon guide.
This bonus is split in half, with 3.75% coming from CL (maxing at CL 75) and the other 3.75% coming from the pet’s growth, maxing at 750k growth. The gains are linear for both.
Alien Bizarre Event
Alien multiplies the chance of a dungeon event by [1 + (0.5 * CL)]% which maxed at 25% at CL50. This means that if an event used to have a 10% chance, with Alien in that dungeon team it now has a 12.5% chance.
FlyingEyeball Marking
FlyingEyeball is the only Adventurer that can gain CL in dungeons. It also has a bonus to gaining DL experience, provided it is not currently holding any XPSword or Gram.
FlyingEyeball will, on its own initiative, place a mark on the enemy with the least amount of Max HP. This Mark will increase damage the enemy takes by 10% unevolved, and if evolved as an Adventurer, by 10+(0.25*CL)%, maxing at 35% at CL 100. The Mark will also force your own team to focus fire on the Marked enemy until it is dead. Once killed, the player team will continue to fight and attack as normal, and FlyingEyeball will set a new Mark as soon as it can.
Yes, this means Mages will launch all attacks at the Marked target as well.
It is currently unknown how this interacts with Ghost Scream and how that ability increases odds of targeting a scared enemy.
AncientBasilisk Toxic Blast
The Ancient Basilisk attacks once per room, dealing (150% + 1.5% * CL) damage. This poisonous blast also melts away 10% of the enemy elements.
At this point the Ancient Basilisk feels the job is done, and will sit and just glare around the room…every turn, however, the enemies take a damage tick of (50% + 1.5% * CL) and will lose another 0.8% of their elements. This stacks with T4 knives.
The Basilisk will deal a minimum of 6 damage to CosmicGnomes in D4; if your normal attack would deal more than that, it will deal that instead.
It is not advised to use this pet against those that reflect damage…it will die. Horribly.
Leviathan Counterattack
Leviathan counter attacks, using standard damage formula but substituting a % of it’s max HP for Attack in the formula. It also has a bonus 2000 Water Element to start with.
Tödlicher Löffel’s Spoons of Pain
This vicious pet allows each of its hits to act like it is wielding a T4 knife, shredding both Defense and Elements from the target. This works regardless of evolution state or evolved class.
Once evolved into a Mage, all of the multi hits from this pet will add up to one T4 knife hit; eight magic missiles means each hit is ⅛ of a T4 knife hit.
This pet also counts as every element, EXCEPT for its own (Neutral) in dungeons. This means it qualifies as a wind pet for the Floating Shrine event, but not as neutral pet for the Portal Form Beyond event.
Jellyfish Bubbles
Yeah the base form is MistSphere, but it is a pretty Jellyfish later. So.
The Jellyfish is a pacifist, it can not attack at all. Instead it always heals on each action it has.
But it doesn’t have a flat portion of the Heal, as all other supporters do. It only has the % portion. Instead, Jellyfish places a bubble shield equal to (40 + 0.25 * CL)% of the original flat heal on not only the target of its heal, but on two other pets as well.
These bubbles do not stack with the Gnome Bulwark, and whichever is larger is the one that is kept.
Sniper Headshot
Sniper lays in wait for their target. The moment comes, it squeezes the trigger, and BANG!
Sniper will only ever act once and it will always act last in initiative order. Each attack, however, will be tripled in damage for both the main attack and the speed damage portions.
Sniper works well with its partner, Flying Eyeball, and will deal an extra 25% damage to any target with an active Mark on it.
Sniper also has a changed stat spread for DLs…it loses (additively) 10% from HP, Defense, and Speed stats and gains 30% more Attack.
So if the usual distribution is 120% for each stat, Hourglass would gain 110% for HP, Defense, and Speed, and then 150% Attack.
- Shadow Clone – Can gain CL in dungeons, can create shadow clones based on DL and CL similar to fake CC from OCCC.
- Black Tortoise – Token Imp – Reduces enemy speed based on BlackTortoise’s Defense rating. Caps at 30% of enemy (If they started with 100, they will cap at 70)
- White Tiger – Token Imp – Stacking damage bonus from killing blows, and executes enemies based on CL. Executes instantly kill the target if they are under a certain % of maximum health. Execute check is after White Tiger deals damage (confirmed by Ryu 02OCT23)
- Azure Dragon – Token Imp – Adds a pseudo heal over time to it’s heals. The original heal is split, only healing 70% now, but the next time that pet is hit, it will heal another 40%. Doesn’t stack.
- Vermilion Pheasant – Token Imp – Boosts speed damage dealt by the entire team based on CL.
- Vampire – Double dungeon stats as Alchemist, can gain CL in dungeons, killing blows give blood, 6 blood 1 sun stone let Vampire craft a growth pontoon for 100 base growth. Vampire can drink 10 potions per DL.
Advanced Strategy Notes!
Making GP in Dungeons!
GP is really nice and easy to farm up in Dungeons. SY D1 and Volcano D2 both have a good event that gives a decent amount of GP, and Volcano has a room-extending event for more GP chances.
Water Temple has a nice small event that is in both D1 and in D3 for a smaller amount of GP.
Mountain has an event that, alongside the Growth it grants, also gives a wide range of GP.
The Clam pet, mentioned above, will also double any GP found in the dungeon where it was sent.
If you feel lucky, the Lucky Draw events can potentially grant you a significant amount of GP. Or crafting materials. Gambling!
Gearing Up Is Good!
Any gear is better than no gear provided it is the correct gear choice itself. It is a poor choice to equip a Dragon Mage with nothing but Air element gear, after all, because it would bring its Fire element down into the negatives, which as we saw above, will significantly harm Dragon’s damage output.
So picking the right gear for the pet is important. Note that those notes are not optimal for lower depths, and are specifically intended for hunting Mimics in D3, and using the strategy that Nooby employs. It can be harmful to your progression to use that resource without understanding it.
There is no real need to purposefully make T1 dungeon gear better than B+5, or T2 to be over S+10. Making T3 S+10 is a nominal amount of T3 materials, so start there once you have the materials.
Here is another mini-guide, specifically for lower depths (D1 and D2). Think of it as a starting point and not as the definite answer to all your gear problems, as gearing changes later on for mimics etc.
If you want to avoid having to re-craft gear when mimics time comes, you can check below what gear you will need for them and avoid crafting items you won’t use later.
Lowbie Gearing TLDR
- Build your Hammer first! Recommended is a T2 SSS+20. Don’t make it a T3 right away, you will potentially lose bonuses that way.
- Supports: Fire Sword and accessory
- Mage: Either a case-by-case, or gear similar to a support
- Defenders: All neutral gear
- Rogue/Assassin/Blacksmith: Knives and fire accessory
- Armor: Either match element to dungeon, or do off element of the pet (to even out elements)
- Gems: Defender 3x Water, all else is Fire/Water/Neutral
- Sometimes you can wind gem Rogue/Assassin weapons, but this is usually later
- Usually avoid Wind/Wood Weapon and Accessory unless you know what you are doing.
Fully Equip Your Team First, then Focus On:
- T1 gear to B+5.
- Upgrade all gear to T2
- T2 gear to S+10
- Add lvl 10 gems (can do earlier, but usually unnecessary)
- Upgrade all gear to T3
- T3 gear to SSS+20, enchant to (20)
Some Brief Notions About D3 Mimic Gearing:
Mimics are neutral enemies, so you will naturally want to avoid having any negative elements when fighting them. To achieve this, the best way is to make use of Enchanting (refer to Enchanting section for more info about it).
The gearing method suggested below assumes that all gear is T3 SSS+20(20).
- Defenders: full neutral gear. Gems: 3x water OR 1x earth + 2x water.
- Mages: counter element weapon / own element armor / cape. Gems: Fire/Water/Neutral
Example: Dragon – Tsunami Spear / Inferno Armor / Cape
- Gems: Everyone gets a Fire/Water/Neutral for easy gear swapping, except rogues that get a Wind gem on the weapon instead. You can also add a Wind gem to Supports’ weapons if overhealing is an issue for you.
All other pets will be geared by Element instead of by Class:
- Water: Knives/Fire/Wood OR Knives/Wood/Fire
- Fire: Knives/Wood/Water OR Knives/Water/Wood
- Wind: Knives/Fire/Cape
- Earth: Knives/Fire/Water OR Knives/Water/Fire
Note that wearing Fire Gloves instead of a Fire Armor for the setups with two options will result in higher offense but lower defense. The recommended option would be the more defensive one, using a fire armor and either a wood or water accessory, but feel free to experiment.
Leveling Up Is Even Better!
The most powerful part of your Dungeon teams will almost always be their DL. The DL determines the base stats, which are then adjusted by gear, gems, classes, events, more I am missing here…basically everything else hinges upon the DL of your pets.
So how do we get precious DL with reasonable ease? Just continue to do the Dungeons and over time, the DL will increase? Absolutely.
Or…you have one team in a higher Depth, let’s say it is Mountain at D3. Mountain has four or five slots taken already: Two Defenders, a Mage, a Supporter, and a Rogue. Rogue is optional, but we like materials, so let’s just pretend it isn’t. That is one slot for whatever pet will help us push the most in the dungeon…or for a pet that can help push somewhere ELSE soon.
By placing a lower DL pet in that deeper dungeon, it will greatly increase the amount of experience they earn, at the cost of some potions and phoenix feathers. Then, this newly empowered pet can be moved to a dungeon that better suits it.
Just be sure to gear that weaker pet for survival, to limit the amount of consumables used. They won’t be doing damage here anyway, they are getting carried.
In addition, as mentioned above, you can use an XPSword, of the highest possible Quality and Upgrade that you can stand, and then even if dead that pet will suck the experience into itself. If you want it to live, give it a spare set of tanking gear…Neutral is usually the best…to make sure it can gain its own experience as well.
What’s a Log / Simulation?
After your dungeons, there is a breakdown of room by room, what happened. Export them, read them, love them. They are a better gauge for how your teams are doing than a spreadsheet.
At a glance, we’ll say your entire team died from a combined, ultimate attack in Room 24. Looking over that room, we see that three summoning enemies and two healing enemies were spawned alongside a fast damage dealer. Since that fail condition is only if the enemies are too numerous, the reason for the deaths are more than likely a lack of damage combined with bad RNG.
But in reading through the log, we see Rabbit getting the snot knocked out of it by a specific enemy and not the others. Maybe we should see what the issue is with that monster’s stats, and see about fixing Rabbit up. Could be a Defense issue, could be an Elemental issue.
Maybe you notice that your Penguin Assassin just isn’t pulling the damage your Shark Assassin is. You would know to check the gear, or maybe bench it in that team and pull in a stronger damage dealer.
Maybe you are wondering why your pets are dying at the strangest intervals, and see that your supporter just…isn’t healing all that often (due to the conditions above in Actions!) for whatever reason. That is fixable!
Another great reason to read the logs is when there is a special boss summoned. It is good to see how its abilities are wreaking havoc, or if it is not those abilities, but just raw stats causing the issues.
Another good rule of thumb is watching your Phoenix Feather usage and how many turns it takes to beat a Depth Boss…I refer to it as the Feather Test.
- Low feathers and low turns taken? Probably time to move up a difficulty.
- High feathers and low turns taken? You have a Glass Cannon situation.
- No feathers and very high turns taken? You need to stop living and hurt them already.
This can also be combined with watching Potion usage, because if the pets are dying before they can even take a sip of that refreshing and restorative draught, then that is another tissue found, and is fixable.
Hard at first, but practice makes it easy to follow.
You can now simulate running a dungeon, this ignores special bosses, but you can see if you have any issues otherwise, and it SHOULD generate a log to review as well. Treat it like an in game log, you’ll be fine.
Overhealing and You!
As seen above in Actions!, If the Supporter is going to overheal, then it simply won’t heal any pet at or above 61% health. This means for maximum survival and Supporter healing, one of two things need to be true.
Either (A) the health of the pets must be high enough that 60% of their life is not a danger zone for being killed or (B) the attack power of the Supporter needs to be low enough that it can heal smaller percentages of the health pools in question.
The CL of Supporters directly impacts the heal being given, in two ways:
- There is a heal based on the target’s Max HP that goes up to 20% at CL20 for non-Specialists, and 20% * SpecialistBonus for the…well specialists.
- There is also a static section, which increases by 10% every CL, and is based on the Supporter’s Attack stat. 5 + (Attack * 0.1CL) is the formula.
The crux of the situation is that Supporters ultimately, when their CL is high enough, often don’t need all that extra attack that they are given at lower CL because the percentage heal can be so much more significant than the static amount given by Attack.
Overhealing…will in all likelihood kill your pets. Using Phoenix Feathers is fine, but using them when they are not needed is just wasteful.


Be the first to comment