
Contents
Before We Start
By Trey!
The strategies laid out in this guide are found to be successful most of the time, based on firsthand accounts by other players. Team and equipment loadouts will be given as examples. Please feel free to play around and find your own strategies.
Chameleon
What is it?
Chameleon is a special boss fought as part of the Chameleon pet quest. The boss comes in five variants, one for each dungeon (not counting Newbie Grounds). Defeating all five versions of Chameleon will unlock the Chameleon pet. This boss is one of the easiest on the list, but it can also prove to be a challenge depending on the Element. Early on you won’t have very many Neutral Element pets, making the Scrapyard Chameleon more difficult than the others. The approximate difficulty of Chameleon is around a D2-2 or D2-3 normal boss.
Where can I find it?
Chameleon will replace the normal Depth 2 boss fought in room 16, but only if you have a Pet in the team and a Tier 3 material of the same element as the dungeon. Bring a Water pet and Magic Ice to the Water Temple, a Fire pet and Magic Fire Stone to the Volcano, etc. As long as you have this, Chameleon will replace the normal D2 boss. You need to defeat Chameleon in each of the main dungeons in order to unlock the pet.
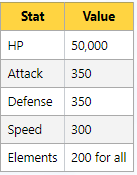
The main stats for each boss do not change, but the Element stats will change to reflect the version you encounter. The Element of Chameleon changes depending on what dungeon you fight it in. Volcano = Fire Chameleon, Mountain = Wind Chameleon, etc. Stats do not change based on difficulty.

The main Element of Chameleon (the respective dungeon you fight them in) is 250, where all other Elements are 50. Scrapyard Chameleon is the exception, since it is Neutral Element, and has 120 in all Elements.
As long as you are early-to-mid Depth 2, you should have little trouble with this boss. Do your best to win the rock-paper-scissors Element game with the boss.
- Water Temple: Bring earth/water pets.
- Volcano: Bring water/fire pets.
- Mountain: Bring fire/wind pets.
- Forest: Bring wind/earth pets.
Scrapyard is a bit different, which is touched on in a moment.
Chameleon has the special ability to “drain” HP from your pets and heal it back to itself. This effect is very minimal however, and the battle is only a slightly harder version of a normal Depth 2 Difficulty 2/3 boss fight you are used to. Scrapyard Chameleon can be a bit stronger compared to the others, since you will most likely not have very many Neutral pets at this time.
Chameleon-Scrapyard:
Bring Neutral pets (Cat, Dog, Ghost if you have it unlocked) along with your pets that have the lowest Elemental weaknesses (preferably all positive elements if you can smoothly manage it) and best overall stats. Although I wouldn’t advise investing in Alchemist Capes quite yet, unless you already have a couple for your Alchemists, the Capes can serve well in this boss fight since they increase all Elements and have decent overall stats.
Super Rogue Shadow Clone – SRSC
What is it?
Super Rogue Shadow Clone, or the SRSC, is fought as part of the Undine pet quest. It drops the necessary material Magic Shadow Essence used to finish upgrading Undine. Seeing a theme here with pet quests and special bosses?
Where can I find it?
SRSC replaces the Newbie Grounds boss as long as you have a Shadow Essence item with your dungeon team. How do you get a Shadow Essence? I advise you take a look at the Undine quest on the wiki for more in-depth info, but basically you…
- Bring Undine to the Newbie Grounds and fight the boss to get Shadow Essence (1 drops each fight, no more no less).
- Bring Shadow Essence with your dungeon party to the Newbie Grounds to fight SRSC.
The wiki page is linked below with more in-depth info. The main reason for fighting SRSC is to gather Magic Shadow Essence (not to be confused with the non-magical variant) which is used in upgrading Undine. This item has a base drop rate of 50% which can be increased just like any other drops. This means Rogues, Lucky Talismans, Lucky Coin, etc. all work.
Note: To fight SRSC you do not need to bring Undine with you to the fight. Undine’s special ability does not work in the boss room, so it may even prove to be a detriment to bring her. You only need the Shadow Essence in your dungeon party items.
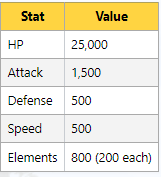
SRSC can prove to be a bit challenging for some players, since it is quite a bit stronger than Chameleon. Even though it is in the Newbie Grounds, it is about as powerful as the Scrapyard D2-5 boss.
By the time you fight SRSC, you should be comfortable fighting mid Depth 2 bosses. If your team can kill D2-5 or higher bosses without using too many items, you should be fine fighting SRSC. The same notes regarding Scrapyard Chameleon apply, since SRSC is a Neutral Element boss, but remember it is stronger. Bring your strongest Neutral pets and/or pets that have a low Element weakness.
Team Suggestion:
1 Defender, 1 Supporter, 2 Mages or Assassins (whoever deals more damage), and 2 Rogues. The last slot can be filled by a rogue, to help increase the drop rate of Magic Shadow Essence. If you are struggling to kill SRSC with a rogue, you can swap in another supporter or another DPS-class like mage or assassin. (Use a supporter if you’re failing to beat the boss and using a lot of potions/feathers. Use a DPS pet if the fight is dragging on more than 15-20 turns and you’re dying. Make sure to read your logs, they’re your friend).
Delirious Essence of the Forgotten – Aether Boss
What is it?
Wow. Now that’s a name. If this name doesn’t strike fear in the hearts of all who dare to challenge this fearsome — oh.
It’s dead? Already? But that was only turn 1. Don’t worry, it gets tougher. The purpose of this boss is to both unlock, and upgrade, the Aether pet.
Where can I find it?
Delirious Essence will appear by default as the boss of Newbie Grounds provided you have the Aether Ring item included with your team as a dungeon item, which is an item dropped from your first defeat of the normal Shadow Clone boss.. The number in the ring’s name indicates how many times you defeated Delirious Essence, Aether Ring+n.
This guide will only discuss the boss’s stats and potential strategies. One thing to keep in mind, however, is that doing the fights early-early as a newbie can drastically increase the amount of time needed to evolve it later. That said…
The first 10 fights can be done with pets with levels in the mid 40s. Be sure to bring along potions and phoenix feathers. No other items are necessary (outside of the Aether Ring).
For the mid-fights (11-25) you will need evolved pets in the low-to-mid DL 100s. Delirious Essence is a Neutral enemy and so will attack your pets’ weakest Element. For this reason, it is vital that you gear your pets with items that increase your Elements above 0. Bring along the strongest healing potions you can, and plenty of phoenix feathers. Don’t worry about any Lucky Talismans, as Essence has no drops. Just treat fight 25 as a half power +0 Mimic, and you will be fine. Probably. Just remember, that isn’t even its final form.
Delirious Essence has a special ability to deal unmitigated damage when it attacks, equal to an additional X% damage per attack where X is the current fight number you are on. So for example if you are on fight 10, Essence will deal an additional 10% damage per attack that bypasses your pet’s defense and the Supporter damage reduction aura. This extra damage shows up in the logs as “extra” after the initial damage, but before speed damage, similar to Carno’s token improvement.
Note: Elephant’s burn effect does not work against Delirious Essence.
Since each fight is harder, it is difficult to give a definitive team build. However, the following pets/classes will make the fights much easier as you get into the later ones (25+)
- Defender 1 (Neutral Element)
- Defender 2 (Another Neutral Element highly recommended)
- Mage or Assassin
- Supporter 1
- Hourglass
- Free Space. Bring along another DPS class, or a third Supporter.
Important Equipment:
- T3 Knives
- Alchemist Capes and Rune Patch
- Titanium/Mythril gear
- Neutral and Water gems
- More Knives! No, seriously. This guy has a lot of defense.
- In fact, T4 Knives, to cut those Elements down too.
Thankfully it only takes around 1h to reach this boss with NRDCs completed, so you can play around with equipment and strategies without sinking too much time.
Nothing aka Redacted
We are officially entering spoiler territory with this boss. Feel free to skip ahead to the next boss, Mimic, if you want to discover all the secrets of the game on your own. Ctrl+F the phrase “end of spoiler” to skip ahead.
This is your last warning. Everyone gone? I see you in the back. Go on.
Alright, cool.
Now then, nobody sees ANYTHING.
What is it?
Nothing is a hidden boss that unlocks a hidden pet. As you can see, the Nothing pet is not in your list of pets until you fight this boss and defeat it. Encountering the boss is a task itself, forcing you to read obscure parts of the in-game FAQ to get hints. This guide will give you a brief run-down of 1) Where to find it, and 2) How to then evolve the Nothing pet.
Where can I find it?
Nothing is found in Depth 2 Scrapyard. In order to unlock it, a series of puzzles must be solved. To avoid spoiling too much, please check out the comprehensive guide posted on the wiki detailing just how to unlock and evolve the Nothing pet.
The first time you fight Nothing, with your normal pets, is just…so much easier than the second fight. The first fight can be done with pets in the low 100s with T2 S+10 gear. Treat this boss similar to Scrapyard Chameleon, or Delirious Essence, because you want to bring along your Neutral pets for this fight. Should notice a theme here…however…
Nothing likes to confuse your pets. Confusion causes your pets to attack each other, and heal Nothing if they’re a Supporter, for two actions. Mages particularly are fun, because they will launch their full compliment at your own pets. It’s a good idea to bring along potions, instead of bringing Supporters, in the instance your Supporter is confused and begins healing Nothing. Defenders though will still Protect your pets even while confused, and so they can make an excellent shield to protect the squishies in the back, even if they can’t remember why.
You can defend against confusion by increasing your total Elements. Each pet has a chance to defend, at a rate of (((attacker elements/2) / defender elements) – 0.3)*100%. Your pets are the defenders in this scenario, with Nothing being the attacker. Add up all four Elements of your pet to get the defender elements variable. Nothing’s total Elements, attacker elements, are 800. It is recommended for the first fight to have your pet’s Elements higher than Nothing’s. You can still be confused, but at a lower chance rate.
Also, Nothing likes to heal itself. Probably won’t notice much of that in Fight 1 but for Fight 2 it will be your absolute nemesis.
Fight 1 Team:
- Dog – Neutral Defender = good
- 2nd Defender (Elephant) – Its passive burn status effect does wonders on Nothing’s HP
- Assassin – Any assassin will do, just be sure it has good Elements from things like enchanting and Alchemist Capes.
- Mage – Dragon, or your strongest mage.
- Other DPS – Any other high DPS mage or assassin. Be sure you’re gearing with total Elements in mind.
- Other – Second assassin or another Mage. A Supporter can help, but be sure it has >900 total Elements to minimize the chance it becomes confused.
Fight 2: Remember the first fight? This time, the only pet allowed is Nothing. It is a really good idea to rename your Nothing pet to something unique for this fight for the log afterwards. As a minimum, it is suggested to have your Nothing pet to be ~30k growth and ~150 DL. You can do it at lower growth with a higher DL, or vice versa. I chose the hard route, and beat this fight with only 10k growth, but 210 DL. If you can fight Mimics (which we cover next) you can increase your leveling speed even more.
Your Equipment is pretty important as well. You will need a set of good T3 Knives, to shred the defense down and make sure your Nothing can out damage the other Nothing’s self healing. Then, to maximize damage, raising both Attack and one Element will help. For these, the typical choice is Inferno Armor and Inferno Gloves. Hopefully, once geared up, your pet has over 500 Speed for more actions, and enough Attack to stab it down. If not, verify in the log, and reassess what you need, gem-wise.
Play around with it, and try not to get impatient. This fight can be quite tough and usually takes a couple attempts.
Mimics
What is it?
Mimic is less of a special boss, and more of a special enemy. Nonetheless, it should still be talked about due to its nature. Mimic is a tough enemy that will randomly spawn in Depth 3 dungeons if you bring along the “nothing” item with you. Every time one spawns, you lose one nothing item.
Where can I find it?
Mimic is able to spawn in any of the five main dungeons, in any of the Depth 3 rooms. As long as you bring along a nothing, one single lone Mimic will have a 10% chance to spawn instead of one of the usual enemies outside of a boss room. This will consume a nothing every time, whether you win or lose, and you can encounter as many Mimics in a dungeon run as you have D3 rooms and nothings and luck.
Mimic is the first, and only, enemy on this list with stats that scale with the Difficulty of the dungeon. This is, however, to your advantage. Mimic gives a lot of XP so you should start farming it as soon as possible. Something to note, however, is that the XP a Mimic gives does NOT scale at all. A good rule of thumb is to drop your Difficulty setting by 2 or 3 when fighting Mimics in order to give yourself a fighting chance. For example, if you are running D3-5 confidently, drop down to D3-3 or even D3-2 when fighting Mimics. The only two downsides are that you may not have enough Alchemists/Blacksmiths to keep up nothing production if you start farming too early, and that the materials dropped will be lower than that from the higher Difficulties. Like everything in life, farm Mimics in moderation until you can keep your stockpile of nothing in the positives.
Now, don’t just jump into Mimic fighting at the first opportunity. They’re being written about in this guide for a reason — they’re tough. These things can easily wipe out your team if you’re not fully prepared. Mimics are a Neutral enemy, which we’ve learned can cause quite a bit of trouble. It is vital that you have all of your pet’s Elements > 0 when fighting Mimics, preferably a value of 30 or more.
This can be achieved with Neutral gems, enchanting your equipment, using Alchemist Capes, and mix-and-matching your equipment. For example, please don’t give your Dragon three pieces of fire equipment, since even fully enchanted, it will have a negative to Water. Instead, consider tossing a tsunami spear on there to counteract the inherent Water Element deficiency.
Long-term, it is a good idea to gear your pets with zero Elemental deficiencies. Most of the game’s toughest bosses are Neutral Element, and the gear you use to fight Mimics will typically work on them as well.
The key to winning Mimic battles is to outlast them and chip away at their health. This does imply that damage is less important…and that is correct. This is why you bring Knives to a Mimic fight.
Note: It is important to know that Mimics do not count as bosses. Undine and Elephant’s special abilities (Water Spears and Burn) work normally against Mimics.
You have three reasons to farm Mimic.
- The XP. Mimics give a large amount of experience for our effort. The chart below, made by the user Gallant Goblin, details the difference of running dungeons with and without Mimics. As we see, a D3-7 dungeon without Mimics gives the same experience as doing a D3-0 with Mimics. So, yes, Mimics give a lot of XP. This XP, again, does NOT increase with Difficulty as everything else does. It will be increased as normal by events though, such as Landslide.
- Mimics give Mimic Points. For each Mimic you kill, you will get points corresponding to the Difficulty of the dungeon you killed the Mimic in. Running a Difficulty 5 dungeon? You will get 5 points for every Mimic killed in that dungeon. Likewise, fighting a Mimic in a Diff 0 dungeon will give you 0 points, so please don’t do this. Points are used to both unlock, evolve, and boost the Treasure/Mimic pet’s damage output. The more points you get, the harder your pet will attack.
- Mimics drop a useful item, shiny stone, that weakens another superboss that we will talk about next (Evolved Balrog). This has a 25% chance of dropping, and is increased by Rogues and Lucky Talismans.

Ancient Mimics
Depth 4 dungeons have Ancient Mimics, which can only be encountered by bringing the Not Nothing item with your party. Rather than being high-stat neutral brutes, Ancient Mimics come in 5 elemental varieties, one for each dungeon.
They have the same spawn rate of 10% as normal Mimics, and are only encountered in Depth 4 rooms. They drop Shinier Stones (currently no use), Ancient Mimic Points (also currently no use) and give large amounts of XP. Every turn, Ancient Mimics have a damaging aura that will hurt all pets for defense-bypassing damage that gets stronger the higher the Difficulty. Due to their strength, it is advised to run D4 dungeons without Ancient Mimics until you are in the higher Difficulties.
Evolved Balrog
What is it?
Evolved Balrog is a tougher (much tougher) version of the Depth 3 Volcano boss, Balrog. It is used to both evolve, and boost, the Balrog pet unlocked by defeating P.Baal v88. Evolved Balrog (I’m just going to call it Evo Balrog) comes in two separate forms. One form for the first time you fight it, and another for each subsequent time you fight it after beating it once.
Where can I find it?
Evo Balrog replaces the regular Depth 3 Balrog bosses in the Volcano, as long as you bring along the Balrog pet and are on Difficulty 10. It doesn’t require you to bring any special items, however there are certain items you can bring that will make the fight much easier.
Evo Balrog comes in two forms, but the fight itself is nearly identical. First, let’s discuss the differences between the forms before we get into strategies on beating them.
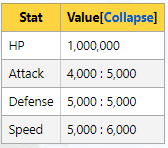
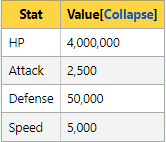
Form 1 Evo Balrog is fought every time you encounter the boss until you are able to defeat it. Form 1 has a very unique feature that distinguishes itself from Form 2. It retains HP between encounters. What does this mean? Say you fight it once, and deal 5,000 damage before all your pets die. When you go back in to fight it again, it will start with 5,000 less HP than normal. “Well, this sounds great!” I hear you saying. The reason this feature exists is because Form 1 Evo Balrog has a whopping 1,000,000 HP. Yeah…
Form 1:
As I said, Evo Balrog Form 1 has a lot of health. Because its health doesn’t restore between instances, you can fight it as many times as it takes to kill it. Just be sure to check your logs to make sure you are actually dealing damage in the first place, because this boss is an absolute beast. It has very high Elements, making it resistant to almost all types of attacks. It is weaker against Wind, however…
Form 2:
After killing Evo Balrog once, its health will drop down to only 200k. This comes with a trade-off, as it will now behave like a normal enemy and reset its HP to default if you lose.
Regardless if you’re fighting Form 1, or farming Form 2 for Balrog Horns, some things remain constant. Evo Balrog has a very high Fire Element, so be ready to bring a team of mostly Fire pets. Bringing along a Shiny Stone and Magic Ore will weaken Evo Balrog, with the Shiny Stone also reducing its chance to use its multi-target attack. Having the Wizard pet in your team will also help with the fight, as it removes Evo Balrog’s ability to heal itself, but is not necessary with enough damage being dealt. Be sure to gear Wizard defensively, since a wind pet vs Balrog is not going to turn out very well.
Because Balrog only has a small chance to drop a Horn, it is a good idea to have a couple Rogues or Lucky Talismans if you are able to boost the drop rate. The Horn’s benefits have diminishing returns past 900, but that already is enough to double your Balrog’s health, resulting in a nice and tanky pet. You can see the total HP increase on your pet Balrog’s tooltip.
Horn drop rate math: 25% is base drop chance, with pet stone upgrade 37.5%, with wise talismans 56.25%, with 10% from chp 61.875%. To get 4 horns per run you would need about 650% drop boost from rogues. This can also be influenced by the “Timeline Manipulation” SpaceDim element.
Team Suggestions:
The team you use will be different depending on if you’re trying to maximize farming Balrog Horns or not. If you are farming, you want to bring along as many Rogues as possible, which can in turn bring down the amount of damage you are able to deal/take. You will need very high DLs in order to farm Evo Balrog with several Rogues. The team below is a safe setup, which can be used if your DLs are too low to farm or if you’re just going for that first kill to evolve your pet Balrog.
- Elephant – Burn deals crazy damage, very useful for Fight 1. Full neutral gear and Earth/Water gems
- Assassin – preferably Fire or Neutral pet for better defense.
- Firefox/Book/Nothing – useful for Blacksmith event. If using Book/Nothing, consider Rogue for more Horn drops or Supporter for better survival.
- Balrog – can evolve to Rogue for more Horn drops
- Supporter – Fire pet
- Mage – (Wizard if you are unable to beat without)
Bringing along Firefox is very useful, since Evo Balrog hits like a truck and has a very high Fire Element. This will also allow you to get the Blacksmith event that is in Volcano. Alternatively, bring either an evolved Book or Nothing in order to pass the event while also having a pet slot free for an additional damage-dealer or healer.
You can slowly trade out some of the pets for Rogues as you get stronger, such as one of your Supporters (if doubled-up on this class) or even your Assassin if you have a strong Mage.
This team is very flexible, and changes as you get stronger. The good thing is, this is totally optional. You can farm as much or as little as you want, but the bonus to your pet Balrog’s HP is very noticeable. Having enough Horns can let you gear your Balrog more offensively in dungeons and give you a nice boost to HP for UBv4 fights.
Patreon Bosses
This is the real reason many of you came to this guide. You’re looking for the toughest bosses this game has to offer. Well, you came to the right place. These bosses all have a very unique way of fighting, each of them having a gimmick you have to learn and counter in order to achieve victory. You unlock these bosses by gathering Runestones, dropped by P.Baal v30 after you have killed your first Mimic. You get 1 Runestone for each time you kill v30, so it will take multiple rebirths to collect all of them. The max number of Runestone you can have is equal to the current number of Patreon Bosses that are in game (more are added as Patreons come.) These can only be obtained once and are not used up.
Each Patreon boss is designed with the help of a Lord of Gods or God of Overlords tier patron.
Spoilers Ahead!
Each of the Patreon Bosses have a unique feature/gimmick that is both fun, and frustrating, to figure out and work around. If you wish to figure this out for yourself, I’d say stop reading now and go throw your team at these superbosses to see what sticks.
Wolf of Nobina
Bring 1 Runestone to the Newbie Grounds and the Wolf of Nobina will replace the regular dungeon boss.
Nobina is a very powerful boss, if only for its excessive speed stat and dodge mechanic. The chance Nobina dodges one of your attacks is:
- (1 – (PetSpeed / NobinaSpeed))%
With Nobina having a base speed stat of 5,000 you’re going to need to gear around this if you even want a chance of hitting her. Including Hourglass in your team will also give you a decent boost, since it both increases your own speed, while lowering Nobina’s speed. If you can, powerlevel Hourglass to CL 50 to maximize this effect.
Nobina can poison you, similar to the Poison trap you can find in some dungeons. Just make sure your Supporters can keep up with healing, or pack enough antidotes, and it shouldn’t be an issue.
To stand a chance, your team should be at least DL 160-170, higher for your DPS pets. Speed gems, and equipment that boosts speed, is highly recommended. The demand for speed equipment is lessened with higher DL and growth.
Elephant is a strong pet here simply for its Burn effect. It may be hard for you to hit Nobina as much as you’d like, but having a constant stream of passive damage from Elephant will really speed this battle up. Elephant only works if you have 2+ Supporters on your team, or else the Burn will be reflected onto your own pets.
Hourglass of CL50+ is almost a must here, to aid with mitigating speed damage from Nobina and boosting your own chance to hit the boss. If you are bringing Hourglass, be sure to include a second Supporter for the damage reduction.
After bringing Nobina down to 20% HP (200k), she goes berserk. Her element changes from Wind to Neutral, and she gains a 1,000 point buff to both Attack and Speed (as represented by the numbers after the colon in the table below). As long as you have the burn from Elephant, and Hourglass on your team, you will hardly notice a change in pace due to this buff. Just be sure your second Supporter is close to CL50 to help mitigate the extra damage caused by this buff.
Winning this fight will award you the Gram weapon, which starts at SSS+20(20) and gives a 20% bonus to XP for the equipping pet. It behaves similarly to an Ego Sword where it steals XP from other pets in your team, although it does not generate XP outside of dungeons.
PS: Nobina gives quite a bit of XP (15,000 before any increases from Spacedim, talismans, etc) and can be used for farming. Since it only takes 6 rooms to face Nobina, you are able to earn more XP/hour than you would farming Mimics as those are both chance-based and take several hours to even reach.
Wisps
Bring 2 Runestones to the Newbie Grounds after defeating Wolf of Nobina, and the Wisps will replace the regular dungeon boss. As a special condition, you can only have 5 pets in your team for this battle to occur.
This fight is very unique. Instead of dealing damage to a boss, you will be required to heal an ally that joins your team. The Fawn joins your team as a temporary 6th pet and needs to be healed a total of 4 million HP to win the battle.
The entire time, enemy Wisps will be attacking your team in an attempt to stop you from healing Fawn. The Wisps deal a lot of damage, so make sure your Defenders are equipped with earth gems and maxed T3 or better gear. Your Supporters are the key players here, but they have a debuff: the percent-based portion of their healing is disabled. If you look at your Supporter’s tooltip on the “Dungeon” tab you can see how much you heal without the percent-based portion.
Stats are listed below, but are mostly irrelevant except for Attack and Speed since you do not need to kill the Wisps.
A good team setup is 2 Defenders (preferably Neutral, and with high defense) and 3 Supporters. If you have Hourglass, its Speed buff is very useful to ensure all your Supporters have 1500 speed. Load your Supporters up with Attack boosting gear and gems, to heal Fawn as quickly as possible.
Winning this fight will upgrade Gram to SSS+22(22) and increase the XP bonus to 22%
Zombie General
Bring 3 Runestones to the Newbie Grounds after defeating the Wisps, and Zombie General will replace the regular dungeon boss.
The boss starts with a shield that can only be broken by Adventurers. Having 2 in your team should be enough to shred the shield and allow your normal pets to do damage. Thankfully, if you have the other 4 slots filled with strong damage-dealers, you only need to have the Adventurers around DL 100. Class Change Book, Nothing, or Grayling to Adventurer for free since those pets will most likely be at a high DL if you’ve been using them in dungeons.
Multi-targeting attacks are very useful against Zombie General and the mobs he spawns, so use Mages as your main damage dealers for this battle. Depending on your team, you may need one or two Supporters. If you can survive with just one Supporter, replace the second Supporter with a strong Assassin like Archer or Mimic.
Because of a strong defense buff that the Zombie has, equipping your Adventurers with knives is a good choice and other speed-boosting gear to push them to at least 1000 speed. Your other pets should be around DL 250. The biggest problem with this fight is the lack of space for a Defender, so you can either gear your pets more defensively for survival or you can go full offensive and try to kill Zombie General before you take too much damage.
A good setup for this fight would be…
- Supporter – Neutral preferably for survival, so either Tanuki or Grayling 2
- Adventurer – Book/Nothing/Grayling 1
- Adventurer – Book/Nothing/Grayling 1
- Supporter – Neutral, or Hourglass to boost your Adventurer’s Speed
- Mage – Big DPS like BHC, Balrog, Sylph, or Witch
- Mage or Assassin – Depending if your Mages can quickly clear the spawned mobs, an Assassin might be good here to solo-target the big bad General himself.
Winning this fight will upgrade Gram to SSS+24(24) and increase the XP bonus to 24%
Lernean Hydra
Bring 4 Runestones to the Newbie Grounds after defeating the Zombie General, and Lernean Hydra will replace the regular dungeon boss.
This one is… confusing. Let me try my best to explain the mechanics.
Get up on the Hydra’s back! Oh, wrong game.
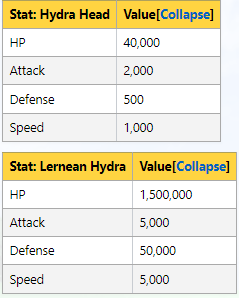
Lernean Hydra starts with one head, but any time you kill it two more will spawn (for a max of 25). This will trigger an ultimate attack, forcing you to lose the battle. You can prevent this, however, by only bringing 5 pets on the team.
If you leave a pet slot open, the demigod Heracles himself will join your team for this battle. He will join when there are 25 Hydra Heads, and Heracles will hop in to stop the ultimate attack.
The heads can not respawn as long as Heracles deals the killing blow to it. You need to make sure you’re only killing around 1 head per turn, so Heracles can keep up and stop them from spawning. This can be tricky, since your pets will need to be high-leveled for this fight but not high enough that you kill too many Hydra Heads. Be sure to only bring along one or two main DPS pets as to not deal too much damage. If you are dealing too much damage, consider swapping equipment to one that doesn’t buff Attack as much, or using a less-powerful DPS pet (i.e. instead of using Archer, try Ape or Cat instead). This fight can be confusing, so don’t be afraid to take your time reading the dungeon log to see why you failed.
Heracles needs to kill the same number of heads that were present when he joined for the fight to move on to Phase 2. At this point, the main body of the Hydra will approach and you can damage the Hydra itself. This part has no gimmick, and is a normal battle. Its scales prevent you from lowering its Defense all the way to 0 with your knives, but thankfully Heracles is still here to deal heavy damage.
During Phase 1, the Hydra Heads are able to poison your pets with a unique, stackable, toxin. Antidotes will help this, but will only remove one of the poisons in the stack. The only way to truly counter the poison is by bringing the Hydra pet with you. Since I’m sure many of you have this pet as an Adventurer, you may be asking “is it really worth spending the time to level it?” Eh. It will help, since using an antidote only removes one of the stackable poisons, but can be done without.
A good setup for this fight would be…
- Assassin – Archer, Ape with Token Improve, or Mimic for high damage-dealing potential
- 2nd Assassin… maybe – Only bring if you aren’t dealing enough damage to kill 1 head per turn. If your first assassin gives you enough damage, then instead use…
- Defender – If using 1 assassin
- Supporter – Gear with Knives and mostly defensive equipment
- Blacksmith – Good for boosting the damage of your Assassin, to ensure it can kill a head in one turn. Your Blacksmith will also buff Heracles too.
- Hydra Supporter – If you have space, include Hydra here to avoid the boss’s poison status. This might not be a priority, depending on your team, since you can theoretically out-heal poison with strong enough Supporters and some potions.
Hydra has a very high Water Element, so be sure all your pets have >100 in their Water Element to help defend against this. Water equipment, like spears or necklaces, make good options to help boost this.
If using Hydra, give it some knives and let it go to town. Speed >1000 will help shred the boss’s Defense.
Winning this fight will upgrade Gram to SSS+26(26) and increase the XP bonus to 26%
Chicken(s)
The Chicken God brought some friends to pay you a visit. Bring 5 Runestones to the Newbie Grounds after defeating the Lernean Hydra, and the Chicken will replace the regular dungeon boss.
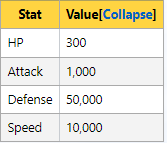
The battle starts off against just one Chicken, but many others will spawn for a total of 25 Chickens. These enemies have incredibly high Defense, have the ability to weaken your own pet’s Attack stat, and can revive themselves if killed. To completely kill a Chicken, you must have an Adventurer deal the killing blow when the Chicken is at 1 HP, cooking the Chicken in the process. This will heal all pets for 3,000 HP. One Adventurer can cook one Chicken per turn.
Because the Chickens have such high defense, you will most likely rely on speed damage to deal with them. Equipping your pets with Sticks and Wind Gems, while still maintaining a high degree of tankiness is key. Hourglass is helpful for a boost in Speed, but not necessary with the right gearing. Thankfully, the Chickens only have 300 HP so it won’t take much damage to bring them down to 1 HP to be cooked. To one-shot the Chicken, your Adventurers need 11k Speed post-Hourglass buff (~7.3k Speed pre-Hourglass)
Pets should be around DL 275+ with 150k+ growth to be doable with mostly T3 gear and some T4 gear. With more T4 gear, this can be done at a lower level. A good setup for this fight would be…
- Defender – Full Neutral gear and Water gems
- Defender – Full Neutral gear and Water gems
- Adventurer – Preferably front row for the Speed bonus.
- Hourglass – Speed, but also defensive. Wind gear with Water gems is good for this
- Supporter – Geared similarly to Hourglass
- Supporter/Adventurer – If your one Adventurer isn’t enough, bring in a second geared similarly
Equip all pets, except for the Defenders, with Sticks and one or two pieces of Wind gear to help maximize Speed damage. If you are losing due to survival issues, consider replacing some of the Wind armor/accessories with Neutral gear. There’s no point in using Knives over Sticks, since Sticks give more Speed over Knives.
You can, and should, use Nothing, Book, or Grayling to class-swap and become your Adventurer for this fight, since you will most likely not have any Adventurers with a high Dungeon Level.
Winning this fight will upgrade Gram to SSS+28(28) and increase the XP bonus to 28%
Godly Statue
Bring 6 Runestones to the Newbie Grounds after defeating the Chickens, and the Godly Statue will replace the regular dungeon boss.
This fight is pretty straightforward, given you know what you’re doing. And thanks to my guide, you do know what you’re doing!
The Godly Statue has a total HP pool of 1e308, but don’t panic. The Attack and Speed stat, as well as all 4 Element stats, of every pet in your team is multiplied by a small value every time the boss gets hit, so having more actions per turn is the key to winning.
By this stage, you should be able to get 6 Mages to 3 actions per turn (1500 Speed each), so having a full team of high-CL Mages should be enough to win. Choose your highest CL Mages, since every 20 CLs the Mage can launch more attacks, and go to town. You’ll want at least a full team with CL60 or higher. If using Sylph, this should be enough. Without her, you may need a couple mages with a CL of 80+. Sylph is a good option here, as she will get more attacks based on her Wind element stat.
You almost NEED each of your pets in this fight to have at least 1 Element stat in the negative. If the sum of all four Elements passes a certain point, your attacks will start missing. Have at least one Element start off as negative, as the others increase the one negative will keep the total at a reasonable spot. This means Neutral pets should stay behind and keep the bench warm. Sylph, Rabbit, Witch, Vesuvius… all great Mages who will most likely be at high CLs.
Godly Statue does not fight back, making survivability a non-issue. In fact, it has an Attack and Speed stat of zero. Give your Mages high Attack gear, keep an eye on the Element stats, and let the damage multiplier from the boss do the rest.
Winning this fight will upgrade Gram to SSS+30(30) and increase the XP bonus to 30%
Animal Band (C.U.T.E. Platoon)
Bring 7 Runestones to the Newbie Grounds after defeating the Godly Statue, and the Animal Band will replace the regular dungeon boss.
You will be facing off against six of the cutest, cuddliest, most deadly bosses yet. With high stats, unique abilities, and eyes made of buttons, this is going to be a tough battle.
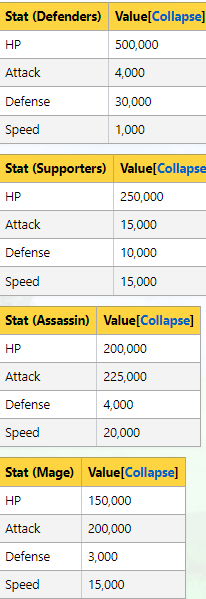
There’s actually a lot of moving parts here, so let’s break it down. In this fight, six bosses are fought at once in a way that is meant to mimic fighting another team of pets. There are 2 Defender-type bosses having an ability similar to Gnome’s shield, 2 Supporter-type bosses with an AoE heal like Salamander, 1 Mage-type with the ability to regenerate all of its HP when hit, and finally 1 Assassin-type enemy who can attack 2 pets at once — one pet in the front row, and one pet directly behind that first pet in the back row.
- Danger Noodle: Water Defender
- Sunny McChubs: Earth Defender
- Starshine: Neutral Supporter
- Flopsy: Neutral Supporter
- Caramel: Fire Mage
- Sgt. Softie: Wind Assassin
The toughest target here is, surprisingly, Caramel. Any time Caramel takes damage, they fully restore their HP back to full. The only way around this is to kill Caramel in a single attack, before it gets the opportunity to regenerate itself. This makes Floating Eyeball a good addition to your team for this fight — once it marks Caramel, your DPS should hopefully be able to kill Caramel.
A good team composition is one similar to the fights against Delirious Essence.
- Defender
- Defender
- Assassin/Mage
- Blacksmith (Rune Patch)
- Defender/Floating Eyeball
- Supporter
The Defenders will draw away the attacks from your DPS, keeping them safe while they take out the CUTE Platoon. If using a Mage as your DPS, you may struggle to take down Caramel before the regenerate kicks in, but the Mage might offer better damage overall against the other bosses. It might take a couple tries to figure out which one (Assassin or Mage) is best for your setup. Floating Eyeball is a big help here, but does lower your survivability.
Your DPS should be geared fully offensively, with the rest of the pets geared on the defensive plus a few knives here and there.
Winning this fight will upgrade Gram to SSS+32(32) and increase the XP bonus to 32%
Chromatic Dragon
Bring 8 Runestones to the Newbie Grounds after defeating the Animal Band, and the Chromatic Dragon will replace the regular dungeon boss.
This is probably the strongest boss you’ve faced yet. Even worse than the ??? boss we talk about in the next section. It is highly recommended to have pets over DL 350 and CL 80, 200k+ Growth, and some pretty strong Dojo buffs (at least 50% in the main stats). Yeah, this one takes a bit of prep work.
Chromatic Dragon is on the move, always changing, and it’s up to you to keep up. It will change its Elements every 2 turns, with one of them being extremely high and the other three being manageable. Along with this, any damage dealt over a certain threshold in a single hit will instead be absorbed by the Chromatic Dragon.
- Any damage done in a single hit over 60k dealt by a Mage will be absorbed (this is per hit. The total damage done by all the Mage’s multi-attack can be over 60k.)
- If this Mage is Sylph, the threshold is 35k instead (due to its likely increased hits/turn)
- Any damage done in a single hit over 500k by all other classes (Assassins mainly) will be absorbed.
Because of this damage limit, you need to be careful when using Knives and other defense-reduction skills from pets like Todlicher. Shredding too much of Dragon’s defenses could mean all your hits deal too much damage and heal the boss. Start with bringing one set of knives, but maybe not maxed at SSS+20. You will likely need 3 damage dealers of different Elements to keep up with the Dragon’s ever-changing Element resistances.
Neutral pets are stunned and will not act for the whole fight, so only non-neutral pets are viable. You can use Neutral Defenders, but just remember they will essentially act as HP sponges and will not be able to attack the Dragon or defend other pets from incoming attacks. Their passive ability to take a small percentage of damage for other pets is still effective, but they will not actively protect pets by blocking incoming attacks. Neutral Defenders are more likely to survive, so test which is better for you: Stunned Neutral Defenders, or potentially weaker Non-Neutral Defenders.
Chromatic Dragon has the Slash ability, which will target all pets in the front row. If you choose to use Assassins, you may have to gear them more defensively. Because of this decrease in their damage output, Mages are typically the stronger choice here since they will be in the back row.
Winning this fight will upgrade Gram to SSS+34(34) and increase the XP bonus to 34%
Ukreon
Bring 9 Runestones to the Newbie Grounds after defeating the Chromatic Dragon, and Ukreon will replace the regular dungeon boss.
This is going to take a minute to explain, so bear with me. Ukreon has the potential to inflict party-wide debuffs that range from pretty inconvenient to “this feels like I’m trying to move a mountain with a toothpick.”
Ukreon has five different auras it will put up based on each of the five elements. These all activate at the start of the battle and persist until Ukreon dies. But there is hope! To disable an aura, you need to have two pets of the corresponding element on your team. So, want to disable the Earth aura? Have two Earth pets on the battle team and Ukreon will not be able to use that aura. With this method, you can disable at most three of the five auras by using pets of three elements, two pets each. Let’s take a closer look at each aura to decide which pets will work best.
Ukreon Auras
- Fire – Pets take 20% of their max HP as damage each turn and Ukreon’s damage output increases by 5% per turn.
- Wind – Pets take damage equal to the total Dungeon Level of the party x 10. Ukreon’s Speed increases by 5% per turn.
- Earth – One random pet dies at the start of each turn. Ukreon increases its Defense by 10% each turn and completely removes any Defense reduction from Knives at the start of the turn.
- Water – Inflicts Freeze on 2 pets at the start of the turn, making them unable to move for the next 3 actions. Ukreon increases max HP by 5% and heals for 5% of its max HP.
- Neutral – halves all damage dealt by your pets, and doubles the damage dealt by Ukreon.
Earth is probably one of the worst to deal with, making it important for you to disable it. Having all defense reduction ignored at the start of each turn makes it nearly impossible to do any reasonable damage against the boss.
Fire is also good to get rid of. Not only is one of the highest damage dealers a Fire element (Succubus) — you’ll probably have her along anyway — but Ukreon’s damage can get crazy high with this ever-increasing buff.
Water is an important one to deal with, but you can swap with Wind depending on your pets. If you get unlucky and it freezes both of your Supporters, the fight is quickly lost. The healing from this aura can be out-damaged, but it’s not ideal since with this strategy your pets will only be doing half damage from the Neutral aura. If you’re disabling Wind instead, this helps mitigate damage taken by your pets and reduces the boss’s Speed Damage.
With these three auras dealt with, you are left with Wind and Neutral. This is manageable. Make sure you have enough upgrades put into Dojo HP buff to outlive the damage caused by the Wind aura. With a team of around DL 350 pets, this comes out to 21k damage per turn to all of your pets. Neutral aura makes the fight drag out a bit more since you will only be dealing half-damage, but this can be dealt with by having a strong Strat Room and team setup.
Team composition example:
- Defender – If you have Leviathan, use it. If not, Tortoise or Grayling. Water #1
- Defender – Gnome. Earth #1
- Assassin – Succubus, there’s Fire #1
- Mage – Witch. Water #2
- Supporter – Panda, Earth #2
- Supporter – Salamander/Santa for Fire #2
With so many good pets being Water, Earth, and Fire, there are many potential team setups.
Be sure to gear defensively since this will likely be a long battle regardless, but still with enough Knives to shred the defenses to make up for the half-damage you’ll be dealing. Dojo upgrades are vital, since increasing your levels will just keep increasing the damage from the Wind aura.
Partway through the fight, Ukreon puts up a temporary shield equal to 500 million HP. You can bruteforce your way through, but there is another option. Any pets equipped with a Light or Dark element weapon (Divine Bow or Demonic Sword) will deal a flat 5 million damage to the shield per attack. This will likely allow you to break the shield down much quicker than with traditional weapons. Currently, the only way to get Dark/Light materials is through SS-rank Tavern Quests.
Note: Tödlicher counts as a Neutral pet for this fight.
Winning this fight will upgrade Gram to SSS+36(36) and increase the XP bonus to 36%
Sleeping Sloth
Bring 10 Runestones to the Newbie Grounds after defeating Ukreon, and the Sleeping Sloth will replace the regular dungeon boss.
I like to call this fight Hydra Part 2. This one can take a bit of experimentation with your gear and team setup. Sloth will start this fight asleep, and is woken up by certain conditions. If Sloth wakes up, it’s a complete party wipe.
While asleep, Sloth will attack twice per turn — one single target attack for heavy damage, and one multi target attack for less damage. If this hits any of your pets for more than 222,222 damage, Sloth will wake up. If your pets deal more than 222,222 damage in a single hit, Sloth will wake up. If you use defense reduction and get it down to 50% or less of its original Defense, Sloth will wake up. If a pet has high Speed, there is a chance for Sloth to put them to sleep. With a Speed stat of 30-35k, this pet will likely be asleep for the whole fight. It’s unlikely you’ll have a Speed stat that high unless specifically gearing for that number, but try to avoid using Wind Gems on any gear (and don’t bring Hourglass).
You must kill Sloth within 42 turns, or else he will wake up. Yeah, scary. With 60 million HP, this is a difficult time constraint.
Oh, and as a nice cherry on top, Sloth has incredibly high Water and Wind elements making damage done by traditionally-powerful pets like Witch and Sylph weakened. This could work to your favor, however, since dealing too much damage leads to a loss.
To win this fight, you essentially need to meet these stat checks…
- All pets with enough Defense/Elements to take less than 222,222 damage when Sloth attacks
- Note that Sloth is Earth Element, so gear with that in mind
- No pet able to deal more than 222,222 damage in a single attack
- Around 5,000 Speed or less on each pet to lower chance of Sleep
A good team for this fight would be:
- Defender – You want these pets to absorb the single-target attacks which are likely to deal heavy damage over the 222k threshold. Mix Neutral and Earth gear to cover all bases.
- Defender – gear similarly, Neutral and Earth
- Defender/Mage – Depending on damage output / survivability of your main Mage you might need an extra Defender to protect him or another Mage to supplement the damage.
- Balrog/Sylph/Witch – Due to the high Water/Wind of Sloth, Fire is a strong choice if you can’t deal enough damage. Sylph and Witch can still be used, but are more likely to go over the 222k limit. Trial and error is the best practice here
- Supporter
- Supporter
Mages are ideal here, since they are less likely than Assassins to hit the 222k damage limit per hit. Sloth has incredibly high Water and Wind element stats, weakening the damage done by traditional OP Mage pets like Sylph or Witch. Given there is a damage limit before Sloth wakes up, using these as your Mages might actually be ideal since they will be nerfed slightly. Balrog is strong here, since it can tank hits with enough Horns.
You want a team DL 380+ with decent 50%+ Dojo boosts.
For general gearing, Earth gear and Earth (defense) gems are strong. Since you want to reduce how much damage your pets take, not necessarily their survivability, Defense is more important here than in other fights.
Winning this fight will upgrade Gram to SSS+38(38) and increase the XP bonus to 38%
Loof Slirpa – The God of Fools
Loof Slirpa is fought to both unlock and evolve the Fool pet. There is a whole hidden questline to unlock Fool.
The first fight against Loof Slirpa, to unlock Fool, is done by taking at least one hundred Fools Coin to the Newbie Grounds boss room. It doesn’t matter how many you bring with your team, since it counts the TOTAL you have in your inventory. One of your pets has to be named Aprils Fool. If you don’t… Well, we will get to that later. Hint: It’s not fun.
Loof Slirpa is pretty tough, requiring a decent team of DL 160+ pets capable of killing D3-10 Mimics. The biggest issue with this boss is his ability to inflict Confuse on your pets at a rate of:
- (((attacker elements/2) / defender elements) – 0.3)*100%.
This causes your pets to attack fellow pets or even heal the boss. To help protect against this, bringing Assassins as your main damage-dealers is a good choice, since Mages can target several of your pets at once if they are confused instead of just single-targeting like Assassins. If a Supporter is confused, they will heal the God of Fools instead of your own pets. To stop this from ever happening, simply don’t bring Supporters and bring potions along instead.
Fight 1 Team Suggestion:
- Defender
- Defender
- Defender
- Assassin/Mage
- Assassin
- Assassin
You can replace any Assassin with Mage if they have high enough Elements to reduce the risk of Confusion. If you don’t have 3 strong Defenders, swap out one of them for a Blacksmith with the Rune Patch from the Ultimate Stats Challenge.
After beating this first fight, you will unlock the Fool pet and can now work toward evolving it! This involves fighting Loof Slirpa several more times to earn more Fools Coins, with its stats scaling higher the more Coins you have.
Stats scale with the following formulas:
- Max HP = Total Coins * 25000
- Attack = Total Coins * 10
- Defense = Total Coins * 20
- Speed = Total Coins * 15
- Total Elements = Total Coins * 40 (Loof Slirpa is Neutral, so divide by 4 to get individual element values)
Since you need 1000 Coins to evolve Fool, the fights can get very difficult toward the end making this boss more difficult than the Patreon bosses. You want to maximize your Coin gains from this boss to help speed up the farming process. The drop rate of these coins can be influenced by regular things such as Lucky Talismans, SpaceDim, and Rogues.
Coin Farming Team Suggestion
- 3 Defenders – 2 Front Row, 1 Back Row.
- Archer, Succubus, or Mimic – Whichever is strongest. Front Row with the 2 Defenders.
- Witch or BHChan can be used instead, but are more risky if Confused.
- Blacksmith – Highest CL Blacksmith you have to power up the DPS pet. Rune Patch.
- Undine (Rogue) – Reduces the total number of fights by increasing Coins received. Swap for another Defender if you can’t beat the fights with a Rogue.
Be sure to bring along Phoenix Feathers and Elixirs since you won’t have a Supporter to rely on.
Note: Elephant’s Burn does not work in this fight.
The great Havixx has compiled a list of fights against Loof Slirpa starting at around the 500 Coin mark. You can use these as a reference for the type of DL/CL and equipment you will need to beat these fights.
??? Boss
Yes, that is actually the boss’s name.
??? is an incredibly powerful version of Loof Slirpa. It can be fought by bringing a Fools Coin to the Newbie Grounds but NOT naming a pet Aprils Fool. ??? does not take kindly to insults.
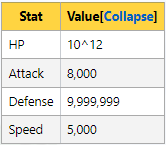
??? will require incredibly strong pets to defeat it (DL300+). Beating ??? will unlock the Fool’s Card, a permanent item that will increase your God’s Battle stat by 7,007% (except in UACs).
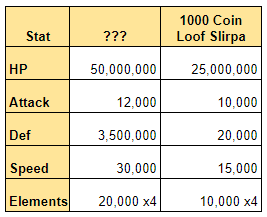
The above table compares the stats of ??? and Loof Slirpa at 1,000 Coins (so about the difficulty you faced for the final battle against him). As you can see, it is much more difficult.
??? has all the same abilities as Loof Slirpa, including the ability to Confuse your pets. Follow the same rule of bringing potions to make up for the lack of Supporter.
Team Suggestion:
- 3 Defenders – 2 Front Row, 1 Back Row. Knives.
- DPS Assassin (Mimic/Archer/Succubus) – Front Row. Gear offensively if you can get away with it. Defenders should be enough to keep it from dying.
- Blacksmith – CL 100 with Knives and maxed Rune Patch.
- Taco – Gear for Fire Taco, so with enough speed to act before Mimic and with enough Fire Element to have that be the highest.
Note: Elephant’s Burn does not work in this fight.
Bringing along knives will help you bring down the boss’s defense, but it will take some time before you are successfully able to deal damage. Put knives on most pets except your DPS Assassin, who will want a Sun Sword.
Mimic is very useful if properly leveled, over any other Assassin, since it has the added damage multi from Mimic Points. Aim for 25k Attack and a 2.4x damage multi from Mimic Points. Fire Taco will push Mimic the rest of the way to be able to take down ???. If not using Mimic, you will need much more Attack and overall Elements to make up for the lack of damage multi from Mimic Points.
Why Fire Taco? Taco will target the pet with the highest Attack (DPS Assassin). The next attack deals additional (Taco class level)% damage.


Be the first to comment