
This guide will help you get Grand Theft Auto: Vice City working on Windows 10 without using any mods or extra downloads. Follow these steps to make sure the game runs properly on your Windows 10 system.
How to View Local Files
Step One
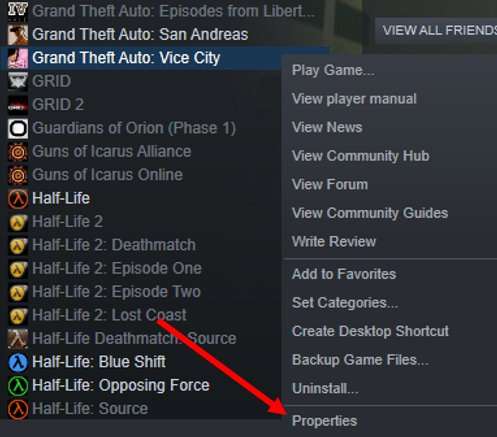
Step One is to view your local files on your computer. This can be accomplished after downloading and installing the game. First, right click on “Grand Theft Auto: Vice City” in your library. When the menu pops up, click on the last option, entitled “Properties”.
Step Two
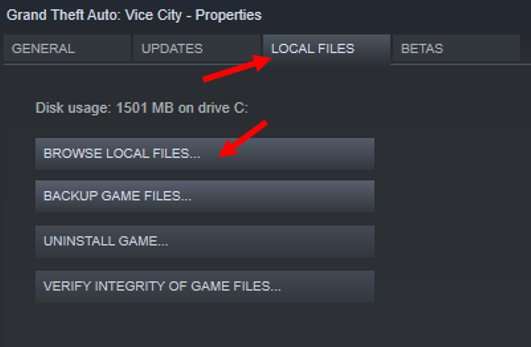
After entering the Properties menu, a different Steam window will appear on screen. First, click the tab named “Local Files”. When done, click the first option that says “Browse Local Files…” to view the installation files for Vice City.
Step Three
Ensure that you did it properly, as you should see a menu like this pop up in Windows File Explorer.
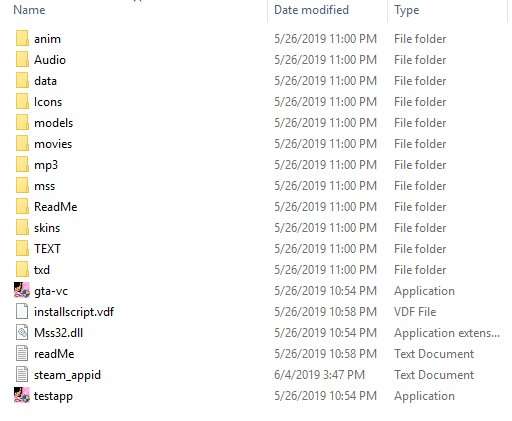
This menu should include many folders, and a few Executables that will be used later.
Enabling Compatibility Mode
Step One
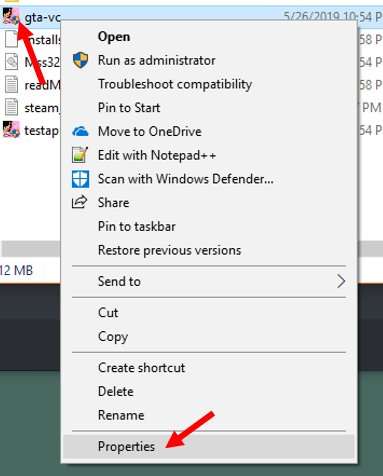
Now that you are in the file explorer menu for Vice City, you can view the two Executable files, the first one is called “gta-vc”. When found, right-click it to bring up the menu, and click “properties”.
Step Two
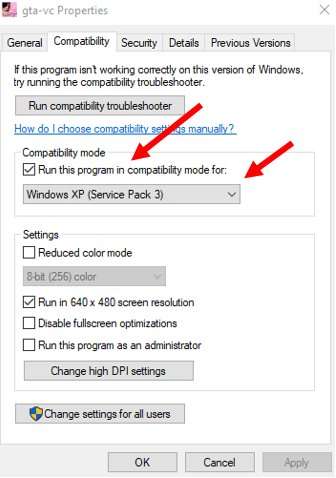
Make sure that you right-clicked the actual name of the Executable or the Icon, because if not, a different menu will appear when you click the “Properties” section. When the correct menu is opened, look for the “Compatibility” tab. Find the checkbox labeled “Run this program in compatibility mode for;”.
When enabled, a dropdown menu below should be available to use. Find the option for “Windows XP (Service Pack 3)”, this service pack is compatible with the format of Windows 10 and should allow use of this Executable now.
Step Three
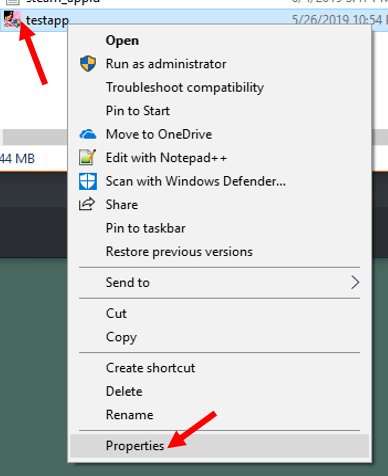
You will do the same thing again, but with the other Executable in the Local Files. This Executable is called “testapp”. When found, right-click it to bring up the menu, and click “properties”.
Step Four
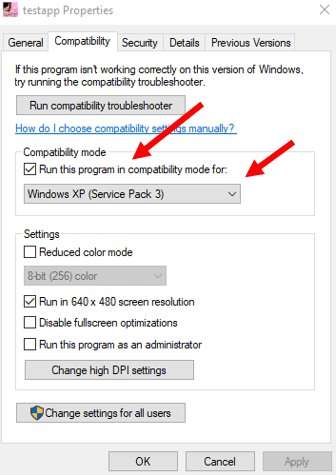
Again, make sure that you right-clicked the actual name of the Executable or the Icon, because if not, a different menu will appear when you click the “Properties” section. When the correct menu is opened, look for the “Compatibility” tab.
Find the checkbox labeled “Run this program in compatibility mode for;”. When enabled, a dropdown menu below should be available to use. Find the option for “Windows XP (Service Pack 3)”, this service pack is compatible with the format of Windows 10 and should allow use of this Executable now.
Step Five
Do make sure that you hit, “Apply” or “Ok” before closing these menus, because if you do not, your changes will not be saved. After you have ensured this, close all windows and return to the Steam library interface to test compatibility.
Troubleshooting the Game Launch
Troubleshooting
For an unknown reason, the file formats of the “gta-vc” and “testapp” are somewhat different. If the game is still not launching and you see an error message after enabling the correct Service Pack for Windows XP in Compatibility Mode, reverse the names of these two Applications. Rename the “gta-vc” Executable to “testapp” and rename the “testapp” to “gta-vc”.
Ensure that you give a temporary name to one of them before doing this, and ensure you do not Copy and Replace the files. Both need to be present and changing their names is one potential solution in order to get the game to launch successfully. This is only if it does not launch after enabling Compatibility Mode.
Another thing to ensure is that you accept the permissions every time the game launches. A Windows message will appear to alert you about the program’s permissions, which you must accept to launch the game. This is a minor issue and is the result of the Compatibility Mode program.
If you had any problems viewing any of the files in the File Explorer menu, go to the Properties menu from Steam through Right-Clicking the “Grand Theft Auto: Vice City” option in your library, locate the “Local Files” tab again, and click the last option that says “Verify Integrity of Game Files…”.
Troubleshooting the Mouse Issues
Troubleshooting Issues with Mouse Input
Regarding issues with the mouse input not allowing you to look by rotating the mouse and/or the clicking not working, there is a way to get around it and re-enable the mouse. This is not a perfect fix, but does work quickly and is a viable fix. When navigating menus (pause menu, home menu, brief, map, etc.), always use the ARROW KEYS and ENTER key to navigate. Instead of ARROW KEYS, you can use the MOUSE to hover over things, just remember to use the keyboard controls for selections.
To troubleshoot this, if you load into the game and the mouse is not functioning, pause, and try to click on an option on the pause menu (best option is to click “Resume”, as then you will know when it it unfrozen), this sometimes does unlock the mouse movement. This is never a perfect fix, but can be remedied in less than a minute or so every time.
(Note: Ensure that Mouse Controlled Steering is turned off and the Frame Limiter is turned on.)
Gameplay Fixes
Fix Gameplay Issues
When you use Compatibility Mode to run GTA: Vice City on Windows 10, you might notice some problems like vehicles not reversing properly or unusual vehicle speeds. You can fix these issues by turning on the Frame Limiter in the game’s Display Settings.
With this adjustment, the game should run at its best performance using just the default settings available in the game and Windows 10, without needing to download any mods or additional software.


Be the first to comment