
Here is a guide to help you navigate Deep Caverns. This guide is for players who have spent a lot of time in Deep Caverns and are looking for a more efficient way to proceed. It aims to reduce the time spent guessing which items are needed and searching for information.
Introduction and Preparations
Deep Caverns (DC) is the final area of Underrail. You can access it using the elevator in the protected area in Institute of Tchort, by:
- Completing enough quests for the Tchortists for their leader Eidein to meet with you, triggering a series of events that take you down to the elevator,
- Pickpocketing the elevator’s keycard from Eidein, then finding the elevator in the utility section of the Institute.
- Taking the elevator’s keycard off of his corpse, then finding the elevator in the utility section of the Institute.
This elevator ride is a one-way trip, and you can’t go back until you’re done. Consequently, before you cross the threshold, you’ll want to make sure you’re prepared. Make sure that you have:
- Enough experience to approaching the level cap (25 for the base game, 30 with Expedition).
- Endgame gear, including weapons, armour, headwear and boots. There are crafting components and finished items there, but there’s no guarantee you’ll get all the components you need, and you’ll be cut off the your crafting benches.
- A healthy stock of medicine, grenades, foodstuffs, and repair kits (unless you can craft them). There is ammo in DC, but it’s mostly standard rounds. W2C rounds are going to be helpful, and anything consumables that you need to craft will have a limited supply, so stock up beforehand.
There’s only one merchant, and depending on your choices you may not get to talk to him.
While not required, the following can make your life easier:
- A lifting belt and supersteel infused leather boots, both for increasing your carry weight. A bunch of key items are heavy, so this’ll help you manage the weight.
- Electric resistant gear, ideally the Tesla Armour from Expedition guarded by spiders in LEMCO, but stacking several galvanic components can also work.
- Biological and Acid resistant gear, ideally the Chemical Assault Unit Armour from the Protectorate/Free Drones questline, plus Biohazard boots and a gas mask.
The Goal
In Deep Caverns, your main objective is to collect the necessary components to unlock the gate leading to the final boss. This process will involve exploring a significant portion of the area. Due to the weight of these components, it is recommended to establish a central storage location. The warehouse areas, patrolled by the Faceless, can serve as a suitable storage point, provided you can avoid confrontation.
When searching areas, you are looking for the following key items (in order of appearance in the steps below):
- The Bone Handle Knife, which is technically optional but without it, walking through Hollow Earth is like walking through an obstacle course of broken glass and used heroin needles.
- A Universal Mechanics Tool Set with enough mechanics (the wiki says 115 effective skill, but I haven’t tested that) to fix the gate yourself, or the Red AI Core from Arke to get the robot to fix it for you.
- Hydro-Pneumatic Accumulator
- 3 Hydraulic Fluid Canisters
- Maria Hope’s Keycard
- Wasi Abdul’s Keycard, or enough hacking to break into Tithonus
- HS-89 Hydraulic Pump Drive Shaft. The other Drive Shafts won’t work, so ignore them.
- Hydraulic Control Valve
- Mycokardia, which is used to make Psimorphic Biocide Grenades
- TG-44HD Service Manual
With all of these, you can open the gate leading to Tchort.
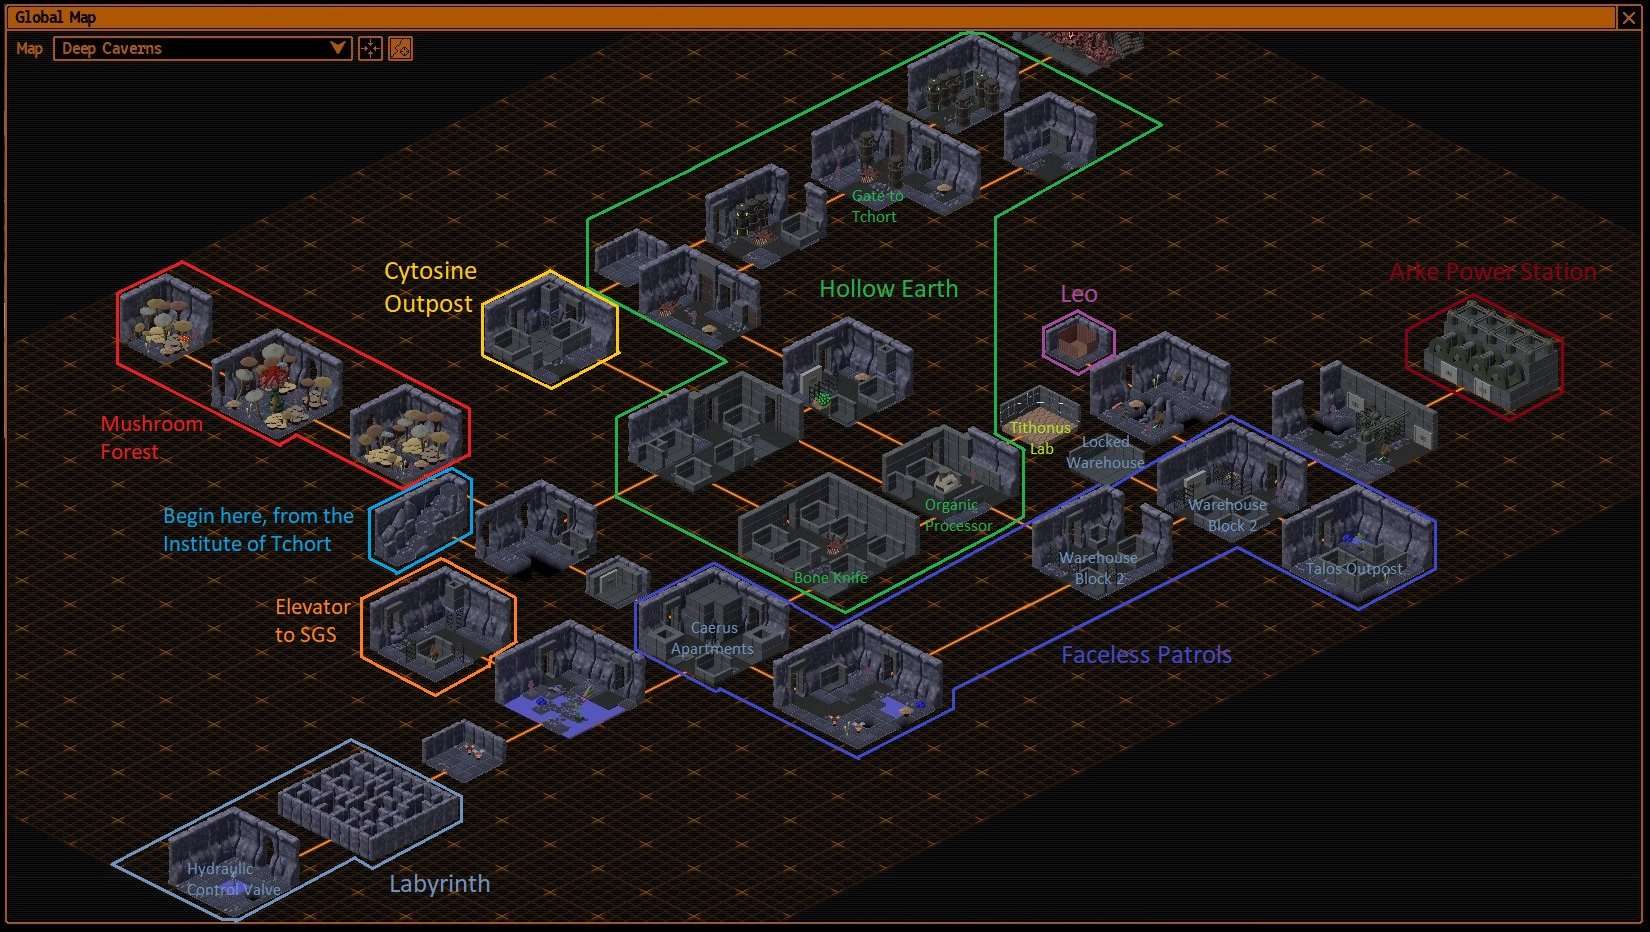
The Map
The steps are going to reference certain areas, which are labelled on this map.
Click to enlarge…
Guide Part 1: Crazy Old Men
Now that you know what you need to look for, here’s the best way to get them. I’m going to start after the descending elevator breaks, you move through the caves, and you have your long conversation with Six.
A) Go north one zone into the Hollow Earth Complex. You’ll notice that while you’re in the the Hollow Earth Complex (labelled dark green on the map), you get a debuff called Creeping Dread. Once it stacks up to 20, you get a further debuff call Eye of Tchort, which summons infinitely respawning monsters to attack you. Fighting them isn’t really worth it since all you get is a couple oddities and components for the Supersoldier Drug.
As a result, when moving through the Hollow Earth facility, do not loiter. The only thing worth looting is the bone knife (and some mutagen reagents if you want to do the mutagen puzzle). Do what you need to do, then get out ASAP to avoid Tchort’s gaze.
There are manholes that you can enter where Tchort’s gaze is blocked, where you can wait for the debuff to wear off. Then exit the holes and continue moving to your destination.
The good news is that you can get some help managing Creeping Dread. Go east one zone, and here you’ll find the Bone Handle Knife on the body of a tchortist. You’ll need this for later.
B) If you’re on good terms with the Faceless (i.e.: been generally helpful rather than murderous), go south one zone, where you will speak with them. Go east, then north, which will take you to the warehouse section of DC which has a ton of useful supplies, including a Universal Mechanics Tool Set (these aren’t unique, so you’re bound to find one). Go north then east, where you can speak to the faceless commander, get some lore and context, have some closure for a previous quest, and even get some supplies if they like you enough. Then go west three times.
C) If you’re not on good terms with them, then grit your teeth, since you’re going to have a bad time. Go north then east to the warehouse section. Absolutely do not speak to the faceless, and go north then west twice.
D) Talk to Leo (marked purple on the map). He’ll ask you to get his knife, which you should already have. Give it to him, and you’ll learn a feat that reduces the effect of Creeping Dread, making Hollow Earth a little more bearable.
Guide Part 2: Daddy Issues
I might add more details here later. Arke is a dungeon all its own, and deserves its own section when I can get around to it.
Make sure to bring your electric resistant gear if you have some.
E) Go east, east, north then north, which takes you into Arke Power station (labelled dark red). It’s a complex dungeon, so this might take a while. Eventually, you’ll gain access to the room that lets you route the power to the different areas of DC. Depower Arke, then power up Caerus and Warehouse Block 2.
F) If you don’t have enough Mechanics skill to fix the gate yourself, go to the boss area of Arke, and once it’s dealt with, take the AI cores.
Guide Part 3: Dead Scientists
G) From Arke, head south then west into the now unlocked area of the warehouse. You’ll find a Hydro-Pneumatic Accumulator and 2 Hydraulic Fluid Canisters, as well as more supplies.
H) After exiting the warehouse section, head south, south and west and enter Caerus. There’s a ton of interesting character writing and worldbuilding here, including 2 characters you’ve met already. Make sure to pick up both Maria Hope’s Keycard and Wasi Abdul’s Keycard. Additionally, if you want to do the mutagen puzzle, some instructions are on someone’s computer.
I) Head south then west to find the elevator (marked orange) and a third Hydraulic Fluid Canister.
Guide Part 4: The Part with the Worms
Now’s a good time to pick up any acid resistant gear.
J) Head east, then south twice to get to the Labyrinth (marked in light blue). To get to the objective, go South, South, West, Southeast. It should bring you to a transition. Go South, Southeast, North, then East for another transition. Finally, go South, East, then South, which will take you through another transition into a large area with a Hydraulic Power Unit, which can be looted for the HS-89 Hydraulic Pump Drive Shaft.
J) Part 2: Optional loot: There are other interesting things in the Labyrinth. First, there’s a historical mining helmet in here; from the entrance, go S, S, W, SE, S, SW, and you can pick it up. Finally there are oddities hidden inside brown spherical plants (?) that leak purple goo out of a circular opening. These plants(?) are interact-able but not visible when highlighted, so you need to mouse over them to find it. There are at least 4 Wax Cells, and a two headed grub; from the entrance, go S, S, W, SE, S, SE, E, and it’ll be inside one of the plants (?).
Guide Part 5: Drunk Necromancy
K) Exit the Labyrinth, head north 5 times, which should get you into Tithonus Labs in the Hollow Earth Complex (labelled light green). The enemies here have very short sight, so if you can’t fight them, try walking past them when they move away. You can kill them permanently by interacting with the suspension pods. At the end of this mini-dungeon, you’ll get the Hydraulic Control Valve.
L) From here, backtrack to Arke, and reroute the power from Caerus and the Warehouses into the Research Complex.
Guide Part 6: But Then I Got High
If you have Bio resistant gear, you can make the next part way easier for yourself.
M) Backtrack all the way back to where you first spoke with Six. Head west into the Mushroom Forest. Remember the Bladelings from Foundry? Well, meet their cousins. There are some mushrooms that shoot out spores that temporarily reduce your max health. Stand inside them until you get high enough for them to send you to a new place. Work your way through the caverns, until you find the Pulsating Roots. Kill it, then make sure to grab the Mycokardia; the area on screen you need to click is kinda hard to spot. it might take a few tries to find it. Climb out and exit the Mushroom Forest.
N) Go north, then northeast. Use the Organic Processor to turn the Myokardia into Psimorphic Biocide Grenades.
Guide Part 7: Breaching D Gates
O) Grab all your key items, best weapons and ammo, because you’re almost there. Starting from where you spoke to Six, go north, north, west, and inside the building, entering through the western entrance (the one closer to the gate). Inside, there will be a staircase on the northwest wall. Inside, you’ll find a locker with the TG-44HD Service Manual and the gate mechanism itself.
Alternatively, you can get in through Cytosine Outpost (marked yellow). Wear a Tchortist robe, remember their greeting, and if your character was a good little Tchortist who read the Original Report in the Tchortist Library, you’ll remember that Eidein’s friend was Saban. Pick up a jackhammer, head north out of Cytosine Outpost, then go north until you find the gate.
P) Interact with the gate mechanism, and you will have all the required components to fix the damn thing.
Q) Throw a Psimorphic Biocide Grenade on the gate to remove the biomatter, then open the gate with Maria Hope’s Keycard. Enter the mutagen tanks.
Guide Part 8: Boss Fight
R) There is a little bit of stuff to explore, including some mutagen reagents, but you call feel free to skip right to the boss. Go north twice, and enter the hatch, where you steel yourself for taking down the final boss. Save, prep all your combat drugs and load up with your strongest W2C ammo.
- If you want, you can bring all the mutagen reagents to make the fight easier. The mutagen puzzle is a bit abstract, and you can find a program to solve it here. Honestly, if your build can get to the final boss, it can probably also kill the final boss.
S) Kick Tchort’s ass, take the Cube and use the computer to turn off the electric ladder and turn on the elevator out of DC. Leave the mutagen tanks, deal with the Faceless, and go to the elevator back up to the rest of Underrail.
T) You’ll get another infuriating conversation with Six, who doesn’t bother explaining himself again. The elevator will drop you off not too far from SGS.
U) You did it! Now enjoy the denouement and take care of the last couple loose ends. The game ends when you accept Vera’s offer or take the train north. It should be pretty obvious which ending I think is better, but it’s up to you.

Be the first to comment