
Welcome to Holdfast: Nations at War! This guide will aid you when it comes to the basics of the game itself, so that when you join our server you’re as battle-ready as possible.
Other Holdfast Guides:
- Admin RC Console Commands Guide.
- How to Make the Dot Crosshair Permanent.
Gameplay Basics
We’ll start with the basics.
HUD and Basic Controls

This is the in-game hud. You’ll see certain parts of it labelled, from 1-5. Below is an explanation of the various parts.
- Avatar and Health –
Fairly self explanatory; The avatar shows your unit and team, and the health bar represents your health. The less health you have, the closer you are to death. Veteran tip: bullet and sword wounds are likely to lower your health. - Weapon and Ammunition –
These display your currently equipped weapon, and your ammunition. The number on the left is your chambered round, signalling that you are ready to fire. The number on the right is your remaining bullets.
If you have a melee weapon or are using your bayonet, the icon will change and the ammunition counter will vanish until you equip your firearm. - Scoreboard –
This scoreboard shows the reinforcements remaining for the teams, the time remaining and the current score. - The Chat –
The chat displays voice commands made by your fellow soldiers, and also displays messages typed by players. Press ENTER to type a message. - The Minimap –
This map will show nearby allies and sighted enemies, and will also give you a bearing to help you direct your fellow soldiers.
Melee
Melee: Up close and Personal
A gritty reality of Napoleonic Warfare is that quite often you will have to abandon the comfort of distance and charge the enemy, clashing swords and battling in close proximity.
This section of the guide will hopefully help you transform from a bumbling drunkard to a master duelist!
Direction-Based Combat
Similar to NW, Holdfast features direction-based combat; your attacks and blocks will all be made in a certain direction, depending on where you move your mouse to do so.
Moving your mouse to the RIGHT and holding RMB will allow you to block any melee attacks coming from your RIGHT, while moving it to the LEFT will allow you to block any coming from the LEFT.
Note that you cannot simply spam the block button in every direction in hopes of blocking all incoming attacks; precision and timing are key when fighting up close.
We would also highly recommend fighting melee in third-person perspective only.

This picture shows an example of a melee attack: this one being the overhead musket attack which is achieved by moving your mouse forward when attacking.

This picture shows an infantryman blocking in the upward direction; he moved his mouse forward and held the block button-this allows him to fend off the appropriate attack.
The animations of the blocks themselves make it easier to remember which attack is which when facing an attacker, and before you know it you’ll be dueling your way to victory.
Aiming and Shooting
Firearms lie at the heart of every battle, and knowing how to use them can be the difference between victory and defeat.
This section of the guide will give you a basic idea in regards to how firearms handle, and how to use them effectively.
The Firearms of Holdfast
Holdfast: Nations at War has several different firearms, all of which handle differently from one another. This guide will give you a bit of insight, and help you pick which firearm suits you best.
1. The Musket
Used by: Line Infantry, Light Infantry, Guards
Musket Infantry form the backbone of any army; they make up the bulk of the personnel and will usually form the main weight of any major attack or defence.
Muskets are at their most effective when used in volleys , where infantry will form a horizantal line and fire together on the order of an officer at a target. What they lack in range and accuracy, they make up for in sheer number and firepower.
Muskets also have a bayonet fitted, allowing for a swap to melee in a pinch or a charge.
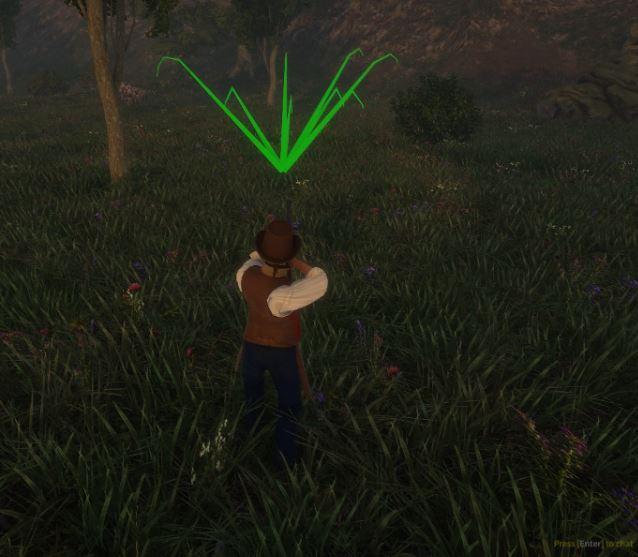
They have a limited range, so bullet drop truly needs to be taken into account; the set of pictures below will illustrate how to compensate for bullet drop.
The blue marker indicates the target, the red marker indicates where the bullets hit, and the lines indicate where the bullet travelled. The white circle is the in-game crosshair.


As you can see, aiming above the target compensates for the bullet dropping, allowing for an effective shot. Not that regardless of mastery over bullet drop, muskets are at their most effective when fired in volleys, allowing the maximum chance for successful hits.
2. The Rifle
Used by: Riflemen
Riflemen are the elite shooters of the army; they are the scourge of those without cover and can turn the tide of a battle with a few well placed shots.
Rifles are most effective when used in a defensive or skirmish situation; while they lack the versatile nature of muskets and take longer to reload, you can make every shot count due to the increased accuracy and safety of cover or distance from your target.
They have the best range of any of the in-game firearms, however bullet drop does need to be taken into account and not every shot will hit, as shown below.


Firing rifles in volleys will add the increased chance of a hit, but the safety and bonuses of using cover and skirmishing far outweigh the potential gains of standing in the open.
3. The Musketoon
Used by: Carpenters/Sappers
The musketoon can pack a punch in a pinch. Used primarily by non-combat units, it is not particularly viable in most combat situations due to incredibly short range, poor accuracy and long reload times.
However, when in a tight spot or when faced with a fight you can’t escape, it packs a powerful blast which can bring down even the toughest opponents.
Most effective in very close range (to a point where melee might be more viable) it fires several bullets, scattered in front of you. While they will kill any target they find, they aren’t guarenteed to hit an approaching enemy, they’re useless outside of close range and you’ll not be able to reload them in time to take on a second opponent.
The pictures below illustrate the range and scatter of the musketoon.

4. The Pistol
Used by: Officers, sailors and support units
The pistol is used as a sidearm for units who will often be in combat, but not required to fire upon enemies constantly. Units who’s main purpose of something other than combat; buffing, healing, loading cannons or commanding other players for example can use their pistol to keep themselves safe should the fight get a little to close to them.
The pistol’s range lies somewhere between a musketoon and a musket, as does its accuracy; it is not considered a very effective weapon and is primarily used for self-defence or combat against a single enemy.
Don’t dismiss it completely, however; its fast reload and good close range accuracy can make it a perfect choice to fend off anyone who slips by the main combat units.
The pictures below show an example of the pistol’s range.


If you keep in mind where and when each weapon performs at its best, you’ll gain not only an understanding of how to better hit your targets, but also how to command people to use them.
Support Units
Support Units: Unsung Heroes
When most people imagine an army, they see first and foremost the footsoldiers and the officers, bravely charging into battle with guns, swords, spears and any other tool of wroth they can lay their hands upon.
However, behind the scenes of this initial bloodbath lie the unseen backbone of any army’s cohesion; the support units.
Holdfast has a wide array of support units, from musicians to flagbearers to surgeons; there is much more to a battlefield than simply shooting and stabbing.
This section of the guide will list the support units, as well as how to use their unique abilities. As features and units are added, the guide will be updated.
Musicians
Musicians provide a rousing song to marching or fighting troops, buffing their abilities and reminding them that they are not alone in the fight.
There are several kinds of musician in Holdfast, but they all use the same controls in order to access their unique features.
Once you have selected your unit, press Q and then press LMB to bring up a list of songs which you can play. Simply click on the song you want, and your musician will begin to play!
You can double check that the buff is active by looking for the buff icon underneath your health bar.


Artillery
Artillery: Raining Fire
One of the most crucial elements of any battlefield is artillery superiority; the army which controls the most artillery has an immeasurable advantage over the army which does not.
Artillery (or “arty” as it is informally known) can destroy and disrupt infantry, decimate structures and cover and generally make life hell for anyone stuck in the line of fire.
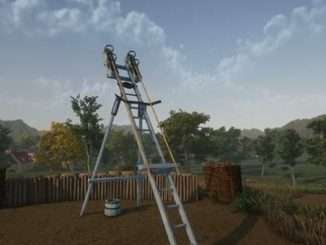
The arty mechanics in Holdfast: Nations at War are very similar to those in NW-there are several steps to loading and firing a cannon, which must be repeated after each shot.
These steps are as follows:
1. Locate the ammo box and retrieve your ammunition


2. Load the cannon, and then push it into position


3. Aim the cannon and fire!


Cannons on ships work the same as cannons on land; find and load your ammo, then let rip!
Sailing
Naval Warfare: Master the Seas
A huge new feature of Holdfast: Nations at War is the revamped naval warfare; with multiple ships of varying speed and firepower, large crews and attention to detail, the Naval Warfare of Holdfast is just as fleshed out as the land warfare.
But unless you know how to sail, you’ll soon find yourself adrift! This section of the guide aims to teach you the basics of ship handling and sailing, so that you can make use of yourself on the seven seas.
Know your Vessel, know your shipmates
Holdfast offers a variety of naval vessels (with more on the way) and they each have their own uses.
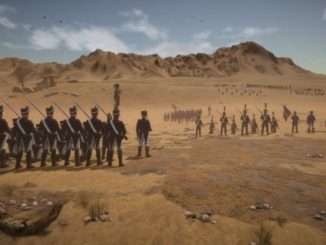
The picture below shows a list of several ships, as well as various units.
You’ll notice two things about each of the various ships; the number of guns and the number of men required to staff it.
The “12-Gun” Brig Sloop will have a total of 12 cannons on board, while the “8-Gun” Schooner will have 8 cannons on board.
The number of guns a ship has-as well as their position on the ship itself (some ships come with front and rear guns) can play a huge role in regards to how the vessel in question can be used.
However, more guns doesn’t always equal a better ship! An 8-Gun or even a 2-Gun vessel can wreak havoc on a 12-gun vessel if it can keep out of line of its guns and use its speed and size to its advantage.
Knowing your ship’s strengths is far more important than increasing your ship’s size.

Naval units are not dissimilar to land units in some ways; the Captain of the ship is in charge of all those on board, the marines and sailors serve to do the fighting while the support units server to, well, support!
The captain aboard any ship takes precedence above all; his orders outrank all others, his initiative and skill are what will sail the ship or sink the ship. While others may take control of the wheel, they must always give it up for the Captain should he choose.
Basic Sailing Controls and Mechanics
There are two main aspects to sailing any vessel; the sails and the cannons.
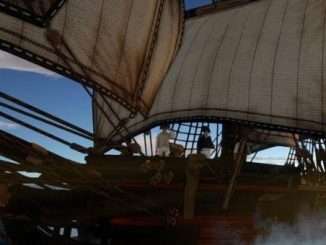
The more sails a ship has unfurled, the more wind it can catch and thus the faster it can go. However, having more sails unfurled also makes them more vulnerable to enemy fire which can render your ship immobile.
To unfurl sails, you press W repeatedly until they are all catching the wind, at which point standard WASD controls can be used to steer and propel the ship, with the exception of S which lower a sail with every press.
Below you will see the wheel of a shop which is used to take control, and an example of a ship with all sails unfurled, moving in a straight line.


The second major aspect of any vessel is the firepower, which differs slightly from that of conventional land warfare.
While artillery onboard a vessel is loaded and fired in the exact same manner as on land, a new kind of ammunition is introduced; chain shot.

Standard round shot is to be used when attacking the hull of a ship, troops or forts on land or when hoping to deal general damage; it can decimate sailors, destroy enemy guns and even sink the ships themselves!
Chain shot is designed to be used against ships in full sail; a successful hit with chain shot can damage or even destroy enemy sails which can render a vessel utterly immobile, forcing those on board to abandon ship or try and hold their position as you hammer away at a still target.
Knowing when to use Round Shot and when to use Chain Shot can be the difference between sinking a ship and giving it a love tap as it passes by.
Be careful with your shots, however. Some ships have a lot of overhanging rigging or equipment which can and will be damaged if you misfire and collide with part of your own vessel.
The last thing you need to know about your ship is the life-saving rowboats.
Rowing boats are fitted on every vessel, in case the crew for any reason need to leave the main deck; whether you’re assaulting an island fort or fleeing a sinking ship, rowboats can be your last chance to avoid being stranded at sea.
Launching rowboats is easy; simply approach them and use the action key (standard: E) to launch one, which will appear alongside the ship.

Leader Training School
Officer Training: Lead by Example
This section of the guide is specifically for officers.
The picture below shows the officer units for each of the factions:

Officers lead the players, and are therefore often one of the most important figures on any structured battlefield.
On NRP, officers in BATTLE RP can often lead massive chunks of the team into battle, and therefore they need to know how to lead!
Here you will find a few tips to ensure that you are can effectively lead and command men:
- Know your map! –
If you’re on unfamiliar ground, you are less able to effectively move your men and more likely to be ambushed by a more experienced officer. If you aren’t sure what lies ahead, move slowly and safely (or pass up command to someone who knows the land a little better) - Know your unit! –
Are you the officer of the rifles? Then you’ll want to keep them far from combat, and use them to pick off high profile targets and wear down the enemy with skirmishes. Are you leading line infantry? Have them line up and fire in volleys at your targets, maximising potential. Knowing the strengths and weaknesses of the unit you lead is essential. - Use the environment! –
Anything from weather, structures to landscape can have a huge affect on how you lead your men. If there is high ground within reach, it may be useful to lead your men to it-but only if you have enough to hold it! Foggy weather causing low visibility? Look for the flashes of musket fire or lanterns to find your targets. Avoid trying to defend areas if you don’t have enough men to fend off an attack; the bigger the area/the more possible entry points, the bigger the number of soldiers needed to guard it! - Know when to fight and when to flee! –
There is no shame in pulling your men back from a fight you cannot win; while some may wish to seek glory or a proud death, they’re no good to you with a bullet in them. If you feel yourself getting overwhelmed, pull out to regroup! That being said, if you spot a weakness in your enemy or a gap in their defence, exploit it! Losing a few men in a charge is worth decimating an entrenched enemy. - Know your men! –
Communicate with your soldiers; a silent officer will discourage those who follow him. While voice commands can be useful, instructing your mean and talking to them using the chat is vital.
Be the first to comment