
This guide provides the locations of nine out of ten hidden areas and all collectible items in the game. It contains information that reveals the locations of these items, which may reduce the element of surprise for players who wish to discover them independently.
Collectibles
#1 – Odd Rock
- Hint: Poor little fellow in the hardcore nightclub dumpster.
- Effect: Show friends and foes in minimap.
- Map: 10, Ash Bay Nightclub. Hardcore Difficulty.
The initial hint is relatively straightforward, although it may appear complex initially. One portion of the hint clearly indicates the map and location of the collectible item. The other portion is less clear regarding the method to make it appear.
Make sure you have the Shrinkify cyberware equipped and an explosion Special Weapon, Heavy Ryckets or C-4K to blow the dumpsters up so you can reach the collectible before you enter the map. That’s the only other thing you’ll need.
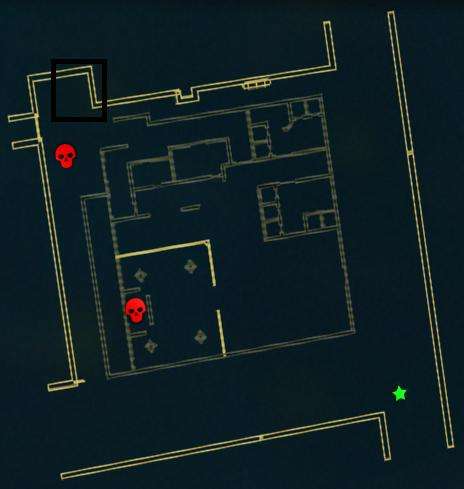
As marked on the map, you want to make your way to the top left corner of the map. Feel free to take out the boss if you wish or simply blow the dumpsters away and grab the Collectible hiding in the corner.

#2 & 3 – Pixelated Glasses and Space Ship Model
- Hints: Metro can be a deadly place, What’s this doing in a garden shed?!
- Effect: Pixelated Vision! and Increasing your fire-rate by 5%
- Map: 11, Neighborhood Watch. Normal Difficulty is fine.
…And now we go to one that was very ambigious and the last one I stumbled across. Or at least Collectible #2 was. The only indication of there being a Secret Area leading to the collectible is the Grim Reaper poster down by the underground rail box near your starting position. Thankfully, it’s easy enough to access. In either case, bring your handy dandy C-4K along.

Simply walk into range of one of the sweeping turrets either to the left or straight up from where you start, destroy it and make sure it sets off the alarm. Turn back around and wait by the box, four thugs with blue mohawks will spawn and walk out of the box. Kill ’em off and enter it and volia, off you go to the Secret Area!

Although it’s not in the screenshot, the game will pan over the item you’re after to the top right of the lone enemy present. Just deal with him, grab it and get out. And yes, that pistol is something you can pick up…but only while you’re here, unfortunately.
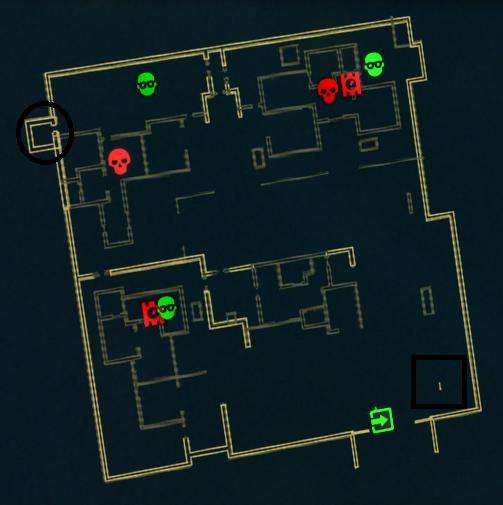
…As for the third collectible, you’ll want to head to the top left corner of the map nearby where one of the Gang Lord and civilian are. The door is locked, so simply blow it away by planting the C4 right up against it and voila, you’re in.

#4 – Grim Reaper Poster
- Hints: Behind a crimson red door at dawn.
- Effect: Extra Blood & Gore.
- Map: Well, the name of the map is in the hint. It’s ‘The Dawn of Jydgement.’
Just bring your handy-dandy C-4K or in a pinch, a Heavy Rycket. This’ll be over quick. Skip past the opening dialogue and simply follow the road/go to the top left corner of the building where the red door is located.

Simply blow it open with that handy explosive (two Ryckets hitting the door should also work) and you’re in. You don’t need to, but turn the in-game music down before you walk into the room. It’s certainly a welcome call-back, isn’t it?
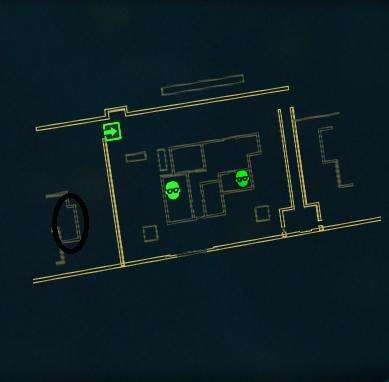
#5 – Cog of War
- Hints: X Marks The Spot.
- Effect: Increases reload speed by 5%.
- Map: 5. The Cobra Gang Hideout. Any difficulty works.
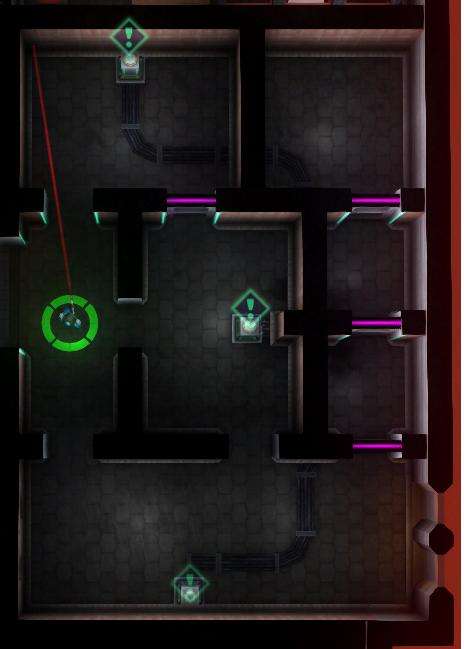
It looks a little obvious on the map, doesn’t it?
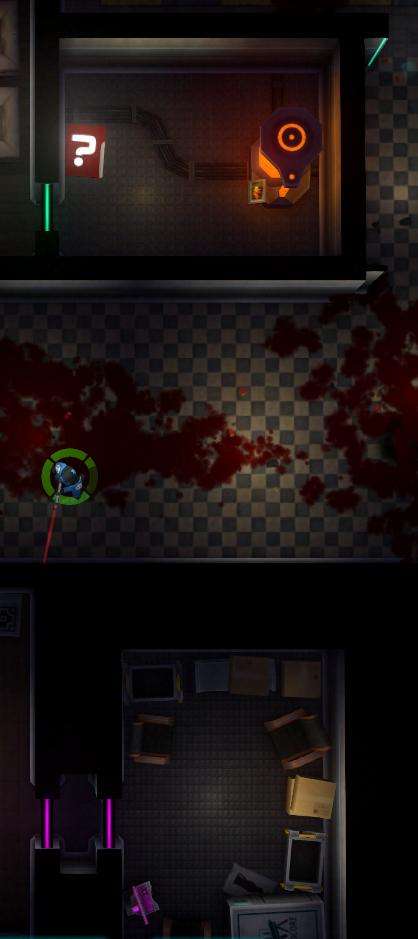
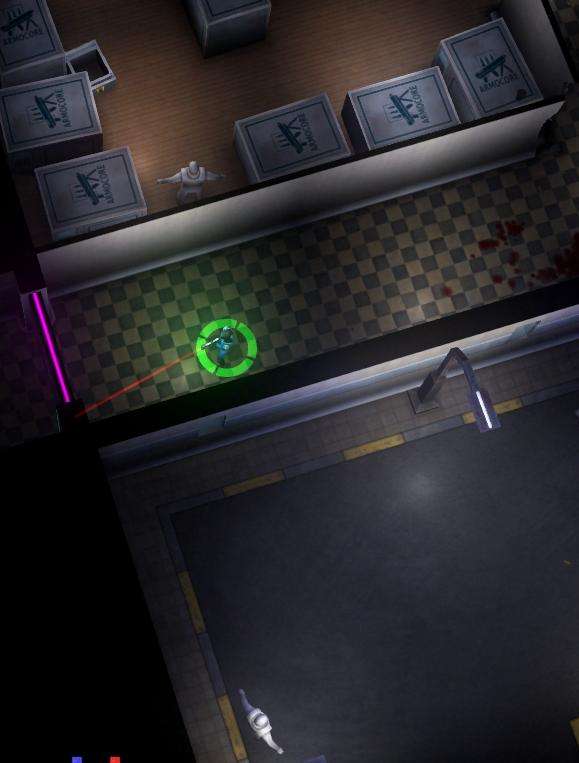
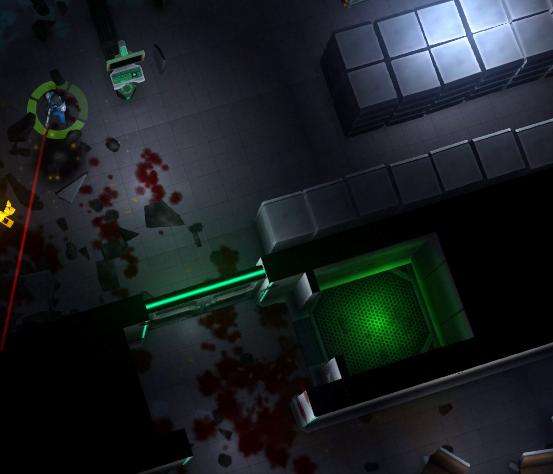
Anyway, bring the C4-K along or again, a decently powered Heavy Rycket. C-4K is pretty much a staple, being a key for nearly everything, really. Head up and go take out the spider bot. After you’ve dealt with it, simply place the C4 at the doorway the laser-sight’s pointing at and blow it open, revealing the room behind it and an elevator to the Secret Area where you’ll find the Collectible.
It’s a fairly small room, with the collectible in the top of the room. Just break through the glass to reach it and leave through the other elevator.
#6 – Seashell
- Hint: Be Patient, the other elevator seems to be out of order. Normally there should also be a button.
- Effect: Shows the ghost (a sphere of light) of your previous run/death.
- Map: 7, Hostile Hospitality. The difficulty DOES matter, but only slightly.
Thankfully, this is an easy Secret Area to reach. You still will want to bring some C4 with you. In Normal difficulty, you’ll need to blow open the Red Door to get to the upper half of the map where the button is waiting, on other difficulties, you don’t need to. After that, as the hint implies, you must simply be patient and wait for the elevator but that won’t trigger/become active until a short time. It’s a bit inconsistent, sometimes taking up until 1:54.
Either way, step inside to Secret Area 2.

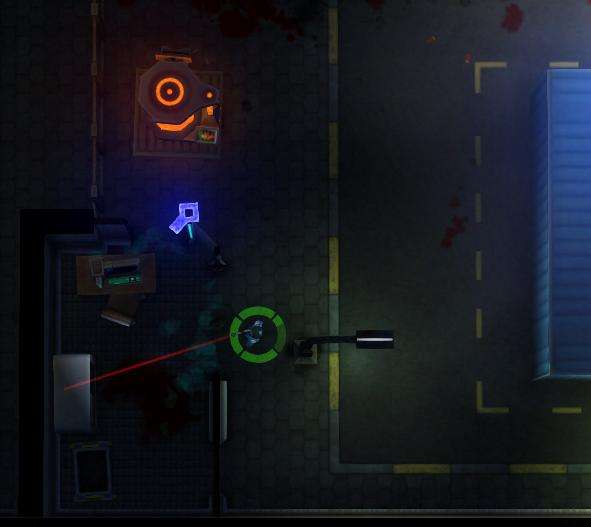
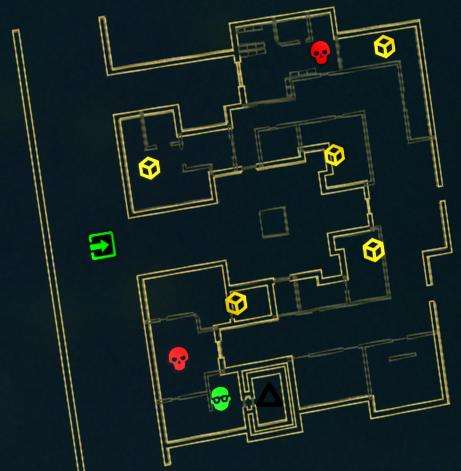
From your starting position, it should be easy to get to the ‘Do Not Feed’ room in the screenshot.
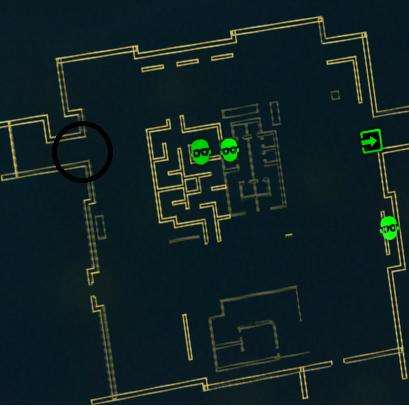
Directly south of it is a small room labelled with a ‘Start Test’ switch. Pressing it will cause the purple door to the right to open, leading to the maze you’ll see below.
Each switch opens one of the three doors in the far right while closing others in the maze. If you’re quick on the button and have the Fast Legs cyberware, you can get into a different room before the door closes. However, if you want to do it properly…
Middle, Bottom, Middle, Top, Middle, in that order.. That’s the order of the switches to push. The red and blue keys should be easy enough to get and leave through the red gate.
#7 – Old Key
- Hint: A dead night watchman’s locker holds the key …to the key.
- Effect: Well, you need it for the next collectible on the list.
- Map: 13, Industrial Boom. Any difficulty works. Bring Shrinkify and Hacking Tool.
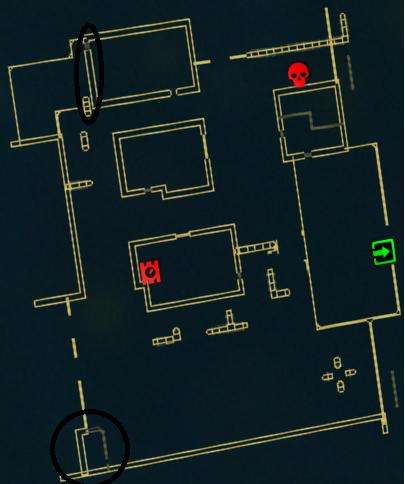
First off, head to the bottom left corner of the map. It might be best to defuse the bomb to remove the ‘time limit’. When you reach the small ‘room’ with a corpse/pool of blood (and therefore a Hackable Chest), open it and grab the blue key.
Then head up directly north to the wire mesh fence with people huddling around the barrel-fire.

As you can see, with Shrinkify, there’s a small enough gap to get through and being able to unlock the Blue Door and walk into the building with the collectible.
#8 – Sin Eraser
- Hint: Such a dangerous item can only be sold under the counter.
- Effect: Using this Collectible brings up a prompt giving you two options. To erase half of your ‘sins’, ie, Civilian Deaths by paying 66,666 credits or ALL of them at the cost of wiping your Mission and Medal progress back to the start of the game. Think of it at New Game+. You DO keep any Cyberware and Weapons you’ve PURCHASED, if you’ve only unlocked them, they WON’T carry over. The former is repeatable if somehow you’ve got that many credits on hand, but if you’ve already finished Map 18…best not to bother.
- Map: 12, Circuit Market. The difficulty doesn’t matter. There’s no real need for a map as you’ll see the item directly to your left when you start the map.
Simply unlock the door in the alleyway and pick up the Collectible. Again, I need to make this clear, you need the previous Collectible to get this one.
#9 – Tentacle Statue
- Hint: It seemed like just a normal night at the park…
- Effect: See things in their ‘true’ form..
- Map: 14, Artificial Park Rescue. Normal Difficulty.
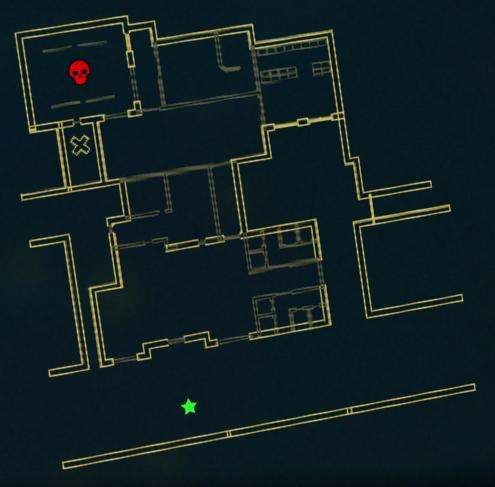
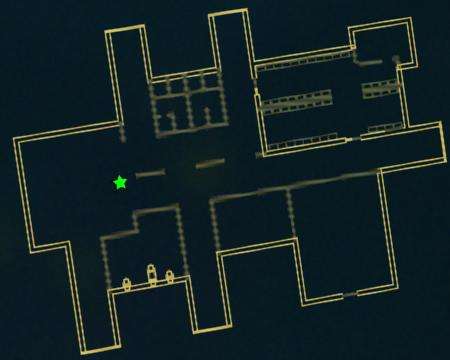
Simply walk to the top left corner of the map, following the path until you arrive at the corner and the picture below.

Just walk right through the gaps to a small room like you saw on the map, with the Collectible in the middle of a bloody pentagram.
#10 – Time Recoil Comic
- Hint: This comic gave nightmares to the kid next door.
- Effect: Slows down time. It’s a subtle effect and is always in effect while activated.
- Map: 1, House Arrest. The difficulty doesn’t matter. Bring Shrinkify.
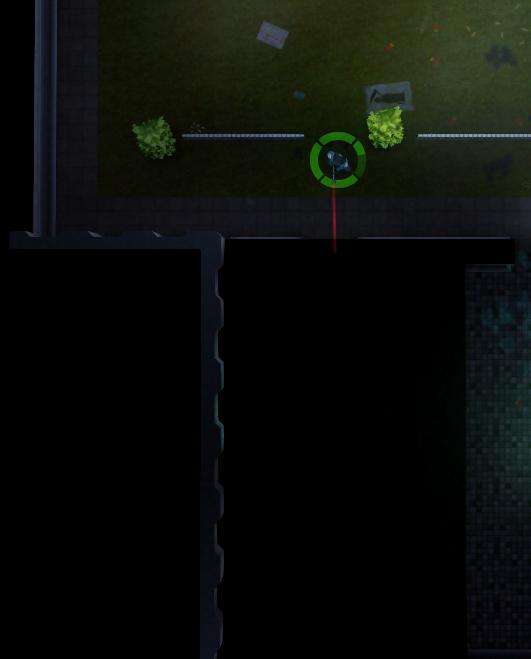
This is another short map where you likely saw the Collectible on your first playthough. With Shrinkify, walk through the gap between the hedgewall and barricade near your car…

…and voila, you’re ‘next door’ and able to pick up the Comic that’s located a bit further south.

#11 – Peculiar Gem
- Hint: Only found on a grim day in the safe room.
- Effect: Oh, hey, there’s a familiar hidden mini-game.
- Map: 18, Cobra Manor Takedown. Take a guess on what difficulty’s required.
As the camera pans over the main target you’re after for the level, that’s where you want to go. Blow through the blue door and take him and everyone out to save a hassle. As you can probably see depending on your camera view, there’s a ‘explosive’ generator in the top room and a room with purple doors below.
Simply blow up the Generator and the doors will open. Go and get the collectible!
#12 – C.A.T.S.
- Hint: There’s been rumours about a vault under the bank…
- Effect: Increased accuracy by 25%. I’m not exactly sure how effective/much of a change this actually entails, however.
- Map: 2, Bank Robbery. Hardcore or above. Bring Hacking Tool.
Many people have seen the yellow door taunting them, not being able to get through. Even your trusted companion C4-K can’t break through, but it can help you get the key. Where is? Directly to the right at the barricade where the citizens are hiding behind.
To get the key…well, you have to do the opposite of your job. The easiest way is to put the C4 next to the barricade and blowing it up, one of the civilians will cough up the key. Usually it’s the one on the top, so if you can kill him off without getting others injured, go for it.
Again, making it clear that you need to be on Hardcore difficulty or above. Head back to the golden door and head on down to the secret area, number 6, this time. You’ll need the Hacking Tool to unlock the doors and away you go, the collectible is at the end of the ‘gauntlet.’
It may be best to save this one until after you’ve finished the game as the ‘Citizens Died’ tally is there for a reason.
#13 – Book of Secrets
- Hint: Sometimes science requires sacrifice. Luckily these people are frozen so they won’t mind.
- Effect: Shows you the Secret Areas you’ve discovered. Yep.
- Map: 6, Shift From Hell. Any difficulty is fine. Explosives will come in handy as you’ll see, or Wall Breaker, which will make things a lot easier.
Well, if you’ve played another certain game by 10tons, you’ll likely know what you have to ‘sacrifice’ to open the way up to the Secret Area with the collectible you’re after. For those who’ve played this map, you might have already seen while scrambling to survive on the map.

Simply destroy those stasis pods and the door at the bottom of the room will open, leading you to the Secret Area. A rather pleasant stroll with the Collectible easy enough to get.
#14 – Friendly Fire
- Hint: Private elevator, beware of mines though or he’s gone.
- Effect: Name kinda says it all. Watch your fire.
- Map: 3, Office Retaliation. Hardcore and above. Friend of Mine is recommended, but not needed if you’re confident enough.

Thankfully, exploring through the level will bring you to the switch you’re looking for, which until it’s patched/adjusted, will work only on difficulties Hardcore or higher despite appearing on Normal difficulty. Head to the northern-west corner of the map to find it.

As you can see, the switch and the elevator is in the same screenshot and it will turn grey, signalling it’s active. Step inside and get whisked off to Secret Area 7.

Have fun. The collectible is at the bottom of the room near the computer. Keep the hint in mind when you’re trying to reach it.
#15 – The Orb
- Hint: Follow the rescued shoppers.
- Effect: Round and polished. Seemingly does nothing. …To be honest, I’m not sure what it does.
- Map: 17, Corruption for Sale. Grim Difficulty.
The last Collectible and a self-explainatory hint telling you all you need to do. As the goal is clear, there isn’t much to say beyond rescuing the Civilians and following them to the elevator they escape on and away to the Secret Area you go, with the Collectible easy to reach.
Secret Areas: 8, 9, 10
Secret Area 8
Map 15, Raid on their Parade. There’s something you need to do before you access the terminal…
To be more specific, BEFORE you activate the terminal that is your mission objective, destroy the two explosive drums behind the Yellow Door.

Which will cause three dummies to spawn around the map.

Take ’em out and then activate the Terminal. The database will explode and an elevator will appear nearby.
Secret Area 9
Map 4, Riots on the Street. There’s something in the level that there’s more of than anything else. Destory ’em and that ‘sign’.
Destory ALL of the computers on the desks in the level and the sign on near the bottom right corner on the map. If the door behind it is still shut, you’ve missed a computer. Blow ’em all up!

Secret Area 10
If you’ve read the Patch Notes in-game or on the Steam Discussions, it’s quite clear that to reach Secret Area 10, you need to reach 64000 points in Gembine. You know, what that Peculiar Gem we got on Map 18 does. Unfortunately, that’s quite a tall order for some of us, so hopefully 10tons/temper will lower the requirement down to something a bit more reasonable.
Other minor Easter Eggs
Click on the Jydge’s mechanical arm or visor several times. If you’re using a 360 controller, mash the X and Y keys to get similar results. Again, it’s minor, but it’s still some source of amusment, I suppose. And playing Map 1 on Nightmare will have some…unexpected creature lurking in the top right corner of the map. You can’t reach it, but it’s still a little unsettling.
Be the first to comment