
This guide tells you what choices you need to make in the game to see all the different story paths. It also gives some general advice on how to experience most of the content in the game. Have fun reading it, and you can also join our Little Busters book club if you want.
Introduction
This guide uses the flowcharts from the Little Busters! visual books, both the original and EX versions. These charts mostly show the important choices, but you should still check out other choices yourself.
To beat the game, you first need to finish Rin’s first ending (Rin1), then Mio, Komari, Kurugaya, Haruka, and Kud in any order to unlock Rin’s second ending (Rin2) and then Refrain. Refrain is the original final part of the game. The EX routes for Saya, Sasami, and Kanata were added later, and you need to finish Refrain before you can play them.
For the best way to play, it’s a good idea to start the game over each time you want to try a different story path. If you just load a saved game, you’ll probably miss some stuff. Plus, you might get further in the minigames if you restart.
Our guide shows the routes in the order we think is best, but you can do them in a different order if you want. If you want to see the most scenes, you should probably go Komari -> Kurugaya -> Haruka -> Kud, and you can do Mio and Rin1 whenever. For the most fun, we suggest doing Rin1 first. Some people think Komari should be before Mio, but you can play however you like. It’s your game.
Formatting
Choice you don’t want to pick- Locking Choice§ [Critical choice that becomes unavailable after the route is cleared and stays that way until Refrain is completed]
- ~Choice that may or may not appear. It’s fine if it it doesn’t.~
- The (CG) tag means the choice doesn’t affect the route and is only relevant for Gallery completion.
- [Common Bad End] – This is a broad description on endings that usually aren’t the main bad ending. These endings can often be gotten through many different means. Narratively, their importance varies, but they all involve Riki going to bed and thinking about the girl he was most close to.
Rin
- 5/14 Watch for a while (CG)
- 5/15 Go look for her
- 5/15 Watch for a while (CG)
- 5/15 ~Use another notebook~
- 5/16 Follow after Rin
- 5/17 Run after Rin
- 5/19 Look for Rin
- 5/23 Keep helping her out
- —– Cheer her on
- —– Go (Rin2)
- —– Become stronger (Rin2)
The Rin2 segment is only available after completing Rin1 and the 5 other pre-Refrain heroine routes.
Rin Bad Ending
- [Common Bad End]
Cheer her onLeave her be
Mio
There are extra scenes available if you choose Mio as Kud’s roommate on 18/5.
- 5/15 ~Use another notebook~
- 5/18 Stay in the courtyard
- 5/18 ~Hostility~
- 5/19 In the courtyard (CG)
- 5/21 Look for her
- 5/21 Good intentions
- 5/22 Go to the courtyard (CG)
- 5/22 ~Shook my head~
- 5/23 ~Quit~
- 5/23 Go to the courtyard§
- 5/24 Go to the courtyard
- 5/28 Go to the courtyard
- —– Midori
- —– Good intentions
Mio Bad Endings
- [Bad End 1]
MidoriMio- [Bad End 2]
Good intentionsBad intentions
Komari
- 5/15 ~Use another notebook~
- 5/17 Go to the rooftop
- 5/18 ~Hostility~
- 5/22 Go back to the classroom (CG)
- 5/22 ~Shook my head~
- 5/23 ~Quit~
- 5/23 Go to the rooftop
- 5/28 Go to the rooftop
- —– Fix her clothes
- —– Ask her for details of the dream
- —– Face reality head on
Komari Bad Endings
- [Common Bad End]
Ask her for details of the dreamSuggest that she forget about it- [Bad End]
- —–
Face reality head onPretend not to notice anything - —– If it will protect another
After completing Refrain, an extra scene with Komari on 21/5 becomes available. If Kurugaya is unavailable during your playthrough, she gets replaced by Rin in the scene after the final choice. This also happens if you’ve completed Rin 1, but in that case the game will still show the Kurugaya scene at least once.
Kurugaya
- 5/15 ~Use another notebook~
- 5/17 Watch the battle (CG)
- 5/18 ~Hostility~
- 5/21 Go buy juice
- 5/22 Go find her§
- 5/22 Go to the backyard
- 5/22 Listen carefully
- 5/22 ~Shook my head~
- 5/23 ~Quit~
- 5/28 ~Go to the cafeteria~
- 5/28 Don’t talk to her
- —- Feign ignorance
- —- Forward
- —- I can’t give up…
Kurugaya Alternate Endings
- [Common Bad End]
Don’t talk to herTalk to her- [Bad End]
I can’t give upIt’s impossible…- [True Ending] (Only after Refrain)
- On the first playthrough after Refrain, you will automatically get the true ending. On subsequent playthroughs, you are able to choose between the two endings. The true ending also gives you the achievement I Like You, In A Romantic Way
- Original: I don’t know the sender
- True: I know the sender
Haruka
Haruka’s second bad ending has a scene that will be permanently unavailable after the first playthrough. To view this scene: you must have completed the Kurugaya route; you must not have completed the Kud route, and Kanata must be chosen as Kud’s roommate on the 18th. The scene in question is a conversation between Kud and Kanata, so saving there is recommended.
- 5/15 ~Use another notebook~
- 5/16 Take it (CG)
- 5/16 Get involved (CG)
- 5/18 ~Hostility~
- 5/22 Go to the cafeteria
- 5/22 Haruka-san§
- 5/22 ~Shook my head~
- 5/23 ~Quit~
- 5/28 ~Go to the cafeteria~
- 5/28 Ask what happened
- —– Ask for the truth
- —– Check it out
- —– Continue searching for Haruka-san
- —– Saw it in the class register
- —– Yes
- —– I understand
- —– That’s a good idea
- —– Accept her condition
- —– Don’t give up
Haruka Bad Endings
- [Common Bad End]
Saw it in the class registerHeard it from Futaki-san- [Bad End]
Don’t give upGive up- Version A: I want to.
- Version B: I don’t want to.
Kud
There are a bunch of scenes that depend on who Kud’s roommate is. On 18/5 you can choose Haruka or Mio as the roommate; all other cases will default to Kanata being chosen. Those three can also become unavailable if you’ve completed Haruka or Mio’s route. If your chosen roommate is unavailable during the later parts of the route, their scene will be handled by Komari, so this means there are 4 variations that scene.
- 5/15 ~Use another notebook~
- 5/16 Help her look for a roommate
- 5/18 ~Hostility~
- 5/19 Help her
- 5/22 Nodded§
- 5/23 ~Quit~
- 5/27 Do you mind if I tag along?
- —– Kurugaya-san and Komari-san
- —– Look into the question from yesterday
- —– She should go
Kud Alternate Endings
- [Common Bad End](Only works if Haruka is available)
- Pick Haruka as Kud’s roommate, then choose to study with Masato.
- [Bad End]
She should goI want her to stay- [Muscle End] (Only after Refrain)
- See Muscle Sensation for details
- [Alt End] (Requires you to finish the Bad End and Refrain. Includes the achievement ”Feelings” That Can’t Be Cast Away)
She should goAsk what she wants to do
Refrain
Refrain only unlocks after completing Rin2.
- —– Escape with Rin
- —– Yes (Only appears after you clear Refrain once)
- —– It’s not enough
- —– Calm myself down
- —– Break off branches
- —– Postpone his rescue
- —– Tell her to check the luggage
- —– Think it through
- —– Rescue Kyousuke
After completion, you can play through Refrain again from the start in order to get the achievement My Precious Rin. From the third playthrough and onward you are able to choose between the two epilogues.
After completing Refrain, a whole bunch of content becomes available. Most notably, all previous heroines routes are unlocked and 3 more are added. You will frequently find new content by replaying old routes.
Saya
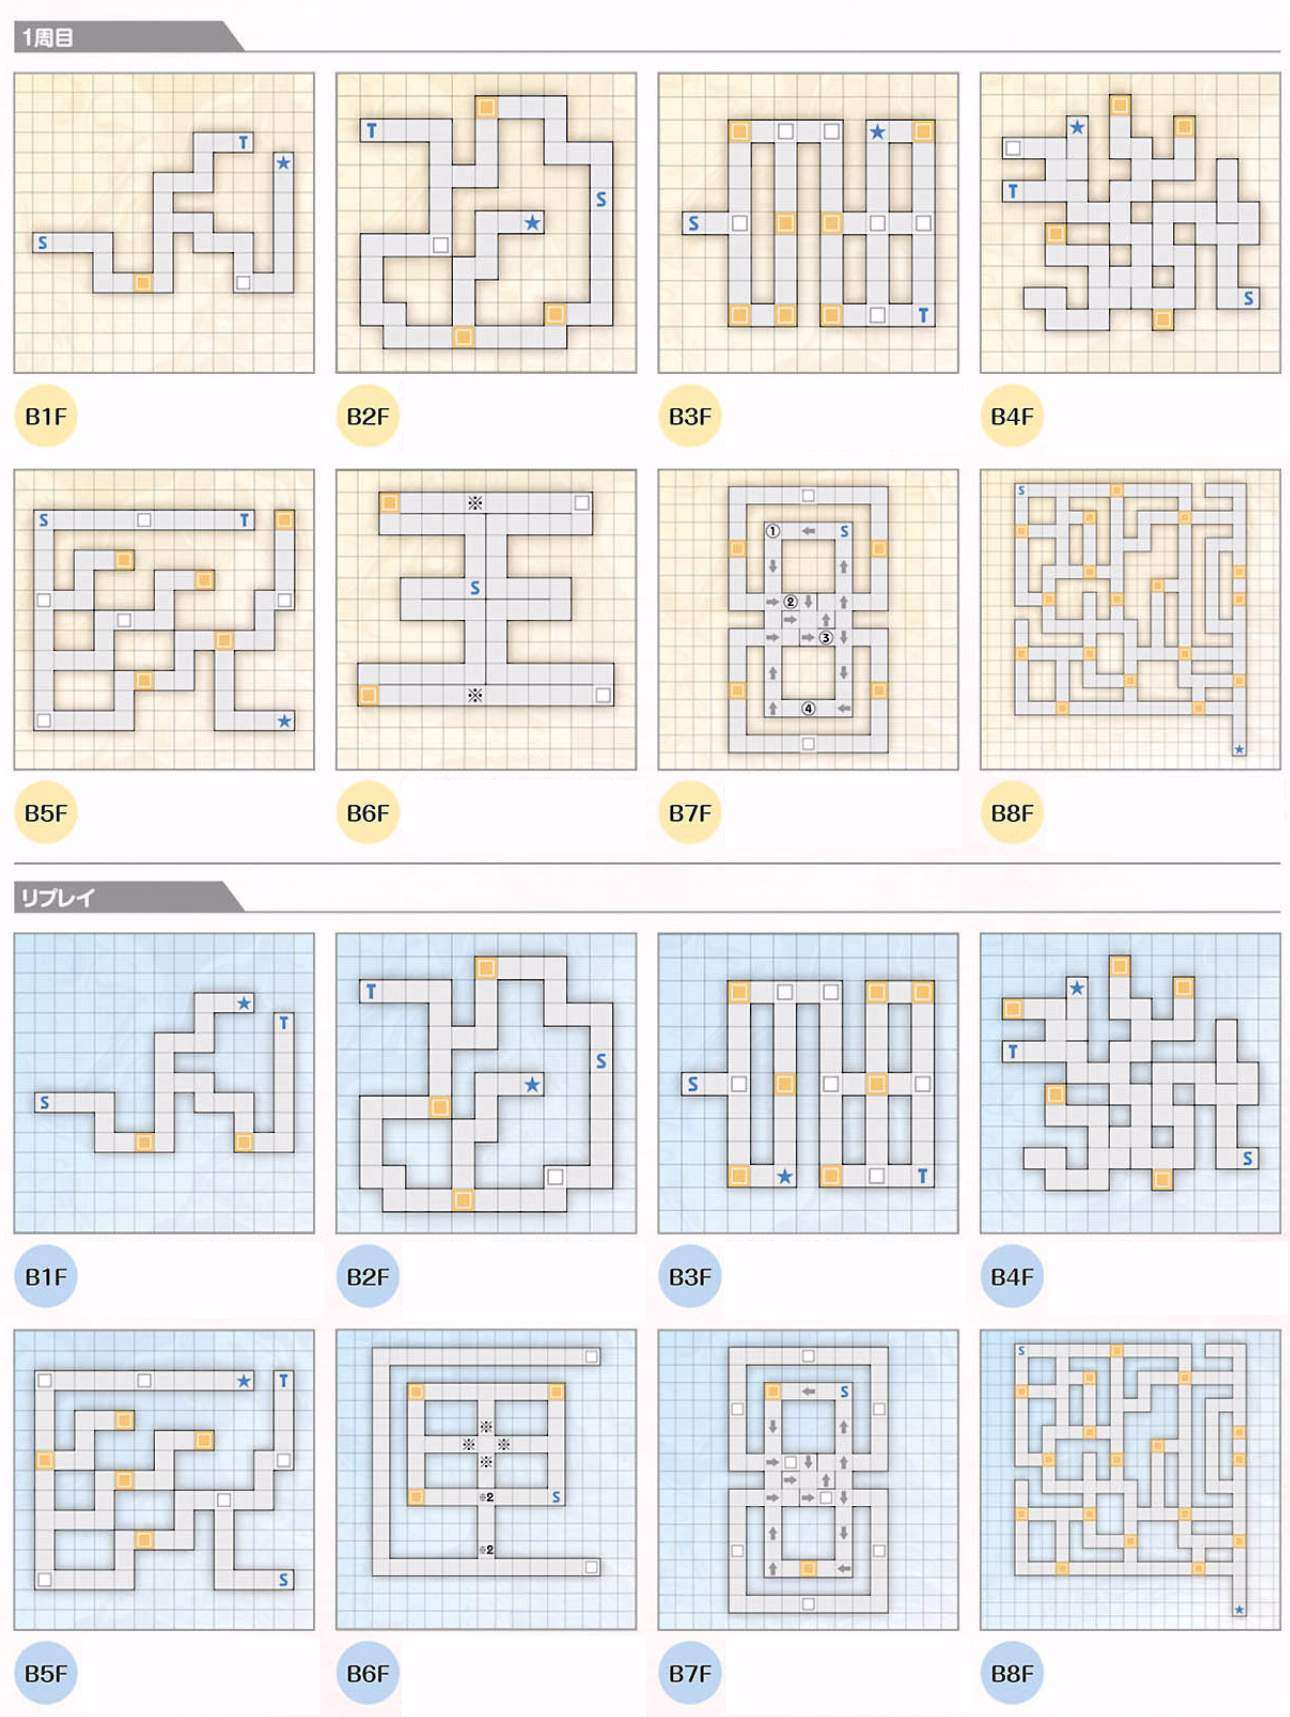
Saya’s route involves a lot of unique mechanics most prominent of which is a dungeon crawler. Please refer to the map linked below to help you navigate. The map symbols are as follows. The S is the starting room for the floor. The T marks a trap. The star is the goal that leads to the next floor. The yellow squares are enemy rooms. White squares are just empty rooms.
- 15/5 Go fetch the notebook
- 15/5 Get back inside
- 16/5 Not okay
- 17/5 Don’t throw it away
- B1F (Go to the ★ room)
- B2F (Go to the ★ room)
- B3F (Go to the ★ room)
- B4F (Go to the ★ room)
- B4F Look around outside the room (CG)
- 20/5 Spend time with Tokido-san
- B5F (Go to the ★ room)
- B5F Give up
- B6F (Discover the left side of the map, then go back to the nearest room)
- B6F Look at the map one more time
- B6F (Discover the rest of the map, then go to both rooms on the right)
- B6F Open the sarcophagus in this room (Either room is fine)
- B6F Leave him be
- B6F (Go to the other sarcophagus room)
- 22/5 Say it
- B7F (Discover the whole map, then walk around until the prompt to return to the start)
- B7F (Follow the arrows on the map and walk in the shape of an 8)
- 22/5 B8F (Go to the ★)
- 23/5 B8F (After going to the ★, walk around to 10 different rooms, then take 3 more step)
Replay
<Choices formatted like this are required death choices> When you die, just go back to the same room unless instructed differently.
- — Investigate the floor
- — Investigate the blackboard in the back
- B1F (Go to the ★ room)
- B1F <Left>
- B1F <Middle>
- B1F <Right>
- B1F Listen to Riki-kun’s opinion
- B2F (Go to the ★ room)
- B2F <Use my own strength>
- B2F Jump into the air
- B3F (Go to the ★ room)
- B3F <Jump back>
- B3F Climb the statue
- B4F (Go to the ★ room)
- B4F <Think of another way>
- B4F (Enter the T room to disable the trap.)
- B4F (Enter the ★ room to descend to the next floor.)
- B5F (Go to the ★ room)
- B5F Find another way
- B5F (Go to the T room)
- B5F <Check>
- B5F Take off my clothes
- B5F Take off my panties
- B6F (Check all rooms then go to the middle.)
- B6F (After the conversation with Riki, go to both of the hidden rooms)
- B6F (In the bottom mummy room) Open the sarcophagus in here
- B7F (<Walk in the shape of an 8>)
- B7F (<Walk in the shape of an 5>)
- B7F (You automatically progress after that)
- B8F (Go to the ★ room)
After Replay, you need to start a new playthrough. Note that after completing this second part of the route you will be locked out of interacting with Saya, so saving is recommended. You’ll be able to unlock the route after completing Sasami and Kanata.
- 15/5 Go fetch the notebook
- 15/5 Get back inside
- 16/5 Not okay
- 17/5 Take it
- 17/5 At this rate… (This option only appears if you’ve done the Idiot Riki route.)
Saya Alternate Ending
- [Common Bad End](Both options give the same ending)
Take itLeave it beAt this rate…I dodge (Only available when doing the Idiot Riki route)
Sasami
Sasami’s route is only fully available after completing Refrain.
- 15/5 Don’t lend it out
- 15/5 ~Let her be~
- 15/5 ~Use another notebook~
- 16/5 ~Don’t get involved too much~
- 17/5 ~Don’t go to the rooftop~
- 18/5 ~Go to the cafeteria~
- 18/5 ~Hostility~
- 21/5 ~Play with Masato~
- 22/5 Go to the backyard
- 23/5 Get something to drink
- —- About Mon Petit
- —- Wordlessly hold out the Mon Petit
- —- Keep her to myself
- —- Stay with her
- —- I too…
Sasami Alternate Endings
- [Bad End]
I too…No, that’s not it…- —– I guess there was no reason
- [Alt End]
I too…No, that’s not it…- —– There’s another reason
Kanata
Kanata’s route is only available after completing Refrain.
- 15/5 ~Use another notebook~
- 18/5 Friendliness
- 21/5 Get a breath of fresh air
- 23/5 ~Quit~
- 23/5 Get something to drink
- 28/5 Help
- —- Help the dorm committee out
- —- Don’t leave
- —- Don’t leave
- —- Because I like you
Kanata Alternate Endings
- [Common Bad End]
Don’t leaveLeave- [Alt End]
Because I like youI can’t answer
Achievements and Extras
Muscle Sensation
Muscle Sensation is a humorous offshoot from Kud’s route. It can only be read to completion after Refrain. While playing through Kud’s route, pick Mio as Kud’s roommate on the 18th. After that, play with Masato 3 times during common route. Masato is available for playtime on dates 16,18, 19, 21, 22, 23, and 24.
While in Kud route:
- —- Masato and me
- —- Muscle
- —- Muscle
- —- Muscle
- —- Even so, Muscle
Perfect Catering
This achievement requires you to get 45+ points in the cafeteria minigame on 18/5 during Rin’s route. My best tip is to simply pause buffer by right clicking or swiping up.
Idiot Riki
The Idiot Riki/Baka Riki route is a variant of Saya’s route that slightly alters Riki’s personality for comedic effect. This route is only available after completing Saya’s route at least once. This gives you an extra CG with the crane game. You also unlock a slew of funny dialogue.
If you complete this route and then go into the true Saya route, you’ll get an option to dodge Saya’s kiss. Doing so leads to some really funny scenes but also a bad ending. The choices below must be made in addition to the ones from the normal guide.
- 16/5 Lawson
- 16/5 Famima
- 18/5 Yell
- 18/5 Declare my love
- 18/5 Lie
- B1F: Tokido-san
- B1F: But I’ll still do the jump
- B2F: Turn it 360 degrees
- 19/5 No
- 19/5 It’s been super fun
- B3F: Push it onto Tokido-san
- B4F: Investigate the bath
- 20/5 Ask what her type is
- 20/5 Pray
School Revolution
School Revolution is a secret ending to Saya’s route, and you also get the achievements The Greatest Feeling Ever… and School Revolution. This route is only available after completing Saya’s route at least once. During Replay, make sure to die 3 times each on floors 1-7. Saya will give different responses to dying, so you can stop when she starts repeating herself.
This unlocks Ecstasy Mode which makes you invincible versus normal enemies and allows you to fight Tokikaze(only if you have the mini game enabled). I wish you good shooting.
- B1F: Walk into the trap room 3 times(poison gas)
- B2F: Walk into the trap room 3 times(snakes)
- B3F: Walk into the trap room 3 times(cutter blades)
- B4F: Your 3 deaths only start counting after Riki saves you from drowning, so you need to die once to the boiling bath then go into the trap room and choose to not believe in Riki.
- B5F: The 3 deaths only count when you fall down by going barefoot, so follow the normal guide until that option appears.
- B6F: Open the sarcophagus in the top room 3 times.
- B7F: First walk in the shape of an 8. After that, fail 4 times. You can do that just by walking down from the starting room. Now you should gain a heart meter below your health. The meter fills up by taking damage. When it’s full you go into ecstasy mode which heals you every time you take damage. The normal enemies can no longer kill you, and you can damage Tokikaze in this mode. Note that he’s still not an easy fight. You need to hit him 16 times to win.
Repeating lines that indicate when you’ve died enough:
- B1F: Except they’re not!!
- B2F: Okay, snakey, come here!
- B3F: Come on, bring it !!
- B4F: Come on, water!
- B5F: Yahooooooooooo…
- B6F: Alright, I’m gonna die! Hey, come on trap!!
- B7F: Alright, lasers come on!
Omg the length is just bizarre. I only wanted to watch the H-scenes that LB! Ecstasy has, thx god i found a save file so i could watch them all without wasting months for some mediocre HCG.
hmm… i see your a man of culture as well…
also a month is way too long for one VN.. It didnt even take me a week to finish LB eX
Please ,i need your save. The New routes dont unlock for me ;-;
just search in sagaoz