
Here’s how to play as a successful trader in Star Traders: Frontiers, covering everything from setting up your game, to early trading, and finally, becoming wealthy.
Introduction
This guide will explain trading, starting from the beginning of the game to the end. It’s written by a player who focuses on trading on the hardest difficulty. The purpose is to help you use the trading system well. This includes making good choices when setting up your game and giving advice on how to manage your ship.
Star Traders: Frontiers supports many playstyles, and has a lot of depth. Even if you decide against persuing trade as your primary focus, I hope you will find this guide’s discussion of templating, strategy, and keeping your ledger ‘in the black’ helpful. If anything, I hope you will leave it realizing that you needn’t generate goods from exploration or piracy to become rich and powerful.
Templating and You
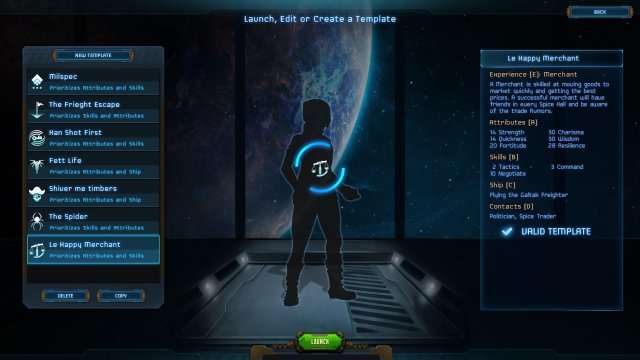
Here is the template I used to break through to year 23 and the heaviest hull in the game on Insane difficulty.
Let’s talk about why it is the way it is:
- Ship priority has to be at least C for a bulk-goods merchant, because this is the minimum required to acquire the Galtak Freighter at character creation. This ship has the largest cargo compartments of any ship you can select at this stage of the game, even though it is outmassed by several of the other choices. Its main competition for trade is the Cautela Heavylift, which has more crew, more officers, and a much higher overhead (in terms of salary, fuel, and repair cost) to run.
You could select the Heavylift by upping ship prioriity, but you give up at least two of the following: 2 contacts (and starting rep), 8 skill points, 8 base attribute points, and/or experience for captain and crew. Moving your captain’s stats down any further than necessary at the start of the game will limit your long term growth in exhange for a ‘kickstart’ at the beginning of the game. Consider carefully how much challenge you’re looking for, and what parts of the game you’re willing to have be a bit harder vs. easier before going for a heavy hull at character creation. (Remember that there are more hulls out there, if you can become rich enough to purchase them!)
Captain attributes and skills are prioritized because I’d rather scrounge in the beggining for things like contacts and XP, which I can acquire through play, than be locked into a sub-par captain. Contacts are above XP because the difference between D and E experience isn’t enough to warrant placing Contacts at position E. Experience is easy to come by for every captain, and a low priority at the start as long as your hull allows you to staff effectively with low level crew. (Scout hull, I am looking at you.) Contacts are not higher because as a merchant, my first talent choice will be one that lets me find Contacts when I trade. Since we’re looking at trade as a focus and selecting merchant as a starting class, a lower priority for contacts won’t hurt our prospects as much as it might in other builds.
With a starting priority set, that leaves attributes, skills, and contacts to be allotted.
- Attributes are heavy mental and low physical, with Charisma & Wisdom maxed.
- (Of the physical stats, the only one increased is Resiliance, which influences captain HP (and death rolls) heavily. This captain is not meant for crew combat, which is the only reason the stats are allocated as they are.)
- Skill points are spent in capping Negotiate, and then split between Command and Tactics.
(Later merchant talents are tied to your Negotiate skill.) - I have selected contacts who buy intelligence and potentially have useful recruits.
(Spying fits well into our trade strategy, as you will be going many places over the course of your playthrough.)
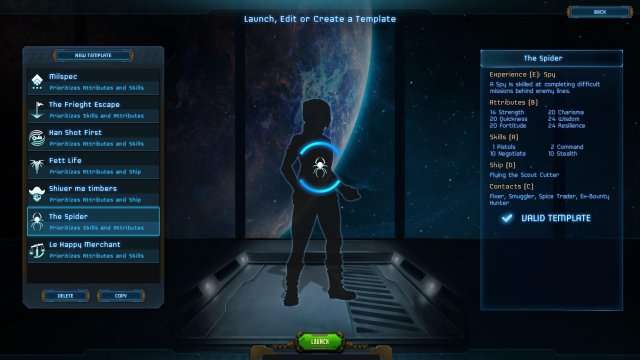
If I weren’t playing a merchant, first and foremost, I might put skills first just to have more flexability, so I could accomplish my primary aim while still dipping into the unholy pot of contacts that is the Merchant early game. That would look like this:
Warning!
Templates like I just suggested you create have minimal experience!
If you’ve followed my template suggestions, then you want to use he “Assign manually” box for crew talents when setting up your game so you can prioritize skill saves in your starting crew. Try to get at least two of them for all the primary skills, and one each at least on your navigators. With low levels and low skill pools, we are likely to need them!
The Moklumnue Merchant Seed
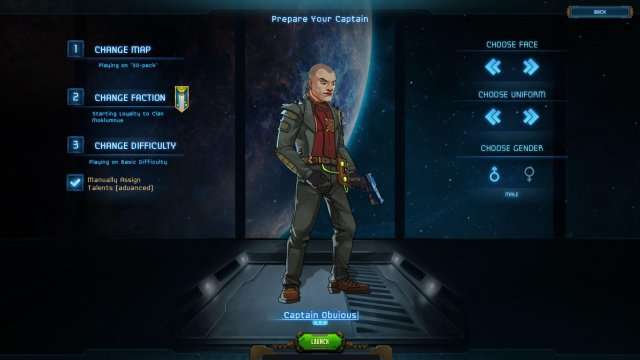
Once you’ve made your character, select a map. For the purposes of this guide, I have provided a seed:
st-v01-30-4-163808917
This seed has a starting sector with a very strong economy. I recommend it for learning the ropes. After you know what you’re doing, any seed will be appropriate for plying the space lanes as a merchant.
Especially on the harder difficulties, cash is very tight in the beginning. The starting story quest line gives access to a prince who is guaranteed to have trade permits. This immutable fact is what makes this a strong seed.
In this seed, your first trade permit will allow you to buy the spice on Prince Faen’s farming site, Formosa / Phrexia Cross to haul for sale at the refinery on Hydra Tri-C / Hydra Tri-C. From there, Refined Spice can be purchased and sold at the luxury settlement on Tomoyta Prime / Kataja Hieghts. Biowaste from Tomoyta can be taken back to Phrexia Cross to close your first route. From this point on, you should have easy access to credits sufficient to trade freely in this sector.
I recommend this sector because of the low trade law (5) on the Independent population center Formosa / Shrevport Holding, Independent farming site Hydra Tri-C / Lvagrette, and the Industrial site Matilda / Andovia Cross. These low law locations will allow you to bring low-legality goods to market easily late game.
Because non-story contacts are randomized at each start, this is the limit of the help I can provide based on map generation. Your early game will vary, based on what contacts you have and what ‘Proving your charter’ in-system missions you can exploit in the first 27 weeks of play while trading.
Welcome to Destruente Quarter! Happy Trading!

Crew Management and You
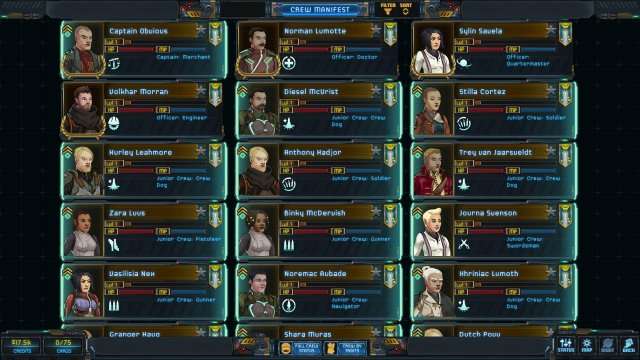
Talents are what make or break your early game.
In general, skill saves are great to start with, and I recommend getting at least two of every type you can. (Except for navigators, where you can’t. Since you have three points to spend, buy two piloting saves, and one tactics save.)
The other vital talent for a starting captain is on the E-tech, and it is called Signal Jamming. This talent is another one I recommend having multiple uses of. It will reduce reputation loss from botched ship encounters, which can add up very quickly and have the other factions shuting their exchanges to you. You can recruit E-Techs at Orbital, High Tech Industrial, and Luxury Pop centers.
Captain:
- Go Merchant 5 / Commander 1. You want the commander’s talent Discerning Glance to improve your recruitment as soon as needed. Since in the current build merchant only has useful talents up to level 8, and the level 11 talents are dead, hopping over to smuggler for mid to late game works best.
On your captain, since we’ve gone merchant we have a choice between a Negotiate skill save and this skill: Market Confidant.
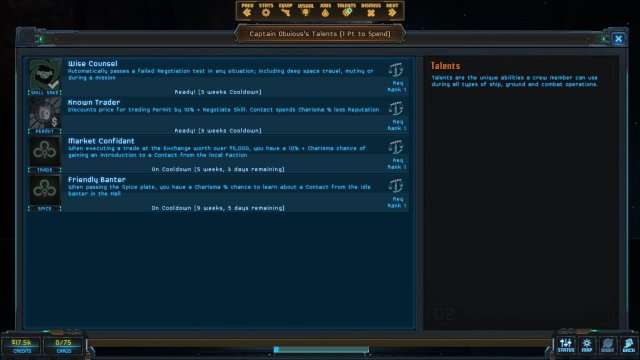
Our charisma should be 33 at this point, so Market Confidant grants us a 43% chance to learn of a new contact when we move $5000 credits worth of goods. Something you will do countless times as a merchant, just to pay for water-fuel for the void engine.
You’re giving up a Negotiate save to get it, but you have 10 bonus points there from the template, and you can pick that up at level 3. A decent chance of contacts from the very start is worth that delay. Take Market Confidant and rack up the contacts!
Officers:
- I like to take levels in spy on my engineer, since both classes emphasize electronics. I also like to hire mechanics so that I can retrain the engineer’s talent point into spy talents early. I usually go 1 engineer / 5 spy there, to gain access to spy card game options.
- I like to take levels in military officer on my quartermaster, so that I can pick up the stiff salute talent. 1 Quartermaster / 5 Military officer grants access to the Commanding Sweep talent.
- I like to take a level or two in combat medic early on my doctor. At first for the extra skill save and eventually for E-Suture, once the doctor skill is high enough, for large group heals in crew combat.
- A promoted specialist crew should be your 4th officer, once you modify your ship enough to accomodate the promotion. I recommend diplomat, merchant, or spy for this post. The promotion will reset the new officer’s levels to one and allow you more talents. It is a very nice utility pickup as a result.
Crew:
- Make sure you have 5 gunners. You want at least 4 of them to train the talent Supremacy of Firepower, to allow you to dominate the Patrol card game in the your midgame.
- Once you have enlarged your Barracks, hire a few Mechanics, so you can retrain your Engineer / Spy officer into the Spy card talents.
- Hire extra 2 spies / 1 merchant or diplomat as mission specialists. The spies will grant you dominance in the Spying card game, and the merchant / diplomat is to promote to officer when you get the chance.
- Hiring a bounty hunter or military officer for the intimidate skill save talent is probably worth it. It is this strategy’s soft spot. Train your Quartermaster/Military Officer into Zealot for the save late game as well.
- Maintain a 4 pack of combat crew. The two Soldiers, a Pistoleer, and a Swordsman is good. The combat medic / doctor officer can round out your team late-game. Look for the swordsman to use the Sharp Counter talent and the soldiers to have Suppressing fire. Your combat crew is ideally about making the enemy miss attacks on your swordsman, who counters when they try to kill him.
- Dumping combat crew until your barracks upgrade is possible, but you will get punished for it by the Arbiter’s storyline. Having to rebuild your combat crew because they were inexperienced and got killed sucks, but having early Mechanics and an extra E-Tech can make for a nice early game boost. YMMV.
After you cover the basics, select ship combat talents that focus on either debuffing the enemy’s move/escape/accuracy, or those that boost your move/escape/defense. Your initial ship is good at all ranges, but my recommendation is to swap out your short range weaponry in favor of utility. Because of this, buying talents that let you keep enemy ships at range is crucial.
Gaining positive reputation with all factions
Welcome to the main challenge of the merchant mid-game, gaining positive reputation with all factions. Achieving this play goal allows you to freely move and trade between sectors, most ships will be suspicious or better when you interact with them. A rare bribe will be required, but most vessels will be content to ignore you.
When you set this goal for yourself, you should have traded a great deal against the initial trade ban landing you at least at -30 with that one faction. Your story interactions with Prince Faen’s nemesis, Princess Char, should have you at somewhere between -15 and -30 with her rep. All other factions should be in the -10 to +10 range.
As compelling as Prince Faen and Val’s storyline is, I recommend abandoning it once the Arbiter leaves. Follow these stories on a seperate captain. Earning the emnity of a faction is not worth it from a merchant’s perspective. It will shut too many exchanges and opportunities to you, and close off a whole faction’s worth of potential contacts from you. You have no idea what faction will kick out your first rare goods contact, and you don’t want to lock yourself out of a valuable late game asset by ruining your reputation with their faction.
Your goal is to patrol at planets with low rep factions, to get their rep high enough for the majority of your future random encounters to be friendly acknowledgements, that might boost your rep even higher. Once you reach this tipping point for all factions, this phase of your midgame is done.
That said, Rule One of Patroling & Spying your way out of negative rep is: You can walk away from bad hands.
Rule Two is: Let your merchant talents do the heavy lifting. Merchants have the luxury of not having to grind rep entirely by patrol.
Rule Three is: Carry no cargo when patroling, so you can surrender to pirates without loses.
Learn when to walk away. This is the most powerful tool in your arsenal. You can always come back to a bad hand when the cooldowns on talents are favorable, or change planets / sectors if a bad hand presents a choice you don’t want to make.
Don’t fight if you don’t have to. Your frieghter is outmassed by most of the military, zealot, bounty hunter and pirate hulls. Consider surrendering early and often at the start of the game. Every encounter your crew survives adds to their experience, getting you that much closer to talents that can help you.
Secondarily, you want to gather intel to sell so you can bolster your reputation with contacts, so you can recruit mission specialists and fill your last officer slot on your Galtak Freighter.
Your main tools during this phase of the game are Patrol talents:
- Commanding Sweep, on your mid-level Quartermaster/Military Officer: this will help you push rep up by patroling. Use it when one other rep bonus card is in the draw pool. This will improve your odds from 25% to 40% that you will draw positive rep.
- Supremacy of Firepower, on your mid-level Gunners: this is what you use to ‘veto’ the worst cards in a Patrol Draw, or when multiple rep cards are already in play. Two rep cards out of a pool of four is fifty-fifty, and while you could use Commanding Sweep to make it 60-40, that’s only 10% better, vs 15% for the above scenario.
- Methodical Sweep, on your Crewdogs. This is a poor man’s Supremacy of Firepower. Rerolling a really bad card into something at least tolerable is better than not using a talent.
Your secondary tools are Spying talents; you use these while your patrol talents are on cooldown:
- Scouring Search, on your mid-level spies: Commanding Sweep for intelligence gathering. Use it when you have one positive result.
- Espionage Sweep, on your spies: Supremacy of Firepower for spying. Your veto card, or your go-to when multiple intelligence or credit skim/score cards are in play.
- Wide Sweep, on your E-Techs: The analog of Methodical Sweep. One reroll of a bad card is still better than nothing. Can be retrained out for other skills, once you have extra spies.
- Clink of credits, on your high-level E-Techs: Commanding Sweep, but for credit gain. Use it when you have one positive result.
- Secrets Unbound, on high-level Spies
Supporting talents:
- Stiff Salute, on your Quartermaster/Military Officer: this can defuse many of the situations you get yourself into while patroling & spying. You usually want this off cooldown when you patrol or spy!
- Signature Jammer, on your E-Techs: Reduces the consequences of messing up across the board. You always want this off cooldown when you Patrol or Spy! Combos with Stiff Salute to bypass hostile military and zealot enounters with minimal rep loss.
- Static Talks, on your mid-level E-Techs: allows gathering rumors when you spy sucessfully.
- Garbled Identiy, on mid-level Smugglers & Spies: a parallel talent to Signature Jammer based on stealth, rather than electronics. Usually not worth it compared to…
- Forged Permit / Faked Signature, mid-level Smugglers (also Faked Signature on mid-level spies): Another get out of combat free card. Using multiples can make the enemy captain friendly. If he acknowledges you in this way, you can gain rep.
- High Stakes & Data Haul, high-level Spies: Improve intelligence record gathering by 30% or the sale price of a single (hopefully large) batch of records.
Honorable mentions:
The Triple-Arc Signal Array. This is a ship upgrade that will get damaged slightly on each use, but boost Intelligence Records gathering by 50%. You want one if you’re spying.
The Assertive crew trait. This trait has a percentage chance, based on Charisma, of increasing rep gains by 25%. Having a crewman or two with it is a nice bonus during this phase of the game, but trying to get crew with this trait would be a frustrating task.
The Garner Favor talent on mid-level Merchants. This talent is what you will use to net long term gains on factions which you trade at. The talent grants a Charisma percent chance to gain 1 to Negotiate points of rep with trades over $5000 credits.
Customizing your Freighter
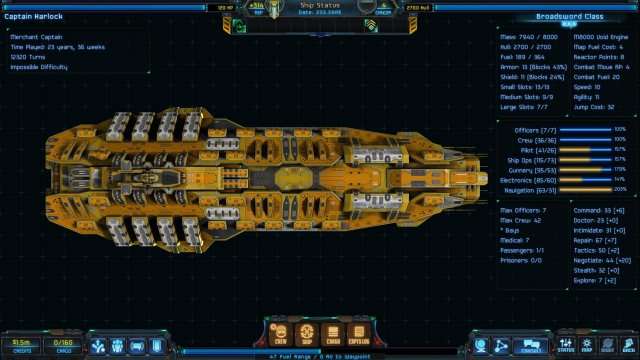
Your frieghter is a workhorse from the get-go, with a higher cargo capacity than any other starting ship– but you can do better. Reinvesting in your ship is the primary way to progress as a trader. More cargo moved means more potential $5000 credit deals, which create potential triggers for your contact-gathering and reputation-boosting merchant skills (plus more money in the bank!)
Here’s what you start with:
- M5000 Void Engine (Large Slot)
- Officer Cabin (Small Slot)
- Luxury Suites (Large Slot)
- Bridge (Medium Slot)
- Cargo Hold I (Large Slot)
- Imperator PC-1 (Small Slot)
- Mass Dampener 1 (Small Slot)
- Hydra Missile Array (Small Slot)
- Barracks 3 (Medium Slot)
- Cargo Hold I (Large Slot)
- M5000 Hyperwarp (Medium Slot)
- Officer Cabin (Small Slot)
- Officer Cabin (Small Slot)
- Hellfire Torpedo (Small Slot)
- Hellfire Torpedo (Small Slot)
- Phoenix Lance (Small Slot)
- Cargo Hold I (Large Slot)
- Valiant Autocannon (Small Slot)
- Weapons Locker A1 (Small Slot)
Your first upgrade should be your Barracks 3. Take that to Barracks 4.
Your second upgrade is your autocannon. Removing it in favor of an officer quarters also grants you 25 tons of mass.
Your next goal is replacing your Luxury Suites with a Cargo Hold 1. This requires 125 tons mass you don’t have. Upgrading your Mass Dampener from 1 to 4 frees up the mass to swap out the suites.
From there, restore your ability to carry passengers with a Passenger Cabin (Small Slot), and add a Triple-Arc Signal Array. Replace your Imperator PC-1 and your Phoenix Lance with these components when you have the spare cash to do so.
Don’t be afraid to swap the Small Slot you use for Passengers to a Prisoner Cell as necessary, or swap it to a smuggler’s compartment for 5 extra cargo space. Treat that slot as a wildcard for mission completion.
Every other upgrade for a merchant consists of straight improvements to the arraingement you now have. When you need to fight, upgrade the torpedoes and missile array.
Your ship now has 100 cargo space, 50% increased intel, is capped on officers & crew, and ready to trade its way to glory!
Turning a profit every sector
Once you have positive rep with all factions, you have access to every market present in each sector. This gives you maximum freedom to exploit the sector as you pass through.
Here’s how to make the most of the legal goods.
Start with a raw goods source: usually Mining/Farming. Feed into Refinery. Proceed to Industrial. Close with a Population or Luxury Population urban center. Lastly, if you can cap biowaste or scrap at the urban zones, load up and hit a Farm or Industrial zone. Loop back to unvisited urban zones as avalable, or hit the same zones with different goods.
Alternatively, hit up an Orbital or Tradeway zone as an end point.
Keep an eye out for doglegs or repeat visits that can increase profits within a sector. A strong refinery can feed full holds of all metals to each industrial zone, for instance. While a weaker refinery might barely make $5000 transactions out of the metals it sells you. Each planet is different and each sector has a variety of planets and zones to visit.
If you have a large enough hold and can split cargoes between landing sites, try to hit the $5000 threshold whenever you can. This will maximize contact and reputation generation from talents. Beware trading into trade bans; cross faction trade can really damage the reputation as an all-around nice guy you’ve been earnestly building!
Move a variety of goods long enough and you’ll make a profit every single sector you pass through, picking up contacts and rep along the way.
Remember to keep Patroling and Spying as you go. This will help keep your reputation sterling and your databanks full of valuble intelligence to ply new contacts with. Although I recommend saving your intel as long as you can rather than spending it on an as-needed basis.
So, what are you looking for?
Those are the basics.
You should realize that you’re sifting through an awful lot of hay as a merchant, but you might be thinking, what am I looking for? Where’s the needle in this haystack?
The answer is two-fold. You are looking for rare goods vendors and the trade permit contacts/black market contacts required to move those goods. Positve faction rep and stashed intel may ease this process, but it’s not guaranteed. You may have to run missions and patiently reveal new contacts for a very long time until you can actually buy rare goods. Often the rare goods are sector-tied, so trading around that sector may reveal a better source for the good. Mark these rare contacts with blue when you find them.
While you do this, examine the demands and legal strength of the planets you pass on your travels. Low legality goods need low law zones to sell, unless you have trading permits for that faction. Mark any target worlds that the laws are lax on, you have the permits to sell a good you’ve found at, or that have a black market with green.
Your goal is to bring the goods from your blue contacts to green worlds. Everything else is a means to this end.
Exiting the midgame
Selling your first holdfull of rare goods represents the end goal of the midgame. Everything you’ve done. The contacts you’ve cajoled and run missions for, the reputation you’ve built, the trade permits you’ve collected, and the black market contacts you’ve cultivated come down to this one goal.
You want to be able to spend huge amounts of money on rare goods that you then can either sell legally via permit, or illegally via a black market once you have sufficient smuggling panache to pull it off.
What this looks like will vary wildly depending on seed, revealed contacts, faction reputation and what you happen to reveal first.
You’ve been eyeing demand and legality, noting places where the law won’t get in the way of delivering rare goods to lucrative markets. You’ve built black market contacts and set up winning hands so that you can deliver the goods in the most spectacular way possible.
Now is the time to earn the money to upgrade your hull and exit the midgame.




Be the first to comment