
The Ship
The ship is divided into 9 sections and 11 rooms in total. All rooms are separated by doors, which can be operated by the buttons on the side.
Here’s a complete map of the ship. If you don’t know what room I’m referring to or where it’s located, check this handy map.

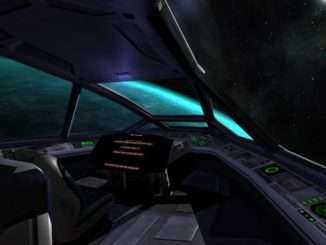
Bridge
You’ll be spending most of your time here, sitting at the main console. You have a spectacular view of the planet and the cosmos surrounding you from here. You can do a few things at the center console:
- Establish link with the Rover (aka take control of it)
- Operate the Rover
- Recall the Rover
- Reset the Landing zone (the Rover will land where it originally did on the first landing)
- Examine the map of the explored surface area
- End the expedition
Viewing the Rover’s survey data will show a map of the already explored surface area. Your current/last position before recall will show as a dot.
Medical
If you want to assure your long term survival, you better check in with the Autodoc on a regular basis. It’s as simple as accessing the terminal, and clicking on the “Activate Autodoc” button. It will scan you first and give you an evaluation, which tells you how much radiation you suffered, how your body reacted to that and how much radiation will be left in you once it applied the treatment. If you suffered other injuries, it can treat those too.
Next click the “Apply treatment” button and it will do it’s best to minimize the radiation and any other damage. The more damage you suffered, the longer it’ll take to heal you.
It’s advised that you check in every 5 or 10 minutes. Periods longer than that could leave you with more severe, lasting damage.
Science Lab
Once you send some new samples over from the Cargo bay, you can start researcing them here.
Every sample has a “code” assigned to it, which is a short string of letters and numbers after or before the actual name of the sample. This helps differentiate between similar modules/artifacts.
The speed of the research in general will depend on the number of samples being researched at once (ex. 1 sample = 100% speed ; 2 samples = 50/50 % for each). Click the “Research all” button to start research on all samples.
Clicking on a specific sample will start “Active research”, which gives a 20% speed boost to that sample as long as you have it selected AND you are using the console (exiting out will remove the bonus).
Research speed depends on a few factors:
Complexity – more valuable/rarer things take longer.
Damage – depending on the amount of damage, it will take longer. You can damage samples by shooting them, damaging whatever holds them (Sentries, Vaults, etc).
- Yellow – slightly damaged.
- Orange – modaretaly damaged.
- Red – severely damaged.
Previous research – if you have researched similar samples before (same category/subcategory), the system will recognize the items.
This will let you skip stages, sometimes almost completely skipping research.
Research has three stages:
- Stage 1 – Complete unknown
The samples name will only have a bunch of question marks. At this stage, you know nothing about it. This is the shortest stage.
- Stage 2 – Category
The sample will have a generic category assigned such as “Optical” or “Mechanical” with 2 questionmarks on either side. The description will now hint more towards what the sample could be. This takes a bit longer than the 1st stage.
- Stage 3 – Subcategory
Now you know the subcategory of the item. “Laser” or “Launcher” will mean a weapon, while “Camera” or “Power Storage” will mean other utility. Takes a while to finish.
After Stage 3, the research is complete. Now you get every bit of info from the description. It will tell you the value, energy consumption rate, heat production rate, effects and efficiency of the module or attributes of the artifact.
Fully researched items will function more efficiently in the Rover.
Items not fully researched will still sell for their full value at the end of the expedition. Mounting these unresearched items on the Rover will result in abstract and undecipherable displays on the screen they are assigned to.
Cargo Bay
Consists of 2 rooms: one where you operate the terminal and one where the airlock is.
You can move items to the Lab, the Storage, the Garage and unload the Rover from the terminal by:
- Dragging an item to any empty slot
- Clicking an item, then clicking an empty slot
- Dragging an item onto a room’s label
Dragging an item onto another one will swap the two.
You can also organize your stuff, send the Rover to the Garage or launch it from here. To discard an item, click on it, then click the “Discard” button. This will get rid of the item permanently.
Clicking “Bulk Unload Rover” will transfer all items to available storage space. This is useful when you don’t feel like dragging 7 items by hand. While the Rover is transfering items, it can’t be moved from the bay or launched.
Garage
You can install/uninstall modules on the Rover, repair items, transfer the Rover around or launch it and read item descriptions from the terminal.
The success of repairing an item depends on how many similar items you’ve researched before. The more you know anout these types of items, the higher chance of succesful repair you’ll have. Catastrophic failure will destroy the item. Depending on how damaged an item is, it could take multiple repairs to get it into the green.
Repairing the default Rover equipement is always 100% succesful.
Engineering
There are many submenus on the terminal:
- System overview – a general evaluation of the ships status
- User terminals – reboot crashed terminals from here
- Door override – open / close any door on the ship (even airlocks)
- Cargo system – an overview of the cargo network
- Consumables – your supplies aboard the ship
- Engines – displays the status of the engines
The ship’s terminals will crash from time to time due to the radiation emitting from the planet. If you are looking at a terminal while it happens, it will display a message like “Cargo operations terminal offline. Reboot via Engineering”.
Life Support
You can check your air supply, change the air valves and control doors from here. If you wear an EVA suit, you can refill its air supply at the terminal.
Air valves:
- Closed – rooms won’t get filled with air when it’s depleted from them. Could cause drafts when opening doors.
- Normal – rooms get filled with air at a steady rate. Recommended setting.
- Emergency refill – rooms get filled super fast. Only for certain situations.
Storage
You can admire check out your items, view remaining cargo space or put on the EVA suit from the terminal. You can sort items by value and the total value of your stored items is also displayed.
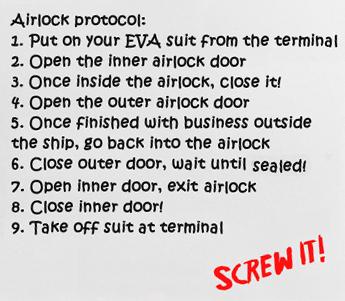
If you wish, you can also get out of the ship using the airlock. I would advise using the “Airlock protocol”, unless you trying to do something crazy.
Quarters
On the terminal above the bed you can read your logs, turn music on or play Dungeon Road. The game has it’s own section if you want to find out more.
There are also randomized little things around the room that are different on each playthrough: a guitar, framed pictures, a dino figure and much more. These are some of the cool things you can look at around the room. Sadly, you can’t use the toilet.
Be the first to comment