
Sometimes you just want a little nudge in the right direction. This guide will try and point you to places you’ve missed while still letting you solve the mystery yourself.
Other Return of the Obra Dinn Guides:
- Comprehensive Retelling of the Obra Dinn’s Tragedy (Walkthrough).
- How You’re Supposed to Identify People.
- The Fate of Every Crewmember.
Introduction
This is a hint guide for Return of the Obra Dinn. It doesn’t contain the full fates for each crew member, but it will (mostly) give you oblique pointers for places to examine more closely. After all, a lot of the fun of mystery games is figuring out the mystery yourself, and there’s a lot of voyage to examine.
I’ve been more explicit with the causes of death and locations of corpses that gate the game’s chapters, because what mystery that’s there is usually unintentional.
As Return of the Obra Dinn is non-linear, I refer to events as follows:
- ‘Earlier’ and ‘later’ chapters and events are always chronological. An earlier chapter is one that happened earlier in the voyage, even if it’s one of the last you might see. Despite The End being the first chapter you unlock, it’s referred to as being ‘later’ than the others.
- ‘Later in the chain of events’ refers to sequences where you follow corpses from scene to scene, stepping back in time chronologically. In this case, ‘earlier’ and ‘later’ refer to your experience, not what order these scenes occur in chronologically. Usually, I’ll mention this because you’re about to learn more information if you unlock more scenes.
Non-specific Advice
What assumptions can I safely make?
- The ship manifest is completely accurate in every detail, and no-one changed name or status during the voyage.
- Crew members stick to what they’re best at during typical conditions. Officers don’t help in the rigging; seamen don’t spend time in the officers’ quarters unless they have permission; officers and stewards tend to stick together. During unusual circumstances, and there’s a few of those, crew members tend to help where needed.
What should I know about determining cause of death?
- As an insurance inspector, ‘accident’ is not an acceptable cause of death. Be tediously specific.
- ‘Stabbed’ is also not an acceptable cause of death. You must specify the weapon.
- Ambiguous deaths will often accept multiple answers, as long as the culprit is accurate.
Where is Formosa, anyway?
- It’s the colonial name for the island of Taiwan.
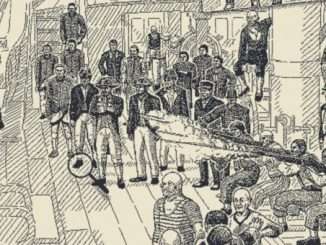
I. Loose Cargo
Part 1
- Identity: Someone talks about this incident later. Identify them, and you’ll know who this is.
- Cause: This should be straightforward – the right choice even lets you specify ‘cargo’.
Part 2
- Location: Once you’ve opened the cargo deck, check the side rooms.
II. A Bitter Cold
Part 1
- Identity: The dialogue can be relied upon here, but there’s also another definitive clue in the scene.
- Cause: The doctor’s diagnosis can be relied upon.
- Notice: Like a similar scene in Chapter 7, this scene is pivotal for identifying many of the crew members. Take the time to examine it carefully; there’s a lot of information here.
Part 2
- Identity: Try and find this crew member before he died. He’ll have something that will definitely identify him.
- Cause: The laudanum was too little, too late.
- Notice: Two people in this office have telling behaviour.
Part 3
- Location: A macabre decoration, on the orlop deck.
- Notice: One speaker is performing his job. The other three speakers share a role. You can’t identify the named speaker from this scene alone. You can either try and place the other crew member that shares their name, or try and identify what role is shared between the speaker and the man he is teasing.
III. Murder
Part 1
- Identity: This man is named in a scene you’ve already seen.
- Cause: There’s few weapons that work at such close range.
- Culprit: The culprit is known to the victim.
Part 2
- Identity: The dialogue can be trusted here.
- Cause: ‘Executed’ is not an available cause of death. Use the weapon.
- Culprit: Of the four members of the firing squad, only one managed to hit the victim. This man figures into later events; identify him there.As the insurance inspector, you’re within your rights to blame the captain for condemning an innocent man.
- Notice: A few people can be definitively identified during this scene, including the people named in dialogue, a person who doesn’t appear in any of the sketches, and a person who only appears here and during their death.
Part 3
- Location: At the window of one of the officer’s cabins, the door to which the pocketwatch will open.
- Identity: Does the victim have any unique or distinctive features? Check scenes in earlier chapters.
- Culprit: Keep stepping back in time, and the identity of this man will become clear soon enough.
IV. The Calling
Part 1
- Identity: This man is particularly tricky; the nationalities of the seamen is important here. The last line is spoken by the victim, which should help narrow the options, but to identify him, you’ll have to place several other people later, back on the Obra Din.
- Cause: In many of these scenes, both ‘speared’ and ‘spiked’ will be accepted.
- Culprit: ‘Terrible’ means to induce terror.
Part 2
- Identity: There’s a lot of confusion going on here. Try and work out the nationalities of the seamen, and this man’s identity should become clear.
- Cause: In many of these scenes, both ‘speared’ and ‘spiked’ will be accepted.
- Culprit: ‘Terrible’ means to induce terror.
Part 3
- Identity: Think carefully about this victim’s behaviour, and why they’re out on the open ocean in the first place. You should already know who they’re addressing.
- Cause: You can get a clear view of the murder weapon from the corpse in a later scene.
- Culprit: Keep following the chain of events, and the culprit’s identity should become clear.
Part 4
- Identity: This person has been addressed by name in a few other scenes.
- Cause: This one can be ambiguous; both ‘clawed’ and ‘devoured’ are accepted.
- Culprit: ‘Terrible’ means to induce terror.
Part 5
- Identity: This person will be named further down the chain of events.
- Cause: “A great and terrible destructive power” is not an acceptable cause of death, but there’s something on your list you could describe that way.
Part 6
- Location: You’ll be led to it from one of the dual deaths, with corpses on the deck.
- Identity: Explore other chapters to learn this man’s identity.
- Culprit: As you follow the chain of events, you may be able to identify this man by process of elimination. If not, identify the victim as well.
Disappearances
- Identities: These men may or may not be named during this chapter. They’ve taken their possessions with them; check earlier scenes to see if they’re visible where they can be matched to a name.
- Fates: Find the last appearances of these crew members during this chapter. Their fate should become clear.
V. Unholy Captives
Part 1
- Identity (top): This man is identified via process of elimination.
- Identity (bottom): This man can’t be definitively identified. You’ll need to identify more of the crew before there’s only one person this man could be.
- Cause: In many of these scenes, both ‘speared’ and ‘spiked’ will be accepted.
- Culprit: ‘Terrible’ means to induce terror.
Part 2
- Identity: Go with your gut on this one.
- Cause: That’s a tail, not a claw.
- Notice: Some of the bystanders in this scene will give you strong hints to their role.
Part 3
- Identity: Identify this man during the death of one of his friends.
- Cause: A few options are accepted here, all of which don’t require a culprit (so don’t use ‘clubbed’, for instance).
Part 4
- Location: Beside the stairs leading up from the cargo deck, at the lazarette end.
- Identity: You’ll need to use a process of elimination to identify this man.
- Cause: The weapon used is present in the scene. Use that.
- Culprit: You can definitively identify this man from this scene alone. Check the crew logs and think about what the dialogue must mean.
- Notice: A person is named during this scene, but it won’t be clear at first who this refers to.
VI. Soldiers of the Sea
Part 1
- Identity: You should be able to identify this crew member’s nationality, but you’ll need to identify his countrymen as well. Conveniently, there’s clues to help you in this scene, alongside many others.
- Notice: Everyone in the rigging during this scene is a topman.
Part 2
- Identity: This man is acknowledged to be the beasts’ first kill.
- Cause: Both ‘spiked’ and ‘speared’ are accepted here.
- Culprit: ‘Terrible’ means to induce terror.
Part 3
- Identity: This crew member refers to his boss. Another scene will show them working together, which should give you enough information to identify both.
- Cause: Both ‘spiked’ and ‘speared’ are accepted here.
- Culprit: ‘Terrible’ means to induce terror.
Part 4
- Identity (top): Identify this man in earlier scenes. He’s usually seen with someone else.
- Identity (bottom): This man is easier to identify while at work. His identify is particularly tricky to determine; you’ll need to see if there’s anything that can definitively identify him in a scene set during happier times.
- Cause: You might be wondering, ‘at what point does a cause of death count as decapitation?’ Whatever that point is, these deaths are beyond it.
- Culprit: I’m sticking to a consistent format for this section to not give anything away.
Part 5
- Identity: His location in the sketch will be helpful in narrowing down his identity. You’ll be able to identify him and his friends at about the same time.
- Cause: It’s hot and bright.
- Culprit: I’m sticking to a consistent format for this section to not give anything away.
- Notice: Use the walk peepholes to check the offices.
Part 6
- Identity: This man performs his job in an earlier scene and can be identified there.
- Cause: Both ‘spiked’ and ‘speared’ are accepted here.
- Culprit: ‘Terrible’ means to induce terror.
- Notice: Use the walk peepholes to check the offices.
Part 7
- Location: In the port walk, around the back of the orlop deck.
- Identity: This man’s behaviour compared to the rest of the crew is a clue to his role. The other crew members of his role should all be accounted for.
- Cause: This can be misleading. Check the body, the scene through the peepholes, and the state of the ship in the present, very carefully.
- Culprit: Not what you’d expect. Rethink your assumptions on the cause of death.Being trapped in the walk makes identifying most people in this scene impossible. Check earlier scenes in this chapter to try and spot who is armed during this battle.
Part 8
- Location: Stuffed in a room on the cargo deck. Surprise!
- Identity: This man performs his job in an earlier scene and can be identified there.
- Cause: Both ‘spiked’ and ‘speared’ are accepted here.
- Culprit: ‘Terrible’ means to induce terror.
VII. The Doom
Part 1
- Identity: This man can be definitely identified from this scene. His killer gives you all the information you need.
- Cause: As always, use the weapon as the cause of death.
- Culprit: Identifying the last name of this man is not difficult. He may have left something behind that will identify him.
Part 2
- Identity: This man has a special role aboard the Obra Dinn. The scene depicted in one of the sketches should identify him.
- Cause: ‘Crushed’ works here.
- Notice: Like a similar scene in Chapter 2, this relatively calm scene is vital for identifying crew members. Pay close attention to whom you can confirm is still alive as of this chapter.The cook is not among the living.
Part 3
- Identity: He can be identified in a scene where his countryman passes away. With some logical deduction, you should be able to identify all four of them.
Part 4
- Identity (top): This man is named in an earlier scene. Examine that scene closely, because it won’t be obvious who’s been spoken to.
- Identity (bottom): You can’t even see this man’s corpse! You can see him a little earlier, though, but you’ll need to have most of the names placed to place him.
- Cause (top): This cause is obvious, but you might be surprised to learn you need to identify who lit the fuse.
- Cause (bottom): Because this man was shot overboard, you have a choice of which cause to use here.
- Culprit: The crew member crushed while operating the cannon is considered the culprit here.
Part 5
- Identity: It might be difficult to identify the victim if you don’t know who they’re speaking to. An earlier scene in this chapter will make their role aboard the ship clear, and a later scene will help you identify who they’re with.
Part 6
- Identity: Try and identify this man’s role first. Until you understand what he and his friends have been through, some of the clues won’t make sense.
- Cause: ‘Powder’ is a vital clue here.
Part 7
- Identity: Don’t jump to conclusions. Find this man at work, first.He is a topman, despite a later clue implying otherwise. Identify the other topmen first.
- Cause: The obvious one here is correct.
Part 8
- Identity: You should know, going into this scene, who this is.
- Cause: This is your first cause of death that’s not obvious. That is rigging that she’s under.
- Notice: The victim has identified someone else in this scene. Make sure you take note!
Disappearances
- Page 90 (top): This man has a favoured possession ready to hand.
- Page 90 (bottom): This man gives you a lot of information during one scene. He’s left something behind that can give you his first name. A later scene will show you his fate.
- Page 91 (top): This man has left behind something that can identify him. His last appearance is later than you’d expect.
- Page 91 (bottom): What this man thought was important to take with him suggests education. Chapter 6 will give you enough information to determine which educated man this is. His last appearance is later than you’d expect.
- Page 92 (top): This man can be identified earlier this chapter.
- Page 92 (middle): You might suspect who this is. Check whether anyone else seems to fit the bill better.
- Page 92 (bottom): This man’s behaviour and company is a strong clue to his role.
VIII. Bargain
How do I get into the lazarette?
You cannot enter the lazarette while aboard the Obra Dinn, as the note at the start of this chapter says. If you delay your departure until the game informs you that you’ve done everything aboard the Obra Dinn, you’ll be able to fill in this section after you depart.
IX. Escape
Part 1
- Identity: This man’s dialogue, and the crew manifest, should be enough to identify him.
- Cause: An earlier scene will help you confirm what happened to him. Even though he didn’t die immediately, the obvious cause will work.
- Notice: Don’t jump to conclusions over the identity of another person based on this discussion. Gather more information first.
Part 2
- Identity: You’ve heard a first name, but once you identify who’s being spoken to, you should also be able to work out the identity of this victim.
- Cause: As always, use the weapon as the cause of death.
- Culprit: You’ll need to identify this man through his friends. He’s sour about people taking boats for a reason.
Part 3
- Identity: You’ll need to learn much more about the crew to identify this man.
- Cause: As always, use the weapon as the cause of death.
- Culprit: Identifying this person may be tricky. You can get a better look at these people in their earliest appearance; there’s something about one of them that should help you decide which of the two possibilies each are.
Part 4
- Identity: Try and identify what this man’s role is; unlock earlier scenes and watch closely.
- Cause: As always, use the weapon as the cause of death.
- Culprit: Identifying this man is a process of elimination.
Part 5
- Identity: Identifying this man is a process of elimination.
- Cause: As always, use the weapon as the cause of death.
- Culprit: This man plays a pivotal role in the later mutiny, but you’ll need to learn more about the other mutineer before you can put a name to one of them.
Part 6
- Identity: This man has crawled back to his cabin. You’ll need to learn more about his fellows and how they perished before you can identify this man
- Cause: “Bled to death” is not an actionable cause of death.
- Culprit: Someone in previous scenes is the culprit.
- Notice: At this point, you’re not expected to know which of the remaining men is Brennan, or the surgeon. Learn more before you draw conclusions.
Disappearances
- Identities: The two men can be identified in earlier scenes. The two women can be identified by finding their earliest appearance; there’s something about one of them that should help you decide which of the two possibilies each are.
- Fate: Once you’ve identified the passengers on the last boat, check the book carefully, from cover to cover. There’s a clue you may not have noticed at first that will answer what happened to them. You may assume all four are together; for obvious reasons, they’ve lost their appetite for sea travel.
X. THE END
Part 1
- Identity: The culprit will give you a vital clue in a later scene.
- Cause: Typically, you should always be able to identify the cause of death before the iris out.
- Culprit: You may not be sure of this man’s identity (or mullet) at first – despite them referring to him as Captain, you can’t rule out a mutiny at this point – but he’ll confirm his identity soon.
Part 2
- Identity: You’ll need to get a fair way through the game before you can definitively identify this man.
- Cause: “Stabbed” is not an acceptable cause of death. Use the weapon as the cause of death.
- Culprit: To save you time, this is the same culprit as the previous scene.
Part 3
- Identity: You’ll need to get a fair way through the game before you can definitively identify this man. Did you notice how he took a more swashbuckling route into the cabin than his compatriot?
- Cause: “Hit” is not an acceptable cause of death. Use the weapon as the cause of death.
- Culprit: To save you time, this is the same culprit as the previous two scenes.
Part 4
- Identity: From looking at the crew manifest, you should be able to identify who he’s talking to, and therefore who he is, and who he’s apologising for shooting.
- Cause: The obvious cause of death is accepted here.
Not exactly sure why you say the named man can’t be identified in Chap V part 4. Theres really only one person you’d be saying “You’ll be alright” to in that scene.
Thank you so much for this guide! I got very stuck figuring out where I needed to look for hints on differentiating the topmen, and this pointed me to the right chapter.
Just a quick note to add that in VII-4, it could also be the tentacle that was considered to have “lit the fuse.”
Excellent guide. Very appreciated. Helpful advice on the causes of death (especially that it is broader than it seems) and made me think, well, “correctly”.
Hey!
In ESCAPE part 6 you can actually know who Brennan is based on a gesture he does.
Thank you so much! I had 42 but got stuck. And the fact that you don’t directly say the right answer is awesome!
Just wanted to say thankyou for writing this guide! It kept me going when my morale was low and pushed me in the right direction without making it too easy. 🙂 Big thanks!
I just finished the calling chapter that mostly takes place with the little boats at sea and then I found the stowaway in the barrel I think you guys found before, where do I go now, I feel like Ive seen the whole ship
Terrific guide. I was stuck on the fates of the disappeared people in Escape. Turns out I was overthinking it. 🙂
Two related things I didn’t know when I was starting the game, that would probably be useful to others:
1) The “unknown (job)” items aren’t because there are gaps in the ledger, but to let you mark someone down by job even if you don’t know their name yet.
2) When someone has been correctly identified and typeset, their name disappears from the list of who you can say a corpse is (but not of course from the list of murderers). The list never shows you invalid options.