
This is a guide for players who are new to the most difficult class in Barotrauma. It covers basic information, helpful tips, and detailed explanations.
Duties / The Bare Basics
This section is for those that are completely new to the role, so if this isn’t your first time, you can probably skip this.
Obviously enough, you’re on that submarine to make sure that people don’t die when they are killed. This can come about from a number of things, such as the natives of Europa, or accidents/murderous bastards on-board. Hopefully, this hasn’t happened yet, so don’t get all flustered.
While others may be able to perform medical techniques or give treatments too, your higher medical skill allows you to be more efficient (e.g. using less of a medicine or CPR generally being more effective) in what you do. Therefore, you are essential to a submarine’s well-being.
At the start, you get a uniform, ID card, headset, and health scanner. The health scanner is very important. It shows the health, oxygen, and status of nearby crew. Keep it safe. It works without batteries, unlike the headset.
Using this HUD, you can perform triage in emergency situations, deciding who needs your attention the most according to their injuries. Of course, you should try and help everyone if you can, but life and death situations call for decisions to be made.
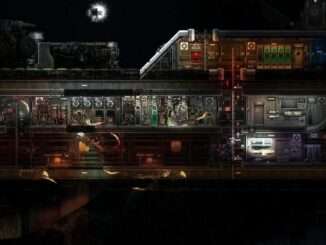
You should spawn in the med-bay on the submarine, where all the delicious drugs are kept (and probably your fabricator.) Here is the Typhon’s for example:

Take note of what you start off with in the lockers, as you’ll need to see if you need to fabricate more (or stronger) medicine. It’s usually a good idea to keep some of the most commonly used ones with you so you can quickly respond to any injuries, such as: Blood packs, bandages, morphine/fentanyl/stabilozine (if you have them.)
With the mission underway, you should make yourself useful and patrol the sub. While there may not be any enemies attacking yet, your crew mates are just as dangerous to themselves and each other. They may accidentally create burns with welders or fall from a tremendous height because they decided not to use a ladder, just for example. It’ll keep you busy until something interesting happens, anyway.
When something bad happens, stay alive. A dead doctor cannot help. Before helping others, make sure the area is safe. For example, check for enemies or fires. Ask people to use the map markers and voice chat to tell you where they are and what injuries they have. Do not wait for them to come to you. Time is important. If needed, ask other crew members to do CPR to keep them alive until you arrive. They may be hurt, but they can still be saved.
If all goes well after all that, you should arrive at your destination with your mission a resounding success. Take note that, if you are playing a singular mission and not a campaign, you don’t need to worry about re-stocking anything as the submarine (and your character) will not have saved. If you’re in a campaign, make sure to jot down what medicine or crafting materials were used up during the mission, and request what you need at the next outpost.
There’s a lot more to learn with being a doctor, so please read on to truly become an expert.
Healing / CPR
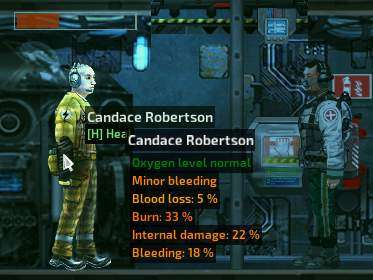
So how does one heal anyway? Well, if you’ve played the legacy version, it’s gotten a bit more advanced than just jabbing someone in the face with a needle. You can still do that, but it’s…well, unknown to me if it’s more or less effective right now, so let’s not do that. Instead, we have a nifty new context menu to use. When you approach someone, you can press [H] to bring up the healing menu. This will give a more advanced display of the person’s vitals than the HUD can, as well as any injuries they have.

From left to right is the overall health, the body’s separate limbs, any injuries on that limb, and suggested treatment options.
In order to heal, you must know that injuries can be spread out (and differ in severity) across the limbs of the player. Select a limb to get a list of what injuries it has (icons will be displayed on limbs to quickly show you) and to see how much vitality is being affected. You should treat the limbs with the highest vitality damage over the others (on-going injuries such as blood loss or poisoning will take priority, as to prevent death.)
If you don’t have a handle yet on what the best treatment options are for injuries, the game will show you (based on your medical skill) a list of treatments on the right, with the top one being the most effective choice. The higher your skill, the more accurate this list will be. As a doctor, you can (hopefully) rest assured that these options will not be incorrect. As for non-doctors…let’s just leave it at you shouldn’t let other players do any guesswork if they don’t know what they’re doing.
To actually heal, just drag the treatment onto the circle below the suggestions. Usually, one usage will use up half of the item, but other items can recover more vitality in that half of a usage than others if they’re meant for the same injury type. On that topic, you should try and conserve your supplies for situations that really call for it. If someone has only -5 vitality from a burn or internal injury, it’s not really worth healing. Even if that injury is that small amount, it will still end up using half of the item like it would if the injury was -40 vitality. Therefore, you should try and heal injuries when a player’s total vitality is at about 75% or so. Joe in engineering might have a fractured skull, but it’s only -10 vitality, so he’ll have to live with it.
CPR is useful for keeping someone that has fallen unconscious alive (and can also revive) until you arrive at the scene. Just like administering treatment, you’re better at CPR than others. In fact, others can injure someone if they aren’t skilled enough, so it’s not always good for someone to perform it. Lifted from the game files, CPR has a revive chance per skill of 0.01, while stabilization is 0.02. The game lists the equation it uses for calculating this, but just know that the person with the highest medical skill should be administering CPR. In the vanilla game, the damage threshold is set at 20, so just as long as the medical skill level is above that, it should be fine.
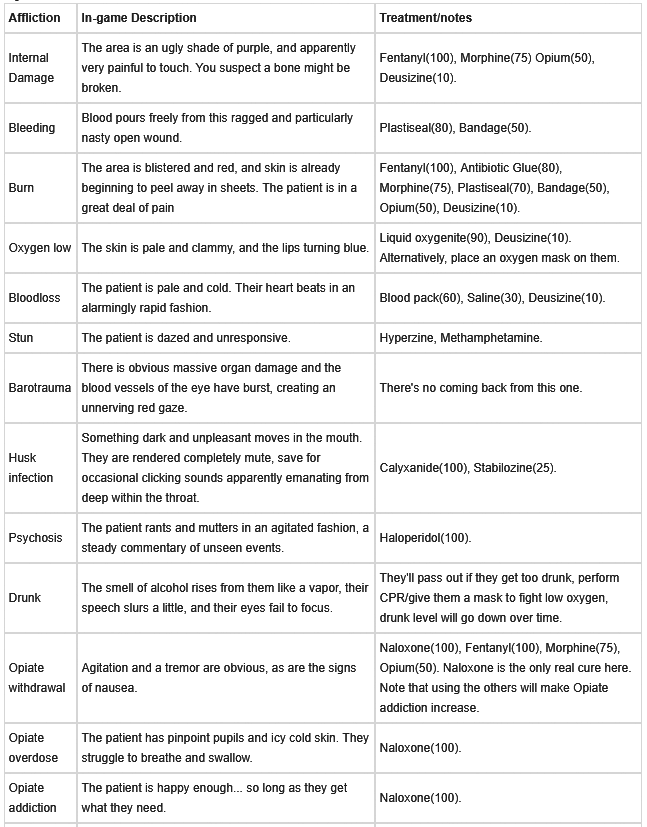
Afflictions
Injuries / Diseases

Buffs


Be the first to comment