
A guide that reviews basic information and strategies of the six characters.
Other Dicey Dungeons Guides:
- List of Monster Weaknesses and Strengths.
- Witch Walkthrough / Shocks & Spears.
- Guide to the Inventor.
- Jester Strategy Guide.
Introduction
There are currently six different classes to choose from in Dicey Dungeons. They are as follows:
- Warrior – A straightforward, high-damage champion.
- Thief – An assassin with a knack for utility equipment.
- Robot – An automaton whose abilities scale with rolls.
- Inventor – A genius who creates unique, deadly gadgets.
- Witch – An enchantress with a knack for status effect application.
- Jester – A fool who utilizes special decks to form combos.
Each of the characters have unique abilities and attributes that allow them to perform powerful moves that suit their playstyles. The six classes are described in further detail in their respective sections.
The Warrior
⭐

I’m here to have fun and fight monsters! Back home, I love working out, long walks on the beach, and working out!
- Health: 24 (+4 on each level)
- Dice: 2 (+1 on level 2, 4, & 6)
- Initial Equipment: Sword
- Limit Break – Fury: Double next action.
- Special Ability – Combat Roll: Reroll a dice up to 3 times.
The Warrior is a class that focuses on two main abilities: high-damage and self-shielding. Its primary ability, the Sword, is a basic damage-dealer that can defeat low-level enemies with ease. As the player progresses, they gain items similar to the Sword, however, they also apply various effects (Freeze, Shock, etc) on the enemy when a 6 is used. Combat Roll gives the Warrior numerous opportunities to either roll high numbers or values that can be transformed into desired numbers via utility equipment such as Spatula or Bump.
Tips:
- Don’t rely too heavily on dice-manipulation utility items in the late game. The Warrior’s Combat Roll allows for plenty of opportunities to obtain high numbers. A maximum of two slots should be occupied by dice-manipulation utility items. Two of the most useful for the Warrior are Bump+ and Midnight Charm+.
- Don’t bother using (or upgrading) the Sword after the second floor. A quick comparison to other items reveals that the Sword’s intended purpose is to act as a starter item only. The Hammer and Shovel are both much better than the Sword as they also apply status effects upon using a 6.
- Don’t be afraid of damage, especially in the first episode. The Warrior is meant to be the introduction character of the game, so most enemies can’t do much to you unless you let them. Because of how easy it is to get a swift kill, an optimal strategy would be to use the Boomerang and take the all of the damage so you can charge up your Fury for another high-damage attack on the same turn.
- Consider using shields only. It’s quite easy to create a high-damage build using only shields. Shield Bash allows you to deal damage to an enemy equal to your shield (it is also automatically granted to you when you level up later in the game). For maximum efficiency, equip it with at least two other shield-granting items, such as Iron Shield and Spiked Shield. Beware of enemies that use Dodge or Poison, as they can prevent the majority of your damage or pierce your shields, respectively.
The Thief
⭐⭐
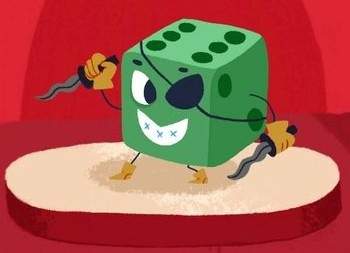
I’m not here to make friends. I’m here to win. Everyone else is too, of course – they’re just lying about it.
- Health: 24 (+4 on each level)
- Dice: 2 (+1 on level 2, 4, & 6)
- Initial Equipment: Dagger, Lockpick
- Limit Break – Unlucky Roll: Roll four extra 1s.
- Special Ability – Steal: Automatically borrow a random item from the enemy for a turn.
The Thief is a class that prefers utility equipment rather than just straight-up damage. It starts the game with two items: the Dagger and Lockpick. The beginning of the Thief’s run is typically the most difficult as you cannot roll too high (you cannot insert anything into the Dagger) or too low (the damage isn’t enough to get a quick kill). Upon reaching level 3, the game becomes a lot easier as you can start creating a solid build.
Tips:
- Determine what build you are going to use when you reach level 3. There are three primary builds:
- Dagger – The Dagger build utilizes low numbers with an upgraded Dagger and a variety of dice manipulation equipment, particularly Lockpick and Hacksaw. To prepare for the rare situation with a lot of high-numbered dice, equip an item that works well with large numbers, such as a countdown (Dodge and Peashooter+ could work). Keep in mind that you may not need to waste a slot for such an item if you are fighting against an enemy that only utilizes high numbers (you will steal the necessary equipment).
- Poison – The Thief is pretty much the only character that can pull off a reliable Poison build. There are two ways to do so: Poison Needle and Poison Crowbar. Poison Needle is the name of an actual item in the game. It utilizes low numbers (1s and 2s) to add Poison to an enemy. It is best used with Lockpick and Hacksaw. It is best to equip other Poison-application equipment (such as Poison Slingshot or Blight) for your high numbers. The Poison Crowbar utilizes the Crowbar, Poison Slingshot, Blight, and other similar equipment to apply Poison quickly and with ease.
- Crowbar – This build is one of the easiest to pull off, however, it can be difficult to set up. By the time you obtain the Crowbar (level 3) you will either have very few or no countdown equipment, so taking the Crowbar always has risk with it. If you are unable to obtain enough reliable countdown equipment, resort to the Dagger build. The two most prominent setups are the Poison Crowbar (mentioned above) and the Staff Crowbar. The Staff Crowbar utilizes the Staff and Peashooter. No matter your build, you will want to upgrade the Crowbar as soon as possible.
- When fighting the Alchemist, consider abandoning your current build and becoming the Bear. The Alchemist’s Bear Potion allows you to transform into the Bear for the rest of your run. The Bear is the most straightforward character in the game; its main attack is very similar to the Broadsword+ (it actually does one more damage than it, though), and its main form of healing is similar to the Healing Crystal+ (it doesn’t cure 1 Poison, though).
- Don’t forget to consider using the equipment to steal from your enemy. Most enemies contain extremely powerful equipment (such as the Skeleton with his Two-Handed Sword or Audrey with her Earthquake). Determine whether or not your actual equipment is worth abandoning for a use of the enemy’s.
- The Thief’s Unlucky Roll synergizes extremely well with most abilities. The Bandage, Poison Needle, and Dagger are the most notable. Don’t be afraid to activate your limit break as soon as it’s ready; it’s best to gain an early advantage than to use it only when you are in danger.
The Robot
⭐⭐⭐

BEEP BOOP, HUMANS! Haha, just joking. I can definitely talk. I love colour-coded to-do lists and pushing myself to the limits.
- Health: 24 (+4 on each level)
- CPU: 9 (+2 on level 2, 4, & 6)
- Initial Equipment: Plasma Blaster, Pea Shooter
- Limit Break – Autoroll: Jackpot guaranteed.
- Special Ability – Calculate: Roll a random dice and increase your CPU. Hitting the jackpot grants an additional ability.
The Robot does not roll dice naturally; instead, it rolls its own dice using its special ability, Calculate. Calculate generates a usable dice and fills the CPU counter. The Robot does not have unlimited uses of the ability; if the CPU counter exceeds its limit, all equipment will be destroyed, however, if the player is lucky enough to hit the exact limit, they will receive a special bonus. The Robot is very similar to the Warrior is at relies mostly on straight-up damage and, occasionally, shields. Some abilities are based off of the number of dice summoned from Calculate or relate directly to the CPU counter itself.
Tips:
- The Ultima Weapon is better than the Buster Sword most of the time. The Ultima Weapon deals double damage to enemies when you obtain a jackpot while the Buster Sword simply isn’t destroyed if you go over your CPU limit. As long as the player plays safe, none of your equipment will ever be destroyed. If you prefer playing risky, the Buster Sword may be the better option. Additionally, you will most likely want to upgrade the Ultima Weapon or Buster Sword before any other equipment as they are the player’s main source of damage.
- In most cases, you should never use Calculate if you have a 50% chance or less of experiencing an error (this means that you should only Calculate if there are 4 slots or more left); most of the Robot’s equipment is incredibly valuable (such as Ultima Weapon and Forcefield), and you want to activate them on every turn.
- Try to either get consistent jackpots or long turns. Upon reaching level 5, the player will have the choice of receiving either Heat Sink or Increment. Heat Sink decreases the player’s CPU counter, making it extremely useful for equipment that are dependent on number of rolls (such as Mechanical Arm and Forcefield). Increment’s purpose is to increase the CPU and land on the jackpot. Because of this, it pairs very well with the Ultima Weapon.
The Inventor
⭐⭐⭐⭐
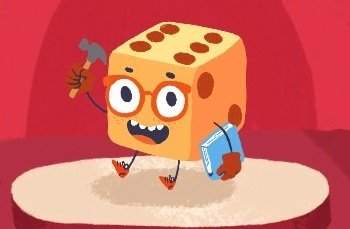
Oh wow, this place is so cool! The doors! The spotlights! Oops, sorry, I mean, thanks for having me on the show!
- Health: 24 (+4 on each level)
- Dice: 2 (+1 on level 2, 4, & 6)
- Initial Equipment: Hammer, Spanner, Pea Shooter
- Limit Break – Focus: All dice become 6.
- Special Ability – Recreate: After a battle, destroy one of your equipped items and create a gadget that can be used for free on each turn.
The Inventor is a very strange character. She uses very strong equipment, however, after every successful battle, the Inventor is forced to destroy one of her equipment and turn it into a powerful gadget. Because of the fact that the Inventor loses her equipment, she receives more equipment throughout her run. This difficulty of this character comes from determining which equipment to use in battle and which to destroy after.
Tips:
- Never enter a battle immediately after finishing one. Remember, you lose an equipment after every combat. Upon defeating an enemy, enter your inventory and determine what equipment you need to both defeat the enemy and transform into a gadget.
- Learn what gadgets your equipment creates. Gadgets can pair incredibly well with some of your equipment (for example, using a Fury-inducing equipment [which can be obtained by transforming a Crystal Sword) on a Flamethrower can deal 48 damage and inflict 8 burn at once).
- Use your Scrap Metal sparingly. Scrap Metal is not an equipment that should be equipped and recreated as soon as you obtain it. Upon encountering an annoying enemy, you should equip very strong gadgets along with Scrap Metal so that you can end the fight quickly and prevent a loss of a valuable item. Additionally, when not using Scrap Metal, try not to equip any more than 2 items that you want to keep for the rest of the run. If you have 3 or more valuable items, you are risking the loss of strong equipment, even if the chance may be low.
- Only upgrade an item if you plan on either keeping it in your inventory or always using it as one of your 2 valuable equipment that you will never scrap. Upon reaching level 5, you will have the option to either upgrade an item or copy one. I strongly advise copying, especially if the equipment you choose is already upgraded. Copying allows you to play a little riskier and still keep an item if you happen to lose the duplicate of it.
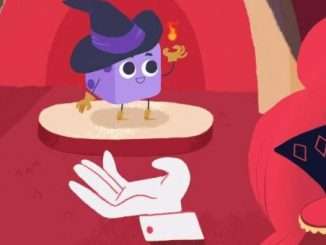
The Witch
⭐⭐⭐⭐⭐

Hey, everyone! I’m #blessed to be going on this amazing adventure with you. Don’t forget to subscribe for updates.
- Health: 24 (+4 on each level)
- Dice: 3
- Initial Equipment: Cauldron, Infliction
- Limit Break – Crystal Ball: Roll three extra dice.
- Special Ability – Spellbook: Use dice to summon a usable spell from your spellbook.
The Witch works in a very different way than the first four characters; rather than organizing equipment in six-slot inventory, the Witch gathers six different spells for her spellbook. Each spell is assigned a numbered slot, and they can be summoned by using a dice on the spellbook. The player can choose from three primary spell paths to base their build on: Freeze, Shock, or Burn.
Tips:
- Prepared slots are infinitely better than upgraded slots. The Witch’s main problem is that she has only three dice for her entire run. Prepared slots mitigate that problem by providing her with free spells. Upon obtaining three prepared slots, you already have a large advantage against your enemy, so you next choice (another prepared slot or a single upgraded slot) can go either way.
- Don’t randomly place your newly-discovered spells in your spellbook. Bad placement can potentially destroy your run. It’s best to do the following:
- Place a cauldron of some sort on the first slot (probably not the Glass Cauldron, though). If an enemy applies a lot of Freeze on you, you will always be able to obtain other numbers.
- Equip at least two damage-dealing spells and place them on slots that require the opposite number(s) (Ice Shard on an even slot such as 2, Electric Shock on an odd slot such as 3, etc).
- On slots 4 and 5, try to use dice-manipulation spells such as Duplicate or Nudge. Hall of Mirrors can work as well.
- The last slot is a wild card, however, I highly recommend that you equip an equipment that takes two equipment and applies a status effect (such as Blizzard). As far as I am aware, the shop on the fourth floor always sells the three double-dice equipment.
- Freeze is definitely the best status effect out of the big three (Freeze, Shock, and Burn). Most enemies rely on large numbers (Gargoyle, Cowboy, Buster, etc), so their builds are countered very easily. Shock only works on enemies with very few dice and equipment. Burn only dishes out some extra damage.
The Jester
⭐⭐⭐⭐

You may remember me from all those fights where I was a cool enemy! But I’m glad to be a giant fighting dice now. This is fine.
- Health: 24 (+4 on each level)
- Dice: 3
- Initial Equipment: Boop x4, Bop x3, Sweets x2
- Limit Break – Snap!: Matching cards can be used for free this turn.
- Special Ability – Deck: Shuffle through a deck with numerous cards, however, you only have access to three at a time. You can discard matching cards.
The Jester has a very interesting mechanic. Rather than having the ability to choose the layout of his inventory, the Jester gathers cards for a deck and draws them at random (however, you will be able to see your next three cards). Upon reaching level 2, the player will choose from 2 decks to create their build from. Each of them has a different them, including Freeze, Burn, Poison, etc. Throughout the run, you will have the opportunity to destroy any cards that don’t fit your deck while also collecting cards that do (shops and booster packs always match your starter deck).
Tips:
- Discarding at the end of your turn when you have no dice is generally a bad idea. If you wait until after the enemy finishes their turn, you can use the matching cards as shields for status effects such as Shock or Weaken. Additionally, you will be able to reach the finale card in your deck much faster.
- Don’t use Snap as soon as you have a pair of matching cards available to use. Preview the next three cards so that you are confident you can make use of the ability.
- Don’t feel compelled to add every card you come across to your deck. It can be quite advantageous to have a short deck; not only can you reach your finale card sooner, but you will also be more likely to have matching cards at any point.
- The only way the Jester can win is if he has plenty of dice-manipulation abilities, particularly Duplicate. Because of this, it is best to upgrade and then copy all dice-manipulation equipment. However, another possible choice would be Boop. Its upgraded form actually allows it to return the dice afterward (very similar to a Keyblade), and free damage is never a bad thing.


Be the first to comment