
A simple guide for animal taming and training in Rimworld.
How to Tame and Train Animals
The animal training system in RimWorld can be hard to understand. This is a simple guide explaining each training option for animals in RimWorld. I will avoid spoilers.
Releasing animals refers to sending out animals to attack someone or something (animals / mechs). This command is available only when a few conditions are met:
- The pawn has to be a “Master” of that animal.
- You have to draft the pawn and the pawn has to be in attack-mode.
- When you give the command to send the animal, you are releasing that animal.
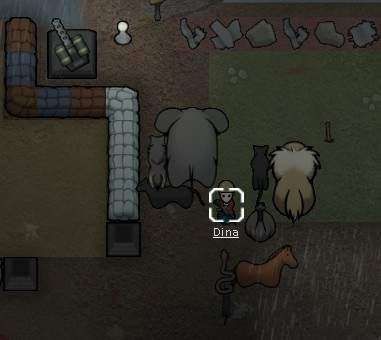
Dina, the pawn on left, is drafted and you can clearly see her “bodyguards”. She’s the Master of these animals.
The Training Tab
Let’s start with an animal, left-click on one and select the “Training” tab. In this case, it’s a Bison and opening the Training tab for Bison-13, we see:
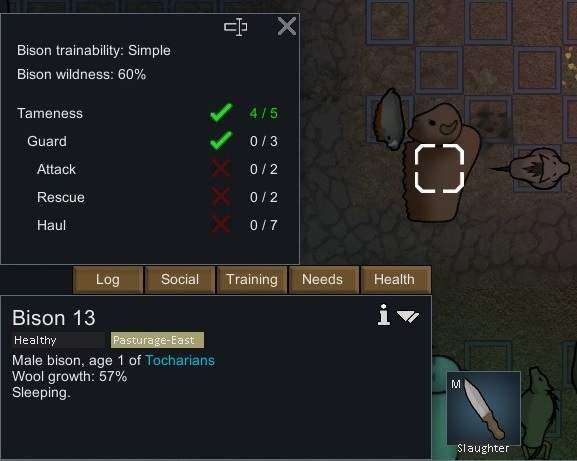
Notice the following:
- Tameness
- Guard
- Attack
- Resuce
- Haul
Also notice the Wildness indicator, 60% in this case.
The Training Elements
Tameness
All animals in the “Animals” tab start with 5 out of 5 tameness. This bison has 4 out of 5. This means the bison is becoming less tame. If you want to keep the animal, have your animal handlers work with it before its tameness reaches 0 out of 5. If tameness reaches 0 out of 5, the animal will leave the colony.
The 60% for Bison is important and I will explain more in the next section, Maintenance Taming. Only tamed animals have “Training” and “Needs” tab. Wildlife does not.
Guard
This is a basic feature for any training of the animal. Think of it as animal foundation training.
Without Guard training, the animal does not follow pawns or guard them. In order for an animal to do the guarding work, it has to be assigned a “Master”. To do that, once an animal is trained for Guard, you assign a Master under Animals tab in your main game window or directly on the Training tab of that animal. Once you’ve assigned a master, you then click on the “Follow” command under the Animals tab in the main game window.
This is the sequence to ensure an animal will guard its master (instead of wandering around):
- Train the animal in Guard work.
- Assign a Master to this animal (under Animals tab).
- Press the “Follow” tick of the animal (under Animals tab).
For Bison-13, it is in training for Guard. It cannot have a Master because it has not been trained yet. (See further examples of Caribou-1 vs Cassowary-2 below)
Attack
This is a sub of Guard. And the whole purpose of this training is to allow you to send animal forward to attack someone/something – the button to do this is “Release animals” of your drafted pawn. There’s an example of this below – sending 35 predators to attack a sole raider.
The Attack training happens after you have done Guard training. So, when you have a new animal and it has no training whatsoever, you can click on Attack training and the game will automatically ask pawns to train the animal for Guard training first, then for Attack training. Attack training without Guard training is not possible. If you click on Attack training only, the game will automatically also click on Guard training. And Guard training comes first before Attack training can begin.
Picture below is a silly move whereby I sent 35 predators to attack a single remaining raider (his friends are down) but the key point is the “Release animals” buttons on the bottom of the picture. Five pawns had control of animals, i.e. is a Master. The others did not have sufficient animal handling skills to do so. This, in fact, is why you train animals for “attack”, viz, to send the predators to attack someone or something (“Silly” because I am usually not that cruel. I promise!).
This could be confusing for newer players because “Attack” training is for the “Release animals” command by a pawn that is drafted, and only if the pawn is Master of that animal. Notice not all pawns are animal Masters in this picture, of the 10 pawns/humans, only 5 can control the predatory animals. Predators usually have higher animal handling skill requirement.
It may be an oversight by game devs, using two different words for the same feature – “release” of an animal to “attack” something. This duality could be a source of confusion is all I’m saying.

Rescue
This one, fortunately, is self-explanatory. The animal will rescue your downed pawns or even animals that are injured in a fight. It’s automatically assigned. You cannot give command to an animal to perform rescue as you would to pawns. For pawns or animals with significant injuries, it’s usually better to assign pawns directly instead of waiting for game to assign one of your rescue animals.
Haul
This should be self-explanatory. Use the zoning features of the game and the animals that are trained in hauling work will do it automatically. A good hauling setup is a time-saver and allows you, the player, to get on with the game instead of double-checking the pawns or animal haulers to see if the work is done.
Maintenance Taming
The 60% for Bison is important because you need to maintain your animals. In the context of tameness, see it as an indicator of decay – the rate of an animal going feral (becoming wild again). Translated for colony management, this means more time has to be dedicated to “maintenance taming”.
Maintenance taming plays a significant role in your game if you intend to keep animals in your colony. Not just as food resource (meat + milk) but also as active participants – hauling materials, rescuing downed animals & pawns, elite fighting squad (predators) and so forth. The strategies you can use with an animal-based colony is endless. Unfortunately, animal tips and tricks is beyond the scope of this guide.
Just note that, once you start taming predators and do too many of them, you will notice your tamers having a harder time maintaining your animals. And you might begin to lose some animals, becoming feral again. There are multiple ways to mitigate this. One approach is to be selective with what predators you tame for your “animal army”. The final section of this guide focuses on wildness rating and choosing better predators to tame.
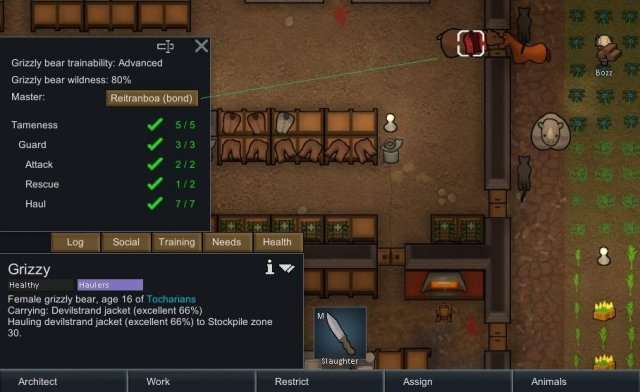
Bears, because of their size, looks funny doing hauling work. Whatever they carry looks tiny. Here’s Grizzy — she has a bond with Reitranboa, the focus of the next section. Note the rescue decay of Grizzy (at 1/2).
Bonding and Animals
Not all animals have bonds with your colonists (pawns). But if they do, your pawn gets a buff of +5. These buffs stack. So, you can get significant buffs just by having pawns that bond with your animals.
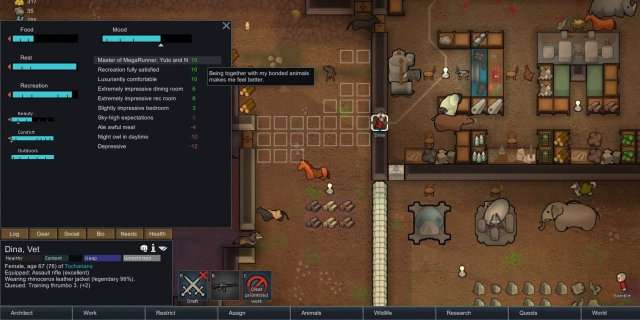
Example below is Dina (she is also featured in the very first picture above). Dina has Depressive trait. It is usually quite difficult to manage pawns with high depressive trait (a permanent -12) but in this case, it is counteracted with +15 buff because she has bonds with 3 animals. Hence, bonding is a simple, yet effective, strategy to manage pawns. (Also note, in picture below, the different animals doing hauling work.)
To check whether an animal has a bond with anyone in your colony, bring up the Animals tab in main game window. The heart sign beside the Master column is an indication of a bond.
Do note that Guard training has nothing to do with bonding with the animal. Bonding has nothing to do with actual training per se, because I have seen my non-animal handling pawns actually bonding animals they cannot train, such as a grizzly bear, which has 80% wildness rating! Check out last picture below, Grizzie. She requires a minimum handling skill of 8, but she has a bond with a pawn, Steven, whose animal handling skill level is 1.
Animal Master and Guard Training
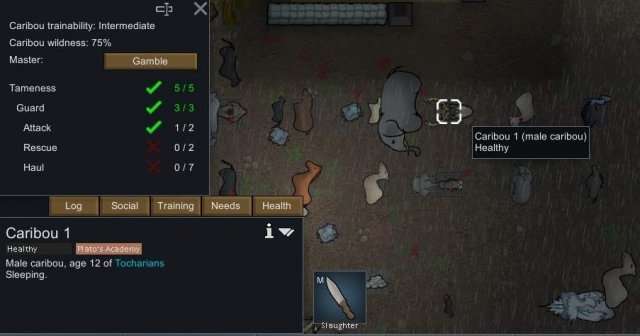
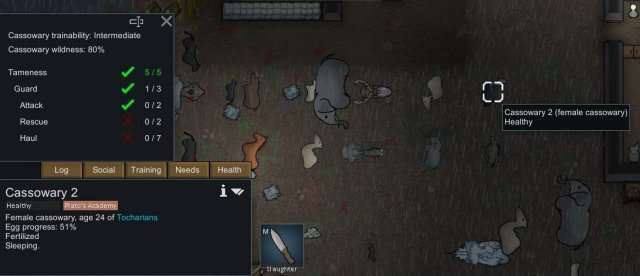
On the point of Masters and “Guard” training, only animals that have completed the Guard training can be assigned a Master (Note: For assigning a Master, “Attack” training may still be outstanding, as in Caribou-1). Picture below shows Caribou-1 has a master (Gamble) whilst Cassowary-2 does not because her Guard training is outstanding.
You assign the role of Master via the animal’s Training tab or in your main game window, the Animals tab at the bottom.
Wildness Rating of Animal
I said no spoilers but, ok, maybe one — the wildness of an animal and their DPS rating is a good indicator of whether you should tame these animals to be used for your own pawns’ protection.
The way to check wildness and DPS stats is to click on the “info” / “i” element of the animal-type. An example of a grizzly bear, Grizzie – the highlights in orange:
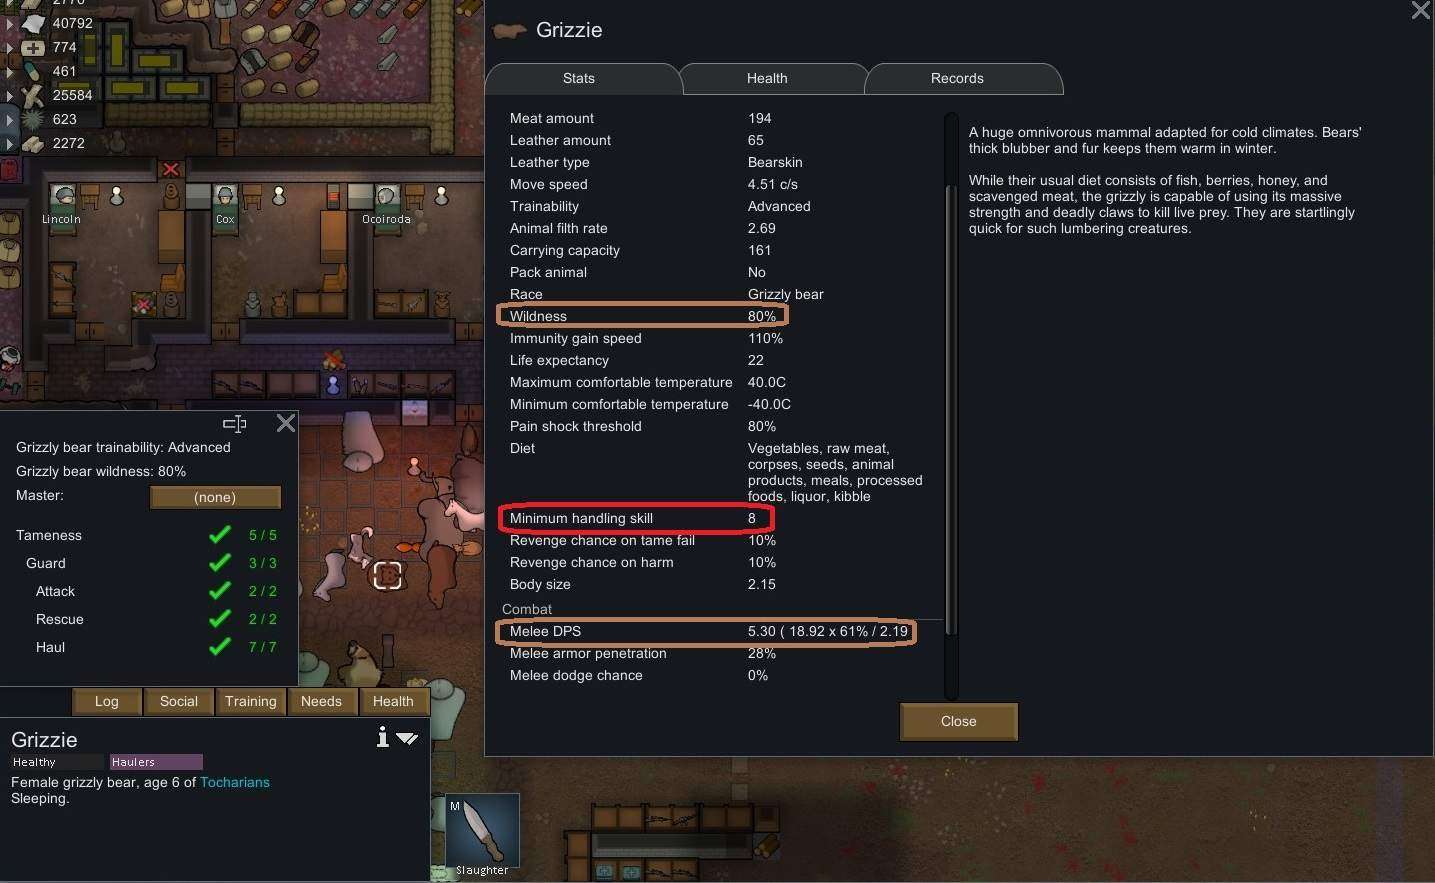
The red highlight in this picture, value of 8, refers to an animal-handler skill – minimum level 8 skill is required for a pawn to tame or train grizzly bears.
Time spent by your handlers on maintenance training can be quite high (see Maintenance Taming above). So, the idea is to tame animals with tolerable wildness rating, yet have good DPS. Otherwise, your game gets bogged down with endless taming and training but you never actually achieve full-training of the animals because your pawns are distracted by having to re-tame other animals that have gone feral (again).
Some animals, like bears and elephants, gets you better “value-for-money”. Rhinos are for animal-lovers only!
Here’s a sample:
- Bison – 60% (W) / 3.05 (DPS).
- Caribou – 75% (W) / 1.80 (DPS).
- Cassowary – 80% (W) / 2.58 (DPS).
- Elephant – 75% (W) / 5.75 (DPS).
- Grizzly Bear – 80% (W) / 5.36 (DPS).
- Rhino – 90% (W) / 5.24 (DPS).
By the way, check out wildness rating for boomrats and foxes!

Be the first to comment