
This is a guide for achieving high rounds in Contested Territory. It will likely not apply to players with City level 30 or below.
Guide to Contested Territory
Introduction
This guide will not help the majority of newcomers! This guide will apply likely when you hit City Level 30, as it is when the “late game” begins.
Why are there so many people aiming for round 100? Why not further?
Round 100 in Contested Territory is the final bunch of rewards for the Milestone rewards. By reaching it, it also pretty much guarantees you own that CT for the next 6 hours (unless someone is crazy enough to go higher)
Going past round 100 isn’t easy, considering the mass amount of ZOMGs that spawn along with the insane health and speed buffs to anything ceramic and above. For those reasons, round 100 is what a lot of veterans perfer.
TL;DR (In case you don’t want to hear the specifics)
Late game in CT involves a lot of late game planning, with towers that stall and pop massive amounts of ZOMGs taking high ranks. I find the best combo is having Temples, Bloonchipper Moab Shredders (Bloonchipper 4-2), MIB CTA (Village 2-4) with Energy Beacon cooldown reduction (Village 4-2), Spike Storms (Spike Factory 1-4), and stalling with 2+ Cripple Moabs (Sniper)(You will need one with Fast firing and one without, as the snipers shooting at the same time will not give any additional stun) as well as with abilities like Absolute Zero (Ice) can push to round 100 pretty simple with enough ability spam.
Here are a few of my round 100 setups for reference:
Beehive (Light Forest)
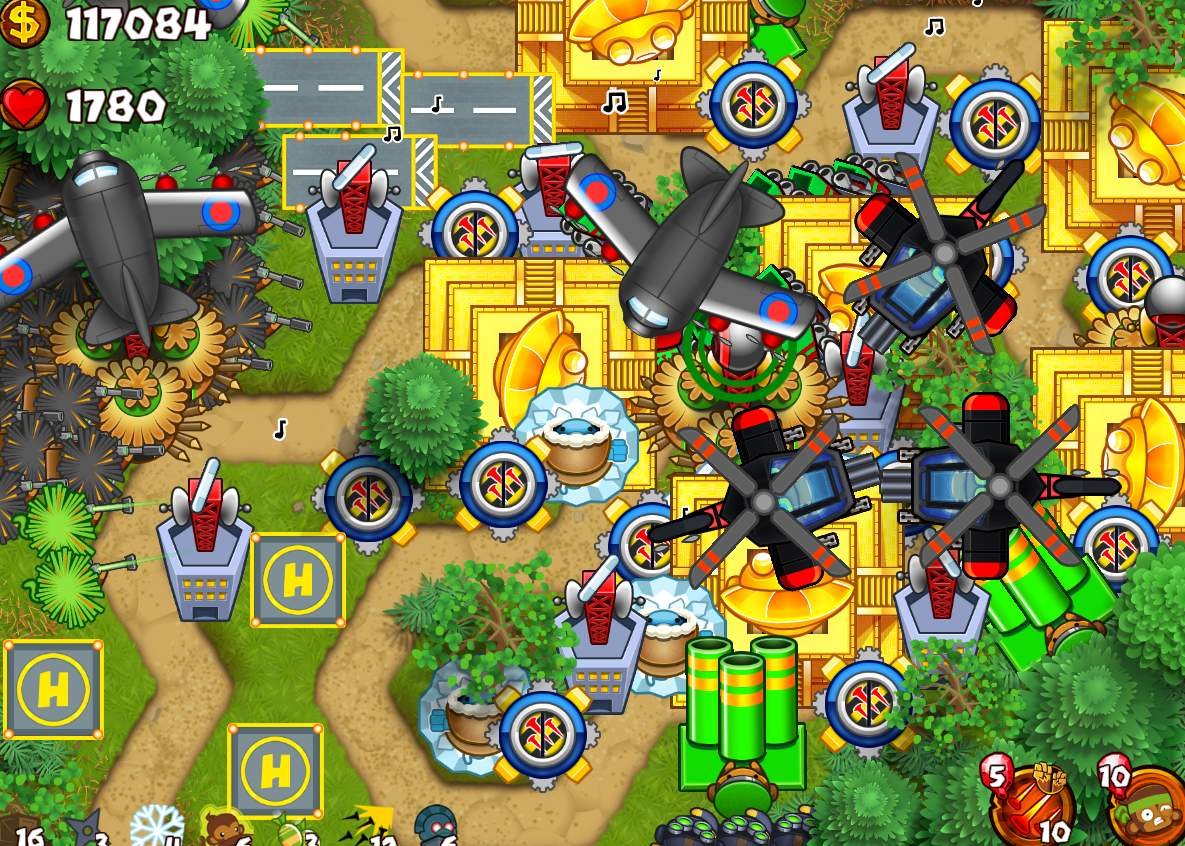
Currently waiting for good CT maps to have more examples, stay tuned.
Making Cash
This may be obvious to some, but the golden rule to winning CT is to plan for the late game. You’ll want to use Farms and other sources of income to bring in enough cash to afford a solid defense late game. But there’s an immediate issue to this: Farms lose value the longer we go into CT, because there are a fixed amount of cash that can be gathered from them each round.
So what other income can be used? I’m glad you asked.
The Bloon Trap
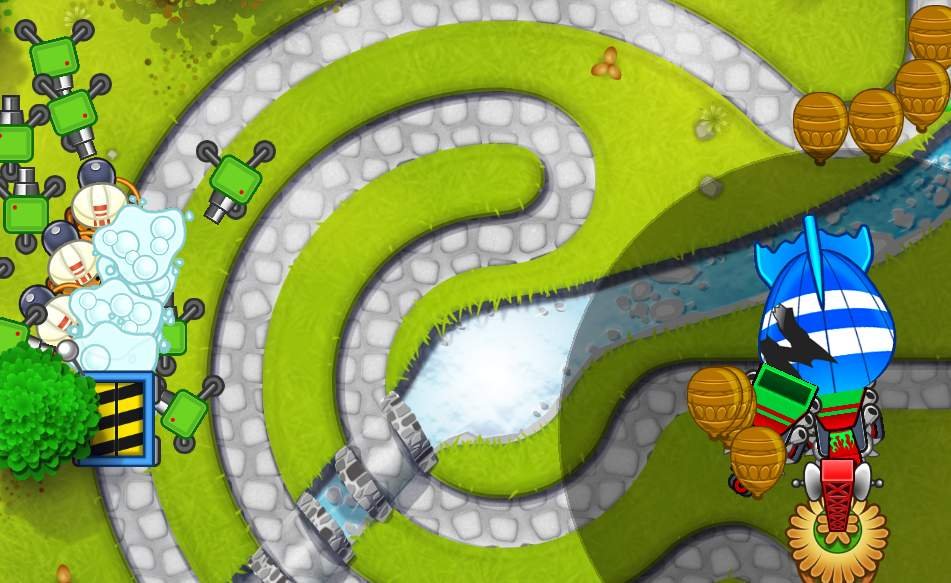
The engineer’s 4th tier upgrade can handle 2 problems we have: Mass ceramic rushes and Mid game cash generation. By using these effectively, we can generate heaps of cash in the midgame. Placing the tower where only one section of the track is visible makes a quick and easy clicker game cash trap for ceramics.
The only thing Bloon Traps can’t trap are MOAB class bloons, but that can also be accounted for by using 4-2 Bloonchippers, the Super Wide Funnel Upgrade. In order to ensure they do not scoop up valuable ceramics, have their range not directly on the track (Since MOABs have a much bigger hitbox) shown here as an example.

Supply Drop
Pretty soon, there will likely be too many MOAB class bloons for just a handful of chippers to break down. At about round 35, you’ll want to switch entirely to using the Sniper’s supply drops. Each crate drops about $1000, and you will usually have 15 or more active for money grinding. Since the waves are much longer and bigger, snipers become more valuable since the ability can be activated independently of the waves. (Remember when I said farms lose value? This is why. You can activate supply drops any amount of times in each wave, whereas factories will only give you a set amount of banana boxes per wave).
Another useful thing to note is we can use the Village’s 4th tier Energy Beacon to reduce the cooldown of supply drops from 60 seconds to 45, giving us even more cash per round to finally start building an actual defense like Temples.

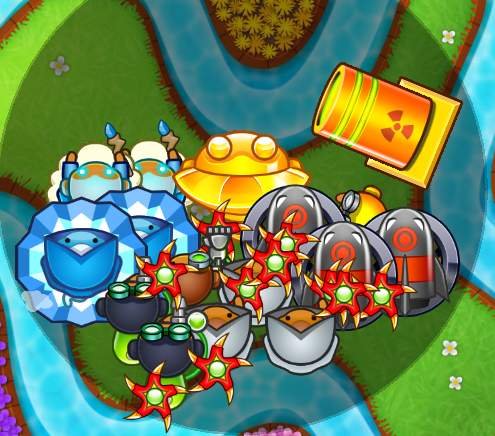
Temple Setup
City Level 38 gives the max amount of Super monkeys, 6, you can have, meaning that is the max amount of temples that one can use. Maximizing the temple’s effectiveness is essential to late game popping power.
Placement
Of course, you can’t just stick supers in and expect them to be good temples. Aside from having space for sacrifices, you must also realize that the Temple’s beams fire in a straight line: if you can hit more track with one beam, you can hit lots of ZOMGs.
Sacrifices
The big bulk of effective temple usage is sacrificing towers in it. You may already know that you must sacrifice 30k of Explosive (Bomb Tower/Mortar), Apprentice, Glue, Ice, and Miscellaneous towers to have the max amount of sacrifices, but this can get tricky in BMC.
The reason? Tower Limits.
In BMC, you have a limited amount of towers to work with, and even when sacrificed to a temple, they still eat up a slot placed. This will likely mean you can’t reach that glorious 30k sacs with every temple.
Knowing that, we want to sacrifice towers that are useless to an end-game CT setup. Good candidates are Bombs, (Mortars can stun MOABs with the Pop and Awe ability, although not quite powerful) Boomerangs, (Handles ceramics well, but Temples can already shred them easily.) Apprentices, (Pheonix is dull, period.) and Glue (They can’t do anything against MOAB). Feel free to sacrifice 1-2 ice towers if you want a little more, but the Absolute Zero ability is very useful so make sure you have more than 4 remaining.

The Other Towers
Of course, temples alone cannot get near round 100. Thankfully, we have a decent selection of towers that can assist with getting there.
Super Wide Funnel Bloonchippers
I covered this briefly in the Farming Cash section, but chippers are singlehandedly the cheapest option of MOAB shredding. Place them around the front to the middle of the track with lots of range coverage so that they constantly drain the ZOMG health.
Cripple Moab Snipers
A Cripple Moab sniper set to strong doesn’t make a whole difference, but since you will have enough money, feel free to toss a few in. Another thing to note is that multiple snipers hitting the same MOAB at the same time will not stun for longer, meaning you’ll want each sniper attacking at a different speed. The simplest form of this is with two snipers set to 4-1 and 4-0, but if you’re feeling really crafty you can have four snipers, with two set to 4-1, 2 set to 4-0, and ensure one 4-1 and 4-0 sniper is not boosted by a Jungle Drums Village while the other two are.
Spectre Aces and Apache Dartship Heli Pilots
Even though they take up a ton of space, adding a few of these can assist in popping power. You may be only to fit in 4 at a time, but it helps.
If you do hit max Helis and Aces, they can shred pretty effectively.
M.I.B. Call to Arms Village
The attack speed from this village is extremely benefitial for ramping up the damage of Temples and Bloonchippers. Don’t underestimate it.
Energy Beacon Village
This one’s pretty simple, it’s to reduce the cooldowns of important towers like CTA and Spike Storm.
Spike Storm Factory
With enough of these, it can severely damage ZOMGs that bust through our defenses a little bit. A short cooldown ensures it can be effective at shredding.
Sabotage Supply Lines Ninja
This ability from the ninja helps with stalling ZOMGs. The ability affects recently spawned bloons and bloons about to spawn for 15 seconds, then they are immune to the effects. Paired with Absolute Zero, ZOMGs can be slowed to a crawl.
Absolute Zero Ice Tower
Again, a really useful stalling tool for ZOMGs. This ability only affects bloons on screen, but it is permanent until they are popped down to another layer.
Artillery Battery Mortar
This one is not as used compared to the flash version, but it ensures a quick ZOMG stun. (About half a second) Having a few can help.
Overclock Engineer
Has a different, but effective attack speed buff for one tower at a time. Usually, you’ll be selecting a Temple to buff, as well as the buff can stack up to 3 times in the BTD5 era. A lesser but helpful support.
Final Notes and Misc Tips
- Use up 2-3 of your Supply crates to jumpstart your Banana Farms or Bloon Traps. Winning the territory gives you 25 bloonstones, while purchasing 3 crates costs 15.
- A good bonus monkey should give us early game popping power and late game usefulness. Some of the good ones can include Spike Factories, Engineers, or Snipers.
- Play with the terrain. Of course, not every track can allow for farms, but it can be a good opportunity to build better Supply Drops and Bloon Traps.
- The first MOAB class bloon appears at around round 13. Ensure you are ready for it if you are using pure bloon trap spam.
- Don’t get too frustrated if you can’t setup properly! Early game takes practice to balance money farming with tower popping power. If you have to place an extra tower to deal with rushes, so be it.
- Late game can lag a lot. I’d suggest not doing this on the mobile edition.
- There is a current bug with the Steam platform where Villages buffed with range will not give bonuses outside of the “default” range. This includes Energy Beacon, so be aware of it when setting up. Alternatively, switch to the Windows 10 version if you can’t wait for the patches.
And that sums up pretty much everything to accomplish the famed round 100.


Be the first to comment