
I share what I think are very good ways to beat the main story levels with a 3-star veteran rank. I also have several small guides about towers and other things. To help me pick the best way to play each level, I finished them with many fewer stars than you can get.
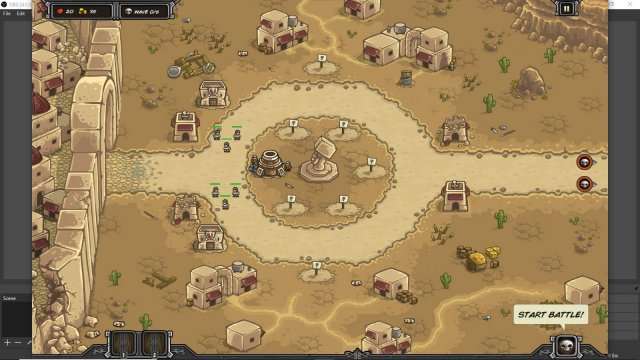
Stage 1: Hammerhold
Conditions: No Rain of Fire
This stage isn’t that difficult, so there are many ways to complete it. There are two focal areas. I like to use the one in the back with an artillery unit in the middle. From there I build mage towers, since they are better against dune raiders.
Mini-guide: Resistant Enemies
You want mage towers for physical resistant enemies, and archer towers for magic resistant enemies. Sometimes one lane consists more of one kind of resistance than the other, and some enemies might have irrelevant resistances since a DWAARP will kill them anyway.
Mini-guide: Artillery
The goal with artillery units is usually to make enemies group together to fight your ground troops and main character. This way, the artillery fire hits many enemies at once. Some downsides of artillery are that they don’t do much damage to a single enemy for how much they cost, and they can’t attack flying enemies. If you use too much artillery, strong enemies will easily defeat your ground troops over time until you lose. Also, many flying enemies can beat you.
However, artillery can work well with towers that focus on one enemy by quickly defeating weak groups of enemies. Then, the single-target towers can focus on the strong enemies with a lot of health. Often, using a mix of both types of units is the best approach.
Mini-guide: Focal Area
A focal area is an area where mobs can take concentrated damage output, especially if it blocks multiple paths. Most strategies rely on concentrating gold spending on at least one focal area.
Stage 2: Sandhawk Hamlet
Conditions: No Upgrades, No Hero Skills
This stage has lots of enemies with low health, so I went with a double barracks double artillery build in the back. From there I made lots of mage towers, since they are better against dune raiders.

Mini-guide: The Standard Strategy
The standard strategy is to focus almost exclusively on one focal area. Usually one building will be barracks and another building will be artillery, with the rest being mage towers and archer towers. Sometimes doubling barracks or artillery can also work well. Once the focal area is covered well the standard strategy branches out by building more buildings elsewhere to help weaken mobs heading towards the focal area.
Mini-guide: Barracks
Level 1 infantry die very quickly, so they should only be used to catch weak fast enemies. Level 2 infantry are a lot better, but still die quickly to any tougher more aggressive mob. Level 3 infantry is quite solid against a variety of mobs, and I usually start with level 2 and then get to level 3 soon.
Mini-guide: Double Barracks
Barracks are meant for stalling enemies so they can be killed by other towers, because by themselves they have poor damage output. The problem with double barracks is that the focal area you’re guarding is going to have less potential for damage output, but improved stalling capabilities.
Stage 3: Snape Oasis
Conditions: No Upgrades, Alric Lvl.3
I built a double barracks by the exit area, and then an artillery tower and a mage tower. After upgrading those towers I created more towers elsewhere, in other words this is the standard strategy. Archer towers are a little better on the southern area because war hounds have 50% magic resist. For upgrades I recommend 4 points in Rain of Fire, 1 point in mage towers, and 1 point in barracks.

Mini-guide: Crossbow Forts
The first upgrade of barrage is the most cost-effective, with the remaining upgrades also being valuable if you have nothing better to invest in. The falconer upgrade should be strategical for the bonus to range, as its damage bonus is not very notable.
In particular boosting the range of a DWAARP tower can be a really good use of gold, or getting other towers in range of strategic points. Necromancers can also benefit from the range boost.
Mini-guide: Assassin’s Guild
The general principle for barracks buildings is that you ideally want to upgrade them at the last possible moment, but perhaps a little sooner just to be safe. Assassins are even better than level 3 infantry, plus they can be upgraded.
I haven’t experimented with pickpocket, but the second upgrade is only a third as good as the first upgrade so keep that in mind. Counterattack is an awesome defensive upgrade, and each additional upgrade is even more worth it than the previous one. So if you get it, consider getting all of them.
Assassin’s Effective Health with:
- No Counterattack – 333
- Counterattack I – 400 (150 gold)
- Counterattack II – 500 (100 gold)
- Counterattack III – 667 (100 gold)
And this is ignoring how regeneration becomes better each time.
Sneak attack is interesting because it’s damage-based, but usually blockers aren’t meant to be dealing much damage. The instant kill potential is useful against really tough enemies like blacksurges. Each upgrade here is a better value than the one before, but overall I would get it for the instant kills if you’re against the right mobs.
Stage 4: Dunes of Despair
Conditions: No upgrades, Alric Lvl.3
The genies are good so you should consider using them, but just keep them away from the desert archers and keep them alive. Give them a barracks as backup support, because they’ll face lots of dune terrors. They are a really cheap solution to dealing with the east entrance. Other than that there is a good focal area on this stage to be used, and mage towers reign supreme. Be sure to read my desert archer mini-guide.

Mini-guide: Tower AI
Towers seem to target enemies that are closest to the exit, so keep this in mind as it can work for you or against you. If a sand wraith is slowly creeping towards your well-defended focal area, then don’t expect it to be killed anytime soon because your towers will focus on all the mummies and other enemies instead. The solution is to plan ahead by putting towers in strategic places where they will pick off the more upsetting enemies.
Mini-guide Desert Archers
These are ranged enemies that kill infantry very easily. They aren’t very tough though. To deal with them first make sure you have a good amount of damage output setup in the place(s) where they will be traveling through or stopping at. Spamming reinforcements on top of them when they are passing through your defenses can stall them. Even better is that Alric can stall them for considerable time by moving to where they are, basically trivializing them if they haven’t yet mixed with the general enemy crowd.
Mini-guide: DWAARP
This tower does area damage in its entire range. The most important thing to know is that it’s not a good value without furnace blast, so if you build a DWAARP and face waves without furance blast then you’re working with a large deficit. All upgrades to furnace blast are about equally good, and even a single upgrade makes a massive difference.
Core Drill will automatically kill just about any enemy unit. It’s expensive though, and targets a random enemy and so gets wasted often. The first uprade is the better deal, with the second two about equally good (third slightly better). Either use it strategically or get it as a random upgrade during a last wave when there’s nothing better. At least it tends to hit the big targets once furnace blast has killed the smaller ones.
One DWAARP per stage is almost always enough, and it makes you a lot more resilient to dense mobs in a way that other towers cannot emulate.
Stage 5: Buccaneer’s Den
Conditions: No Upgrades, Alric Lvl.4
Massive numbers of weak enemies come out of the northern entrance, so a DWAARP by there is a great idea. Pair that with a barracks to stall enemies, and then auxiliary damage with mage towers especially to help focus down the sand wraiths that will appear. Down by the southern exit the game gives you its own barracks.
Gradually build 3 corsair from it: they are a great deal, just don’t let the scopions kill them. All you need in the southern area are mage towers to deal with the scorpions, and Alric / reinforcements to help stall them. The same is true for the executioner that appears.
On the eastern path you just need a barracks or two to catch the stragglers that think they got past your DWAARP. Getting a DWAARP with furnace blast III is pretty expensive, so try to make sure you have towers to keep you alive until then.

Mini-guide: Upgrade Choices
For 15 stars you can max upgrade your reinforcements, turning them into powerhouses with arrows. It’s a very good choice.
Another good choice for 12 stars is to max out Rain of Fire. Hitting every single wave with a good Rain of Fire is strong, and it can help with certain problem enemies like sand wraiths. Just watch them disappear.
For 9 stars you can max out mage towers. This is incredibly strong for stages where spamming lots of mage towers is effective, which is a lot of them. Brilliance is extremely powerful. If you have 8 mage towers then the best thing you can do is get the 9th because for the gold the total DPS increase across all your mage towers is very high.
For 9 stars you can max upgrades for archer towers. They don’t get as large of a boost as mage towers, but if you plan to build lots of archer towers then it will make a big difference with increased DPS and range. For 9 stars you can make your barracks infantry very tough, but it’s not really worth it. You can always build and train assassins if you want your infantry to be better, so the only real gain is getting better infantry for the same amount of gold. Why improve the gold efficiency for a tower that you only plan to build sparingly? Being able to set rally points farther away is sometimes helpful.
For 10 stars you can max artillery towers. I don’t recommend it early on, but the stun effect is quite nice. And although you only usually build one artillery tower, it is expensive and it is desirable for that single tower to be as good as it can possibly be due to how difficult it is to build and how important its role is.
Overall maxing reinforcements and/or rain of fire is a very good idea. Maxing mage towers can be effective for magic-weak stages. The cheaper upgrades for the main towers are a good value for leftover stars. Barracks upgrades are a bit less important but the first 4 stars might be considered.
Stage 6: Nazeru’s Gates
Conditions: 9 Stars Spent, Alric Lvl.5
I lost my patience with trying to get a lower star count on this stage, and no upgrades seems impossible. Either way, the standard strategy wins again, except it’s hard to see which areas should be the focal point.
The tower placements are awkward, but a barracks by the south does work. You might as well add in an artillery tower to turn into a DWAARP once you can, because this map has massive mobs especially with the sand wraiths. My strategy was to focus heavily on mage towers since war hounds are the only thing that give them a problem, but the DWAARP helps with that.
You might consider turning the awkward looking mid-northern tower spot into a barracks later. It’ll help with terror dunes and mobs in general. You might even add a barracks somewhere in the east later. It’s really up to you. The way I won was by creating lots of mage towers, an extra barracks or two, and one DWAARP by the south. I did attempt a sand wraith execution with Alric and successfully got one of them at least.

Mini-guide: Flying Mobs
Artillery and barracks don’t help against flying enemies so you’ll need adequate firepower with archer towers and mage towers. The challenge is to upgrade your artillery to the point that you can handle ground mobs without spending so much gold that you can’t handle flying mobs. It’s a simple optimization problem.
Also try not to make towers that will overkill flying enemies. Giant wasps only have 80 health, for instance, so level 3 mage towers and above are considerably inefficient due to wasting damage in overkill attacks. Archer towers are a better choice.
Mini-guide: Knight’s Templar
All that you need to know about this building is that it has a higher potential for stalling than the Assassin’s Guild does, but at the cost of being a lot less gold-efficient. I honestly find almost no use for it, but if you ever need three blockers somewhere who refuse to die, and you have tons of gold to spend on that, then this tower will absolutely achieve that goal.
Max upgraded assassins have 667 effective HP while max upgraded templars have 1111 effective HP. Keep in mind though, again, that you’ll be paying considerably more gold per HP point.
Stage 7: Crimson Valley
Conditions: 6 Stars Spent, Alric Lvl.6
Use the standard strategy. That’s really all there is to this level. It’s all weak mobs and flying wasps, and there’s no need for mage towers either. A DWAARP gradually upgraded handles the ground mobs while lots of archer towers handles the giant wasps. For my playthrough I put 6 stars into archer towers because I just needed a little bit of gold efficiency to handle the mobs.
For your upgrades I recommend maxing reinforcements. They help with everything from blocking to damage output against the ground and air. The rest could go into archer towers and one star into artillery.
Note: I forgot to experiment with spear maidens. I think they can be good, but evidently they aren’t needed.

Mini-guide: Tribal Axethrowers
Tribal axethrowers without upgrades are very near equal to crossbow forts without upgrades, but the weakness totem is only a good investment when you have enough towers taking advantage of it. I think about 2000 gold is a good rule of thumb: if you have 2000+ gold invested in pure damage output towers next to where the weakness totem appears, then upgrading the weakness totems to max is a benefit. They also help with blocking at narrow passages.
The totem of spirits can be good but it depends on what enemies you need to bolster your defense against, but keep in mind that they’ll be placed towards the front of a mob (wherever the mob is that’s closest to the exit.)
Stage 8: Snapvine Bridge
Conditions: 9 Stars Spent, Alric Lvl.7
This stage taught me that the snapvines can be your friend. Instead of trying some kind of semi-split defense amongst them, just focus on artillery and a barracks right by the exit. The artillery is capable of defeating everything except gorillons and wasps, so invest the rest of your towers to defeating them.
For that matter I stuck with archer towers entirely to give myself the best chances against the wasps, but depending your upgrades you can vary it. I put 9 stars into artillery, which was overkill, but I just wanted to get past the stage.
Try no upgrades for a challenge…I think it’s possible (I was on the last gorillon when I died.) Anyway, for upgrades you can max reinforcements or rain of fire, both are great options. Otherwise max archer towers most likely. I went with artillery for the stun, because the ground mob gets pretty intense on wave 15. Try to create one or two tribal axethrowers.
Upgrading an Assassin’s Guild to max (ignoring pickpocket) once the gorillons appear is an interesting idea. They can dodge and get instant kills on the gorillons. You also might as well get core drill towards the very end of wave 15.
Summary: Barracks and artillery at the back, damage towers elsewhere, one tribal axethrower with maxed weakness totem near high damage output areas. Maxed archer towers and artillery.

Mini-guide: Maxed Reinforcements
This is a flat benefit, unlike tower upgrades where having more towers means a greater benefit from those upgrades. The thing is that maxed reinforcements are incredibly strong early game, so if you like experimenting with strategies then this is the best upgrade there is. It enables strategies that would be too weak early on too work and reach their potential.
It helps with ground mobs and flying mobs. Just be sure to realize that they do way more damage with their bows, but they are also useful for blocking if it comes down to it. A single pair of reinforcements with max upgrades has the same damage output as a crossbow fort with 4/5 upgrades.
Stage 9: Lost Jungle
Conditions: 15 Stars Spent, Alric Lvl.7
Once again, the standard strategy prevails. The DWAARP has a nice spot made for it. The barracks goes near the exit. Put an archer tower above the DWAARP tower to give it bonus range later on. Put a tribal axethrower right by the major focal area and then upgrade its weakness totems to max when you have enough firepower to accompany it.
I used maxed reinforcements and they provided the flexibility needed by a lot. The rest of your stars could go into maxing archer towers, and then it should be hard to lose.

Mini-guide: Necromancer Towers
These towers block enemies with skeletons, which you get from fallen enemies close enough to the tower. The death knight upgrade helps make those skeletons stronger, so it’s worth getting once you can. The latter two upgrades for the death knight will only make the death knight stronger, so they aren’t as important. Pestilence to me seems to just be a gold sink for when you might as well get more damage by a focal area.
Overall necromancers are basically stalling towers that do some damage as well, and they benefit a lot if lots of enemies are being killed near them. For that matter it’s worth putting a DWAARP tower by a necromancer tower. As for barracks…don’t bother, unless you actually need help blocking. You might as well rely on the necromancer tower and your hero/reinforcements for blocking, and concentrate lots of damage by the area. This tower can be really good.
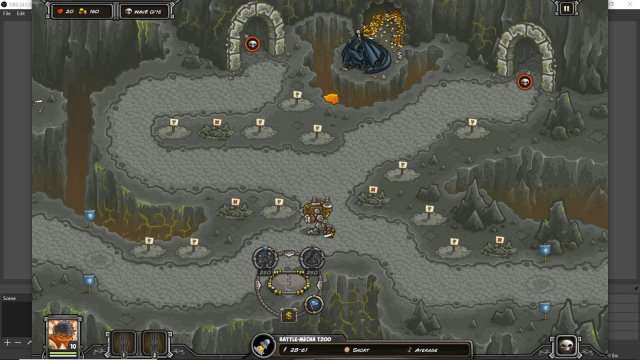
Stage 10: Ma’qwa Urqu
Conditions: 13 Stars Spent, Alric Lvl.8
Blood tricksters are summoners so they are high priority targets. For this reason we want to handle massive mobs, meaning we want the DWAARP tower. We also have access to the Necromancer tower, so we’ll use it in place of barracks. The Necromancer tower should be paired with a DWAARP because they benefit each other massively. Where should the DWAARP tower and Necromancer go on this stage? You could place them by the exit, but by the time the massive mobs reach that area you’ll be overwhelmed. You need one pair on top, and you might as well get another pair on bottom.
In what order should this be done? I was able to manage it by rushing to it first thing, but I waited until wave 7 to develop the artillery because wave 7 has lots of fliers. I maxed rain of fire which I found to be helpful on this stage. You can kill clumps of enemies, pick off tricksters early, or kill the guy that tries to throw the lady into the volcano. Lots of utility, in other words. Unfortunately for me I sometimes had to use rain of fire on the volcano guy since my reinforcements were so weak, which brings me to my upgrades recommendation: max rain of fire and reinforcements.
That combination is extremely powerful and having maxed reinforcements will make this stage a ton easier since you can easily pick off the volcano guy with the bows of your reinforcements, you can also use them to help defend against flying mobs which adds flexibility, and they are good stallers too to supplement your necromancer towers. Assuming you got 27 stars from the campaign missions, you’ll just need to finish a single heroic or iron stage to get the needed 28 stars. Otherwise just max reinforcements, get level 4 rain of fire, and put one star into archer towers and mage towers (the necromancers benefit from this a lot).
So my recommended strategy is this: Maxed rain of fire and reinforcements (or maxed reinforcements, level 4 rain of fire, level 1 archer towers and mage towers), necromancer/DWAARP pairs on top and bottom, stall artillery development to build crossbow forts in preparation for wave 7 (you can ignore this though with maxed reinforcements), continue to spam crossbow forts and max upgrade everything on your towers except facloner (but get some) and core drill.
Use reinforcements to kill volcano guy (it takes a single pair at range). To vary this strategy you could experiment with more artillery, battle mechas, and tribal axethrowers. I don’t think barracks are very good against the massive mobs on this stage, but archmage towers might be useful. Battle mechas would definitely work well.

Mini-guide: Battle-Mecha T200
This tower could have a whole guide just for itself, and I won’t be achieving that here (this is a mini-guide) but I might try to add more details in the future in the “Strategy Theory” section. The most important upgrade by far with this tower, which is mandatory, is the wasp missiles. The mech this tower produces can deal some splash damage while also having impressive range with the wasp missiles.
It can fire them across the map, but whether it will do that or not depends on whether it is locked on to a target far away. Sometimes it will, and sometimes it won’t. There’s a logic to it, but I haven’t figure it out exactly yet. It seems that if you’re attacking an enemy, then there’s a higher chance the mecha will attack it from afar. I also notice that if I start a new wave while the mecha is finishing off an enemy unit then they tend to launch some missiles straight into the new wave as well, but then they stop!
This tower is good for general purpose damage with some added splash damage. The DWAARP is the king of dismantling massive mobs, but it can’t attack the air. The mecha can, even though it’s not quite as impressive against the ground. It can also move around and attack enemies from across the map, so it provides lots of utility.
The waste disposal upgrade is quite expensive, so I would only get it if you have the gold to spare and nothing more urgent to upgrade. The mecha synergizes with a necromancer tower pretty well. Sometimes you can simply spam mechas everywhere and win a stage that way, especially if you’re using powerful upgrades rain of fire, reinforcement, and artillery.
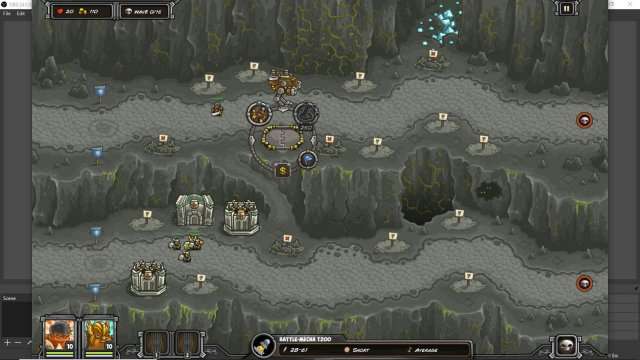
Stage 11: Temple of Saqra
Conditions: 15 Stars Spent, Alric Lvl.9
This is the most complex level so far, so I’ll try my best to explain the strategy. The idea on many levels is to combine a DWAARP tower with a necromancer tower, and then whatever else is efficient for that level. For this level there are a lot of blood tricksters as well as enemies with high magic or high physical defense. On top of that there are swarms of mobs and flying enemies. We need something that can kill tricksters fast, deal damage to both high magic and armor resist enemies, handle fliers, and take care of large mobs.
The Battle-Mecha T200 can do all of this. Of course we will pair it with necromancer towers, for extremely efficient stalling. This strategy depends a lot on having maxed reinforcements, which is how I played it, but I didn’t use anything else. You can place 6 towers near the entrance. Make the inner two and outer two of them battle mechas, and inbetween place necromancer towers. Upgrade the battle mecha’s wasps missiles right away, and you can give the necromancers the death knight when the mobs are pushing through.
Put two barracks near the exits, but you might not need them, so don’t upgrade them too aggressively. Turn everything else into an archmage tower and upgrade twister once for each of them. You could, if you want, put in an archer tower or two (especially one on the upper left by your necromancer tower). Feel free to experiment with waste disposal if you want, and maxing your death knights is a good idea when you get the chance.
For upgrades I highly recommend maxed reinforcements, and in addition to that maxed rain of fire (might as well, it’s so powerful and useful), and a star into artillery and mage towers each (the range helps some, and it’s only 2 stars). Whenever needed you can pull battle mechas downward to protect your sides, and you should do this for the boss.
How can this strategy be varied? I think the main idea is to get at least one battle mecha and place it near the entrance. After that there’s some flexibility depending on your upgrades, and you could even experiment with asymmetrical strategies. Strategies without battle mecha could certainly work with 30 stars worth of upgrades, but this is a stage where battle mechas really shine.
Note: Don’t start like this. Each artillery eventually becomes a battle mecha, and each mage tower becomes a necromancer. Start with a single battle mecha.

Stage 12: The Underpass
Conditions: 4 Stars Spent, Alric Lvl.10
The standard strategy with a DWAARP + Necromancer is ideal here due to the massive ground mobs. You can rush this combination straight away, but since I only spent 4 stars on artillery I needed an intermediary in the battle mecha. I went from a battle mecha to a necromancer, and then to a DWAARP, and then to a couple archer towers. Of course this is completely unnecessary when you have things like max reinforcements.
The ultimate strategy is to have a DWAARP + Necromancer + Tribal Axethrower all by the exit. Saurian Nightscales becomes invisible when they take half damage, but they aren’t allowed to be invisible near the exit. In addition the DWAARP tends to kill them with enough furnace blast, so you really don’t need spirit totems. Aside from this combination you can do almost anything you want to and win. I recommend crossbow forts and battle mechas.
Recommended Upgrades: Max reinforcements, max rain in fire, 1 star in archer towers, 4 stars in artillery towers.
Tactics: Keep Alric and reinforcements by the exit for Saurian nightscales.

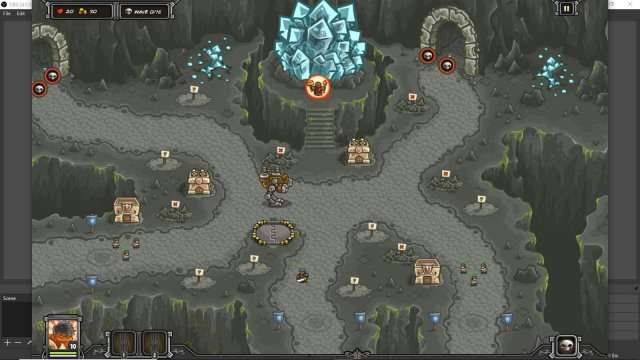
Stage 13: Beresad’s Lair
Conditions: 11 Stars Spent, Alric Lvl.10
This level is quite complex with a variety of threats which is why we’ll be using battle mechas early, then focus some on anti-air to deal with wave 11, and then a couple DWAARP towers to handle the rest of the waves.
General Strategy: Build battle mechas to get a foothold, together with a necromancer, all by the central area. Barracks by the exits + Alric can deal with saurian nightblades. Get one tribal axethrower, anything you need for fliers, and after wave 11 build two DWAARPs near each enemy entrance.
Example: Start with a battle mecha at the bottom, then build a necromancer tower directly above the battle mecha. Build two more battle mechas in reach of the central area, plus a barracks by each exit. Use Alric on the right to support that exit, while the exit on the left will support itself.
Once you’ve got your three battle mechas put a tribal axethrower by the necromancer (clear the rocks) and give it 2-3 upgrades on weakness totems. From there build a couple more archer towers and build them to crossbow forts to handle all the flying enemies on wave 11, although with max reinforcements you don’t need as much help here.
Once wave 11 has been dealt with the rest is routine. Get a death rider. Build two DWAARPs, one for each side. Max out weakness totems. Gradually put more gold into crossbow forts and the barracks. Keep investing in DPS.
Three star-ing this with 11 stars invested was the hardest one so far for me, and required a lot of micro. I used max artillery and 1 star in mage towers. Of course you can use 33 stars, or more. I recommend max reinforcements, level 4 rain of fire, max artillery, and 1 star in mage towers.
That should be more than enough to create a ton of lenience for your strategy. Alternatively you could max rain of fire instead of artillery, or just get a couple stars from heroic/iron missions to max all three.

This is an outline of how I built my towers. The three artillery near the center became battle mechas. The two other artillery became DWAARPs. The mage tower became a necromancer, and the archer tower by it became a tribal axethrower. The other archer towers were crossbow forts, and the rocks by the east exit became…anything (probably a crossbow fort).
Stage 14: The Dark Descent
Conditions: 25 Stars Spent, Alric Lvl.10
I need to get it off my chest that I finished this with 17 lives with only 11 stars spent. My message is that a 10-star 3/3 star finish is possible! I just couldn’t figure out how I did it, and got frustrated.
My suggested strategy for this stage is to spam battle mechas, but intelligently. Make one on the top lane, then the bottom lane, and so on. Alternate like this, roughly speaking. Introduce a necromancer tower to the top at some point. Once you have a necromancer and two battle mechas on the top you should definitely make a tribal axethrower, because it’s free damage basically.
For the bottom lane you should upgrade the armor of the dwarves to max at some point. It makes them way better. Towards the later game you can give them the self-heal too. Don’t give them damage. I’m either missing something or it’s a bad deal. Of course add the mandatory tribal axethrower once you’ve made two battle mechas.
For both the top and bottom lanes it might help to build a battle mecha right by the entrance, so that the saurian savants are killed a little faster. Obviously you could experiment here and maybe make one or two dwaarps, but don’t do that until after the flying mobs (unless you want to do some tactical juggling at least, which is fine…it’ll be fun, unless you only have 11 stars of upgrades.)
For the final wave or two it’s time for major upgrades. Keep building battle mechas but also do some upgrading on your Dwaven Bastions. The Full Mithril Jacket upgrade is worthy, while the explosive one is uncertain for me. I’m going to go ahead and guess that it’s not very good unless you’ve for some reason neglected splash damage (which we haven’t with battle mechas). Regardless of that, you might as well upgrade it if you have the spare gold. Also get some waste disposal upgrades, especially in front of your dwarves. Do the same on the top lane by the necromancer. What else? An archmage with twister back by the exit on either lane is a nice insurance policy against the saurian brutes who tend to forget to die.
My upgrades were 15/15 reinforcements and 10/10 artillery. I recommend that you do the same. The reinforcements help a lot with dealing with the flying mobs. The artillery makes your battle mechas a lot better. As for the other upgrades, some excellent options: 13/13 rain of fire, and 1/9 mage towers. This is quite basically everything you ever needed. Your necromancer towers get more range, which means more skeletons and more blocking. Rain of fire is also a powerful “help me” button that can be used for so many different things, and chops the difficulty curve back a lot.
Other strategies: A more archer/mage-based approach can work, but it means you have to transition into something more powerful (like dwaarps) before the later waves, and transitioning like this could take some finesse so it ends up making the level more difficult in my opinion.
As for low upgrades, I’m skeptical of starting off with archer towers and mage towers except to fill in needed gaps to survive a given wave here and there. I also already mentioned that getting a dwaarp earlier is possible if you do so carefully, but with low upgrades I tried it and it seemed like something that couldn’t be safely attained until the mid-waves.
A lonely battle mecha, “Ready.”
Stage 15: Emberspike Depths
Conditions: None (42 stars spent), Alric Lvl.10
I didn’t come up with a special strategy for this stage. It’s fairly complex with changing waves and three exits. I think you should get two tribal axethrowers, one by the center and one towards a side of the center. Fully upgrade those. Battle mechas work here, but they aren’t the only things that work. Necromancer towers can work, but I went with multiple barracks. That is, I spammed barracks. It makes some sense to double or triple up on barracks for the left and right lanes.
For the middle lane just use Alric and maybe one barracks. With enough protection from barracks you can focus on making battle mechas. Once you have two of them go ahead and max a tribal axethrower, then maybe the other. Keep going. Get waste disposal for the left and right center during the late waves. Generally the goal is to not focus tons of gold into single towers, but still have a good defense.
On wave 15 stop spending gold. You might consider clearing all rocks and putting basic archer towers. The final boss randomly kills your towers, so this is like improving your odds of saving gold against the final boss (according to a quick calculation, it’s worth it.) Save up gold for the final boss. Rain of fire is best used on saurian savants to kill them when they appear. Other than that, focus on difficult clumps or enemies about to make a breakthrough.
Upgrade recommendations: 15/15 reinforcements, 13/13 rain of fire, 10/10 artillery. For the rest split between archer towers and barracks, probably favoring archer towers at 4/9.
Final boss: Keep reinforcements going to protect your lanes. Don’t start dying. When Umbra (the boss) kills an important tower, replace it with a crossbow fort with barrage I upgraded. When Umbra kills an unimportant tower, replace it with a basic archer tower.
Alternative Strategies: You could go with an archer/mage-based approach. It can work well.
This is no master strategy for this stage. I might replace it with a better one in the future, but for now I just want to complete things (as I’m burning out some on this game). With all that said, it did work for me. I won comfortably. I think the trickiest thing is managing your infantry.
Move them back when the darters or nightblades show up, and move them towards the center for everything else. Alric is responsible for the middle lane but can roam to other lanes to help, or to the center to fight. Reinforcements should go to whichever lane is struggling the most.
The two archer towers become the tribal axethrowers. Everything else is battle mechas towards the center and barracks toward the exits.
Overall Strategy
A Theoretical Look at KRF Strategy
By “tower setup” I mean everything in control of the player: towers, heroes, infantry, and reinforcements.
There is an abstract perspective on what a solution is for a KRF stage, and how all of them could be found in principle. For each wave there are only finitely many tower setups that can defend that wave. There is also a gold limit for each wave based on the amount given in the beginning and what can be gained from each wave, so this constrains what tower setups are possible.
The next part is actually really simple: only certain tower setups can in wave k can be connected to tower setups in wave k+1. This also constrains the set of solutions. But that’s it! We’ve just described, ignoring some of the finer details of KRF mechanics, exactly what it means for a strategy to defeat a stage. It just needs tower setups that defeat each wave, within the constraints of gold limits, and within the constraint that each tower setup can be reached by the tower setup in the wave before it.
I firmly believe that any human could use this approach to successfully defeat a stage, but realistically speaking no one is going to dedicate that amount of time and analysis to a single stage. Instead we might benefit from “bottleneck waves” that seriously restrict how many ways victory is possible. Flying mobs do this a lot, forcing the player to not build a dwaarp early on (in some cases) because such a tower setup can’t be connected to a tower setup on the flying wave that defeats it. Of course usually you can still get a dwaarp, but it’s a theoretical point.
A Practical Look at KRF Strategy
First decide if you want a dwaarp or not. A dwaarp + necromancer + tribal axethrower combination is particularly ideal. The challenge with a dwaarp is that it’s expensive, it isn’t anti-air, and it’s not good against large health enemies until you have other towers to back it up.
A brief aside: A dwaarp does help against large health enemies if it has backup from towers with good single-target damage output. The reason is simply that the dwaarp kills the massive low health mobs so that the good single-target towers can focus on the large health enemies. The problem with rushing a dwaarp in the early waves is that you won’t have backup towers until later, so in that case large health enemies actually do pose a problem to the dwaarp.
If you don’t get a dwaarp early, then should you get it for the mid or late waves? It’s still usually possible, and it might especially be ideal to get it after the last flying mob (or after the last flying mob in a while.)
Maybe none of these considerations help though. The enemy waves are so aggressive and difficult, and the tower placements and lanes are so inconvenient, that the problem is more about immediate survival. In this case the battle mecha is often the answer. The problem the battle mecha poses is that it’s expensive to get one setup, so while you’re building your second one you are still relying on a single battle mecha. When you build your third one you’re only relying on two battle mechas to survive. This is not ideal if waves are too aggressive, so you need to supplement your strategy.
A necromancer tower is one option as it provides some blocking and magic damage, and goes well with a battle mecha or two. An archer tower can also help with basic damage output and to improve your anti-air. A barracks could be used if you need blocking but can’t afford a necromancer tower. I recommend bringing it to level 3 in most cases. Once you head into the mid and late waves you have to consider how you want to transition. Spam battle mechas? Build a dwaarp or two? Utilize more archer towers and mage towers? To make these decisions you should know what waves you face in the future, and what tower setups would work against them.
Not every strategy revolves around artillery. With the Brilliance upgrade you can sometimes spam mage towers to great effect. Keep in mind that after building 9 of them there’s really no reason to build more (yes, that additional mage tower gets a +30% damage bonus, but if you simply upgrade one of your existing mage towers you’re also getting a +30% damage bonus on that damage upgrade.) Getting 9 mage towers with Brilliance is an excellent idea by the way, as in fact the transition from 8 mage towers to 9 mage towers is the biggest benefit of them all when considering its cumulative effects.
Unfortunately there are often enemies that resist magic attacks, so you’ll want archer towers or artillery to help deal with them. Something like the Necromancer’s pestilence is not enough. Utilize rain of fire and your hero/reinforcements to specifically target enemies with mage resistance, as each point of damage you deal to them could be doubly to quadruply effective in the big scheme of your mage towers laboriously shooting at enemies. Where does a heavy mage tower strategy go later on? A dwaarp is always worth considering, as well as tribal axethrowers which are extremely useful. Battle mechas can help a lot too.
What about an archer heavy strategy? These excel against flying mobs but often have middling damage overall. Still, middling damage output is often good enough to get going. Pair archer towers with a necromancer tower or barracks and focus on transitioning to some artillery once you’re ready. The archer towers are there to provide ease of life in the early waves.
Spamming barracks is a reasonable strategy sometimes, but only when the spaces you can build towers on carry *very little value*.
It’s important to know what towers are good for and what their good and bad upgrades are. Archer towers and mage towers for the level 1-3 upgrades are generally speaking not good deals nor bad deals. That is, a graph of their damage output vs. gold cost will yield roughly a straight line. The creation of an archer tower or mage tower is more gold efficient than upgrading them, but in practical terms you often want to focus gold on a few towers next to a focal area rather than spam level 1 archer towers in places that enemies simply pass by. With that said, the correct answer lies in the details. Spamming low level towers may or may not be effective depending on the details, as there are positives and negatives that vary depending on the details.
I discussed the cost-benefit of each tower in this guide, I believe. Some really important information is there. Say you have two crossbow forts. Should you get one to barrage III, and then the other? Or should you get barrage I in each first? Knowing the answer to things like that (you should spread the upgrades) is important for making gold as effective as it can be.
Late Game Suggestions
Bonehart is the most powerful hero, so if you want to finish everything with as much ease as possible then get him to level 10 and use him whenever you can essentially. There are some heroic and iron challenges that don’t allow you to bring a hero, and some of them are tricky. I might discuss them here later, but most heroic and iron challenges become quite straightforward with Bonehart. If you want an extra challenge then you can ban the use of Bonehart.
Genuinely great guide.
September 2023 and I am leaving the first comment. Well, thanks for writing this out. I appreciate that you not only gave a strategy guide for each level, but that you also explained the different units that become available, giving their strengths and best uses. I have searched far and wide online and nobody else has done this. I was clueless as to what each one was for, now I have a clue. I was stuck on Stage 10, Ma’qwa Urqu. Getting overwhelmed, never making even to halfway through the level. With your advice I now have a chance to survive this level and to eventually finish this game. Thanks!